Every farmer asked himself the question of which feeders to choose for broiler chickens. Poultry farmers know firsthand how voracious a brood of birds can be in the morning. Often it is the chickens, agitated by the lack of breakfast, who desperately try to wake up the owner. The pickiness of broilers is also their native trait.
Having walked around, the birds push food out of the bowls and then refuse to eat it from the floor. In addition, feathered pets eat quite often and in large quantities. This is also something to consider before you start raising chickens. First of all, take care of a comfortable and spacious feeder for your winged friends.
How to make a wooden feeder
In order to make your own wooden feeder, you will need a drawing. You can choose any one that seems most convenient. Consider the standard assembly diagram:
- First, decide what size your design will be. Select a suitable piece of plywood and start drawing the elements of the container.
- Before making a drinking bowl or bird feeder, check that all the necessary elements are present. You will need a wood saw, a jigsaw, a hand drill, screws and self-tapping screws.
- After cutting out the parts is completed, all roughness on them must be rubbed off with a piece of sandpaper. This is necessary so that the chicken is comfortable while eating - it does not get caught or get hurt.
- Using bolts and screws, connect the parts that should be placed on the sides. After that, start attaching the bottom and front. On the back and front of the parts you need to cut a window at an angle of 15˚.
- The final stage of the work is making a lid for the container, which you will attach to the walls. To make the chicken feeder last longer, it can be coated with a product that prevents the wood from deteriorating.
Containers for storing food and water for chickens, chickens and other birds were invented so that they could receive the required amount of food at the right time.
Some poultry farmers prefer to order feeders for broilers in special stores, and some prefer to make them with their own hands. As you have already noticed, the process of making a feeder is not at all complicated.
You can make it from anything you can get your hands on. Any craftsman can build such a practical and multifunctional device as feeders and drinking bowls for chickens. Fortunately, there are simply plenty of materials for this purpose in the household. Diagrams and a detailed description of the assembly can be taken from the World Wide Web.
mojaferma.ru
Grooved container
The grooved container for feeding poultry is popular in small farms. It can be made from galvanized sheets, wooden beams and plywood.
Instructions for making a chicken feeder with your own hands:
- The galvanized sheet is cut to size.
- The center of the future gutter is marked on the sheet.
- The sheet is folded according to the markings made.
- The housing of feeding equipment is made from timber or slats. Nailed to galvanized steel.
- The side walls are cut out of plywood and attached to the body.
- A flat bar is attached to the top, leaving it movable; birds should not sit on top of the container.
Such a feeder for broiler chickens can be made with your own hands from a special mesh that will protect the cage area from birds scattering feed. The advantage of trough feeders is their ease of implementation. They are also not difficult to care for.
Instead of timber, you can use an aluminum profile and then the feeder will last much longer. This is an equally durable material that is lightweight. The main thing is to cover such a profile with plywood or strips of plastic so that the birds do not get injured on its sharp edges.
Bucket feeder
This device is characterized by limiting the food area, which leaves more food in hygienic cleanliness. It doesn’t require a lot of materials to make, but it can feed a large number of chickens. She is also suitable for any age, so she can stay with the young while they grow up. You can see this design in the video at the end of the article.
Tools and materials
- selection plate for chickens (if you don’t have one, a regular one will do);
- plastic bucket;
- a knife with which all manipulations will be carried out.
Design of a chicken feed bucket
Step-by-step instruction
- First, holes are cut with a knife, which should correspond to the areas of the plate, several centimeters in size.
- After this procedure, the bucket is placed on top and food is poured into it. Under its own pressure, it will go into the zones of the plate and fill it as it is emptied. The photo shows the simplicity of the product. This whole structure in action is clearly shown in the video at the end of the article.
Common mistakes
At the design stage, it is important not to make gross mistakes that will result in having to redo the entire structure of the building. This may include:
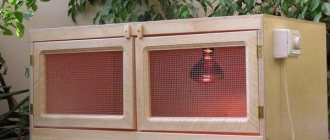
- Lack of protection against rodents. When drawing up a project, it is necessary that the cage is raised from the ground. Contact of insulation with the ground is unacceptable. This may lead to the threat of rats. They are able to chew through wood and penetrate into the structure. It is better to fill the lower zone between the heat insulator and the ground with broken glass.
- Use of unsuitable materials. Do not use isoboards, plasterboard, PVC plastic and chipboard for finishing. They accumulate moisture, as a result of which they collapse. In addition, toxic substances that are dangerous to chicks may be released. Due to increased humidity, mold forms, which leads to the development of various diseases in chickens.
It is quite possible to make a cage for hens or chicks with your own hands. To do this, you need to select the right materials, choose the type of structure and draw up its drawing. All the work is simple, so even a person who does not have the proper experience can cope with them.
Why is drinking regime important?
Poultry can experience extreme thirst, because it does not always receive the required amount of moisture from food. This is especially true when predominantly dry mixtures are included in the diet. And chickens generally need to drink twice as much as adults.
Proper water balance contributes to the well-being and growth of young animals
Broilers are no exception. Water is irreplaceable for them; if there is not enough of it, there is a high probability of death. An uneven distribution of water over the days is also dangerous: if on one of them the birds drank the norm, and on the other - a smaller amount, then the balance is still upset, which will inevitably lead to negative consequences.
The standard daily volume of water consumed is twice as much as feed. On hot days the ratio changes - five times more water than feed. Due to the moisture consumed, the bird cools its body, so you should not deprive it of life-giving moisture. Chickens drink on average 0.028 liters of water at the age of 1 week; two-week-old babies already need 0.075 liters, three-week-olds - 0.01 liters, one and a half months - 0.25 liters.
Small chickens drink 0.075 liters per day
Broiler water must be clean. This means, firstly, it needs to be changed frequently, and secondly, the drinking containers must be closed so that debris does not get in there. It is also advisable to check its chemical composition: if the liquid has a bitter taste due to an excess of minerals, then the birds will not drink it, and if there is a large amount of nitrates, it negatively affects the growth rate. Water contaminated with garbage is a source of infections and germs, and can cause chickens to get sick and die. In addition, broilers will not drink water that is too cold (less than +10 degrees) or too warm (+30 degrees).
The importance of proper poultry feeding
A feeder made of pipes is very easy to use and saves a lot of time on the farm. But they are designed to use grain and feed.
But dry food alone is not enough to provide adequate nutrition for chickens.:
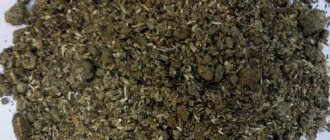
Finely crushed mineral feed should be added to the feeder: chalk, limestone, feed phosphates, shells to provide calcium, phosphorus, and iron.- Chickens, especially laying hens, need to add potatoes to their diet. Small, green, sprouted and even peeling. The norm for an adult laying hen is up to 100g. in a day.
- Fresh greens are also needed - tops of carrots, beets, cabbage leaves, carrion of apples, pears and plums. Fermented milk products - cottage cheese, yogurt, whey.
- Vegetable cakes from crop waste are added to the composition of wet mash.
- In order to successfully breed egg-laying chickens, you should carefully study the feeding and maintenance diet at different times of the year.
Increased nutrition in winter and moderate nutrition in summer, vegetables, fruits, herbs and mineral supplements are the basis for good health and high egg production of your pets.
If you find an error, please select a piece of text and press Ctrl+Enter.
Main types of feeders for broiler chickens
There are the following types of feeders:
- Wall-mounted - they are attached to the wall using various devices.
- Hanging - suspended in a cage.
- Floor-mounted feeders are the most common type of feeders.
Wall-mounted and hanging ones are good because the chickens do not rake or trample down the food, and less waste products enter. They are usually securely fixed and non-traumatic.
Floor feeders are easy to handle and replenish. But birds can turn them over if they are not secured well enough or are too light. Garbage and chicken excrement often get into the floor ones; they need to be washed more often.
Mesh feeders are also used, where grass is placed, and metal ones for mash. Samples and diagrams can be seen in the photo. There are a lot of original ideas.
Feeders also differ in the method of feeding:
Grooved - in the form of a groove, with holes or a mesh on top.
Scheme of a trough feeder
- Tray. The food is fed directly into the tray.
- Hopper - there is a container where the feed is poured, and through special holes it is poured into the tray, ensuring constant availability. This is the most convenient option in the sense that the owner does not need to replenish the food all day; he can pour the entire day’s ration into the bunker. The birds behave calmly, since there is always enough food. The tray is small, and debris usually does not fall in. Additional limiters can be made. The original feeders can be seen in the photo.
Hopper feeder diagram
Are there any disadvantages?
The constant presence of food in the chicken coop can attract rodents
The main problem with a bunker feeder is the unlimited supply of feed. On the one hand, this makes life easier for the breeder, but on the other hand, it can lead to obesity in the bird. This is exactly what breeders fear and it is for this reason that they rarely purchase a bunker design for adult individuals. Indeed, a bird can overeat, especially if it is prone to obesity, so it is necessary to purchase such a feeder either for chickens or for breeds that are not prone to overeating.
It is also important to note that if the coop is damp, all the feed can be blocked and begin to rot right in the bunker. Such food is very harmful, so you need to wash such a dish regularly, check for odor inside and place it only in dry rooms.
Another problem associated with the regular presence of food in the chicken coop is mice and rats. They will enjoy unlimited access to food no less than chickens, so it is necessary to poison rodents from time to time.
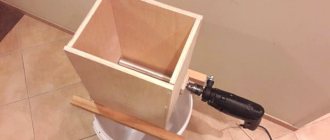
How to make homemade hopper feeders for broilers
Farmers use homemade feeders for broilers quite often. With the right approach, it is possible to produce options that are in no way inferior to store-bought counterparts.
The most difficult option is a bunker feeder.
To make it you will need:
- plastic canister with a volume of 10 liters,
- base for the structure, approximate size 20x20 cm,
- a piece of PVC pipe 15 cm high for sewerage, another 30 cm high for water supply,
- electrical tape or tape,
- nuts, screws, mounting angles,
- saw, nails, hammer, awl, piece of rope.
Owners of broiler chicks, which have a good appetite and low mobility, do not have to worry about the integrity of the structure and only replenish the food supply once a day.
This option is also good because the birds will stop crowding in the fight for food. They will soon get used to the constant availability of food and will feed alternately.
Birds can be installed and accustomed to a broiler feeder 2-3 weeks after the chicks are born.
A simple feeder made from a plastic fan pipe
As a result, the farmer receives the following invaluable benefits:
- economical feed consumption,
- no need to add food more than once a day,
- the ability to calculate how much food birds consume and plan the purchase of new food,
- free up time for other things.
And at the end we will provide a few more simple options for do-it-yourself feeders
Let's consider another option for making a feeder with your own hands.
To work you will need:
- Sewer pipe 1.5 meters with turn, plug and wide latches
- Jigsaw with a fine-tooth metal file
- Screwdriver with drill for metal
- Level
- crosshead screwdriver
- Marker
It is more convenient to install the feeder by turning the pipe towards the entrance.
- In an old metal or plastic bucket, make several holes near the bottom. We put it on a tray or large plate and fill it with food.
- The same can be done with a plastic bottle. The plate will fill itself with food as the birds eat it.
As we can see, it is quite possible to make a feeder for broilers with your own hands from simple available materials.
For small farms, homemade feeders and waterers are a good opportunity to save money and at the same time make your work easier and free up time for solving other problems.
Let's consider the classification of drinking bowls, whose role in feeding also cannot be underestimated.
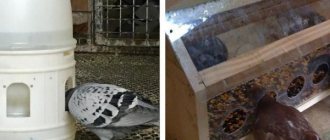
Drinkers for broilers can be simple, nipple and vacuum
- The simplest drinking bowl is a container filled with water. It can be a basin, bucket, plate, trough, not too high so that the bird can reach the water. The disadvantages of such a drinking bowl are that the chicks can turn the container over and can swim with it.
- A vacuum drinker is quite simple to set up. A jar of water is placed on a special stand, and the pressure created prevents water from pouring out of the tank. Disadvantages: birds can drop it and get dirty on top.
- The most expensive way to water a bird is to install a nipple drinker. It requires the installation of nipples, plastic pipes, and drop catchers.
With a little modification, you can achieve full automation. Another advantage is the absence of stagnant water. Disadvantages - high cost, birds can break the pipe.
Manufacturing of nipple drinkers
Such designs are considered the most convenient to use. Drinkers of this type can be used when keeping broilers using both floor and cage methods. This type of structure is particularly suitable for large trusses. But you can install such drinkers in the poultry house of a small household farm.
It is convenient to use such drinkers, but they are quite complicated to manufacture. There are several types of nipple equipment:
more or less simple bucket designs;
drinking bowls with a central tank location;
with a side-mounted tank.
Varieties
From drainpipes
There are also other feeders and drinkers for chickens made from improvised means. It all depends on what idea the owner’s imagination suggests. A brief overview of the options will help you decide:
- From drainpipes. This unit is convenient because it can be used to feed a large number of chickens, using a minimum of funds. All you need to do is make wide enough holes in the pipe and pour food into it. The chickens will be able to feed freely and not interfere with each other.
- Made of wood. As a rule, plywood is more often used in such work. You will need:
- 2 sheets for the sides, up to 20 cm high and 10 cm wide;
- 2 sheets for the front and back walls 80 cm long, 15 high and 10 wide;
- 1 piece of plywood for the base;
- crossbar;
- hammer and nails.
Connect the two side sheets to the base to form a right angle. Then attach the long walls. You should get an elongated box. Nail a crossbar to the top of the narrow walls. The feeder is ready. All that remains is to pour in the food and feed the chicks.
In addition to a container with food, there should always be a container of water in the chicken coop. Similar to the feeder, you can build an original drinking bowl.
Automatic feed mechanism
Farming can be very tedious, and chickens simply don't have the time to constantly keep an eye on their feeders. For a large farm, a do-it-yourself automatic broiler feeder is suitable, suitable for both adults and chickens. The food in such feeders lasts for a long time, and it is supplied as needed. To make a feeder and automatic drinking bowl for chickens you need:
- 2 pieces of plastic pipe;
- self-tapping screws;
- metal knife;
- two branches;
- plug and adapter.
Often, after repairing plumbing fixtures, pieces of plastic profiles remain in the household. If you don’t have them at home, they sell them in the store not so expensively. It is necessary to connect the pipes using an adapter, to which two half-bends must be connected. Having connected the two structures, attach them to the wall. If the number of chickens is large, it is not necessary to make several feeders. Longer pipes are connected to the tee and several holes are made to provide access to the feed.
Basic requirements for feeders
Feeders must comply with the following rules:
- A rational approach to feeding - feed dispensers must have a device that prevents birds from entering them (turntables, dividing sides). Only the bird's head can easily enter the feeder. If the device is more open and birds can climb inside, then the food will be raked with their paws and clogged with bird droppings.
- Simplicity and accessibility in operation and maintenance - the feed dispenser is used daily, it should be convenient for adding feed, cleaning and periodic washing. Moreover, both the convenience of the design of the feeder and the quality of the materials from which it is made are welcomed. The optimal feeder weighs little, is easy to move from place to place, can be easily washed with water, and does not change its physical and chemical properties after using disinfectants.
- Suitable size - both the size and capacity of the feeder are selected so that the feed inside is enough for the entire flock of birds for a full daylight hours. For adult broilers, 100-150 mm of feeder length per bird is needed; for chickens, 50-70 mm per chicken is enough. If the feed dispenser is disc-shaped, then 25 mm is enough to feed each adult chicken (so that only the beak penetrates). With the correct calculation of the number and length of feeders, all birds (strong or weak) will be able to be fed at the same time.
The material from which the feeder is made depends on its purpose:
- A wooden feed dispenser is useful for feeding a chicken flock with dry feed (compound feed and grain) and feeding with mineral additives (chalk, shell rock, small pebbles).
- It is more convenient to place mixtures of succulent feed in plastic or metal feeders, since such feed dispensers require daily washing.
- Finely chopped green feed is fed to chickens from feeders with a lattice lid; the lattice may have a safety lid made of metal mesh or welded from thin steel wire.
We recommend reading about how to make an automatic chicken feeder.
Types of feeders:
- A tray is a shallow container with raised shallow sides into which food is poured. Feed trays are used for young birds.
- Trough feed dispenser - can be divided into sectors, each of which contains its own type of feed.
The upper part of such feeders is often covered with a thick metal grid to protect the contents from being raked by chicken paws. Typically, trough feeders are installed outside the broiler cages, but so that the birds can easily peck the feed.
- Hopper feed dispenser - used for portioned dispensing of dry food. This device allows the farmer to be away from the poultry farm for one to three days. The required amount of feed (grain or mixed feed) is poured into the central part of the bunker feed dispenser. Through a pipe connecting the hopper and the feeding tray, dry food flows into the lower part of the feeder. As the birds eat the food in the lower tray, new food comes out of the hopper in small batches. The device allows you to keep food dry and clean.
Did you know? You can put someone else's egg in the nest of a brood hen, which the mother will accept and hatch without objection. And the hatched duckling or gosling will be led along with its chickens, without distinguishing it from the brood in any way.
Peculiarities
A chicken feeder can be purchased at a store or made by yourself. Each owner chooses the most convenient and acceptable option for himself, which will allow him to obtain the desired result at minimal cost. Purchased options are usually much more expensive and do not always fit the dimensions of the chicken coop or do not correspond to the number of chickens that will eat from them. In this regard, homemade options are becoming more and more popular, and there are more and more options for their manufacture every year
In order to be able to design a structure that is convenient for humans and poultry, which will provide chickens with full access to food, it is important to consider some points
Convenience of the product - it is necessary to choose materials that will be light in weight and have a convenient shape in order to quickly and efficiently clean the feeders, wash them and disinfect them. When creating a specific option, you need to think about how exactly the process of filling the feeder will proceed and how the food will reach directly birds.
Durable materials for the product - when choosing the most suitable option for creating a feeder, you should pay attention to the strength of the structure
Products that are too heavy and massive will be inconvenient to use, and products that are too thin can cause injury to chickens and rapid wear of the food container.
Food quality control - to ensure the normal growth and development of birds, it is important to give them dry and wet food, ensuring constant access to food for all individuals in the chicken coop. The correct choice of design will make it possible to protect food from the fact that chickens will trample on it with their paws, scatter it on the ground, defecate in it. Contaminated food will harm the health of the bird, which will later affect the quality of products received by humans.
Food dosage - depending on the number of chickens, it is necessary to choose the right container for the future feeder in order to calculate the amount of feed that will be eaten per day
For each chicken, you need to allocate 10-15 cm of space for food consumption; for chickens, 5-7 cm of space is enough, which should be constantly filled with food. If the feeder is round and high, then 2.5 cm in height of the container will be enough for one bird. Correctly calculating the volume of the feeder will allow you to fill it with the right amount of food, which will be enough for one day.
No harm to health - when creating a feeder with your own hands, you should make sure that the materials from which it will be made do not harm the chickens. The absence of toxic properties, unpleasant odors, dyes and other harmful components should be taken into account first. In addition, design features also affect safety. The presence of sharp corners and edges makes eating dangerous for birds, so it is worth making the feeder as comfortable as possible so that the chickens cannot harm each other and themselves.
Varieties of homemade wooden feeders
There are various options for wooden feeders, which we suggest you familiarize yourself with in more detail.
Hopper feeder made from pieces of wood
Excellent for those breeders who do not have the opportunity to periodically add grain.
To assemble such a structure, first of all, you need to prepare:
- boards made of durable plywood or wood;
- electric drill, set of drills;
- a couple of loops;
- sandpaper;
- saw;
- screwdriver;
- pencil;
- roulette
The instructions for making a bunker feeder look like this:
- Draw a drawing, which is then transferred to the tree, carefully drawing out the details of the future structure:
- bottom – 29x17 cm;
- two side walls 40 cm high, 29 cm long (you will need to cut a wedge in the side walls, as shown in the diagram below);
- two rectangles for the front wall - 28x29 and 7x29 cm;
- top cover – 26x29 cm;
- back wall – 40x29 cm.
- Cut out all the parts, moving along the drawn marker lines.
- Drill holes for screws in the required places using an electric drill.
- Sand the entire surface so that the feeder is smooth and safe for birds.
- Assemble all elements into a single structure using screws. To achieve maximum density, a clamp should be used. In addition, it is worth considering that the back and front walls must be connected at an angle of 15°.
- Attach the cover to the back of the side walls using hinges.
- Treat the feeders with an antiseptic, remembering that the use of paints and varnish is strictly prohibited.
The assembled feeder will be spacious and convenient, operating in automatic mode.
An example of a bunker feeder assembled from wooden blocks is given in the following video:
Feeder in the form of a trough
It is a simpler design, suitable for those who keep a large number of chickens.
To assemble the structure you will need:
- thick boards or plywood;
- hammer;
- screws or nails;
- saw;
- pencil;
- roulette.
The feeder can be assembled according to the following instructions:
- Draw a diagram of the future feeder, accurately defining all the elements, their dimensions and installation locations for fasteners.
- Transfer the drawing to the tree in compliance with the parameters specified in the drawing above.
- Cut out all the design details along the marker lines. It should be borne in mind that the bottom must be thick and heavy, otherwise the birds will be able to easily turn the feeder over. In addition, the height of the walls should be comfortable for chickens.
- Connect all the parts together, leaving no gaps, since through them the food will get out. There is no need to further process the wood.
This feeder is durable and strong, and is also universal regarding the type of food used, that is, it is suitable for feeding both dry and wet food.
How to assemble a wooden chicken feeder is explained and shown in the following video:
Two-story feeder
This option is primarily used for dry food, although a variety of mash can also be served in it. Such a feeder can be made for a small room, since the second tier allows you to compensate for the lack of free space. It looks like this:
Having prepared the bars and screws, you can begin assembling the feeder:
- Prepare all the details of the future feeder. Among them, the main one is the lower tier, 40 cm long and 50 cm wide. The length can be adjusted according to the number of livestock. The second floor is a small filling bunker - a trough with a front wall height of 10 cm and a back wall of 20 cm.
- Make a flap that will divide the lower tier into 1/3 parts.
- Install the second floor on the ends of the first.
- Attach a lid that will cover the food from debris getting inside.
Hopper feeder for broilers
Such a feeder can be made for broilers over 2 weeks old, and it will take no more than 20-30 minutes. One load is enough to feed 30 chickens throughout the day.
To assemble the feeder you will need:
- a piece of plywood or wooden board measuring 20x20 cm and 8-10 mm thick (the thicker the base, the more stable the finished structure will be);
- plastic canister measuring 20x20 cm;
- PVC pipe for sewerage (a section 10-15 cm high) and for water supply (a section 25-30 cm high);
- tape or tape;
- mounting angles, nuts, screws, nails;
- hammer, saw, awl and piece of rope.
Having prepared everything you need, you can begin assembling the feeder:
- Attach a wide piece of pipe to the base of the structure (plywood or board) using mounting angles and screws. It is enough to attach 2 corners opposite each other on the inside of the pipe.
- Take a smaller pipe and cut it along the diameter of the hole to a height of 10-15 cm. Next, make a transverse cut, which should coincide with the longitudinal one. This will create a pipe with half of the lower part cut out.
- Insert a thin pipe inside with a wide thread inside the feeder, and then connect both pipes with two screws - top and bottom.
- Cut off the bottom of the plastic canister, and then place its neck on a narrow pipe. The joint should be wrapped with tape or tape.
- In the canister, closer to the top, make a hole through which to stretch the rope.
- On the wall where you plan to install the feeder, nail a nail at the level of the rope. Secure the structure so that it is stable and the chickens cannot turn it over.
The following video suggests learning more about the characteristics of the assembled feeder:
Types of feeders made of PVC pipes
To make plastic feeders, farmers often use PVC pipes because they are unpretentious and quite practical - they do not need to be drilled, welded or glued. We will consider various options for feeders made from such pipes below.
With tee
This design has a “standing” shape. To make it you will need:
- sewer pipe 1 m long;
- 2 plugs for PVC pipes of the appropriate size;
- 45° tee;
- a device for cutting plastic pipes or a saw for metal.
The instructions for making a tee feeder look like this:
- Cut the plastic pipe into 3 parts - 70 cm, 20 cm and 10 cm. It should be noted that you can initially purchase pipes of the required sizes so that you do not have to cut them later.
- Take a pipe 20 cm long and put a plug on one end. In this way, it will be possible to obtain the base, that is, the bottom of the structure.
- Place a tee on the other end of the pipe with the side elbow facing up.
- Insert a 10 cm long pipe into the side hole until it stops.
- Insert a 70 cm long pipe into the third hole of the tee and close it with a second plug from the other end to obtain the finished structure.
The assembled feeder should be attached to the wall of the chicken coop at both ends (lower and upper) with wire. Of course, it’s easier to fix it on an iron mesh or support rails. Once the feeder is in place, it can be filled with food. Chickens will peck food from the side hole of the tee without scattering it on the ground. For 15-20 broilers or 30 laying hens, this amount of feed will be enough for a day.
At night, the top of the feeder must be closed with a plug, otherwise foreign objects, debris and bacteria will get into the feed.
What a feeder made from a sewer pipe looks like is shown in the following video:
With cutouts
This design will consist of two pipes, one of which will be installed horizontally and will serve to feed birds, and the other will be installed vertically and will serve to supply grain.
Here are the necessary materials and tools:
- 2 pieces of pipe – 50 cm and 30 cm or 60 cm and 40 cm;
- PVC elbow to fit the pipe size;
- 2 plugs;
- drill, jigsaw or power saw.
The procedure for making a feeder is as follows:
- On a long pipe, draw 2 or more holes with a diameter of 7 cm and with the same spacing. They can be oval, round or rectangular in shape.
- Make a hole with a drill and then cut it out with a jigsaw. If desired, cutouts can be made on both sides.
- Place a plug on one end of the pipe, and install an elbow on the other end into which to insert another pipe.
- Attach the finished feeder to the wall of the chicken coop using wire. It is best to fix it on both sides - top and bottom. As in the previous version, you need to pour grain into the upper pipe, and then close the hole with a second plug so that debris does not get into it. This structure needs to be filled 1-2 times a day.
The method of making a feeder with two rectangular holes is demonstrated in the following video:
Types of structures
They are classified according to various parameters, each of which will be considered separately.
By material
Properly selected material for the feeder is the key to preserving the feed, and therefore saving it. It could be:
Tree. Wooden feeders are one of the most common options, as they are perfect for pouring dry food - grain, animal feed, and various mineral supplements. In addition, wood is a natural material that provides the product with durability. Plastic. Chickens must be given mash in their diet. It is best to pour wet food into plastic feeders, since food debris can be easily removed from their surface.
However, in this case, special attention will need to be paid to the choice of high-strength plastic. Metal
Like the previous material, it is suitable for making containers into which wet mixed food can be poured. It can also be used to make green grass bins. However, it is worth considering that black material tends to rust when exposed to moisture, and stainless steel is quite expensive.
Feeders for chickens are mainly made of wood and plastic, the choice among which depends on what kind of food you plan to use the tray for in the future.
According to the method of feeding
Depending on the type of food supplied to the feeder, the convenience of feeding the bird will depend, because it is much more convenient to pour feed once a day, rather than several times at short intervals. Here are the optimal feeders for the type of food served:
- Tray. The simplest designs that are suitable for feeding young animals. The tray model is a simple container with sides that prevent food from spilling out. As a rule, such a feeder has an elongated shape.
- Grooved. Such designs are complemented by a turntable or a removable demarcation grid (mesh). Inside they are divided by partitions into several compartments (compartments) intended for different types of food. Trough feeders can be placed outside the cage so that hens can reach the feed with their heads only. This will greatly simplify not only the feeding process, but also cleaning the container.
- Bunker (automatic). Used to supply dry food. Their main advantage is that the breeder only needs to pour feed or grain into the feeder in the morning. This volume will be enough for the birds to feed all day long. The design of such devices is made in such a way that the feed comes from a closed hopper into the trays as needed, so it does not become dirty throughout the day and remains dry.
By location
Depending on the location in the chicken coop, there are two types of feeders:
- floor-mounted – mobile structures that can be installed in any part of the cage or poultry house;
- hinged - structures that, using special brackets or holding devices, are fixed to the wall of the poultry house, therefore they are stable, which compares favorably with mobile feeders that can be overturned by chickens.
Some poultry keepers use both types of feeders at the same time, as each has its own advantages.
DIY feeder for broiler chickens
Broilers are raised for further consumption as food. They should be large, fleshy and well-fed. To ensure this condition, it is necessary to feed chickens correctly and in a timely manner from the age of one day. To do this, the chicken coop can be equipped with special feeders.
Grooved option
The groove feeder is the easiest to create and is universal. In order to build it, you will need the following materials:
- wooden planks;
- nails;
- hammer;
- galvanized sheet;
- plywood;
- knife.
The construction principle is as follows:
- The first step is to start with the base of the future feeder. To do this, you need to draw dimensions on a galvanized sheet and draw lines.
- Next, you should bend the material along the contours. Thus, you need to create a chute where the feed will be poured later.
- The next step is to create the sides from plywood. First they need to be cut out and then nailed to the formed gutter.
- Next, you need to attach two more planks to the side, and place a long plank on them. The latter should be located along the long walls.
- To better protect the food inside, you can cover the feeder with mesh on top and make holes for the birds' heads.
- A good option would be to nail a number of planks one at a time at the same distance from each other.
Video: process of making a bunker feeder
Tray option
The tray version is more difficult to manufacture, since it requires a pipe. If you have one on your farm, then creating the feeder mentioned above will require a minimum of time and effort.
To build such a container, the necessary materials will be:
- plastic pipe;
- plugs to close the edges;
- planks for creating legs or wire if you want to create a hanging tray feeder;
- knife for cutting holes.
To build we perform the following steps:
- First you need to make holes into which the chickens will stick their heads and eat. It is necessary to cut them at the same distance from each other, with a diameter of 8 to 15 centimeters.
- Next, you should put plugs on the sides of the pipe.
- You need to attach strips to them with self-tapping screws, which will serve as legs. In the case of a hanging option, use wire.
- Once secured and installed, the container can be used to feed birds.
Tray container
A more reliable design is a tray design, and it also has a drinking bowl.
Prepare a plastic pipe, as well as a couple of plugs, a drill or a knife (they are used to make holes).
The size of the plastic pipe is determined by the number of livestock. For small chicks kept at home, the calculation of the required length of equipment is determined by the ratio of 8-10 cm per individual.
It is better to draw a drawing where all dimensions will be indicated.
A do-it-yourself tray feeder for chickens is made like this:
- On the surface of the plastic pipe, at the same distance from each other, markings are made for future holes.
- Holes are cut according to the marks. Diameter 8-10 cm.
- Plugs are placed along the edges of the pipe.
- 2 self-tapping screws are screwed into the plugs.
- A wire is attached to the screws, which will help the equipment to be suspended.
Tray feeder for chickens
This feeder is suitable for both small chickens and large broilers. It is reliable and easy to clean. Also, with an increase in the number of livestock, the pipe can be easily lengthened by replacing the plug with a special coupling.
Options for feeders made from scrap materials
Chicken feeders can be made from scrap materials found in almost every yard or home. Let's look at a few popular options.
From a cutting board
Required materials and tools:
- wooden cutting board;
- plastic funnel;
- small plastic cup;
- transparent rubber hose;
- electric drill.
Collection instructions:
- Trace the outer contours of the funnel on the board, trying to do it as accurately as possible.
- Drill a lot of holes within the drawn circle, but you should not overdo it, since the supply of dry food should be moderate.
- Take the hose and connect it to the end of the funnel. If necessary, you can use additional fasteners such as a clamp.
- Make a hole in the plastic thicket, the diameter of which should be such that the free end of the hose fits tightly and holds well.
- Place the other end of the hose into the prepared hole. If the density is insufficient, seal the edges of the hole and the outer surface of the hose with sealant.
- Attach the bell of the funnel to the cutting board, having previously treated the contour of the circle with the holes with sealant. Place a funnel on the circle and hold it in this way until the sealant dries.
- Connect one end of the hose to the cup and the other to the funnel, which should be at the bottom of the board.
From the watering can, through the hose, the grain will pour into the bowl itself, from where the birds can get food
At the same time, it is important to firmly fix the board so that the chickens do not manage to knock it over.
From a plastic bucket
Having prepared a sectional animal bowl and a plastic bucket, you can make a simple autonomous feeder according to the following instructions:
- Make holes in the bottom of the bucket through which the food will pour out.
- Attach a sectional bowl to the bottom of the bucket using screws.
- Fill the bucket with grain or any other food, and then close the lid.
How to make a bunker feeder from a plastic bucket, see the following video:
From PET bottles
The simplest version of a bunker, the manufacture of which will require 3 bottles with a volume of 1.5 l, 2 l and 5 m. The feeder is assembled in the following order:
- Cut off the bottom of a 1.5 liter bottle, and drill holes with a diameter of about 20 mm in a circle near the neck. This way you will be able to get a bunker.
- Cut off the bottom of a 2 liter bottle, leaving a side of about 10 cm on it. This will be the lid of the feeder.
- Cut off the bottom of a 5-liter bottle, making a side of about 15 cm on it. This is a container into which feed will be poured from the bunker in the future. Drill a hole in the center of the cut bottom, the diameter of which corresponds to the size of the threaded neck of a 1.5 liter bottle. Make the same hole in a piece of plywood, which will provide stability to the structure.
- Connect all the parts - place the bottom of a 5 liter container on the neck of a 1.5 liter bottle, and then a piece of plywood, and tighten it all with a stopper.
- Turn the structure over so that the cap of the 1.5 liter bottle is on the bottom. So, you get a vertical bunker, inside of which you need to pour grain, and then close the lid from the bottom of the 2 liter bottle. The food will pour out through the holes near the neck into a container made from the bottom of a 5 liter bottle.
How to make a feeder from a simple bottle can be seen in the following video:
From a canister
For such a feeder you will need to prepare a plastic canister, a piece of pipe 10-15 cm long, fasteners and a knife. Collection instructions are as follows:
- Clean and dry the canister.
- Using a knife or other tool, cut 5 holes with a diameter of 6-7 cm on the sides of the container so that the head of the chickens can fit freely into them.
- Make a hole in the top of the canister for filling grain and attach a pipe on top. This means that their diameters must match. This trick will prevent chickens from getting inside the feeder.
From the CD container
If you have an old CD container at home, you can use it to build a feeder. For these purposes, you will also need to prepare a spacious bowl and a knife.
You can assemble the feeder this way:
- Clean and dry the container, and then cut 3-4 holes on its walls at a distance of 2 cm from the rim itself. The optimal diameter of these holes is 2 cm.
- Fill the container with food and cover the top with a bowl.
- Turn the container with the bowl over and place it in the coop.
As you can see, there are many options for chicken feeders that you can make yourself using available materials and tools. Such simple designs will ensure proper feeding of chickens, which is one of the most important conditions for caring for them.
1
Can I buy it in stores?
The choice of feeders in stores starts from the simplest bunkers to high-tech devices with a timer and a feed scattering function.
The price for the simplest bunker feeders is approximately 500-1000 rubles, but for high-tech products you will have to pay 5000-6000 rubles. The body material of the feeders also affects the price . A feeder made of ABS plastic costs 6.5 thousand rubles. Made of powder-coated steel 8.5 thousand rubles.
In stores you can find feeders completely ready for installation and use. They immediately have a food container and a tray.
Better yet, make a feeder yourself from scrap materials . This will cost much less and will correspond to the number of birds.