When hunting for various fur-bearing animals, a variety of traps are used that do not damage the valuable fur of the animal, for example: a noose, a mouth, a scoop and others. However, such traps are still very rare at present; modern hunters use traps much more often, since they have high versatility and are more convenient to use. Most traps are manufactured in factories on assembly lines and are most often assembled from steel parts. All traps vary in size and design, which allows you to catch a wide variety of animal species. But even taking into account their diversity, the animal will still be hunted either for its limb or for its body. Traps are divided into several groups, depending on their design, installation location and can be trace, wood and pressure.
Track and arc traps
This type of trap has a large number of varieties, but there is always a distinctive feature - 2 arcs connected to the center of the trap. Which is why their other name is arc traps. Traps can be of two types - frame and plate. Frame traps are designed for large and cautious animals. They have high resistance, which is why an animal, even a large one, will not be able to escape. And plate traps can be with a cross and a flat spring or without it. Those traps that have a cross differ in size from 0 to 3, depending on the target animal.
In Russia, a ban has been introduced on the use of standard leg-grabbing retention traps with steel arches for catching wolves, raccoon dogs, raccoons, lynx, badgers, pine martens, sable, ermine, otters, beavers, muskrats
In addition, traps can be without a cross, in which case there will only be a lever with a plate at the base and two arcs for catching prey. Traps with a cross have the problem that side parts often get caught in the grass, which complicates its installation and operation, so experienced hunters try to use traps without a cross. This type of device is often used to catch muskrats, but other animals of similar dimensions can also be caught. Without a crosspiece, a trap can only be of 1 size, so it is no longer suitable for larger animals. Despite all the differences between trail traps, their essence is simple: installation on a path familiar to the animal along which it has moved more than once, which is why the animal will be less vigilant, and the smell of the trap can be masked by already familiar smells for potential game.
A new way of fishing with walk-through traps
photo: Mukhamedshina Rafael
In recent years, on the Internet, I have come across very flattering reviews about the method of trap fishing using the “bottom edge set” method.
In these numerous videos, American and Canadian trappers place walk-through traps under the shore, at the very bottom.
No bait is used, there is no special fixation, and virtually the entire setup is done blindly.
I twirled it at my temple and with the words of fat being furious, I forgot about this method for a while.
A couple of years later, I came across a book by the author of this method, Bob Noonan (English: Ken Smith, Bob Noonan “Bottom edge mink set”). The authors caught hundreds of minks per season, without using cumbersome methods such as “in a cave with bait” or “in a trap box.”
The essence of the technique is to know the movement of mink and muskrat under water. These animals move in search of food and shelter under the shore. Namely, at the point where the bottom of the reservoir passes into the shore.
They always move underwater in this natural angle, making it easier for them to navigate dark waters and avoid underwater obstacles. That is, it doesn’t matter which direction the current goes, or how wide the reservoir is. These animals always move in this “shore-bottom” angle.
Bob Nuan suggested setting a walk-through trap in places where the shore of the reservoir protrudes in the form of a hummock or cape.
You need to look at this straight section of the river from or a drainage channel from a hill, you will see that it is flat over a certain length, but sometimes you come across small protrusions of the bank (a hummock, an old tree trunk, old bridge supports), as a rule, in these places there is greater depth and the coast itself is steep.
This is the corridor along which mink, muskrat, otter and beaver move. Then, in accordance with your pink piece of paper, you can put KP 120, KP 180, KP 250 there.
The technique hooked me, I tell you. I believed in it, if only because in Russia, in the same way, mink and muskrat are hunted with snouts on rivers. I caught it myself, but I never realized that in such places you could put a walk-through trap instead of a bulky two-pass snout.
After reading Bob's book, I couldn't sit still and went to the ODU to get a muskrat. It was February, but I knew a place near the bridge where the river did not freeze, and besides, it was a mild winter outside.
Having set six traps, two nights later I caught three muskrats. Not a bad score for the first time catching blind. Now I use this method more actively on beaver and muskrat minks, and the result increases every season!
This method has another advantage - secrecy. No one will ever understand what you are doing there under the shore; from the outside it seems as if you dropped your watch and are looking for it at the bottom. I once successfully found my bearings and said this to an onlooker who was pestering me with questions.
I’ll tell you a secret that this method works for beavers and otters; they obey the same laws of movement in the water column. This method is good because it is all-season. You can set traps under the ice in winter, or in brodys during the open water season.
The method works for any fluctuations in water level. Now, the next time you fence a bulky picket fence on a channel or small river so that the animal does not slip past your trap, just think that there is a less labor-intensive way.
The main thing is to understand the law of movement of aquatic animals across a body of water and find the right corridor where all the invisible paths converge.
Andrey Ponyaga April 29, 2022 at 09:22
Wood traps
Wood traps are an improved version of dies, traps that were made entirely of wood. They are good for catching squirrels or other similar small animals. Such traps are often used by experienced fishermen in the taiga. For example, we can consider CD 1, which is a pressure trap. It has only one plate, but it is with it that the neck of the beast is held in place. The center of the device has a spike, which is best driven into the tree as firmly as possible so that the animal cannot escape from the trap. Such a trap must be installed with an arc downwards and the trap must be camouflaged from above, with the same grass, etc., and bait must be placed on the hook. It is necessary to understand that the animal, when taking the bait, must be in the arc’s affected area. This type of self-catcher is very convenient due to its small size, great lightness and simple design, so moving and repairing it is as easy as shelling pears. Another advantage of a trap is safety for humans, since the likelihood of falling into such a trap due to its installation location and size is extremely low.
A few words about homemade mole traps
You can also make a mole trap with your own hands. Moreover, the complexity of the manufacturing work is directly proportional to the complexity of the structure itself.
In most cases, wire traps and crushers are made at home. These works involve difficulties in manufacturing springs, and to obtain a truly working mole trap, it is necessary to harden the wire at high temperatures.
Sometimes such independent production is limited only to finishing a standard mousetrap (or rat trap) with an adaptation for fighting moles. In more rare cases, craftsmen even make harpoon traps and scissor-shaped traps with their own hands.
In any case, making a mole trap yourself in most cases is irrational. The cost of industrial options is low, and the time spent at home making a trap will be more expensive than the money spent on a high-quality purchased device. In addition, even the simplest commercial traps are very effective - the same wire trap for 50 rubles will work just as reliably as a product that would take a whole day, or even more, to make yourself.
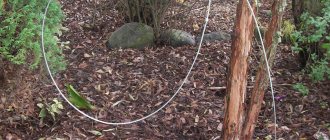
Passing traps
So-called humane traps. They are made of wire and do not have sharp corners, which allows them to avoid damaging the animal’s valuable fur. Therefore, it is often taken for catching sable, mink, marten, etc. Such traps can be installed near holes, on trees, in swamps, in snow, in water and on ice. Moreover, they come in different types. Some can catch the animal by the limb, some by the neck or head, and some by the body as a whole. Mole traps or mink traps are special; they have wires instead of arcs and a center. They are placed near burrows and underground passages of animals, are easy to use and come in different sizes. They can also be used for large animals, but due to the narrow specialization this is very difficult, but hunters can still use them as well.
All of the above types of traps are not all that factories can offer and experienced hunters can try. Most traps vary in their target animals. There are traps for catching squirrels, muskrats, wolves, bears, etc. To catch the desired animal, you need to know how to hunt it, its trails and choose the most suitable trap for capturing it.
Previous post Hunting for wood grouse in larches
Next entry Top best shotguns under 70,000 rubles
Mole crushers
Hunting for moles is quite possible with ordinary mousetraps or rat traps such as crushers. These products are also very inexpensive, sold almost everywhere and very effective.
However, their use is more specific compared to wire traps for two reasons:
- The guard in standard crushers is triggered when it is pulled, not pushed, and therefore it usually has to be modified with one’s own hands so that it is triggered taking into account the specifics of the mole’s movement in the underground passage;
- The pressing bracket itself, when thrown, should not cling to the arch of the underground passage or the opaque material that covers the installation site of the trap.
It is also useful to read: Using a mole net and reviews about this method of protecting a site
The first problem is solved by filing the loop that secures the guard and onto which the bait is placed. In this case, the guard is triggered when the mole simply tries to remove the loop from its path with its paws. You can also simply put an earthworm or beetle on a loop so that the mole tries to eat it and lowers the guard.
To prevent the bracket from catching on the arch of the passage, the installation site of the crusher is usually covered with a bucket or pan - as a result, the space above the trap is more than enough for it to work normally.
Like wire traps, it is better to place such devices two side by side, with guards pointing them in different directions. In this case, they will almost certainly allow you to catch the mole if it passes along this path.
How to make a rat trap with your own hands
If for some reason it is not possible to buy a ready-made trap for rodents, you can always try to build a rat trap yourself from materials that you have on hand.
From a flower pot
This rat trap is the easiest and most affordable to use. But the pot itself must be quite large to completely cover the rat. If you don't have one, an enamel or tin bucket will do.
Step-by-step instructions for making such a trap are as follows:
- We prepare a high plastic bar. It should be such that the rat can easily get into the pot.
- We sharpen one side of the bar and place the bait on the tip. We direct the pointed edge into the pot.
- We place the bar on the edge.
- We place a pot on top, one side resting on the bar and the other on the floor.
To create a home trap, you can use any similar container instead of a pot.
When the rodent grabs the bait, the bar falls, the pot lowers, and the rat remains trapped inside.
On a note. It is advisable to place cardboard or plywood under the structure, this will make it easier to throw out the animal.
From the bucket
To make a trap, you can use an unnecessary plastic or iron bucket, as well as a sheet of cardboard and tape. The rat trap is installed in the following order:
- A tunnel is made from cardboard and secured with tape.
- One half is placed on the edge of the table (it is advisable to secure it with tape to the table so that it does not move), and the other should hang down.
- Bait is placed on the edge of the tunnel.
- A bucket is placed under the hanging half of the cardboard structure.
To create a rat trap, instead of cardboard, you can use a piece of wide plastic pipe
When the rat smells the bait, it will follow it inside the tunnel and, having reached the edge, tip over into the container.
Video: operating principle of a rat trap made of cardboard and a container of water
On a note. Before placing the bucket, you should pour water into it. This way the rat will definitely not get out of the trap.
From a plastic bottle
To catch a large rat, use a 2-5 liter bottle and perform the following steps step by step:
- The top part of the bottle is cut off, but not all the way, so that it can be opened slightly.
- A long rod is fixed at the bottom of the cut opening. A harness is attached to it, replacing the spring.
- A hole is made near the bottom of the bottle. A hook is attached to it, on which the bait is attached.
- The door that is made is attracted to the top of the bottle itself and, as soon as the rodent pulls the treat, it slams shut.
Which bait to choose
Rats love to eat animal products. Therefore, the following baits are suitable for traps:
Care should be taken to ensure that the bait has a strong odor. In this case, the rat will smell the bait and will want to eat the treat, overcoming its fear. Smoked products (sausage, cheese, lard) are perfect for this purpose.
On a note. When working with bait, you should keep in mind that you should not touch the bait with your bare hands, as the smell of a person repels rodents.
If the bait remains untouched for several days, it needs to be replaced with something else.
What to do after exterminating moles
It is important to understand that catching and destroying a mole or several moles on a site is often only a temporary solution to the problem. If animals entered the garden once, their relatives will be able to do this in the future, and with a high probability they will have to be caught again.
If you don’t want to do this, the following options are available:
- Fence the area around the perimeter with a special mesh or slate, which are buried in trenches to a depth of 70-80 cm and protrude above the surface to a height of about 20 cm. It is also known that areas fenced on all sides with a fence with a solid strip foundation are reliably protected from moles (although this is, of course, a costly affair);
- If moles only damage the lawn (that is, where regular excavation work is not required), then a mole net can be laid under this entire area - horizontally, at a depth of 5-10 cm.
These works and the materials for them are quite expensive, and not all summer residents are ready to incur such expenses. Actually, this moment contributes to the popularity of various inexpensive traps.