Breeding ducks is quite profitable, but at the same time troublesome. Birds do not require special care, but it is very important to organize the correct feeding process for them. Experienced breeders know that ducks are very messy birds. They quickly eat their food, but at the same time manage to scatter it and trample it. Therefore, in a large poultry farm it is impossible to do without a special feeder for ducks. It helps save money on feed and also keeps the house clean.
Specific varieties
If you plan to feed the ducks a dry diet, you can make a tray feeder from scrap materials. The work will take about 1 hour, you only need a saw and plywood. Without any problems, you can make a structure designed for 10 or 12 adult birds. It must be accessible from both sides. It is best if the feeder is placed at a height of 0.18-0.2 m. In stores you can find tray products that have a locking part. This part is inserted into the grooves. This solution is good because it allows you to reduce the scattering of feed. A similar lid can be prepared at home. A good alternative would be to build up sides that slope slightly.
A bunker feeder is a very common solution. Therefore, it is not entirely correct to choose between bunker and automatic systems. The peculiarity is that you can put food inside for several days at once. To reduce the labor intensity of work, farmers, of course, prefer larger structures. The bunker feeder can be made not only from wood, but also from galvanized steel sheet. For this:
- make marks using a marker;
- bend the sheet at the marked points;
- Use self-tapping screws to hold the pieces together.
Speaking about original ideas, you should not think that they all require some kind of complex work or sophisticated manipulations. On the contrary, there are excellent ways to quickly prepare an automatic feeder. It will replace broken products and help if existing feeding points are no longer enough. To work you only need:
- 5 l canister;
- steel wire;
- bowl for feed.
A large canister or bottle is secured upside down. At the same time, they carefully monitor that the feed comes out of the lower necks without problems. Details can be varied; taking parts of different sizes and colors is also quite acceptable. But you definitely need to think about whether the feeder is safe. It is safety considerations, not personal convenience, that should come first for any farmer.
Unusual drinking bowl for ducks
And finally, an original idea for creating a drinking bowl from a large leaf of burdock or other plant.
First, it is immersed in a cement solution so that it retains its concave shape. You need to wait 2-3 days until the mixture hardens, and then paint it to your liking and dry it thoroughly in the sun.
A drinking bowl made of a large burdock leaf.
This is a summer drinker, which, of course, performs aesthetic rather than practical functions. However, if you wish, you can decorate your area with similar items.
Feeder for chickens from a sewer pipe: video
Pro100ogorod.ru » Poultry farming » Chickens » Feeders for chickens from sewer pipes
Article rating
Classic methods of feeding poultry are often inconvenient and ineffective. A homemade chicken feeder made from a sewer pipe is practical, affordable, easy to make and does not require large material costs.
Chicken feeders made from PVC sewer pipes are convenient and practical
Hanging feeder
Hanging models of feeders made from PVC sewer pipes are convenient and practical, because... do not allow birds to climb inside the structure and leave garbage and droppings in the feed. They are hung at a certain height, attached to the wall using screws, brackets or other tools.
The simplest design is made from a wide plastic pipe 1 m or more long and has several plugs. There are several stages in making a feeder:
- the pipe is cut into pieces (for example, 0.7, 0.2, and 0.1 m);
- a plug is installed on one side of the 0.7 m long part;
- install a tee and insert a part 0.2 m long into it, its opposite side is also equipped with a plug;
- a part 0.1 m long is also inserted into the tee;
- holes are made in the pipes for the feed mixture and the structure is suspended at the required height.
This hanging feeder for chickens made of PVC pipe is convenient for feeding poultry kept in large quantities; it protects the feed mixture from debris and does not injure the livestock.
Wall feeder
The wall-mounted poultry feeding device is also effective and practical in use; additional brackets are required to make it. It consists of polyvinyl chloride pipes with a diameter of 15 cm or more, lengths of 0.1 and 0.2 m, 2 plugs and a tee.
Manufacturing procedure:
- The PVC pipe is cut into pieces of 0.1 and 0.2 m;
- using a tee, the parts are connected, the smaller of them will act as a tray for the feed mixture, and plugs are installed at the ends of the larger one;
- The structure is fixed on brackets to the wall so that the long part is directed upward.
The practicality of using such a product is similar to a hanging PVC feeder, but this design is intended for a small number of birds: only 2 chickens can feed from it at a time.
The chicken feeder is made from a wide plastic pipe with a length of 1 m
Floor feeder
Advantages of a floor-mounted poultry feeding system:
- it is mobile and can be installed anywhere;
- functional and capable of serving up to 10 heads simultaneously;
- easy to make.
However, this design is open to debris and therefore requires frequent replacement of the feed mixture. Take 2 plastic pipes of 0.4 and 0.6 m each, 2 plugs and a sewer elbow.
DIY manufacturing technology:
- holes with a diameter of 7 cm or more are drilled along the entire length of the 0.6 m part;
- one side needs to be plugged, an elbow from the sewerage system is installed on the second;
- a 0.4 m section is attached to the knee, with the help of which the feed mixture will be supplied;
- the part with drilled holes is placed in a horizontal position, secured in a certain place.
Design Features
When choosing a design for feeding chickens, it is worth considering some points:
- a feeder made of PVC sewer pipes must provide food for the entire chicken population, therefore the distance between the feed holes on the main pipe is from 10 to 15 cm per head, for broilers this distance is increased, for chickens the gap is reduced by 2 times;
- the longer the components made from the pipe, the more feed mixture is placed there;
- when installing a feeding structure in a specific place, it is chosen so as to provide free access to it for all birds;
- limiters prevent birds from entering the feeder;
- The product is made mobile and easy to assemble and disassemble, which allows for regular cleaning.
Bird feeder and drinker made from plumbing pipe
Pros and cons of feeders and drinking bowls made of plastic pipes
Feeder for chickens from a pipe
Conclusion
Do-it-yourself chicken feeders made from sewer plastic and polypropylene pipes are a convenient device for feeding poultry, it is simple and does not require large material costs. Feeders come in hanging, wall and floor types. The choice of feed structure depends on the number of individuals and the poultry house.
Article rating
Kinds
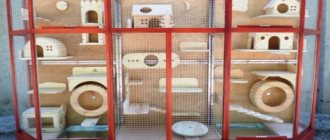
First of all, a safe and easy-to-use design should be installed for birds. At the same time, it must be durable and consist of environmentally friendly materials. For a small poultry farm, you can make a feeder yourself.
The most popular types of feeders for indo-ducks:
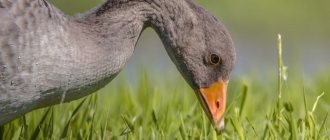
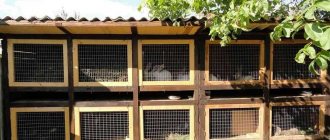
- For fresh grass. Ducks need greenery at any time of the year. It contains many substances important for digestion. Also, many poultry farmers use it to improve the taste of meat. The mesh design is considered the most convenient for fresh herbs. It prevents grass from being pulled all over the house. To make the mesh, it is better to use basket weaving rods or wire. To avoid rotting of the grass, a suspended structure should be made;
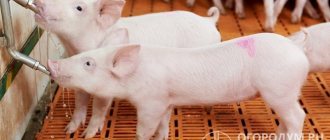
- For wet food. Wet mash is an important part of a duck's diet. Birds gain weight and grow faster on wet food. Trough feeders, which are made from a small trough, are well suited for it. The design is easy to install; assembly is based on the gutter principle. The main advantage of the chute is its ease of maintenance, since the feeders must always be thoroughly washed after wet food;
- For dry food. Dry food is the basis of the ducks' diet. It contains many nutrients and microelements. It does not stain poultry houses, as it is completely eaten by the birds. As a duck feeder for grains, you need to use grooved structures. For convenience, they can be equipped with a mesh or lattice. This way the ducks will be less likely to dirty the food and will not be able to scatter it. Many farmers use hopper feeders for dry food. Thanks to partial automation, they are considered very convenient to use;
- For mineral supplements. In addition to the main food, ducks, like any birds, need additional mineral supplements. Hopper feeders are excellent for this purpose. They can be supplemented with separate sections into which feed additives will be poured;
- For ducklings. For young animals, it is better to equip separate feeding devices. First of all, when choosing a design, you should take into account the mobility of young animals and the safety of the material. Sharp corners or rough edges can injure the duckling, so it is recommended to use well-sanded wooden feeders for young birds.
Useful tips
When purchasing or making feeders and drinkers, consider a few more points:
Containers are selected and installed so that there is always water in them
This is important for the proper development and health of ducks. One bird drinks approximately 270–300 liters per year
In the first days of life, ducklings need up to 0.03 liters per day. By a month this norm increases to 300 ml. Some farmers install “dual-use” sippy cups. They are also used for bathing ducks. This is not entirely correct. Ducks need plenty of clean water to drink and a full bath. Otherwise, health problems arise - the immune system weakens, the reproductive system weakens, and the sebaceous glands cannot cope. If the sippy cups are open, choose deep and narrow models. With this design, it is more convenient for ducks to immerse their heads. They are thinking about installing more practical automatic drinkers. Particularly useful on large farms. Some poultry keepers simply scatter feed around the pen. It's not economical. The ducks will trample most of the food. To combat losses, open feeders are filled to about a third. Additionally, protection is sometimes installed to prevent paws from climbing. Feeders and drinkers for ducklings are made one size, for adults - another. Design features and dimensions depend on the age of the bird.
Duck drinkers and feeders are chosen or done correctly
It is important to provide the livestock with not only adequate nutrition with fresh and clean food, but also constant access to water for drinking and “water procedures”
Important Details
Otherwise, they may become wet and become infected. It is advisable to make the feeder closed to protect it from dirt. Adults are not averse to getting inside to swim, so they do their best to prevent such situations from occurring.
Read also: Canopy over the porch for a house made of polycarbonate
The use of bowls and small basins is acceptable if the chicks are young. The older the birds get, the more complex and profound designs they use. You cannot use the same basin for bathing ducks and for drinking. The water quickly becomes polluted, and there is a risk of water contamination and pestilence of the entire pen.
Instructions for making your own drinking bowls
Making a sippy cup yourself will not take much time and effort. Each of the designs is convenient to use; it does not require constant monitoring of the amount of water, because when consumed, it is independently replenished in the container due to the weight of the birds.
Automatic drinker made from a plastic bottle or canister
Such a drinking bowl will be especially convenient for adult birds. To make such a drinking bowl, place a bottle of the required volume in a regular basin. Make a hole with a diameter of 1.5 cm in its lower part; your finger should completely cover the hole.
When pouring water into the bottle, close the hole with your finger, then place it in the basin, and you can remove your finger. The drinking bowl is ready. Now the water is poured through the hole into the pan, and when consumed, it will be replenished on its own.
How this looks in practice is shown in the following video:
Trough drinker from a sewer pipe
It will be the most durable and suitable for ducks of any age. The grooved sippy cup is easy to use and very simple to make. To make a trough drinker, take a piece of sewer pipe of the required length.
Then make the required number of holes in it and secure it on a special stand. A plug is placed at one end of the pipe, and an angle is attached at the other end along which water is poured.
How to make such a drinker is shown in the video below:
You can make an autonomous version of a drinking bowl from a sewer pipe, which will save time on servicing poultry. The design of such a drinker is shown in the following video:
Nipple drinker
This species is best suited for young animals. Its use is similar to how animals obtain milk from the breast, which is why it is also called the nipple.
It is this type of drinking bowl that is widely used in industrial production, as it saves water and prevents splashing. In addition, such a closed drinking bowl prevents debris from getting into the water, which in turn protects birds from various diseases.
To make it yourself, you will need the following items:
- a square-shaped pipe, it can be plastic, and the side of the square should be no more than 2.2 cm;
- nipples that are selected according to the size of the birds: for babies it is better to take type 3600, and for adults type 1800;
- pipe plug;
- a large reservoir of water and a rubber hose or tube - the source of water supply;
- adapter for connecting square and round tubes.
You will also need an electric drill with a 9mm tip and a taper tap.
Drill a 9mm hole in the square pipe. Using a tap, form a thread and insert the nipple into it. Make the same nipples along the entire length of the drinker so that their number corresponds to the number of ducks
It is necessary to pay attention to the fact that the distance between the holes must be at least 30 cm. A plug is installed at one end of the tube so that the liquid remains inside
At the end, trays are attached under each nipple, which will collect excess liquid.. How blogger and jack-of-all-trades Dmitry Izyumov assembled a nipple drinker, see below:
How blogger and jack of all trades Dmitry Izyumov assembled a nipple drinker, see below:
Vacuum
This is the simplest type of drinker. Pour a sufficient amount of water into the container, cover it with a small bowl, and press it firmly against the bottle. Now turn the structure upside down so that the bowl is at the bottom.
Place the drinker in the house and place a small wooden support under the bottle so that the liquid flows freely into the bowl. For very small ducklings, a drinking bowl made from an ordinary three-liter jar and a plastic bowl is suitable.
How to make an improved vacuum drinker is described in the following video:
For the main tank, you can take a container of any volume, even 50 liters. But it would still be better to install several smaller drinking bowls so that the water does not stagnate and sediment appears. The main thing is to secure the bottle well so that it does not fall and injure the birds.
When using this sippy cup, water does not spill on the floor, the birds remain dry, which prevents ducks from dying from hypothermia. In winter, to prevent the water in the nipple drinker from freezing, you can place a heater in it, which is usually used to heat aquariums.
Cup duck drinker
Cup drinkers for ducks consist of a container of water, a bowl and a rubber hose. The homemade design is suitable for adults and young animals.
It is easy to assemble with your own hands. To do this, a hole is made in the container for the hose. The connection between the hose and the tank must be treated with sealant. Then insert the hose into the drinking bowl and securely fasten it in it.
The cup drinker is considered automatic. The liquid enters the bowl due to atmospheric pressure.
Mandatory requirements for drinking bowls
Ducks always prefer water. The body of an adult requires about 1.7 liters per day for adequate nutrition. In addition, ducks should be able to approach the water at any time, because they even wet their food.
Everyone knows that ducks love to spend time in the water, wallow in it and swim. Especially for this purpose, a container is always installed in the poultry house of such a size that the ducks fit completely into it. Frequent stay in such water leads to the fact that it becomes polluted due to the earth and rubbish that ducks carry on themselves and on their paws. And here those same nipple drinkers come to the rescue, which will provide constant access to fresh and clean water suitable for drinking.
Nipple drinker for ducklings
This type of drinker is suitable for different housing of ducks (floor, cage). It is not difficult to create yourself, it is very practical to use. That is why on large farms and poultry farms experts prefer this watering system.
The nipple drinker consists of several items:
- Barrel supplying water.
- Nipples (nipples).
- A square-shaped plastic pipe.
- Parts for connecting elements.
The main advantage is the dosage of the supplied volume of water. The water here is always very clean and of high quality. All that is required of you for daily watering is to fill the barrel with good water.
Water from floor drinking bowls becomes contaminated very quickly
When choosing nipples, you need to pay attention to the fact that ducks will prefer a large nipple, which will give more water (about 100 ml of water in 60 seconds). There is no need to teach ducks to drink from a drinker: they see that there are drops there and intuitively begin to use this drinker
There is no need to teach ducks to drink from a drinker: they see that there are drops there and intuitively begin to use this drinker.
Little chicks can't drink from a nipple
There is also a small disadvantage to nipple drinkers: they are not suitable for very small ducklings. The fact is that small individuals need to completely lower their head into the container when drinking, which is not typical for a nipple bottle. Therefore, you will need to install a separate container for kids.
Advantages and disadvantages of different types of drinkers
Each product has strengths and weaknesses. This is taken into account when arranging the duck house. In addition, they pay attention to the nuances of a particular farm.
Deep water container
A basin, bowl or something similar is used for the simplest drinking bowl. Use enameled, metal, plastic containers. Such products are easy to maintain and inexpensive. However, they have disadvantages:
- They get clogged quickly because the container is open. Here ducks often take water treatments. This is a blow to hygiene and unnecessary work.
- For large livestock, basins and bowls are considered a poor option. It is difficult to arrange them and maintain normal sanitary condition.
- More suitable for young people. It is not so convenient for adult ducks to drink from here.
- They often turn over. The birds behave carelessly, push the vessels, and often try to swim there.
- Low air temperatures are dangerous. The water cools quickly. Plus, splashed, wet ducks freeze and get sick.
- Wasteful use of water.
Vacuum
Another option is more suitable for thrifty owners. Vacuum drinkers provide savings. Here the required fluid level is maintained for a long time. Ducks don't splash water. There are other advantages:
- The drinking bowls are closed. They are protected from various debris and contamination.
- Constant supply of fresh water.
- The model is easy to use and maintain.
- The design can be made with your own hands.
The disadvantage of vacuum sippy cups is their low weight, which makes them easy to tip over.
Nipple
Nipple (nipple) drinkers are considered by many to be the most convenient. The advantages include the following aspects:
- The ducks always get clean water because the structure is closed. It's healthier for the birds and easier to maintain for people.
- Water is used sparingly.
- Sold at any pet store.
- Suitable for indoor use in winter. In such models, the water does not cool down so quickly.
- Equally convenient for both adults and juveniles.
The disadvantage of nipple drinkers is their complex design. Such devices are rarely made by hand, and purchased ones require money.
Grooved
Another type that is easy to make with your own hands. Although this is not the only advantage of grooved sippy cups:
- long service life;
- ease of maintenance;
- low cost, and if you make it yourself, the device is even cheaper or free;
- Many ducks quench their thirst at the same time from one trough drinker.
Not without its drawbacks:
- They are heavy, making them inconvenient to carry and change water. Maintenance often requires the assistance of a second person.
- If drinkers are poorly secured, ducks sometimes get injured.
- Water quickly becomes polluted.
- Uneconomical.
Useful tips
If you have a nipple drinker installed, then to prevent the water in the tank from freezing in winter, you need to place an aquarium heater in it.
There is no need to teach your bird to drink water from a nipple drinker. When she sees a drop of water, she will intuitively press the nipple with her beak, thereby receiving a certain portion of liquid. She will find the feeder herself.
Experts recommend calculating the number of drinking nipples based on the number of ducks on the farm. The optimal load on one nipple is considered to be ten heads of ducks. If there are 45 heads on the farm, then the nipple drinker should be made with 5 nipples.
It is very important for small ducklings to immerse their entire head in water, this is the only way they can clear their nasal passages and cope with the heat. Therefore, if you are raising young animals, then you need to install additional drinking containers that will be deeper than usual, but narrower. https://www.youtube.com/embed/5I-mEhQdY4o
Winter drinking bowl for ducks
Note! One of the main problems when raising poultry in winter is the rapid freezing of water in drinking bowls.
If the house has electricity, you can use a special heating device. It helps to safely heat water in winter.
If purchasing such a device is problematic, the best solution would be to make a special non-freezing drinking bowl with your own hands. For this you will need:
- Rubber bath;
- Old car tire;
- Styrofoam;
- Stuffing balls or other insulating materials.
Winter drinking bowl for ducks.
We take the tire and insulate it with foam and stuffing balls. Then we place it in the sun and place bricks, sawdust or paving stones in the center and under the tire. Thus, the tire should be a short distance from the ground. Then we place a rubber bath inside the tire and fill it with water. The bathtub should be flush with the tire and not extend beyond its edges. Thanks to the sun's heat, the water in the structure will not freeze, and the ducks will always be able to drink.
Requirements and dimensions
The height of the drinking bowl depends on the age of the birds. The main condition is that the bottom of the structure is 2-3 centimeters higher than the back of the geese, tightness. The container must not allow liquid to pass through, cleanliness. Containers must be kept clean
It is important to ensure an uninterrupted supply of water. Regular disinfection of the premises is required, Size
The calculation is carried out in millimeters per unit. For birds 12-18 weeks from birth - 150 mm per 1 gosling, 8-12 weeks - 95 - 130 mm/unit, for 2-4-week-old individuals - 60 mm/unit, up to 2 weeks - 40 mm, adults individuals – 200 mm/unit, water temperature – optimal. You always need to monitor the temperature, otherwise using cooled liquid will lead to illness in the geese. Insulation. In the autumn-winter period, the liquid should not become covered with a crust of ice, much less freeze completely, so the drinker can be insulated or periodically topped up with warm water. Liquid level. In the first weeks of life - 2-3 cm, then - from 4 cm and above. It is important that the birds can perform a complete immersion of the head and rinse the organs of vision, ensuring the birds are dry. With free access to drink, birds have limited access to water. Young and adult geese should not get wet when drinking. Quantity. The more heads, the more drinking bowls.
Features and selection tips
Making a duck feeder with your own hands is quite accessible even for novice breeders. This solution is more profitable than buying ready-made products, which are not always designed for the size of a specific flock. In addition, it will be possible to carefully monitor the results achieved and use only safe materials. There are two main requirements: ensuring the safety of animals and ease of cleaning the structure. The feeder is designed in such a way that the birds have free space.
In the first month of life, ducklings should be provided with a free passage of 0.05 m. By the end of the first year of life, this distance should be gradually increased to 0.12 m. The oldest bird will feel comfortable if it is provided with a passage of 0.15 m. Important : These figures refer to wet food containers. Tanks holding dry food should be half the size. The main materials of duck feeders are:
- steel sheets;
- plastic;
- wood.
Wood is considered the cheapest option. But it is only useful for dry food. It is much better to place the wet mash in a metal container. The drinking bowls that small ducklings will use should not be very deep. In this case, it is necessary to give them the opportunity to immerse their heads completely in the feeder.
Two options for making your own chicken feeder from plastic pipes
Feeding birds is an important process that ensures their health and productivity. For convenient and economical feeding, you can make feeders from plastic pipes for chickens with your own hands.
Traditional bowls and troughs for feeding livestock are extremely ineffective. Chickens love to rake up food, causing large amounts of it to end up on the ground. Open bowls also easily collect litter and feces from other chickens, not to mention the fuss the birds create.
It is very easy to organize devices for feeding chickens with your own hands from materials for plumbing, because it will not take much time, and the necessary tools are available in every home. In addition, it is reliable, since such feeders are durable and can be used as automatic ones.
Tools and materials
To make such a system for birds with your own hands, you will need:
- PVC sewer pipe, optimal length 1 meter;
- tee with a slope of 45 degrees;
- PVC plugs of the same size;
- metal saw;
- fastener (wire or nails).
Ready-made design for chickens
Step-by-step instruction
- First you need to cut the surface of the pipes with a saw into three parts: 10 cm, 70 cm and 20 cm.
- We put a plug on a plane measuring 20 cm - this will be the basis of the finished structure.
- The tee is installed at the top with a side elbow.
- A long piece of PVC is placed in this tee.
It should be closed with a plug at the opposite end. - A 10 cm piece of pipe is inserted into the hole on the side.
- A product made by hand is considered finished.
At both ends (top and bottom) it is fixed to the wall of the chicken coop. It will be more convenient if you attach it to a block or metal mesh. - The feeder is filled with loose food.
When the chickens eat some of the feed from the bent knee, it automatically fills with the weight of the feed. Poultry will peck food through the opening of the side tee.
You need to close the top of the feeder at night to prevent debris or dust from getting into it.
Complete power supply system
The disadvantages of such a feeder include the inability to feed several chickens at once. Food can also spill out here, but in small quantities. In this case, it is convenient to install several such structures or use the second option.
You can make chicken feeders with your own hands from the same material in another way. This option is designed for a larger number of birds, so it is suitable for large farms.
Another method of obtaining food is also used here - the feeding holes are located one level lower, which can be convenient for growing birds.
Birds eat from plastic products
Tools and materials:
To make such a design, you will need:
- two plastic pipes 40 and 60 cm long;
- two plugs of the same size;
- similar size, knee;
- jigsaw;
- wire.
Step-by-step instruction
- On the longer tube, areas for holes are marked through which the chickens will receive food. Their size should not exceed 7 cm. Then they are sawn or cut out.
- Place a plug on one end of the pipe.
- An elbow is attached to the other part (the second smaller PVC is connected to the larger one perpendicularly).
Placing the finished feeder
The structure is attached to a vertical surface using wire, as in the photo. It is wrapped top and bottom to a pole or mesh. The horizontal part of the feeder should be at the bottom, and food should be poured into the hole on top. It will automatically fill the plane below as it is eaten. This type of feeder is also closed at night to keep the food clean.
A DIY pipe product of this type has a slightly bulky appearance, as well as more connecting parts, so it requires a spacious chicken coop. The feed supply will be enough for about a day - this is for 10-15 laying hens.
Sometimes the bottom of the structure is not lowered to the floor, but is kept suspended so that the chickens cannot insert their heads completely into the holes.
Laying hens peck grains
Thus, using pipes you can make chicken feeders with your own hands. This method will save the farmer time and money on purchasing feed.
What should a good drinker look like?
When choosing or creating a drinker for ducks, consider:
- Convenience. The device should not be too low or too high. The height should be optimal for each bird, regardless of whether it is a small duckling or an adult. The first ones need about 5 cm for approach, while at the same time, grown birds need to be given 15 cm. It should also be convenient for the owner of the farm, who will have to regularly replace the water. The best solution is to provide tap water directly into the feeder.
- The number of the flock. The number of drinking bowls depends on the number of individuals; a separate one is allocated for each. Ducks have a great need for water, this must be taken into account
- Structural stability. Water containers must be securely fastened, and their shape must be such that water does not spill.
- Easy to clean. All components should be easily removable to remove dirt and feathers and disinfect.
It is important that birds are provided with water 24 hours a day. To do this, they are filled out regularly. For Muscovy ducks (Indo ducks) the requirements are the same.
Features of drinking bowls for chicks
Ducklings must be provided with clean water. The shape of the vessels should be deep so that the water does not spill, but at the same time the babies can reach with their beaks. There are several rules:
- Small ducks under 5 days of age need water at room temperature.
- If the chick is 10 days old or more, then use a metal container.
- Choose a wide container because the young animals like to splash water. A mesh is installed on top
- The water coming from the drainpipe must be purified through a filter
During cold seasons, it is important to maintain the water temperature at room temperature.
How to make nipple drinkers?
Similar designs are also automated, but they have a more complex structure, although they are popular for both adults and young chickens. Before assembling such a mechanism, it is worth assessing its strengths and weaknesses.
Characteristics
The advantages of such drinkers are as follows:
- Saving water. This is achieved thanks to its dosed supply, so each bird receives the required amount of water. So, compared to other types of drinkers, the nipple design allows you to consume less water by about 20-30 times. At the same time, its consumption can be further reduced by equipping the system with a drop eliminator.
- Protecting water from pollution. The drinker is of a closed type, so the water is not contaminated with dust, droppings, etc.
- Easy to use. Maintenance of the nipple system consists only of periodically adding clean water to the tank.
- Stability of the structure. Often, such a drinking bowl is attached to the cage lattice, so you don’t have to worry about the chickens knocking it over or it turning over on its own due to strong winds.
The disadvantage of the nipple system is that a limited number of chickens can drink water at the same time. In the summer season, this can lead to crowding near the drinking bowl, especially after feeding. Of course, such a drawback can be eliminated if you correctly calculate the needs of chickens and the optimal number of nipples in advance.
From plastic pipes
You can assemble a complete nipple drinker for chickens according to the following instructions:
- Take a small piece of plastic pipe with a diameter of 2-3 cm. You need to measure 60 cm using a tape measure, and mark every 10 cm with a simple marker. It is in these places that the nipples will be installed.
- Cut off the excess section of the pipe using a metal file or a special pipe cutter (scissors for cutting pipes). The cut may be uneven. In this case, it must be leveled by removing excess areas using a sharp knife.
- Prepare holes in the marked areas of the pipe using a drill. You need to work carefully so as not to drill through the plastic. After drilling, it is worth blowing out the pipe to eliminate plastic shavings.
Screw the nipples into the prepared holes. It's better to do it with your hands first, and then you can use a wrench. The drinking bowl does not require strong pressure, so there is no need for seals. Place a plug at one end of the pipe, and at the other end a special wick, which you need to buy in the store. To securely fasten the elements, you can use a special soldering iron for plastic pipes. Check the drinking bowl for functionality. To do this, you need to blow strongly into the wick. If everything works properly, you need to install special latches and attach the drinker to a suitable place.
From the bucket
It could be an old bucket or tank, but it must be solid. It can be converted into a drinking bowl in two steps:
- Cut 5-6 holes in the bottom of the container. Their optimal diameter is 9 mm.
- Screw the nipples into the holes. The design of such a part is designed in such a way that water flows only when it moves, which saves water.
Such a bucket should be hung in the chicken coop and filled with water, which several chickens can drink at the same time. You can increase the convenience of this design by using aluminum wire or strong rope, making a drinker handle from it.
It is worth considering that the dimensions of the drinker may vary depending on the temperature in the chicken coop or what feed is used. For example, if the temperature in the room does not fall below 18 degrees, then the volume of the drinking bowl should not be more than 300 ml. From this calculation, you can determine the optimal size of the drinking bowl for your chicken coop.
From a bottle
Use a plastic bottle or 5-liter bottle. The instructions for making a drinking bowl are as follows:
- Drill a hole with a diameter of 9 mm in the lid.
Screw the nipple into the hole. Close the bottle with a lid and cut off its bottom. Drill two symmetrical small holes at the edges of the container. Take a strong rope, stretch the ends of which through the holes and secure with a reliable knot. Thus, you will be able to get a convenient handle for the drinker, with which you can hang it in a chicken coop or pen, and then fill it with water.
How to install the nipple into the lid, see the video below:
Trough drinker for adult ducks
It is best to make a drinking bowl for ducks and any other birds from materials that are resistant to rotting and quite durable.
In this sense, a large-diameter plastic pipe is perfect:
- it is inexpensive;
- easy to install;
- will last a very long time;
- Due to its length, it is capable of providing water to a large flock of several dozen ducks;
- cleaning it from dirt is also quite simple - if you do this regularly, then no deposits will form on the surface of the plastic;
- Finally, this drinking bowl essentially combines the function of a small washbasin - ducks will be able to wash their beaks and cool down in hot weather by plunging their heads into the water.
The instructions for its manufacture are obvious - you need to cut several identical holes (for ducklings - small, for adult ducks - 3-4 times larger in all dimensions) and install it on a pre-designed durable stand. One end of the pipe is screwed with a plug, and an angle is installed on the other, through which water is poured.
The simplest drinking bowl for ducks is a sewer pipe with holes.
Note! Such a drinking bowl must be installed very securely, because if the pipe falls on the birds, they will inevitably receive severe damage, and large quantities of water will spill throughout the duckling.
The only drawback of such a device is that, together with water, it is quite heavy, and ducks will caress their beaks quite often, so the water will also have to be changed often. You will need the help of a second person to pull out the pipe, holding it on both sides.
DIY duck feeders
There are feeders for dry and wet food, and if the container is made of galvanized metal sheets, it can be safely used as a universal product.
Tray feeder
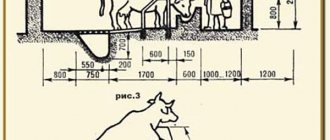
A wooden tray feeder is perfect for dry food, because it can be made in literally 1 hour, and plywood and saw can be found in any household. The drawing shows an option for 10-12 adult ducks, which can approach the container from 2 sides at the same time.
It is supposed to hang such a feeder at a height of 18-20 cm from the floor, so that it is as convenient as possible for the birds to take food.
If you make a trough feeder from a metal sheet, it will work well for wet mash.
A tray or groove feeder is suitable for mash.
Hopper feeder
A bunker feeder is a common version of an automatic feeder for dry mixtures, which is especially convenient because you can pour a lot of food into it at once for several days.
Along with wood, a galvanized sheet is also suitable, on which you need to make the appropriate markings with a marker, bend it in the right places, and fasten it, like a wooden bunker, with self-tapping screws.
The simplest automatic feeder for ducklings
If you need to quickly build an additional feeder because the old one is broken and the ducklings do not have enough feeding points, this model will literally help out. You will need a 5-liter canister, wire and a bowl into which dry food will be poured. Along the diameter of this basin, in 8 places you need to make holes for the wire (it is better to take the thickest one you can find).
We make holes in the bottle in exactly the same places. We insert pieces of pre-cut wire into the holes of the basin and container, bending the edges so that the structure is firmly supported by weight - the food should flow freely from the bottom neck of the bottle (we fix it upside down).
A feeder for ducklings can be made from a 5 liter bottle.
Practical recommendations
Any poultry breeders who have accumulated any significant experience strongly do not recommend using thin plastic. Feeders made from it are impractical, unstable in the cold and last too little. The simplest option is considered by many to be feeding devices made from sewer pipes. All you have to do is:
- cut several holes;
- install plugs;
- mount the entire structure on supports.
By varying the size of the holes, you can make either a drinking bowl or a feeder from the same pipes. As for bunker feeders made of steel sheets, it is recommended to fold them like paper boats. The main thing is that the markings are done clearly. Even a very small error will deprive the product of its seal. As a result, it begins to work incorrectly and unreliably. Don’t assume that it’s enough just to make the feeder correctly
An equally important procedure is proper fastening. If a large pipe comes loose, it can cause severe damage to ducks or even kill several ducks.
And these animals are active and strong, they can turn over almost anything in minutes. Therefore, saving money and time on fasteners is unreasonable.
If we are talking about feeding devices for ducklings, it is simpler - you can limit yourself to hanging. However, suspended structures must also be held securely. Don't underestimate the ingenuity of a bird and the degree of danger if it gets to the feeder
It is important for farmers to consider the practical division of devices. They are classified as follows:
- products for serving fresh herbs;
- products for wet mash;
- for dry food;
- for ducklings;
- for feeding with mineral compounds.
To prevent grass poured onto the net from rotting, it is recommended to hang the structure. As for wet food, grooved products made from small troughs are optimal for it. Anyone can figure out how to make a gutter. The advantage of such devices is that they are easy to clean. And wet food storage containers will have to be washed frequently and actively. Dry food can be fed equally well through a hopper or chute device. The second option is more convenient, as it allows you to partially automate the work. The mineral additive is most often placed in bunker-type feeders. To do this, separate sections are initially formed there. Mixing minerals and main feed is strictly prohibited!
Feeders for young duck flocks should be separate from feeding devices for adult flocks. Regardless of the age of the birds you plan to feed, you will definitely have to get rid of sharp corners and rough edges. Ducks, especially at a young age, are very tender and sensitive to mechanical injury. All steel elements must be polished properly. Unsanded wooden parts must not be used.
Before installation, you should carefully inspect the feeder to see if there are any deformations, chips, and so on. If the product is made by hand, then it is worth preparing a drawing. It will help to avoid unnecessary mistakes, and therefore such preparation should not be considered as an unnecessary complication
Important: in homemade structures it is necessary to provide at least four compartments: for the main food, for the shell, for gravel and lime. This division will make work more convenient
Wooden feeders are considered not only those made from individual boards or from old troughs. Fiberboard is also suitable as a base. It is best to make one feed container for 16-20 heads. If you make a structure with a smaller capacity, you will have to prepare too many copies. If larger, then filling the feed, cleaning and washing become unreasonably complicated. It is recommended to make the sides 0.07-0.1 m high. In this case, the optimal width of the partitions is 0.2 m. Nails or self-tapping screws are used to attach parts. Experts advise using thin boards to make the feeding device easier to move and wash. Knowing what a homemade feeder should be like, it’s easy to choose a finished product using the same parameters.
To learn how to make a duck feeder with your own hands, see the following video.
Self-production
Wooden
Wooden feeders for ducklings and adult ducks resemble a trough and are made of high-quality wood or plywood. Both options are recommended for dry food only. Otherwise, under the influence of moisture, the material will quickly become unusable.
The size of the container depends on the number of heads in your farm. A convenient container is one from which 15-25 ducks can eat at the same time. Acceptable height of the sides is 7-10 cm, width - 20 cm, length - 100 cm.
The entire structure is fastened with self-tapping screws and sanded with sandpaper. Metal strips are installed every 20 cm around the perimeter of the container. It is better to use thin boards for work, which will make washing and dragging the trough much easier. You can nail a strong strip on top. It will prevent ducks from getting into the container, and it will be more convenient to carry it.
From a sewer pipe
For construction, prepare materials: a pipe 150 cm long, always with a twist, a jigsaw, a plug, a screwdriver, a level, a pencil. Don't forget about safety precautions.
We close the straight end of the pipe with a plug, and use a level to mark two straight lines parallel to each other. Mark rectangular holes every 5 cm.
We drill holes in the corners of the rectangles and cut out holes around the perimeter. Secure the feeder - sand the cut parts with sandpaper.
The product is ready. Now it can be attached to the bottom of the cage floor, fixed on wooden stands or suspended 10-20 cm above the ground, depending on the age of the ducks. For ducklings, the first option is acceptable.
Automatic
This feeder for ducklings and grown ducks is easy to use, suitable for farms of any size, and does not require many tools for construction. Just a basin, a 5-liter plastic bottle and some wire.
We make 8 holes at equal distances along the edges of the pelvis. Cut off the top and bottom of the bottle. We make holes at the bottom in the same places as in the basin.
We cut the wire into equal parts and through the holes we “sew” the bottle and the basin. It is better to use thick wire. We bend the edges so as not to injure ourselves or the ducks.
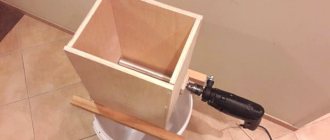
Before assembly, drawings must be made. The feeder consists of two identical sides, front and rear parts, sides, bottom and lid. The bottom of the back wall and sides, sides and bottom form a tray.
To make it you will need: thick plywood for the base, a screwdriver, slats, a jigsaw, self-tapping screws, sandpaper, tape measure, pencil and furniture hinges. Now you can get to work.
- Mark the future details on the plywood (length and width of the tray: 30-50 cm, height of the sides: from 5 to 20 cm, depending on the age of the ducks, height of the feeder - 40-50 cm).
- Cut out the resulting fragments with a jigsaw.
- Sand the edges of the parts with sandpaper.
- Using reinforcing strips, tighten the entire structure with self-tapping screws.
- Secure the lid on top to furniture hinges.
If the feeders are made correctly, the ducks will be able to eat comfortably, and you won't have to spend a lot of money on food. In addition to food containers, birds will also need a drinking bowl. How to build it correctly, read the article “How to make a drinking bowl for ducklings with your own hands.”
Write in the comments your tips for making feeders and keeping ducks. Get acquainted with our other articles, like, and share with those who will find the information presented useful.
What tools and materials may be needed
Every farmer will probably have the tools needed to make feed equipment:
- saw or file for working with wood, metal, plastic;
- drill;
- hammer and nails;
- pencil;
- roulette.
In addition to tools, you may need various bars, slats, metal wire, screws and self-tapping screws, and loops for fixation. As for materials, as a rule, improvised means are used. The following can help in making a feeder:
- plastic bottles, basins, small tanks, other containers of various sizes;
- plastic sewer pipes of different diameters;
- wooden boards or plywood sheets;
- metal containers or boxes;
- thin metal sheets.
Having any of these items or materials on your farm, you can quickly make a convenient feeder and place it in the poultry house.
Hopper-type feeder made of a plastic container and tray.
This is the simplest and most practical option for a feeder for your chickens. To make a feeder you will need a container, you can take a plastic bucket for putty or water-based paint and a round plastic tray.
The manufacturing process is extremely simple: you need to make several even holes at the bottom of the bucket on the sides and attach the hopper to the tray in any convenient way.
The bunker feeder for chickens is ready, pour the feed into the bucket and close it with a lid. The food spills through the holes and ends up in the tray. If the feed does not flow out enough, you need to enlarge the holes.
Duck drinker from a canister
To make a drinking bowl you will need a plastic canister, a small faucet, and a water tray. The volume of the canister can be any from 10 to 100 liters.
- A hole for the faucet is drilled in the lower side part. Screw it securely into the canister and fill it with water.
- Place the canister on the tray, close it with the lid and open the tap. When liquid accumulates in the pan and reaches a certain level, the water supply will automatically stop. As it decreases, it will independently be added from the canister to the pan.
Duck drinker made from a canister.
The importance of drinking bowl hygiene
The issue of sanitation is acute in poultry farms. Any virus causes mass mortality of birds. If closed type feeders are used, then the birds do not have access to a supply of water; the liquid is not contaminated with droppings or soil. As a result, the level of sanitation increases.
Several automatic containers supplying water are installed in the poultry house. This makes it possible not to waste time adding water and maintaining the health of the ducks. The most successful option is a nipple design.
The drinking bowl is a closed type, water does not spill out of it, and the birds absorb only the amount of liquid that is required. Feeders will require regular maintenance: cleaning and disinfection. Metal elements can be boiled.
Water is important for ducks. Their body temperature is much higher than that of humans, 42 C. The metabolic process occurs faster. On average, a bird absorbs 280 liters of water per year.
In the first few days after birth, the chick consumes up to 30 ml of liquid. At the age of 1 month, the duckling drinks 300 g of water daily. Ducks not only need a watering hole, but also a nearby pond.