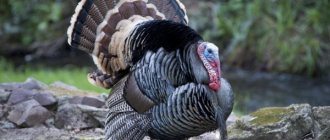
If cutting up a chicken is still something supernatural and incredibly labor-intensive for you, then stay with us. Now we will tell you all the secrets that will allow you to carry out this work in the kitchen in the literal sense of the word in one, two, three times. This type of cutting of a chicken carcass allows you to quickly separate the flesh from the bones, remove the skin and prepare the product for cooking. Depending on production needs, the housewife will be able to simultaneously make preparations for second courses and leave the bones for cooking a tasty and aromatic broth.
The proposed chicken cutting scheme is approved by the technological maps of most restaurants and cafes. When using it, minimal waste is obtained.
Why is it so important to learn how to properly cut up a chicken?
The quality of carcass processing directly affects the taste of the meat. If the intestines or spleen are touched during gutting, the organ fluid will flow out and be absorbed into the pulp. Such chicken will have an unpleasant odor and bitter taste.
The quality of carcass processing directly affects the taste of meat
In addition, professional cutting skills allow you to use parts of the carcass as economically as possible. Knowing the nuances, it is easy to make preparations for a soup set, meat for frying, baking, salads, separate fillets for minced meat and pieces for feeding animals. For farmers, this is also an undeniable plus, since semi-finished products sell better than whole chickens.
For equal portions
If previously it was common practice to buy separate sets of chicken parts, and you didn’t have to deal with cutting up chilled carcasses, convenient step-by-step instructions for portioned pieces will come in handy. At first, such a process may seem complicated and incomprehensible, but this is only at the start, and on the second attempt no difficulties will arise.
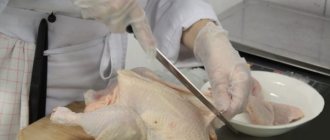
Cutting poultry into portioned pieces involves obtaining 8 parts and a back. This is very convenient, because you don’t have to spend money on buying ready-made semi-finished products. Cutting process step by step:
- Place the carcass breast side up. Let's start separating the thighs. You need to cut the skin with a knife - for convenience, pull the leg away from the body. Hold the leg in your hand and run the knife along the skin at the base of the thigh. Confidently break off the thigh, moving it to the side - the joints and protruding white bone will be visible.
- Cut the joint at the white bone. Move the knife in the same direction - the thigh will completely move away from the carcass. Repeat the same steps with the second leg.
- From two legs you will get four portions - 2 drumsticks and 2 thighs. To separate chicken legs, use your finger to feel the joint between the bones and press with the blade of a knife.
- The next step is cutting off the wings. Repeat the same steps as with the thigh. Holding the wing with your hand, cut the skin, then bend the wing to the side and cut the joint under the bone. The same is repeated with the second wing.
- Now separate the chicken breast from the back. It is recommended to use kitchen scissors or a sharp knife. The carcass is placed on its side, back up. There is a fat strip on both sides under the breast; they begin to cut it from the bottom up. Next, the carcass is cut to the very top on the left side. Similar actions are carried out on the other side of the chicken carcass. This will separate the back of the chicken from the breast. The back is used for cooking broth.
- Next, you need to start cutting the chicken breast into portioned fillets. First, cut the breast in half, turn it skin side up, and make an incision with a knife exactly in the middle to rest against the bone.
- The breast bone is considered one of the hardest, so you will have to make every effort. If you press well, you will be able to cut the breast along the bone into two equal parts.
- Next, carefully separate the fillet from the rib bones and remove the skin. The fillet is folded to the side and cut off from the bone with the tip of a knife.
This way we managed to get 8 portioned pieces of chicken and a back for preparing chicken broth.
The man in the video shows how to quickly and accurately, without mess, cut a chicken into portioned pieces in his kitchen:
How to pluck a chicken at home quickly
How to pluck and cut up chicken at home quickly and easily - part 1.
I cook almost boiling water in a special large saucepan. I fill about 2/3 with water.
And also, my know-how, for which chicken masters may criticize me. I add dishwashing detergent, 2-3 doses from the dispenser, or an incomplete teaspoon. Eliminates odor and makes feather separation much easier.
The birds need to be warmed up to 70-80ºС, and if you don’t have a thermometer, then check this way: try to pull out at least a pinch of feathers.
A carcass (or several) constantly float up, so they must be immersed, as if stirring. To heat the entire surface of the skin evenly.
Scalding can be considered complete if the feathers are easily separated from the skin.
Important! Scalding is just a term. In fact, you don’t need boiling water, otherwise the skin will boil and come off when plucked.
And so, let's pluck the chicken! Feathers can be plucked directly according to their growth, but I like to go “against the grain” - it seems to me that this way it turns out both faster and cleaner.
You can get the hang of plucking handfuls of feathers.
There are small feathers on the wings, I remove them, as if sliding them along the skin.
It doesn’t turn out perfectly clean, I’ll clean it completely while washing the carcass.
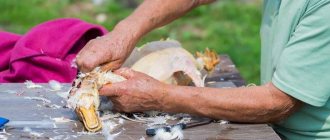
We look at the paws: the yellow skin is easy to peel off.
One foot is cleaned.
General slaughter rules
In order for the carcass to be easily and well plucked, you need to choose the right time for slaughter. It depends on the early maturity of the breed.
In addition to the characteristics of the breed, the time of readiness for slaughter is influenced by the feeding regime. Therefore, the same chickens on different farms are slaughtered at different times.
Traditionally, slaughter begins with the end of molting. Readiness can be determined as follows. The bird's wing is raised and held from the inside with the palm against the direction of feather growth.
If the surface of the skin is smooth and no stumps are felt, then you can begin slaughtering the bird.
To quickly prepare chickens for slaughter, be sure to alternate green feed with grain mixtures when feeding. On average, readiness occurs at the age of 5 or 6 months.
At the moment, there are also modern technologies for intensive fattening, using complete feed. They reduce this period to 3-4 months.
Preparation for slaughter is divided into the following stages:
- A week before the planned slaughter date, the bird is given a bath.
- Then the chickens are driven into a dry room with diffuse lighting. This keeps the pen clean.
- 24-12 hours before slaughter, the birds stop feeding. Only water can be given at this time. A small amount of table salt is added to it. For chickens, it will be a mild laxative that will better cleanse the intestines.
Slaughter is carried out in different ways. But the meaning of any of them comes down to complete bleeding. To do this, hang the carcass by its legs for a couple of minutes.
Also during this time, subcutaneous fat hardens, which makes plucking easier and eliminates unnecessary damage to the skin. There are the following methods for removing feather cover.
Gutting
Preliminary operations are completed. You can begin direct gutting. It is advisable to carry out the process as soon as possible after plucking. This way it will be possible to avoid rotting and fermentation of waste residues in the gastrointestinal tract. This chicken processing step by step is as follows:
- Intestines. Pick up the intestine with one hand through the posterior opening obtained earlier.
Hold the tail with your other hand. Pull the organ out, being careful not to tear or spill the contents, if any. With good skill, it is possible to pull out the intestines even when the anus is removed, along with it; Bowel removal - Liver and stomach. When processing these organs, accuracy is very important, as is the case with the intestines.
The joints are torn with a knife, and the elements themselves are removed. At the same time, they try not to pierce the spleen or cut it off from the liver. Ideally, they are extracted together and separated afterwards. This ensures that the bile is isolated from the meat; Liver and stomach - Larynx and esophagus. Pull out in a bunch. The step is necessary if the crop was previously torn away from these parts;
- Genital organs. Using a pointed knife or scissors, cut off the testes of roosters and the ovaries of laying hens;
- Heart and lungs. They are removed after cutting the corresponding arteries and surrounding fibers.
This is where the gutting ends. Processing of food giblets is carried out. Fat and arteries are cut off from the heart and lungs. The liver is freed from the spleen. The stomach is incised, everted, and the contents and inner layer of rough skin are removed. The resulting products are washed with running water.
Gutting with a carving fork
A lighter version of gutting can be done using a carving fork. After removing the anus, crop and intestines, it is inserted into the carcass. It is important not to damage the organs. All connections will be cut off by the sharp edges of the device, the insides will remain in it, they will be easy to remove. With good skill, all films and “fastenings” can be cut with a thin, sharp knife. Then turn the chicken over a plate and shake lightly. The giblets will fall out on their own.
Evisceration with legs cut off and belly ripped open
There is a trick for cases where the bird is not originally intended for cooking or selling whole. In this version, the process is accelerated by cutting off the legs and opening the abdomen immediately after amputation of the anus. The body will open completely and it will be easier to remove the entrails.
Slaughter of roosters and broilers
To slaughter broilers and roosters at home, similar techniques are used, but there are some nuances that should be taken into account. How to kill a rooster or broiler at home - below is a step-by-step diagram:
- Before slaughtering a rooster, you should prepare it for this process, keep it hungry, and clean it of dirt and droppings.
- Immediately before slaughter, roosters and broilers should have their feet tied tightly.
- The rooster should be restrained and its head cut off with a light but very sharp ax.
- Immediately after this, he is hung up to be bled.
In the case of roosters and broilers, you can use the external and internal methods; the simplest option is described above, which is easiest to implement at home, without special skills.
How to remove the skin from a carcass
It's useful to know more than just how to cut up a chicken. But also how to remove the skin from it for later use.
Place the carcass on its back with the bottom hole facing you. Separate the breast skin from the meat using a knife or your hand. Turn the bird over and use kitchen scissors to trim the connective tissue to remove the skin from the back.
Cut through the joints of the legs and wings. Separate the skin from the main carcass. And remove it from your feet with a “stocking.” To prepare the roll, the wings and legs are separated at the second joint. And for stuffed chicken, you can leave them completely.
Secrets of famous chefs
Professional chefs know many secrets of food preparation and cooking, including how to easily cut up chicken. We will share some tricks with you. The chef of the EdaHDTelevision channel will tell you about the subtleties of cutting chicken for rolls.
A good working tool plays a big role in the cooking process. So, to cut a chicken carcass you need to take a large knife, but it will be more convenient to separate the flesh from the bones with a small but sharp knife. Also, many culinary professionals use kitchen scissors with a serrated blade to cut chicken.
What comes before cutting?
Before hitting store shelves and tables, a chicken carcass goes through several stages of preparation.
The following are produced sequentially:
- Slaughter. A fattened chicken is caught by the legs, placed in a confined space, and given water to completely cleanse the intestines. The bird is then killed by electrocution or mechanical means (cutting off the head or cutting the arteries).
- Bleeding. The bird's body is hung upside down so that all the blood drains into the prepared container.
- Plucking. The feather covering is removed mechanically or manually from the still warm carcass and washed.
- Evisceration. The internal organs are removed from the chicken; cutting The resulting carcass is cut into portions.
Primary processing
After completely bleeding the carcass, it is necessary to begin processing the carcass as quickly as possible in order to obtain high-quality meat. At this stage, you should act quickly, as delay will affect the quality of the product. What to do next - step-by-step plan.
- The first step is to pluck the chicken. In order to facilitate this process, you should take the carcass by the paws and lower it for 10 seconds into a container prepared in advance with boiling water. It is necessary to start plucking from the back and wings, gradually moving towards the belly and back area.
- After plucking, remove the remaining feathers by lightly treating with fire - holding the carcass over a gas burner.
- Now comes the cutting of the carcass. It is necessary to gut it, if necessary, separate the breast, thighs, wings and pack for freezing.
- If you plan to subsequently sell the poultry, experienced farmers recommend immersing it in a container with ice water or ice for 1-2 minutes - this will give it a fresh, appetizing presentation.
In the process of primary processing, the most difficult thing is stripping the feathers. For poultry farmers whose meat production is on stream, manufacturers produce special feather-cleaning machines. They are a rotating container - a drum with protrusions inside, into which several carcasses can be lowered at once. The drum rotates, cleaning up to 95% of the feather cover.
Tools that will come in handy
To quickly and conveniently pack chicken, you will need the following tools:
- Cutting board. This kitchen accessory differs in material and its strength, ability to absorb juices and odors. Based on these criteria, wooden objects that quickly absorb meat juice and odors are not suitable for cutting chicken. It is recommended to use bamboo, plastic or silicone surfaces that resist the growth of bacteria, do not absorb odors, and are not afraid of moisture. If the cook only has a wooden board at his disposal, it should be wrapped in durable film before work.
- Dishes. To cut chicken, you will need any convenient container - a dish, bowl or pan for storing the separated parts of the carcass.
- Chef's scissors. This tool is included in the mandatory list of kitchen utensils needed for cutting poultry and preparing portioned pieces. When choosing such items, you should focus not only on their ease of use, but also on safety requirements - reliable thick handles with a non-slip surface, a screw rather than rivet method of fastening the halves, and the presence of a safety lock. It is especially convenient to use scissors with teeth on the canvas.
- Knives. The set of tools includes trimming, boning (for cutting tendons, separating meat from bones) knives with rounded sharp ends, kitchen hatchets (chopper and cleaver). Each tool must be sharpened as well as possible.
- Carving fork. A similar cutlery, consisting of 2 long horns and a wide handle, is designed for removing intestines, lungs, heart, crop and stomach from a carcass, as well as for convenient cutting and serving meat. Another name for the device is a trancher (spending) fork. The word is derived from the French “tranche” - cutting into large pieces. For convenience, some copies have a folding stop for holding meat.
Cutting a chicken into pieces involves chopping it, washing it, removing organs, and other manipulations that require compliance with sanitary and hygienic rules (using an apron and gloves, disinfecting the area where the poultry is processed), because chickens, although rarely, can still be carriers of salmonella bacteria.
Cut the chicken into equal parts
Some dishes require gutting the chicken into approximately equal parts. You can do this quickly and correctly by following some tips.
First you need to disconnect the legs according to the rules listed above. Then divide the hams into thighs and drumsticks. Separate the breast from the back without cutting out the wings. After this, cut the breast along a vertical line into two parts. The meat is not separated from the bone, the skin is not removed.
The last step is to cut each breast half horizontally into two approximately equal parts. As a result, we get 8 portions:
- 2 upper breast segments including wing;
- 2 lower breast segments;
- 2 thighs;
- 2 drumsticks.
This cut is good for grilling chicken - the portions are equal, they are fried equally, and they look great on a served table.
Chicken chops in a frying pan, proven recipe with photos
The most delicious and tender, of course, are chicken chops in a frying pan in the classic execution. A proven recipe with photographs will reveal in detail the sequence of creating a delicious masterpiece of juiciness from chicken fillet.
Ingredients:
- chicken breast – 400 g;
- chicken eggs – 3 pcs.;
- wheat flour – 130 g;
- spices – 0.5 tsp;
- salt – 0.5 tsp;
- garlic – 4 cloves;
- mayonnaise – 60 g.
Cooking chicken chops in a frying pan. Proven recipe with photos
Remove the skin from the chicken breast and cut out 2 fillets. Rinse and dry the meat.
How to cut boneless chicken
It's best to stick to the boneless method of cutting up chicken when making meatloaf. This meat is suitable for baking both in foil and in cling film. To collect shish kebab, it is recommended to cut the poultry into equally sized portions.
In addition, this method allows you to use chicken for minced meat and semi-finished products. When cutting pieces of meat, it is extremely important to preserve their attractive appearance as much as possible.
Public method
How to cut chicken into pieces, separating it from the bones:
- Run the knife along the entire back in a vertical direction. It is not recommended to start with the sternum, as it may ruin its appearance.
- Slowly cut the pieces of meat from the backbone, working your way up from the tail. Break the ischium, as well as the hip and wing joints. As a result, the ribs are exposed, from which the pulp needs to be moved.
- To completely free the chicken leg, you need to trim the veins in a circular motion. Scrape away the soft flesh until you reach the outermost cartilage. When you reach the bottom, break and twist the upper joint.
- Using kitchen shears, cut off the keel, fork bones, and rib bones. The wings can be left directly on the carcass or removed completely.
Private method
How to cut chicken into pieces so that it is cleaned of bones:
- Through the hole that is located in the lower part and was used to gut the bird, make a notch on the tail. As a result, the ischial frame will be exposed.
- The incision must be made in one sharp movement towards the upper cartilage of the thigh.
- Tuck the skin along with the pulp to make the process more convenient. Carefully dissect the joint where it connects to the body.
- Trim the veins throughout the entire area of the ham, and also break the joint where the kneecap meets the drumstick.
- Cut the flesh from the ribs to the neck, then sharply pull out the last one with your hands. Pull the wings off to separate the brisket from the carcass.
- Cut the meat from the drumstick and remove the fork-shaped bone. Chop the bones next to the cartilage, remove the skeleton, turning the skin out.
This type of cutting is best suited for stuffed dishes. In addition, due to the small number of cuts, the finished chicken turns out to be as whole as possible.