Honey production is a very labor-intensive process that requires very close interaction between the beekeeper and the bees. Manual labor of a beekeeper is impossible without the use of special equipment.
The article will consider a tool necessary for a beekeeper to work in an apiary - a smoker and its types, which are widely used. Methods for making the device yourself and using the device in practice are also described.
What is a smoker for bees?
The idea of repelling bees with smoke in order to take advantage of their metabolic products first came to people from Ancient Egypt. In ancient times, a primitive torch with fire was used for this.
Then they came up with a more complex design. It consisted of a clay vessel with 2 holes along the edges. Fuel was placed inside, a bee's nest was lit and fumigated.
In 1870 in America, a certain beekeeper Hamet improved the device. The invention involved the use of bellows to facilitate the work process. The structure was heavy.
After 13 years, beekeepers were already using universal equipment reminiscent of a modern smoker. Its developer was also an American beekeeper (Quinby).
In the process of development of civilizations, the smoker was reworked and improved many times, and with the advent of progress, new models were invented.
Uninformed people believe that smoke calms insects. It is not true. He annoys them. The action of the smoker is based on the following natural instincts:
- bees are afraid of smoke, which makes them panic;
- honey plants begin to actively fill their crops with honey - this leads to clumsiness and slow movements.
Smoker is necessary for beekeepers to immobilize insects in various situations:
- when cleaning “houses”;
- when moving to clean hives for disinfection and fumigation of the bee premises with medical agents against diseases.
History of invention
For the first time, the smoker appeared in Ancient Egypt, but had a completely different design, different from the modern instrument. The smoker was a torch designed to scare away bees and obtain valuable honey. Later, they invented a device made of clay, which served to supply smoke, and it had a small and large hole.
The design was very simple and to supply air, the beekeeper would blow into the hole and distribute smoke into the bee hive. In the 1870s, an American beekeeper invented a tool with bellows, but this design was heavy and the smoker was inconvenient to use. Later, the scientist Quinby improved the instrument by installing traction.
Currently, the appearance of the smoker for bees has changed, but the principle of operation remains the same.
Equipment design
The simplest modern design is a metal base with a spout. Fuel material is placed inside. Air is supplied through the flask (not only by bellows, but also by fans), due to which smoke comes out of the spout.
The production apparatus (bought in a specialized store) consists of the following elements:
- double-layer body;
- a glass located inside with a perforated bottom;
- air supply system;
- spout;
- lid.
In the manufacture of the smoker, stainless materials are used - black steel, copper, galvanized, stainless steel. The most expensive models made of copper. The most acceptable options are made of steel.
In order not to waste money, beekeepers quite often make structures themselves. Self-assembled devices are in no way inferior to factory models.
Structure
The tool for calming bees consists of several elements:
- A metal cylinder that consists of two layers;
- A device for supplying a stream of smoke into the firebox;
- A lid with a spout, which is most often called a “proboscis”.
Each of these elements performs a specific function - a metal cylinder produces smoke, has a closed bottom and a lid that hinges and has a proboscis. The elongated spout helps deliver smoke even to the most difficult to reach places. Using a mesh installed at the bottom of the cylinder, the refill does not come into contact with the smoke. If the beekeeper needs to introduce medications into the hive, then it is necessary to take a smoker with an extended nozzle.
Types of smokers
There are 3 main types of bee smokers - manual, mechanical and electric. Each type has its own characteristics, advantages and disadvantages. You should pay attention to them when purchasing or making structures at home.
General characteristics of types of fumigation equipment:
- Regular manual. These are models that provide air supply by pressing the bellows. They have the lowest cost and are easy to produce with your own hands. The devices are light in weight and do not require energy consumption.
- Electric. It is considered the most convenient to use, since it is enough to connect it to the power supply or charge the battery. Unlike the previous version, the designs are equipped with ventilated mechanisms (at 500 rpm) and have smoke emission regulators. Despite the convenience, beekeepers note 2 main disadvantages - high cost and difficulty in repair. Often you have to use the services of specialists.
- Mechanical. At the heart of this unit are blades. They are driven by a winding key. It is considered an average option between the two designs presented above. Features - the intensity of the smoke supply is adjusted using a lever, it is possible to unscrew the bottom to clean and lubricate the elements. Another plus is the average cost. Disadvantage: the blades sometimes break.
Useful tips when working with the Varomor smoke gun
- It is better to treat bees against mites, mold and diseases in the evening, when they gather in full force.
- If there is no wind, the entrances are not closed. In windy weather, the entrances are closed for half an hour.
- Fumigation is interrupted if there is brood. The smoke is released in two stages. There is a 10 minute break between them. A day later, the hive is processed again. This fumigation method rids bees of mites, including brood.
If necessary, additional treatment is carried out in the fall at a temperature not lower than 2-8 °C.
What to fill the smoker with?
The bee smoke atomizer can be filled with absolutely any raw material - paper, egg shells, dry grass, hay, straw, pine branches, cones, firewood, leaves, sawdust, Hessian fabric, etc.
Experienced beekeepers recommend paying attention to the following natural fuels:
- rotten trees, old stumps, dry manure, rotted wood - these materials do not harm insects, but burn out too quickly;
- tinder fungus (mushroom) - ignites well and smolders for a very long time, but finding it is problematic (unless you live near a forest where there are a lot of trees);
- oak bark is an excellent option, since it does not burn, but smolders.
When choosing, first of all, they adhere to the basic requirement - the raw materials must be natural so as not to harm the honey plants. Secondly, they focus on what is “at hand”.
Ignition
Next, we’ll look at how to light a smoker for bees. Working with an apiary device begins with placing flammable material inside the grate, which produces smoke when smoldering. How to light a smoker? Typically, rotten trees, dried mushrooms, and dry manure are used. Healthy wood is not placed in the beekeeper's smoker, since it produces little smoke when burned, and it turns out hot, which can cause aggressive behavior of bees. They also do not use gasoline, diesel fuel or kerosene.
The grate with fuel filling is inserted into the body of the device and closed with a lid. It is located at a distance of 30 mm from the bottom, under it on the side there is a hole that connects to the bellows. Squeezing the bellows causes air to be pumped into the beekeeper's device and smoke begins to form, which subsequently comes out of the device's lid.
How to light it?
After determining the kindling material, you should study the ignition process. The easiest way to operate a manual smoker is to just set fire to the fuel material and press on the bellows. As air enters the equipment, smoke will begin to be released.
The same applies to the mechanical version. But in addition you need to start the device and install the regulator.
It is much more difficult (at first glance) to light an electric smoker. How to do it right:
- Disconnect the ash container.
- Light a fire in the combustion chamber, having previously placed fuel inside.
- Turn on the device.
- When smoke starts to flow, fill the loading container and close the lid.
- Place the raw materials for refueling in the ash collector and light a fire here.
- Connect the fan.
You can visually familiarize yourself with the rules for igniting an electric smoker by watching the video:
Operating principle and rules of use
The operating principle of any smoker is based on igniting fuel raw materials, supplying air and directing smoke to the hives. Since you have to work with fire, you must follow fire safety rules. This technique includes the following:
- before work, check the device for serviceability - if there is damage in the case, fire will appear in an unexpected place, which will lead to burns;
- It is strictly prohibited to light cigarettes when using the device;
- remove flammable objects and substances away;
- take into account the direction of the wind - stand with your back to the air currents, otherwise all the smoke will fall in your face;
- before opening the hive, blow a little smoke into the entrance;
- when carrying out work directly in the nest area, make sure that the smoke does not spread pointwise, but superficially;
- do not make sudden movements around bees;
- fumigate the frames one by one (processing one, cover the rest with canvas);
- if smoke is generated in a closed area (pavilion), do not forget to turn on the ventilation system.
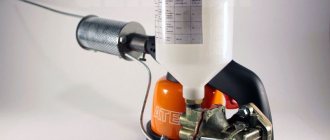
Instructions for use of Varomor
The medicinal mixture flows into the tube from the balloon. Approximately in the middle of the tube, in the spiral, it boils and steam is formed. The beekeeper can adjust the speed and volume of the solution by pressing the handle. The maximum liquid output is regulated by a special bolt on the valve.
We insert the end of the smoke cannon tube into the lower tap hole to a depth of approximately 1-3 cm, and then press the handle:
- twice when using the finished medicine;
- three to five times when using oxalic acid or thymol.
This way, each bee hive gets the right amount of steam. After this, the tube is removed from the tap hole. We move on to the next hive and repeat the treatment.
If you plan to produce an environmentally friendly product, then it is advisable to use a composition based on oxalic acid and thymol (the solution recipe and the necessary proportions are given below). As for the solution with Bipin, there are serious disagreements. For example, in Europe, Bipin and other drugs based on it are simply prohibited. There is no such ban in Russia yet.
DIY smoker
Experienced beekeepers prefer to make smokers themselves. Having a little experience in construction and design, making a device will not be difficult even for a beginner.
Before starting work, you will need to purchase/find suitable materials and parts. Prepare all necessary equipment.
Tools and materials
The choice of materials and tools largely depends on the intended design. But there are universal mechanical models. To make them you need to have:
- scissors and a hacksaw for metal;
- perforator;
- hammer and drill bit;
- knife and wire cutters;
- anvil;
- a stainless metal stand in the form of a container (any large tin can, etc.);
- dense material, leather or leatherette (for furs);
- ship type nails;
- self-tapping screws;
- brass sheet, copper pipe, etc.;
- copper rivets or nuts and bolts;
- pine boards - 2 units. size 0.5 x 9 x 15 cm;
- a tin can (from candies, etc.) - to create a bottom (diameter - 2-3 mm larger than that of the stand);
- metal mesh;
- spring.
Step-by-step manufacturing instructions
Making a smoker for bees must be done in stages. Please pay attention to the following steps:
- Prepare a jar stand (if it contains plastic parts, remove them). Trim it to a height of 17 to 20 cm.
- Make a bottom from a smaller jar and insert a pipe. To create strength, secure the elements together with self-tapping screws.
- Now, using wire cutters, cut a circle equal to the diameter of the pipe. This piece will leave space between the combustion compartment and the bottom. Place the mesh on self-tapping screws or bolts. Install the grill.
- Make a spout from a metal sheet. Cut out a rectangle of the required size (depending on individual parameters), and bend it into a funnel shape. Rivet the seams.
- Select a small metal base (a lid for a candy box or a stand for a brush), cut a hole in it with a diameter equal to the diameter of the funnel on the larger side. Insert the funnel, bend its ends into the inside of the lid, and rivet it.
- Attach the funnel to the lid with snap clips. Clean all cuts.
- Drill a hole 1.5 cm in diameter in one of the boards, 5 cm from the edge.
- Nail on a pre-cut piece of thick fabric/leather. This part plays the role of a one-way valve and a lid on the inside.
- In another board, make a hole 1.2 cm in diameter, 3.8 cm from the edge. Insert a handle (any suitable part can be used for this purpose) into the hole.
- Cut 4-5 turns from the spring. Straighten 1 turn on each side.
- Attach the skin to another board.
- On the boards (on different sides) make holes the same size as the spring. Insert into the boards with different branches.
- Secure the frame and fur with metal strips so that there is at least 3.5–4 cm between them.
- Make a hole in the fumigator to install the pipe. Insert/connect all elements together.
- Close the lid and check operation.
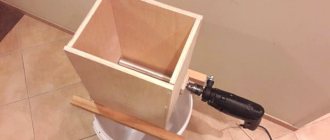
There is a simpler option for making a smoker - from an old teapot. Watch the instructions in the video:
Manufacturing
A bee smoker is a simple device that you can make yourself. One way is to make it, for example, from a teapot, and you don’t even need complex drawings. The device is made as follows: the handle is separated from the metal kettle, a hole with a diameter of 12 mm is punched at the bottom at the place where it is attached, and two more are punched on the same bottom side - 8 mm at different heights for attaching the bellows.
The spout on the kettle will serve as a hole for blowing out smoke. The kettle lid will need to be secured with snap clips. The glass will be an ordinary tin can, in which a large number of recesses are made at the bottom and half the height so that air can pass through to the fuel.
The ends of the metal strips are bent so that the end result is a U-shaped part with a height of 3 mm, and are placed parallel to each other at a distance of 4 cm. A glass jar is installed on these strips. The distance from the bottom of the kettle to the bottom of the tin glass is made to allow air to get into the fuel. Then take 2 more iron strips and also bend them at the ends so that the top is 40 mm long.
Holes with a diameter of 8 mm are punched in the bent ends of the strips. The same notches are made in one of the prepared boards. These notches should fit into the notches on the kettle. A hole is made on the bottom of the same board - 12 mm, it should correspond to the one made on the kettle in height. Then, the iron curved strips are bolted to the body and board.
A tube is installed in the lower recesses on the body and board; it must be attached very tightly. A hole is also punched in another board; from the inside it is covered with a piece of leatherette, which is attached to the top. This will serve as a valve that will let air in, but will not release it when the bellows is compressed.
The second board is attached at an angle of 45 degrees to the first, with a strip of leatherette. A tension spring is placed between the two boards. When holding a 45 degree angle between the boards below, they are fastened with furniture buttons with leatherette bellows.
Which equipment to choose?
Beekeepers who lack time and young beekeepers prefer to buy products for fumigating bees. In specialized stores and on specialized websites there is a wide selection of domestic and European models of smokers.
Each beekeeper independently decides which type of smoker to use. However, when choosing, you should still adhere to the following criteria:
- Quality of material. It must be durable (you will have to withstand high temperatures) and stainless, since corrosion of the metal when burned will have a negative effect on honey plants.
- Manufacturer. Experienced beekeepers buy only from trusted manufacturers. They produce high-quality products, provide a guarantee for operation, provide detailed instructions, etc.
- Construction type. The choice largely depends on the ease of use for the beekeeper and the volume of the apiary. The more hives, the more often you will have to use a smoker, and therefore, expend effort. For large beekeeping farms, it is better to purchase electric models.
- Purchased or homemade option. Not everyone has design talent. If you are not confident in making the device yourself correctly, it is better to buy the device.
- Price. There are budget and expensive models in each range of smokers. The cheapest ones are manual ones, average prices are for mechanical ones, and the highest price tags are for electric ones. But even among each group, prices vary, most often depending on the manufacturer. Designing your own will also require some expenses if you don’t have the right materials and tools at hand. But here the time and effort spent are taken into account.
Advantages of a smoke gun when processing bees
Compared to other devices, it is the smoke gun that is most effective, as it has a clearly targeted effect. Processing of bees is accelerated significantly, medicines are spent much more economically.
The Varomor smoke gun is a fairly small device, weighing no more than 2 kilograms. This allows you to avoid having to resort to additional help when processing bees. It is quite simple and convenient to use. By the way, don’t be surprised if you come across names like Warroed or Sublimation - we’re still talking about the same device.
Versatility is another undeniable advantage of a steam gun. It can be used both to kill ticks and to remove other parasites and fungi.
And, of course, there is the issue of safety - the smoke cannon is harmless to the bees themselves (if you follow the operating instructions and hive processing techniques), so you don’t have to worry about the health of your charges.
This is what Varomor looks like in its factory version.
But the smoke gun has one significant drawback - the price. Ready-made devices are sold at a price of approximately 6,000 rubles. If money is not an issue for you, then buying a smoke cannon is a good investment. Believe me, this purchase will save you a lot of time and nerves, and these are irreplaceable resources.
However, if you are not afraid and know how to work with your hands (and you probably found this article through a search like “do-it-yourself Varomor smoke gun” or similar), then I will tell you about the Varomor device, as well as how and from what it can be made on your own in an evening or two. At the same time, it is cheaper than purchased. Perhaps it will not be as beautiful, but just as functional (do you want “checkers” or “go”?)
Advice from experienced beekeepers
To avoid mistakes, follow the basic rules for working with a smoker. Be sure to listen to the advice of experienced beekeepers:
- Use the device only when necessary. There is no need to scare and anger the bees again.
- Distraction from the fumigation process is not a reason to extinguish the smoke distributor. Place the device on one of its sides (it will not go out and will not emit too much smoke).
- During the event, carefully monitor the reaction of honey plants. You can't let them get too scared. Reduce the pressure.
- Do not touch the frames or hive structure with a hot appliance.
- Initially make 2 blows. Then wait until the bees calm down and start blowing fully.
- To prevent insects from crawling out/flying out during fumigation, open the shelf 2 frames at a time.
- If you need to find the queen, then let less smoke into the hive. Otherwise, she will hide in one of the corners.
The smoker is an easy-to-use device. But you still have to follow safety precautions when igniting and fumigating. And independent production of equipment additionally requires knowledge of design rules. The use of a defective smoker reduces the effectiveness of the effect on bees, which often leads to an attack by pets on the beekeeper.
0
0
Copy link
Effect of smoke on bees
Smoke affects the behavior of bees and causes them to calm down and behave peacefully. Fumigation of the hive is an integral procedure when pumping honey, and this method can be used not only by novice beekeepers, but also by those who know how to pump honey.
When the honey season comes and the hive needs to be inspected, you don’t have to take the smoker with you, since the bees do not attack and behave calmly. When a beekeeper introduces a stream of smoke into the hive, the bees, sensing its smell, try to fill the crop with a drop of honey and this leads to the bees becoming less aggressive.