What is this
A bee nucleus is a small hive that can only accommodate a few frames. A small bee colony with one infertile or fertilized queen is placed in it.
Even in the term itself (nucleus - nucleus) there is a basis that allows you to understand why the nucleus is used. It is needed to grow a strong bee colony in the future.
There are differences from the standard hive design, which are as follows:
- Bees in it are susceptible to attacks from other insects.
- There are very few individuals here, so there are not enough workers to provide enough honey for the family during the winter.
- But precisely because of these design features, insects do everything to ensure that their development occurs at an accelerated pace, in comparison with conventional hive designs.
When it becomes clear what a nucleus is, you need to figure out how to use it correctly in the beekeeping process.
Polystyrene foam core: advantages, disadvantages
Recently, apiary owners have been making small beehives from polystyrene foam. But the main disadvantage of such nucs is that it is unsafe to keep the queen in them for too long. It is advisable to return it to a large hive immediately after fertilization. The frame in the nucleus is small, so it is sown quickly, and then the queen is left without work. This can provoke an unpleasant situation, and the bee will fly away.
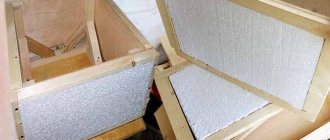
Making a mini hive from polystyrene foam is easy. Moreover, packaging material from household appliances is suitable. Lightweight, durable, perfectly retains heat. This creates exceptional conditions for wintering without requiring additional insulation. It is worth highlighting other advantages:
- does not deform;
- not subject to rotting;
- prevents moisture penetration;
- light, weightless;
- structural strength.
Sometimes bees begin to chew on the walls of their temporary home. This is another drawback that forces them to be promptly relocated from the cores.
Usage
This design has the following purposes:
- Nuclei are used to produce young queens and fly drones around them.
- Working with such a house greatly simplifies the life of the beekeeper, since he does not have to constantly disturb insects in large hives.
- Development and increase in numbers occurs much faster here.
This small house for a young family can be purchased in specialized stores. But, if you use the instructions, making a nucleus for bees with your own hands will not take much time and effort. But before you begin such manipulation, you need to decide why this design will be used and what its main types exist.
Kinds
There are several types of design:
- Mininuclei made of polystyrene foam can be purchased at the store or made with your own hands. As a rule, they include 5-6 frames. Therefore, such mini products are also called six-frame cores.
- There are also micronuclei that are used to fly around queens, and from their drawings it becomes clear that they have double bottoms. The general design has 4 uterine sites with small frames, overall dimensions 60 mm by 75 mm. But too reduced dimensions from the standard frame negatively affect the reproductive function of the uterus.
There are also other types which will be discussed below.
12 seater
The 12 seater design was proposed 30 years ago. Its special feature is the sides that surround the entrance holes. They prevent bees from moving from one nucleus to another. The frames used here measure 145 mm by 230 mm.
Multi-seat
It is the best option for placing barren queens. Its frame size is approximately half the standard one. If you make three or four of these separate frames, you will get a cubic nest. It has a number of advantages, since in this case insects are able to regulate the level of heat.
Hive for the family
You can do it yourself, as is usually the case. Let's look at the options.
- In a separate, specially made, small hive. Pros: these will be good for work, they are easy to send or transfer somewhere. Cons: require a lot of space to arrange.
- Several in special hives. Pros: the work of settling in is easier. Space in the apiary and material consumption for production are saved: one 4-person hive requires less resources than 4 single-person hives. When we remove the jumpers, we get a relatively large volume. This will be more convenient if you are planning to convert it into a full-fledged family: for the first time, before relocation, there is enough space for development. Disadvantages: the possibilities of maneuver are narrowed, it is inconvenient to approach - there are entrances on all four sides.
- In a small compartment of a regular building, behind a blank partition, with its own separate entrance. Pros: often used in sunbeds if there is a side entrance. Cons: requires changes in the design of the home. The ability to keep the nucleus nearby should be provided for at the stage of manufacturing the hive, or better yet, earlier - when we are just making drawings for future dwellings.
When keeping bees in large-volume hives (beds), it is not difficult to adapt them with your own hands for additional layering. Anyone can make an additional hole for the taphole and install a plug-in blind partition with their own hands. Being kept close to a large family makes it easier to warm up and join that particular family. Although a single core is more mobile if you need, for example, to transport it somewhere.
Before making beehives with your own hands, you need to decide whether the bees will winter in them. This is a fundamental question! The usual size of the Dadan frame is 435x300 mm. Foundation is also produced for these sizes. For our mini-family, it’s worth making frames a quarter of this size with your own hands. Then, by connecting two at a time, we can use them in regular stores or cases, and there is no need to cut the foundation into pieces.
Important! When wintering, it must be possible to install two such buildings on top of each other. The supply of food within the frame is small, and it is difficult for the club to move sideways in the cold.
The body size for 6 small frames will be sufficient for wintering and spring development.
If we use it only in the summer, then we have complete freedom of action. Bees will master any volume. The minimum, practice-tested size is 4 small frames. This is enough for a short time until the uterus is fertilized. It is advisable to make a feeding compartment with your own hands; however, the frames contain a very small supply of food. The size between the frame frames is also important: 37.5 mm. It is determined by the size of the cell needed for breeding bees and the size of the insect itself: the width of the street is equal to twice the height of a walking bee.
Based on the required number of queens and the area of the apiary, we decide which hives for the cores need to be made. Then we start making them.
Manufacturing
There is absolutely no need to purchase such a product. You can make a core with your own hands, especially since making it is quite simple.
Materials
Before making a core, you need to prepare the following materials for work:
- Wooden beam to create a frame.
- Fiberboard for the body walls.
- Polystyrene foam or polystyrene foam.
- Plywood to divide the structure inside.
- Galvanized sheet metal for cover structure.
Blueprints
Before you make a bee nucleus with your own hands, it is important to study all the drawings in detail.
And then follow a certain production technology, which consists of the following steps:
- Markings are made on sheets of fiberboard or expanded polystyrene (depending on which material is chosen) in accordance with the drawings. Then cuts are made along it.
- The ends for polystyrene foam are lubricated with glue and fixed. The fiberboard is fixed with nails.
- A hole is made for the tap hole.
- Then the internal structure is made, which will be inserted into the polystyrene foam box.
- The bottom is filled at the bottom. The slats for the partitions are attached to it.
- They make a lid and fix a galvanized sheet of metal to it in order to protect the family from moisture getting inside.
- The lid can be attached in any way, for example, on hinges, or it will simply be removable.
How to transport?
If there is a need to transport “bee housing”, it is transported without a lid, with the holes of the entrance plugged.
The nomadic tray must be pressed tightly against the upper part of the partition so that the bees do not fly to neighboring parts during transportation.
This is the optimal method of transporting the structure and is recommended by the vast majority of experienced beekeepers.
Check-in
To form a colony in a nucleus, it is necessary to do so from a sufficiently large and strong bee colony. Focus on the period when the main process of honey collection occurs, or when insects are swarming. The selection is carried out in the first half of the day, when most of the workers are flying around.
When populating and forming cores, in the southern regions they take one frame in which there is brood and two in which there is honey and beebread. You also need to add 300 workers.
If the climate is not so gentle, then you need to add 2 frames of honey and bee bread and brood. In this case, the number of workers is about 600 individuals.
It is very important during transplantation to ensure that the main uterus is not included. Fresh honeycombs are placed in the resulting free space.
Wintering
If it is decided that the family will spend the winter in a nuclear house, it is necessary to carry out preliminary preparations:
- The family needs to gain strength. For its development, it is necessary to carry out the last replantation of the uterus, no later than July 25.
- When the honey harvest ends early, it is necessary to supplement the insect diet with additional feeding. To do this, use sugar syrup in an amount of approximately 300 g per 1 such house. The total volume of fed syrup is 2 liters.
- From large developed hives, about 3 half-frames, in which honey is sealed, are taken and placed in cores.
- With the onset of cold weather and frosts, it is placed in the winter hut on the upper level. It is this arrangement that allows it to be warmed by the heat produced by the bee colonies.
Insulation
If necessary, the structure is insulated with a second layer of expanded polystyrene. It is also important that there are no cracks through which intense loss of moisture occurs. To do this, it is necessary to inspect the houses for the presence of such gaps.
conclusions
We can summarize by saying that it is best to use a hive under the nucleus, provided that the remaining entrances are sealed so that the bee can only fly in from one side. The main advantage is ease of manufacture and low price. Anyone can make such a box. Plus, standard sizes apply, so if you're lucky, you might find pre-made pieces for your drawer. Such cores have shown themselves to be very positive and are popular with many amateur and semi-professional beekeepers.
Peculiarities
There are a few subtle points to consider. If the queen is not fertilized, then she must be caged and placed in the hive. Released after at least 3 days.
It is also very important to consider that the brood must be sealed. The amount of feed cannot be less than 2 kg.
Naturally, there comes a time when the brood is empty. Bees climb out of the honeycombs. The beekeeper needs to control this moment. As soon as this happens, you will need to remove these empty honeycombs and put new ones in their place, which will contain larvae. This is important in order to keep young bees busy. This manipulation is important for the production of oviposition in the uterus.
It is also necessary to pay attention that as soon as new, young insects are formed, it will be necessary to return the initially transferred individuals to their old hive.
Marking
First of all, you need to mark the foam sheets. You need to carefully examine the instructions and drawings. It is best to use a utility knife for cutting. After marking, cut it. Remember the rule: measure 7 times – cut 1 time. After the sheets are cut into blanks, you need to look at the drawing in which places you need to apply glue. They are marked in a special way.
Glue alone will not be enough, so the sheets must be additionally fixed with self-tapping screws. The finished box can be made stronger by using plastic corners. You must remember to cut (preferably round) tap holes of a certain diameter. Next, the product can be painted, but you need to use non-toxic paint so that the uterus does not get poisoned.