To manufacture products from rigid or elastic polyurethane foam, special equipment is required. The technology of pouring polyurethane foam makes it possible to easily and quickly produce any product with complex geometry, pattern, or relief.
All you need to do is pour the specified amount of liquid into the mold and close the lid before the composition starts (the foam begins to increase in volume). Wait 15-20 minutes, open the mold and remove the finished product. The video clearly shows the process of preparing equipment and manufacturing decorative tiles from rigid polyurethane foam:
Now we’ll tell you how to make the mold used in the video:
PRESS MOLDS FOR PUF
Century of Polymers LLC produces any form of polyurethane foam. We also offer equipment and all the necessary chemicals for casting polyurethane foam products.
Polyurethane foam is an ideal material for the manufacture of complex [geometric] products. This is due to the fact that polyurethane foam initially consists of two liquid components: polyol and isocyanate. The reagents are mixed and poured into the mold. The composition increases in volume, filling the entire space of the PU foam mold .
Depending on the raw materials used, the finished product can be either hard or elastic.
The properties and characteristics of polyurethane foam, coupled with manufacturability and simplicity of the process (mix, pour in, wait, take out) encourage many to choose this particular production method. And then the most important question is, where to buy molds for polyurethane foam ?
Entrust the production of molds for polyurethane foam to Century of Polymers LLC. To be convinced of our capabilities, read this page ruppu.ru and evaluate the equipment that we have made previously.
Why should you contact us?
Our organization is popular among a large number of clients who highly appreciate the positive aspects of cooperation:
- Flexible system of discounts for regular customers. We provide an opportunity to save money regardless of the complexity of the finished product configuration and the size of the batch.
- Individual approach to working with each buyer. Our consultants do not deliberately try to sell large quantities of expensive goods - advice on selection is given taking into account the specifics of the application.
- Delivery service. She can deliver the purchased products to a place convenient for the customer without delay or violations.
To order the production of press molds, you can leave a request on the official website or call.
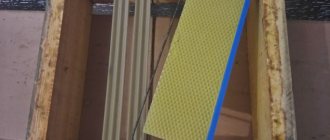
Matrix and punch of PPU mold
The geometry of the finished product corresponds to the geometry of the internal cavity of the equipment, for example, in the photo there is an overlay for the headboard.
Subsequently, this overlay will be washed from any remaining grease, primed and painted so that it “becomes wooden.”
You just need to choose the type of wood: red, black or vintage. The beauty of polyurethane foam for the furniture industry or for decorating premises and interiors is that you can get a valuable type of wood and the desired texture.
The first and second photos on this page ruppu.ru show complex press molds for polyurethane foam casting, because... It is required to obtain large products with a very complex pattern and relief. But still, these are two-dimensional products, essentially “flat”. Embossed on the front side and smooth on the back. Therefore, press molds in both cases consist of two parts: a matrix, which is responsible for the geometry and relief of the front part of the product, and a smooth punch.
The following photo shows a model airplane made of polyurethane foam. At first glance, the product is simpler than furniture elements. It is smaller in size and the surfaces are smooth. But there is one feature due to which the PU molding mold for a small aircraft is more difficult than for a two-meter ceiling plinth or a meter-long bed pad.
The fact is that an airplane is not a “flat” product. The plane is voluminous. It doesn't have a back side where it's flat. In other words, the aircraft is a three-dimensional product and cannot be obtained in two parts. In this case, it would have to be glued together from two halves, each of which would be cast in a separate mold.
To cast a three-dimensional aircraft in a polyurethane foam mold as a single whole, the tooling consists of three parts. The matrix (bottom) is cut into two halves, and the punch (lid) has a concavity to form the relief of the fuselage from below (the product is filled with the “belly” up).
The flash (excess foam on the line of joining of two dies and the punch) is cut off, the seam is ground. Subsequently, it will be impossible to determine this line, especially since the product is painted. the form of polyurethane foam was .
It should be understood that the larger the product, the more difficult it is to fill and there is a risk that voids may remain. Therefore, more attention should be paid to pouring technology. We have extensive experience in pouring polyurethane foam. We will not only make molds and supply chemicals, but also teach you how to correctly pour polyurethane foam into equipment or cavities of building structures (when light foam is used, read a separate review on this on our website).
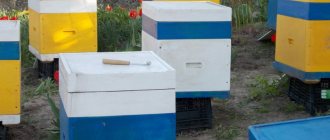
Advantages and disadvantages of polyurethane foam hives
Polyurethane foam is a material that has proven itself for making bee houses.
- The advantages include:
- excellent thermal insulation properties;
- structural strength;
- absence of rot;
- excellent sound insulation;
- lack of development of fungus and bacteria;
- does not allow moisture to pass through;
- easy care;
- design mobility;
- durability, up to 25 years;
- not attractive to mice and birds.
Some disadvantages of polyurethane foam houses still exist.
- These include:
- the need for painting on the outside (due to the destruction of the material under the influence of direct sunlight);
- quite high cost;
- the need to weigh the product;
- likelihood of forgery;
- average level of ventilation;
- high level of flammability;
- the need to replace parts; sections cannot be repaired.
Buy PPU molds at ruppu.ru
Century of Polymers LLC will manufacture and supply any [literally any] press molds for pouring polyurethane foam. We will make a mold and cast several test products in it, which we will give to the customer as proof. that the form is working.
In 9 cases out of 10, molds for polyurethane foam are not a standard, exclusive product. This is due to the fact that each “foundry worker” has his own task. And the equipment required is different, sometimes unusual.
It happens that they bring us a certain product (made of plastic, plaster, stone, etc.) and ask us to make a mold to get the same thing from polyurethane foam. It happens that they bring a ceiling rosette made of polystyrene foam, bought in Leroy Merlin or Obi. And they ask to make a form, but such that the product made from it differs from the original: add an ornament so that they will not be accused of plagiarism later.
For some, the master model is sculpted by a sculptor. Some people just draw a sketch. We will consider any options. The range of polyurethane foam products for which we are asked to supply equipment is extensive.
- Building structures and thermal insulation elements.
- Sofa cushions and furniture elements. Mattresses.
- Car seats, dental chair, gynecological chair, operating [surgical] table.
- Stucco molding for decorating houses outside and inside;
- Hive for bees.
- Packaging for equipment.
- Wheels, bushings, cylinders, rings, shock absorbers.
- Soles.
- Life jackets, buoys, life buoys (PPU does not sink).
- Refrigerators, thermos bags.
- etc. and so on.
Required tools and materials
Before you start, you need to stock up on the necessary supplies.
You must have:
- polyurethane foam from a trusted manufacturer with a material thickness of at least 5 cm;
- water-based paint or acrylic-based paint;
- spray bottle or regular brush;
- a stationery knife with a blade width of 2 cm or more;
- a tape measure, or better yet a metal ruler;
- stapler with staples (14 mm, 6 mm);
- degreaser;
- plastic corners with dimensions: 1.5×1.5 cm;
- a screwdriver is ideal, but you can also use a regular screwdriver;
- glue;
- sandpaper for sanding;
- pen or felt-tip pen;
- self-tapping screws
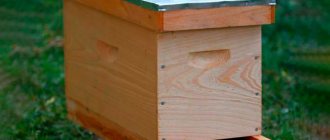
Making beehives from polyurethane foam with your own hands at home
The process of making a hive at home.
The first step is to purchase pine boards. Their thickness must be at least 25 millimeters
It is important that they are dried as best as possible. Humidity should not exceed 15 percent
Next, a pallet is made from the boards, the height of which should be 120 millimeters. There should be a grid in the floor. There should also be a rear debris removal door and a front slot caster. You should also take care of the liner to control the winter or summer passage.
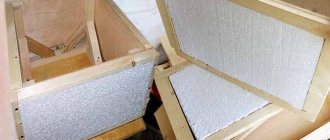
The walls of the housings must be mounted using solid five-centimeter polyurethane foam covered with aluminum foil. All parts must be attached to the groove with polyurethane glue. A fold is selected separately for the upper cut, the height of which is approximately 10 millimeters. It is necessary for more reliable hanging of frames. All this is secured using a wooden insert, which should be installed in the grooves.
Next, two wooden straps in the form of an upper and lower frame are fixed to the outside of the hive body. The parts must be secured with glue, however, for greater reliability, it does not hurt to fix them with screws. Their length should not exceed 9 centimeters.
To ensure ventilation, small holes should be made in the corners of the structure. To prevent the bees from flying out, the holes can be covered with a net. There should be no free space under the frames, but above the frame it should be no more than 7 millimeters.
The last detail for the future hive is the lid. In order to make it, you need to stuff the shield onto the harness
It is also important to ensure that the cover is protected from rain and snow - for this it is best to use galvanized iron or any other protective materials
Now the hive is ready and you can paint it. Making a hive according to this plan is quite easy, which is why all novice beekeepers use it.
Beehives made of polyurethane foam can be purchased ready-made. Today there are many models on the market from various ones, “Khimekselen”, “Bdzholyar”, “Nastusya”, “Khimtrast”, etc. It is also possible to make houses for bees with your own hands, starting from pouring the body.
You can quickly make a hive from polyurethane foam, but you will need certain knowledge and skills
It is important to prepare the necessary materials, tools and components for pouring, and also strictly follow the manufacturing instructions. The recommended temperature in the room where the hive is made is +18…+25°С
Necessary materials and tools for work
To make a polyurethane foam house for bees you will need:
- molds for making the body;
- release agent;
- roller;
- 2 containers for filling components (0.5 l plastic buckets are suitable);
- a wooden spatula (kitchen) or trowel for cleaning out the remaining filler from the bottom;
- a special mixer or drill with an attachment for mixing paint and concrete;
- components for pouring polyurethane foam - polyol and isocyanate;
- kitchen scales for accurately measuring doses of components;
- screwdriver (screwdriver);
- self-tapping screws
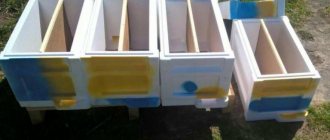
Step-by-step manufacturing instructions
It takes about 1.5 hours to make parts for the body of one hive. No additional drawings are required, since pouring using ready-made molds and assembling the body is quite simple.
To make the walls, roof and bottom, you need to perform the following steps:
- Coat the insides and projections of all molds well with release agent using a roller.
- Leave until the grease dries completely.
- Place the molds at a slight angle for better distribution of the potting mixture.
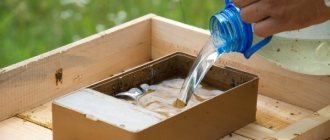
- Prepare the required number of components for pouring.
- Pour the isocyanate into the polyol and very quickly - within 10-20 seconds - mix the components until smooth with a drill attachment and pour into one of the molds.
- Cover the mold with a lid and secure with latches.
- Open the lid after 40–60 minutes.
- Fill the molds for the walls, roof and bottom in the same way. Before each subsequent pouring, the mold must be cooled to +45°C and below.
Assemble the hive body as follows:
- Connect the dovetail joints of the walls.
- Alternately connect each pair of upper and lower joints, central parts using self-tapping screws.
- Apply paint used for exterior use, such as ENAMEL, PF, etc., to the outer casing.
maintain an optimal climate for insects.
Preparing to create a hive with your own hands
How to make a beehive yourself, according to existing drawings? To start making a bee house with your own hands, you will need certain materials and tools:
- metal ruler;
- extruded polystyrene foam (sheet);
- stationery knife;
- steel corner;
- liquid Nails;
- a circular saw;
- screwdriver;
- self-tapping screws;
- sandpaper (fine-grained).
After preparing the necessary materials and tools, we begin to work on the drawings. When working, you should perform all actions according to the diagram:
- Initially, we mark the polystyrene foam sheet according to the size of the planned bee house. Here we need a felt-tip pen and a metal ruler.
- We cut out the required number of parts along the intended lines using a stationery knife or a circular saw.
- To ensure that the future product has a neat appearance, it is recommended to sand the edges using the sandpaper we prepared.
Basic principles for making hives
How to make potholders with your own hands - choosing a shape, material, good advice and photo ideas
Making beehives at home involves the following rules:
- Parts for the future product must be smoothly planed. Burrs and nicks are not allowed. The cut points should be at right angles to the longitudinal edges.
- It is necessary to ensure that when sewing the bodies together, the cut from the core side is on the outside.
- The planks are connected using nails. Their thickness is selected taking into account to avoid splitting of the material.
- Dried wood may develop cracks. To avoid this, it is recommended to prime the outer walls of the hives with a drying oil-based primer. A light shade of paint is added to it: white, blue or yellow.
- Bee houses can be made from boards of any width. It is recommended to make the walls from the inside from one solid board or from two, which are connected by a tongue or groove. The outer cladding can be made of planks of any size. They should be located at different levels.
- Do-it-yourself beehives are made according to the pattern. Drawings are of paramount importance. Without them, it will be very difficult for the master to imagine what he is doing.
How to keep bees in hives made of polyurethane foam
PU foam structures create good microclimatic conditions for bees. This is especially noticeable during early development in spring. Thus, thermal conditions become a guarantee of high yield productivity. Bee colonies grow strong, they will be able to produce 80–85 kg of honey per colony.
This is despite the fact that for development you need 4-5 extensions per frame 39x24 cm. Reducing families for the winter is not required. To prevent families from swarming in the buildings, it is necessary to create strong layers from them in mid-May, and unite them again in the winter.
There is no need to store honeycombs, protecting them from moths, or collecting dry matter. Every year during the bribe period, strong families freely rebuild more than one foundation building. Of course, this became a guarantee of fast and constant cell updates.
Did you know? Bees
—
one of the most powerful insects on the planet. On rough surfaces they can drag a load that is 320 times their body weight.
How to make a beehive from PPS with your own hands
To make a beehive from polystyrene foam with your own hands, you will need drawings and polyurethane foam boards. For bee houses, a material with a thickness of 50 mm is chosen. The higher the density of the slab, the better the sound insulation and the lower the thermal conductivity.
Penoplex or polystyrene foam is suitable for building a hive. The structure of expanded polystyrene resembles a foam sponge. And penoplex consists of small balls.
It is more convenient to assemble a foam plastic structure with your own hands according to the drawings. This will allow you to correctly calculate the amount of material and economically cut out all the elements.
Preparation of tools and materials
For foam hives, you need to purchase material. The standard size of the slabs is 1.2 m by 0.6 meters. To fix the cut parts you need:
- glue;
- liquid Nails;
- 70 cm self-tapping screws.
To prevent the folds from breaking from the inside, they are reinforced with metal corners. First, the dimensions of the parts are drawn on whatman paper. They are then transferred to slabs. To cut the material you will need:
- meter ruler or tape measure;
- felt-tip pen;
- knife;
- fine-grained sandpaper.
Additionally, the beekeeper will need a fine-mesh metal mesh. It is used to close holes intended for ventilation.
Dimensions
The easiest way is to make a 6-frame hive from polyurethane foam. Experienced beekeepers recommend using Dadanov’s scheme for assembly. If desired, you can make a sun lounger. But a common design is for 10 frames measuring 375 by 450 mm.
For experienced beekeepers, drawings for 16 frames measuring 300 by 435 mm are suitable. This hive provides:
- nesting section 690 by 540 and 320 mm;
- half-frame magazine 690 by 540 and 165;
- cover and bottom 690 by 540 by 80.
These parameters are considered optimal. Moreover, domestic manufacturers produce compact modular houses for insects using similar parameters.
Drawings of polystyrene foam hives
The dimensions of the hive directly depend on its design. You can make a multi-body lounger according to Dadan. To do this, prepare the elements:
- cover 535 by 610 mm;
- strapping under the lid. The front and back are cut 610 m, the sides 535;
- the floor is cut 600 by 375 mm;
- ventilation holes intended for the floor are 200 by 300;
- the rear trim piece is cut 375 mm in length, 130 mm in height and 50 mm in thickness.
In addition, you will need to make side parts 650 mm long and 130 mm high.
Build process
Making beehives from polystyrene foam is carried out as follows:
- drawings are applied to paper, all elements are cut out and transferred to the slab;
- the sheet is cut according to the markings transferred from the patterns;
- the cut parts are polished;
- folds for installing frames are mounted on the parts of the back and front walls;
- finished structural elements are glued together. To strengthen the joints, self-tapping screws are inserted;
- From the outside of the box, recesses are cut along the handle.
The finished box is secured with straps. The belts are not removed until the glue has completely hardened. The cracks are filled with polyurethane foam.
The final stage of work
After two days the glue will completely harden. Then the belts are removed. Ventilation holes are covered with metal mesh. On the inside, the folds are fixed with steel corners. then the hives are painted with façade paint.
Impact on honey quality
How to make a craft from tinsel with your own hands. garland decoration. how to make a Christmas tree with your own hands at home for school or kindergarten
Polyurethane foam itself is an environmentally friendly material. Therefore, it is safe not only for bee colonies, but also for humans, from the point of view of its possible effect on honey.
Numerous studies have shown that polyurethane foam does not emit any foreign chemical elements around itself that can pollute the air or beekeeping products.
But one main feature must be taken into account - low-quality polyurethane foam can emit a specific unpleasant odor. Bees, due to the fact that they are very sensitive to any odors, can react very negatively to such a design.
Therefore, before buying polyurethane foam hives, you need to carefully smell the inside of the products, as the smell accumulates there. If the human sense of smell detects the slightest odors, such products should be discarded. It is necessary to choose those that are truly made of high-quality material.
Also, honey itself and other bee products are prone to the accumulation of foreign odors. Therefore, even if the bees accept such a house, in the future the honey may acquire a subtle smell that is formed inside such a synthetic product.
The use of high-quality polyurethane blanks eliminates these negative aspects.
What is needed to make a mold
To make a polyurethane mold of high quality, you need to make a good matrix. You can read how to assemble the matrix here. You will also need the polyurethane itself for filling the molds, a bucket, a kneading stick (or a screwdriver with a mixer), a plastic spatula (I made it from the lid of a plastic bucket), scales and lubricant. I use BC-M wax release agent as a lubricant. You can also take a soap solution, shake it to form foam and use it to treat the matrix, but personally, I like BC-M better.
And of course, you need a room with low humidity and room temperature. Although, to be honest, I filled the molds at only +5 degrees. Polyurethane is not as fluid at this temperature, but I had no other conditions.
Instructions for creating evidence from polystyrene foam
The quality of the design will directly depend on compliance with the basic rules of construction and assembly. After preparing all the parts, you can begin assembly. Assembly is carried out in a certain sequence:
- along each edge of the wall, cut out a “four”, it is necessary for a tight connection of the fragments;
- We glue the walls with liquid nails and press them tightly together;
- We make the screed using self-tapping screws, observing a step of 9-12 cm, the caps need to be deepened by 6 mm;
- We assemble housings;
- We check for gaps and gaps, if any, fill them with polyurethane foam. If this is not done, light will enter the cracks and there will be a draft in the housing.
At first glance, there is nothing complicated about this, but you need to figure out what is included in the design and what the weight of the finished hive will be. The weight of the finished hive body without frames made of polystyrene foam is significantly lower than that of a wooden hive. Its weight is 14 kg, as a result, a weighting agent is needed for the stability of the hive.
Expanded polystyrene hives consist of the following parts:
- Ten-frame case (435x230 mm) – 4 pieces.
- Roof.
- Bottom – consists of a bottom, a hole for ventilation, a notch, a landing board and a tray.
The pallet is necessary to control wintering and is made of galvanized sheet. Thanks to this device, it is possible to prevent serious diseases in time and detect parasitic insects. During transportation, the pallets are removed so that the bee colonies do not become steamed. After removing the tray, it is washed and disinfected.
When making a hive with your own hands, you need to approach the thickness of the walls very carefully: the front and back walls are 35mm, the side walls are 25mm. Handles are cut out on the side walls for better carrying. The entrance is made with an aluminum valve.
It is better to make a feeder from nomadic mesh, with a cell size of 3x3mm. The roof is done last. For this you can use: plywood, polystyrene foam or wood. After building the hive, it needs to be painted a certain color.
When making a hive with your own hands, you need to remember that polystyrene foam is sensitive to some organic compounds. When gluing parts, you must strictly follow the instructions for using glue.
After making the house, it is left to dry for 24 hours.
If the task was set to make a multi-tiered hive, then before assembling the solid frame, you need to thoroughly wipe all the components. Only after this can you begin to connect all parts of the multi-level structure.
What is the feature
The sides of the case have a smooth surface. Attracts a beautiful white color. Such hives do not require additional insulation, such as pillows.
Most beekeepers recommend using polystyrene foam evidence in the summer, when pollen is actively collected. The entrance in such a hive is quite wide open, which allows air to penetrate inside. In this case, the bees do not feel hot, and they breathe freely in any opening.
During the winter period, or in a humid climate, special bottoms are created that help to establish taphole barriers.
The current apiary does not use various rags, cotton wool or small hand-made blocks to reduce the entrances. They are not practical and difficult to use.
Hive assembly
Assembling a structure made of polyurethane foam is not difficult.
The following should be strictly followed step by step:
- Install the housing with the side wall facing down. The spikes on it will prevent the structure from falling apart.
- To fasten the walls, use self-tapping screws (100–150 mm) and a screwdriver or screwdriver.
- Screw the side wall to the end wall using 4 self-tapping screws. Do the same with the opposite side wall.
- Screw 2 self-tapping screws into the end walls in the center of the tenon on the front and back sides. When fastening, you need to hold the corner firmly.
- Place the lid on top.
- Install frames into the assembled body.
Video: Assembling a hive from polyurethane foam
What is the feature
The sides of the case have a smooth surface. Attracts a beautiful white color. Such hives do not require additional insulation, such as pillows.
Most beekeepers recommend using polystyrene foam evidence in the summer, when pollen is actively collected. The entrance in such a hive is quite wide open, which allows air to penetrate inside. In this case, the bees do not feel hot, and they breathe freely in any opening.
During the winter period, or in a humid climate, special bottoms are created that help to establish taphole barriers.
The current apiary does not use various rags, cotton wool or small hand-made blocks to reduce the entrances. They are not practical and difficult to use.