4
(4)
Contrary to the common myth that orchids are difficult to grow, many gardeners have been successfully collecting these wonderful plants for a long time. If you follow simple rules of care, they will grow well and bloom profusely. But when errors arise in the maintenance of orchids, they immediately let you know about it. One common mistake is overwatering. Fungal diseases develop from excess moisture. This includes mold; it can appear on the roots and in the axils of the leaves. In our article we will talk about why diseases develop and how to deal with them.
Mold
On orchids
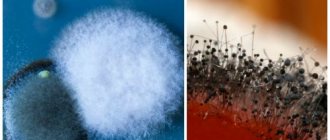
The familiar mold becomes a frequent enemy of orchid lovers. It can be seen on rotting fruits, damp walls, and, even worse, on your favorite plant. It consists of many types of fungi that can spread extremely quickly using microscopic spores.
Mold spreads very quickly.
Most common types
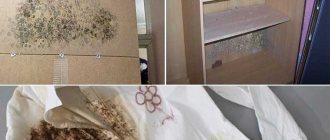
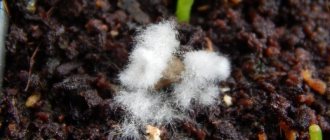
- White mold . In appearance it looks like fluffy lumps of medical cotton wool;
- Blue mold . Settles in islands, fluffy.
This fungal disease can affect all plant organs and even the substrate. So you can find mold on flowers, leaves, stems and bark.
Reasons for appearance
Mold appears on orchids just like on any other object. The fluffy coating spreads over everything that is accessible to it. Spores necessary for reproduction may be present in the substrate or in the air. The most optimal conditions for this are humidity and warmth.
Mold is easy to see with the naked eye. A clear sign that will help distinguish one species from another is color.
Most often, troubles with plants occur as a result of improper care . It is known that mold requires moisture and heat to spread. Such conditions are fundamental for the development of almost everything:
- parasites;
- fungal diseases;
- infections;
- viruses.
Attention! If you do not allow the substrate to dry well and do not monitor the temperature, the consequences will not be long in coming.
Mold itself does not harm the plant. She is a saprophyte, which means that she feeds on decaying organic matter, that is, she will not touch a healthy plant. In this case, she can warn that rotting and other diseases that will be much more difficult to treat are so close.
If mold appeared on the plant first, and not any of the above, then this can help prevent more serious orchid ailments.
Blue mold in the substrate
Through a transparent orchid pot you can see not only the state of the root system, but also the substrate. You can also find mold on it but not white, like on plant organs, but blue . Too much watering and high humidity provoke the spread of the disease.
In addition to errors in maintenance, mold can appear due to the fact that there were initially spores in the bark , which sprouted during normal watering.
Mold can be easily seen through the sides of a transparent pot.
Let's figure out how to get rid of mold in a pot of orchids. If there are very few blue islands, then you can try to let the substrate dry thoroughly ; you may not have to replant the plant. If there are a lot of them, then you cannot do without replacing the substrate:
- The orchid needs to be pulled out of the pot, the old bark removed, and the pot rinsed;
- The roots of the plant can also be washed under running water at a temperature of approximately +35 degrees;
- In order to prevent the spread of mold, the bark should be subjected to heat treatment before planting the plant in it, and also monitor the temperature and humidity in the room.
Always boil the bark for a few minutes when planting orchids, whether homemade or store-bought. This reduces the risk of future appearance of fungal diseases and pests whose eggs could be in the substrate.
Why does a plant get moldy?
The most optimal conditions for mold to grow are warmth and humidity.
Most often, trouble occurs due to improper care. In this case, the plant weakens and its immunity decreases.
Very often, gardeners themselves provoke the appearance of mold on orchids:
- abundant watering and frequent heavy spraying if the flower is in a hot room;
- flower pots stand very closely, preventing the free movement of air between plants;
- the pathogens were brought from the store along with the substrate.
Defeat
Leaves
The leaf blade is most often affected by white mold. If white mold is found on orchids - what to do?
- First, you need to arrange watering . Since such a disease has already appeared, then excess moisture is clearly present.
- In addition, you should pay attention to spraying , perhaps it is too frequent.
- It is possible that the air in the room is simply too humid, which harms not only plants, but also human health. In this case, it is necessary to regularly ventilate the room or even resort to using a special dehumidifier.
In order to remove some of the spores and the fungi themselves, it is recommended to treat the leaves with a solution of copper sulfate.
Copper sulfate solution: dissolve 1 teaspoon of copper sulfate in two liters of settled water. Wipe the leaves with a cotton swab or spray, but not often, otherwise it will still be damp.
Particular attention should be paid to the axils of the leaves and avoid stagnation of water in them.
Attention! Favorable air humidity for keeping orchids is considered to be 50-70%, and the optimal temperature for all varieties: from +18 to +23 degrees during the day, from +13 to +24 at night.
Roots
It is much more serious if the mold spreads to the root system. If this happens, then you need to immediately carefully remove the plant from the pot to assess the scale of the problem. The roots are washed under running water, the temperature of which is +35 degrees, and soaked in a fungicide solution , in a ratio of 1 to 6, for 15 minutes.
If rot or soft areas are found on the roots, it is necessary to remove these fragments using a sharp, disinfected blade, and treat the cut areas with crushed activated carbon or cinnamon.
Rotten roots must be cut off.
In order to prevent mold from appearing again, it is better to change the substrate , as there may be spores in it, and also wash the pot. Old bark should be boiled for a few minutes so that it can be safely used in the future.
Peduncles and buds
If the plant is already affected by white mold and has flowered, and the old buds and flower stalks have not been removed, then the fungal disease can begin to spread from them. In this case , you just need to promptly remove dead parts of the plant so as not to provoke the appearance of mold.
Whole plant
You can see mold on a healthy peduncle only if the entire plant has already been captured. Since it has already spread throughout the entire orchid, there is a very high risk that some part is rotting. First you need to pull out the orchid to inspect it, remove excess, then rinse with fungicide. The substrate must be replaced with a new one.
In case of severe rot it is better to remove the flower stalks , since the orchid is now in a painful and weakened state, and flowering requires a lot of effort. After the plant is returned to the washed pot, you should again think about the correct maintenance and understand the reasons for such a rapid spread of the fungus.
Prevention
Preventive measures against the appearance of mold in flower pots should be taken at the stage of plant transplantation. Proper and sufficient drainage is extremely important. Holes should be made at the bottom of the pot through which excess moisture will escape. It is recommended to dry the soil in which the orchid grows before the next watering. For irrigation, you should use settled water.
It will be useful to water indoor plants once a month with a pinkish (weak) solution of potassium permanganate. The room temperature should not exceed or fall below 22-26 degrees. Sudden changes in temperature can also trigger the development of fungal colonies on the soil and on plants.
In order not to miss the moment when the first signs of orchid disease appear, you need to regularly examine all visible parts of the plant and begin treatment at the first sign.
What can cause white blossoms?
The main factor for the active spread of fungus on an orchid is too high air humidity and too intensive spraying. For some types of orchids, such as phalaenopsis, foliar irrigation is completely contraindicated. For many other species, spraying is indicated only for the root system.- The second factor is very intensive watering . If there are not only signs of a flower being damaged by a fungus, but also rotting of the roots or the stems themselves, then it is necessary to limit the amount of watering (we talked more about whether it is possible to save an orchid from rot and what are the reasons for its appearance here).
It is necessary to water the orchid only when the entire substrate is dry. Watering is done by immersing the pot in water for about 30 minutes.
- The third factor is too cold or too hard water . It is advisable to water the orchid with bottled or rain water, allowing it to settle first. The water should be at room temperature.
- The fourth factor is stagnation of moisture in the core or axils of the leaves . To avoid this, after spraying and watering, be sure to remove water from the axils of the leaves or from the core of the rosette.
- The fifth factor is where the flower lives is too high If the heat is combined with high humidity, the fungus on the orchid will not take long to appear.
- The sixth factor is dead leaves and flowers not removed in time . From them, the fungus can first infect the soil, and then the entire plant.
How to fight with folk remedies?
At home, chemicals can be replaced with products prepared according to folk recipes. The most common of them:
- Ash infusion - 1 kg of ash is dissolved in 10 liters of water at a temperature of +30 ° C and left for 5 days. Then the liquid is filtered and diluted with liquid laundry soap. The resulting drug is used to treat fungal diseases. The plant is treated 3 times with an interval of 1 day.
- Whey - the product is diluted with water in a ratio of 1:10. Spraying is performed to prevent fungal infections once every 14 days.
- Infusion of horsetail (100 g / 1 l of water) - the drug is used to treat powdery mildew.
- Potassium permanganate solution (2 g/10 l of water) – treatment is recommended in an amount of 3 times.
White roots (plaque) on an orchid, what to do, reasons
Beginning orchid owners are sometimes intimidated by the sight of white roots. In most cases, discoloration is normal. But this does not always happen; a whitish coating can be a sign of a disease. We will tell you how to correctly determine the state of the root system in our article.
What healthy roots should look like
The structure of the underground organs of an orchid differs significantly from most plants. Associated with the biological characteristics of the integumentary tissue, which is called velamen .
Velamen are a collection of spongy, hollow cells that can absorb nutrients from the air, rather than from the soil, like most plants.
Under natural conditions, it receives moisture from rain, dew, and fog. Its other function is to protect the orchid from burns and overheating.
A. S. Karavaeva “Beautiful and mysterious orchid”, magazine “World of Orchids”, No. 3, 2015.
In addition to moisture and useful elements, orchid roots need light for normal growth, so they are planted in flower pots with transparent walls. This allows you to monitor the condition of the root system. In particular, by changing the color, you can determine the timing of the next watering:
- If the orchid has enough moisture and feels normal, its roots will be a bright green, uniform color.
- The appearance of a light whitish coating indicates a lack of water in the substrate . By changing the shade on the surface of the roots, the plant signals the need for watering.
Appearance of a healthy orchid root system: 1 – You can wait with watering.
2 – Watering is needed urgently.
The color of healthy orchid roots may slightly change the shades of the white cover from grayish to slightly silver. This is due to growing conditions, the state of the substrate, the quality of water for irrigation, and the composition of fertilizers. If the color becomes different, it does not necessarily mean that it is sick. But it is quite possible that his well-being is at risk.
How to distinguish between healthy and diseased roots
Sometimes it is difficult to determine which root is alive and healthy and which is old and diseased. One way to help deal with this is watering.
- After the next irrigation session, full-fledged, well-functioning roots become green. Although before this, the velamen changed its color to white.
- If the underground organ does not function normally and cannot absorb moisture, its color remains the same, without changes. It is better to remove such shoots. If after watering the roots do not change their white color to a green tint, then their condition is unsatisfactory and they need to be removed.
Reasons that lead to unhealthy white roots
Important! The unhealthy state of white roots is indicated not only by color, but also by the density of plant tissue
Full-fledged processes have a regular cylindrical shape, the same diameter along the entire length, and good flexibility. If the roots are affected, they swell or shrink partially or completely. If you bend them, they break easily.
The following circumstances can lead to this type:
- Lack of moisture in the substrate and low air humidity, less than 50%.
- Poor lighting , for example, sudden changes in scorching sun and shadow. This phenomenon is typical for the western and northwestern sides. There is shade in the morning, and direct sunlight in the afternoon. Without additional shading, the orchid will suffer.
- A low quality substrate cannot provide the plant with nutrients in full. The roots are the first to suffer from a lack of useful elements. Most often, underground organs become diseased in depleted soil mixtures, those that are more than three years old. During this time, the substrate overheats and cakes. Aeration is disrupted, the roots do not have enough air, they suffocate and cannot work normally.
- The orchid has outgrown its flower pot . It looks as if the roots are ready to leave their assigned place of residence. A tangle forms in the pot, and aerial roots grow in dense bunches. It is quite obvious that the substrate cannot cope with providing nutrition and some of the roots die off ahead of time. A white coating can appear when the roots have not significantly outgrown their pot.
- Natural aging of roots also leads to discoloration. For different species and varieties, this process has different timing. For example, in phalaenopsis, gradual death occurs after 2-3 years. This is one of the criteria for the frequency of plant replanting, including for root inspection.
- Watering orchids with hard water. This is one of the common mistakes made by orchid lovers. We'll tell you in more detail how to fix it.
Whitish coating on orchid roots from poor quality water
Many of us are familiar with the problem of the formation of white limescale on plumbing equipment due to high water hardness.
The same crystallization occurs on the surface of the roots if they are watered with liquid from a water tap.
When evaporating, the salts contained in the water turn into a solid chemical state and form a strong, impenetrable crust of white, gray or yellowish color. The shade depends on the composition of the water.
To prevent the damage that hard water can cause, it must be properly prepared for watering orchids.
How to improve the quality of hard water
| Stand up for | Tap water is kept in an open container for several days. During this time, heavy substances will sink to the bottom, and water will combine with air molecules. |
| Filtration | After settling, the water must be filtered. This must be done carefully, without stirring up the sediment that has settled to the bottom. |
| Freezing | The freezing and thawing process brings tap water closer to rainwater. |
| Chemical hardness reduction | Using food acids. To prepare irrigation water for orchids, use: · oxalic acid, at the rate of ¼ teaspoon per 10 liters of water · Citric acid - powder on the tip of a knife per 1 liter of water. |
White plaque on the roots of an orchid can form from hard water.
The formation of plaque on roots does not happen overnight; it is a long-term process. First, the substrate becomes salinized. When the accumulation of substances becomes too concentrated, the deposits affect plant tissue.
Drying of aerial roots
If the roots growing above the substrate turn white and dry, most likely this was due to mechanical damage . They occur during transplantation or careless movement of the plant. The aerial root does not always break completely.
It may be partially damaged and this is not immediately noticeable, because the broken piece of the root does not fall off, but is held quite firmly. But the movement of nutrients is disrupted, and the vessels cannot supply the plant with nutrients in full.
Root tissues gradually die, the first signs can be noticed after about 7-10 days.
Another reason for drying out is insufficient watering..
Since aerial roots are located above the substrate, only evaporated moisture reaches them from watering. Its amount is much less than that received by the roots in the substrate.
If watering is carried out rarely, then the structure of the surface tissue is disrupted due to drought. And over time, irreversible processes occur, and the roots dry out completely. In this case, it is no longer possible to restore them, you will only have to delete them.
What to do with white dry roots
Such roots must be cut off. If there are a lot of them, then after the operation the plant needs to be replanted. To do this you need:
- Remove the orchid from the pot and free it from the substrate. Wash off small particles of soil mixture with a stream of warm water. After this, you can objectively determine the condition of the underground and aerial roots.
- whitened, dry or damaged shoots to living tissue . This operation is performed using instruments that have been previously disinfected. After each cut, the blade of a knife or pruner is treated with alcohol so that the infection is not transmitted from the damaged tissue to the healthy part.
- After trimming the orchid, leave the cuts to dry ; this can take from half an hour to two hours. The duration differs depending on the conditions - temperature and humidity.
- Dried sections should be sprinkled with an antiseptic - crushed, activated carbon or finely ground cinnamon. These substances have disinfecting properties.
- After pruning and processing, the orchid can be replanted . To do this you will need a new pot and fresh substrate.
Important! The pot and substrate must be treated in advance to destroy possible pathogens and pests.
- After transplantation, the orchid is quarantined. For some time it should arrive separately from other plants until it undergoes adaptation after surgery.
- After the quarantine ends, the orchid can be added to other plants. Provided that an environment is created that does not cause damage to roots and ground organs.
Source: https://orchidea.pro/chto-delat-esli-u-orxidei-belye-korni-nalet/