Many housewives are wondering how to remove fungus in the bathroom, because mold on the walls is a common occurrence in rooms with high humidity levels. Such a problem not only spoils the appearance of the bathroom, but also creates a danger to the health of residents, because regular inhalation of fungal spores can cause an allergic reaction or even harm the respiratory system.
There are several effective ways to remove fungus from the bathroom.
What are the different types of fungus?
Quite often, dark marks appear on the walls of the bathroom at high humidity levels, which some housewives mistakenly confuse with dirt. In this situation, the cause of the appearance of such spots is the activity of pathogenic microflora.
The formation of plaque in different parts of the room is associated with the proliferation of certain types of microorganisms. In order to find an effective remedy against microorganisms, you should consider them in more detail.
Most often, fungal activity is observed on the walls from above, from where the stains spread to the ceiling
Table 1. Types of fungus.
| View | Description |
| Sineva | Such bacteria prefer to spread on surfaces made of natural wood, so they can be found in log houses and other buildings made of this material. However, bacteria do not spread on the concrete walls of apartments, as well as in the case of a bathroom or sauna decorated with wood. |
| Rot (white, brown) | Such bacteria also settle in natural wood, causing damage to its structure, which leads to destruction. It is almost impossible to get rid of such destructive effects, so even at the stage of construction, conscientious craftsmen treat the material with an antiseptic. |
| Black mold | This is the most dangerous type of pathogenic microflora, which is characterized by the appearance of a dark coating on the surfaces of not only wooden, but also concrete floors. In addition, mold often settles on tiles. The danger is that black fungi spread quickly, so you will have to deal with them immediately. |
When studying black mold in detail, you will notice that the smallest fungi grow deep into any surfaces
Step by step: Complete grout replacement
Replacing old grout is the most effective option. It will work regardless of the reason why the seams turned black. Below we have described everything step by step.
1 Removing old composition . In addition to the mechanical method, there is a chemical method, which is used for cement grout: apply an acid cleaner to the surface of the joint with a thin brush and carefully remove after softening. Use a vacuum cleaner for 100% cleaning.
2 Selection of composition . Cement grouts are an easier option to work with; they are quickly removed when replacing, but are less durable in a humid environment. Epoxy - durable, resistant to moisture, more expensive and hardens faster.
3 Color selection . Make sure that the shade of the grout matches the color of the tile: for light tiles, compositions of white or a similar color are suitable, for the floor it is better to take a dark shade, and bright grout can be used for the smoothest surfaces (bright colors emphasize defects).
4 Applying grout . Dilute the mixture according to the instructions. Mix well (preferably with a hammer drill or a drill with a spiral whisk attachment). Start work from the top of the area. Apply the compound across the seam with a spatula, and then along the seam, pressing it inward. Immediately remove excess composition. When the mixture has set a little, press down to level it in the seam and remove what has been squeezed out. Wait for the seams to dry (24-48 hours), then go over them with fine sandpaper.
5 Application of protection . After a week, cover the seams with a water repellent, fungicide, sealant, or any polymer composition, having previously sealed the edges of the tile with masking tape. Do 2 treatments a day apart, this will double the effectiveness of protection.
Danger of mold and mildew
Any fungi primarily destroy the ceiling, because they actively grow into the deep layers of the material. This not only provokes peeling of plaster and paint, but also cracks.
Having settled on the walls, colonies of protozoa absorb lime, which is why their number increases
If appropriate treatment is not carried out in time, the possibility of wall collapse cannot be ruled out. Of course, this only happens in exceptional cases, when there are too many colonies.
Another trouble is that fungi provoke the occurrence of various diseases. This category includes the following:
- fungal infection of the skin;
- headache;
- respiratory diseases;
- disorders of the gastrointestinal tract;
- diseases of the musculoskeletal system.
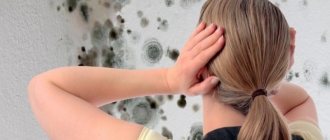
Note! If such a problem is left uncontrolled, the active spread of fungi will eventually lead to incurable disorders of the liver, respiratory tract and other vital organs of the household.
Pathogenic flora poses a great danger to people with weak immune systems, and in particular to elderly and seriously ill people and children.
Mold on walls causes severe allergies
Find out what to do if the windows in your apartment sweat from the inside, and also read about folk remedies in a special article on our portal.
How to prevent fungi
It is worth noting that there are mold spores in any room, but they begin to spread only in the presence of a favorable environment - humidity above 28% and temperature above 19 degrees.
Measures to combat this problem primarily involve eliminating humidity, because in a dry room, even in the presence of high temperature, pathogenic flora does not show activity.
Preventive measures include the following:
- Normal ventilation must be ensured. So, in any multi-storey buildings, as a rule, there is a special ventilation duct. Over time, it becomes clogged and stops performing its functions, so cleaning is required. If desired, you can install a fan or air conditioner. However, even if you take into account good ventilation, you should regularly ventilate the bathroom (especially after water procedures or washing).
It is necessary to periodically check the proper functioning of ventilation
- The pipes should be promptly wiped to remove accumulated condensate. This is why many people prefer to install plastic pipes instead of metal ones, because they are resistant to leakage and are less likely to be covered with fumes.
- Attention should also be paid to containers where brushes, various creams, powders and other hygiene products are stored. If wet jars and bottles are placed in a container, water accumulates in them, which can also cause the formation of fungi.
It is not recommended to dry clothes in the bathroom, because this is what causes the rapid growth of fungi on the walls
- During repairs, it is necessary to use specialized components for plaster that repel moisture.
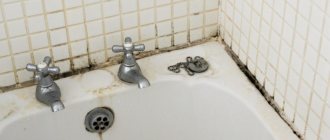
Blackness between seams
It is much more difficult to remove blackness in the bathroom in the seams between the tiles. Initially, you should try to clean them with a soda solution and a used toothbrush.
What you will need:
- a screwdriver (or a similar tool with a “spatula” working surface to match the width of the seams);
- table vinegar, soda (sodium bicarbonate), chloride preparation (whiteness, for example);
- sandpaper;
- a toothbrush with stiff bristles;
- narrow brush;
- grout.
The procedure for removing blackness in the spaces between tiles can be carried out in different ways.
Getting rid of mold and mildew
If mold has already appeared on the walls, then preventive measures will not help. Here you will need to use various mechanical, folk and chemical methods of control.
Types of mold
Getting rid of fungus mechanically
Many housewives, having discovered a black coating on the walls, try to remove it with a spatula. In order for this to be effective, certain nuances will need to be observed:
- The first step is to wet the stains with clean water - this will stop them from further spreading through the air.
- Then you will need to take any scraper with coarse sandpaper and carefully sand the surface. If necessary, you can remove the top layer from the ceiling using milling equipment.
Mechanically it will be possible to remove minor accumulations of fungus
In advanced situations, even such measures are not enough, so you will have to do a global repair, which involves the following:
- Removing the top covering from the wall, because mold can be under wallpaper or tiles.
- Cleaning the ceiling from the layer of lime and paint.
- Dismantling the floor covering.
When carrying out major repairs, the walls must be treated with a disinfectant. Moreover, such substances should be applied to all floors, even in places where mold does not spread.
Mold on the tiles in the bathroom
Note! For efficiency, the floors are treated at least three times in a row, following the drying steps. Only then is it permissible to apply finishing plaster.
Painting
Painting the joints between the tiles will help in two cases:
- The grout has turned black due to age or exposure to light;
- The dirt has embedded itself deep into the seams between the tiles.
Painting will not help against fungus and mold. Unless you first clean them and treat the surface with fungicides.
Suitable for cement-based grout:
- Acrylic paints “Fuga Fresca”, “Pufas Frishe Fuge Komplettset”;
- Polyurethane based paints (for concrete only);
- Latex paints (perform well under large temperature changes and do not crack).
All of the above paints have excellent adhesion and are abrasion resistant. When applying, follow the manufacturer's recommendations.
Water-based paints . Such compositions have a lot of advantages: environmental friendliness, high adhesion, affordable price, large selection of colors, quick drying. However, they are sensitive to moisture and wear out quickly, so they can be a temporary solution or followed by treatment with sealant, varnish or other transparent coating.
Markers . The optimal choice for small areas of contamination with the following advantages:
- Quick application and drying;
- Resistance to moisture;
- Environmental friendliness;
- Ease of use.
This option is acceptable if the length of the seams for cleaning is 5-10 m. Please note: use acrylic-based markers . This is an analogue of acrylic paint, but more convenient to use.
Advice
When choosing a paint composition, carefully study what surfaces it is suitable for. Please choose your color carefully: it may differ slightly from that stated by the manufacturer. A win-win option is white (refreshes, harmonizes with any color) or very dark (gives originality).
Removing fungus using traditional methods
The spread of fungi on the surface of walls is a long-standing problem. Since chemicals came into use not so long ago, people used time-tested folk recipes. They do not lose their popularity today, so we will take a closer look at these methods.
Using copper sulfate (copper sulfate) - step-by-step instructions
This is a budget product that anyone can purchase at a gardening store. Copper sulfate is crystals that are diluted with liquid (at the rate of 150 grams per 10 liters ).
Step 1. First, you need to mechanically clean off any remaining mold on the walls.
During the work, you can use any scrapers, spatulas
Step 2. Now you should dissolve a piece of laundry soap in water and treat the surface with it, after which the wall should dry for 24 hours.
It is recommended to use no less soap 72%
Step 3. It is necessary to pour a solution of copper sulfate into a volumetric spray bottle and treat the floors with it.
The surface must dry for 5-6 hours, and only then the treatment is repeated
Note! In order to increase the effectiveness of the home remedy, you can add a little acetic acid to the copper sulfate solution. The procedure is repeated up to five times (this depends on the degree of fungal damage).
Using vinegar - step-by-step instructions
Acetic acid is a substance that can be found in every housewife’s kitchen, because it is actively used for cooking. In addition, vinegar has a good antiseptic effect, which is why it is used when treating walls against mold.
The only disadvantage of this method is the pungent smell of the bite, so during the treatment process the windows are left open and the respiratory system is protected with a respirator.
Step 1. It is necessary to treat areas of the wall with a black coating using vinegar. For such purposes, you can pour the product into a spray bottle. The tiles are wiped with a sponge soaked in acetic acid.
After treatment, the surface is left for 4 hours until completely dry.
Step 2. After some time, remove any remaining plaque using a spatula or a hard sponge.
After which the walls must be washed with clean water and a sponge.
Note! Sometimes, after treating with vinegar, unsightly marks remain on the walls, so you will have to paint or plaster the ceilings.
Other Home Remedies for Mold
There are other, no less effective means for surface treatment based on fungicides.
Table 2. Popular folk remedies with an antiseptic effect.
| Remedy, illustration | Description |
| Hydrogen peroxide | This is a common antiseptic that can be purchased at the pharmacy. Its advantage is the absence of toxic compounds and unpleasant odor. When using, keep in mind that this substance has bleaching properties. |
| Ammonia | This product is best suited for removing plaque from hard surfaces (tiles). Ammonia is first diluted with water and then applied to the affected surface with a sponge. Its exposure time is 3-4 hours. Then the composition must be washed off with clean water. |
| Technical (soda ash) | This is one of the most effective folk remedies. First you need to add a few tablespoons of soda to clean water, and then pour it into a spray bottle and spray the wall. If there are dark spots, apply baking soda paste to their surface. After a few hours, you should wash off the remaining soda. |
| Tea tree oil | This is a product of natural origin, which is also diluted with water and then applied to the walls. The oil quickly destroys even large colonies of fungi. However, after applying it you should not go into the bathroom for 10 hours, so it is better to treat the walls before going to bed. |
| Creosote | This is a liquid product with a pungent odor, which contains birch tar. Apply it to smooth concrete, brick walls, tiles for several hours (pre-dissolved with water). Then you should wash it with a sponge and soapy water. Natural wood should not be treated with this product, otherwise the creosote will be absorbed into its structure. |
| Anthracene oil | This product is obtained by processing coal. It removes existing traces of mold and prevents the appearance of new ones. |
| Sodium tetraborate | These are minerals of natural origin that cope well with mold even in deep layers. It is necessary to mix these crystals with water until a thick mass is formed. After which this mixture should be applied to the walls in a dense layer. When the surface dries, you should not wash off the composition; you can only clean the protruding areas with sandpaper. In order to prevent the formation of fungi, this product is diluted in a large amount of water and then sprayed on the walls. |
| Mothballs | These balls should be placed in the corners of the bathroom - they prevent the formation of mold. |
| Iodine | You need to prepare several glasses of clean water and add iodine there. After which these glasses are placed in different parts of the room. Volatile iodine vapor allows you to destroy fungi that collect in the air. However, they have a negative effect on metal, so they are not placed near metal shelves and other objects. |
Note! For greater efficiency, many housewives prefer to combine products. For example, you can add vinegar and hydrogen peroxide to soda.
Video - How to clean the grout between tiles in the bathroom
Household chemicals
If traditional methods do not help, it’s time to move on to household chemicals. You can buy special products at a hardware or construction store.
Oxygen bleach.
Bleach is based on sodium percarbonate, it copes with different types of mold: brown, yellow, black. With its help, you can remove fungus from curtains in the bathroom and tile joints. Dissolve 12 teaspoons of bleach in a liter of warm water, wet the surface with the solution and leave for an hour. Then clean the surface with a brush and wash away any remaining mold.
White.
Whiteness will help in the fight against black mold, one of the most toxic types. Apply the solution to the surface and leave for 10-15 minutes, rinse with water. Please note that the product cannot be left on painted surfaces for more than five minutes, otherwise the picture will fade.
Anti-mold chemicals
If there are a large number of fungal colonies on the walls, then it will be difficult to manage only with folk remedies. Only professional cleaning products can cope with such a task. Since manufacturers offer us many options, we will look at the most effective ones.
Table 3. Effective store-bought mold remedies.
| Remedy, illustration | Description |
| MILKILL | This is an antiseptic, which contains components of natural origin, so it is completely safe for the health of residents (as the manufacturer claims). The product is an emulsion that copes with fungi even in porous materials, so the substance is also used for treating wood. "MILKILL" is often used for the purpose of preventive disinfection of various surfaces. |
| ISOCIDE | This is a whole series of preparations used to treat concrete, ceramics and any smooth surfaces against mold. The walls are treated with the substance before painting, so you can use ISOCIDE if, as a result of the formation of fungus, you had to make repairs again. |
| Well Done | An effective antifungal drug that quickly destroys large colonies and prevents their development. It is used with equal effectiveness on smooth concrete, brick walls and wood. |
| Savo | This is a special spray designed to remove mold in rooms with high humidity levels. The manufacturer guarantees the removal of all pathogenic microflora after the first two uses. Another advantage is that the product does not have to be washed off. |
| Dali | A watery antiseptic that removes fungi from any surface, including wood. This substance is contained in most paints (they are intended for kitchens and bathrooms) from the same manufacturer. |
Prices for various types of Dali universal antiseptic
Universal antiseptic Dali
Video - How to remove mold in a couple of seconds!
Bathroom ionization
Another effective way to treat a room against fungus is to use an air stream saturated with ions. It is impossible to do this without instruments, so the sanitation is carried out by specialists.
If the main part of the wall is affected by fungi, it becomes difficult to cope with the problem on your own, so it is better not to waste time and contact the company’s specialists who are involved in the treatment.
However, you can purchase an ionization device for your own use. True, a household ionizer will not be as powerful as a professional one, but it can be used regularly (for example, turned on and left at night).
The household ionizer has compact dimensions
Prices for popular ionizer models
Ionizers
Safety precautions when treating a room for mold
Any procedures for removing mold from the surface of walls are considered unsafe for health, because spores are easily transferred to human skin and then provoke diseases. In addition, during chemical treatment, caustic alkaline components are used, which also have a negative effect on the condition of the skin.
To protect yourself from harmful effects, it is recommended to use the following:
- durable rubber gloves for hands;
- respirators that protect the respiratory system;
- plastic glasses.
During cleaning, various protective equipment should be used, and upon completion of the process they should be disposed of.
Since during the cleaning process you have to scrape off the dark deposits from the walls with a spatula, dust settles everywhere. Therefore, it is recommended to first remove glasses, hygiene products and other small items from the bathroom. It is better to cover large items with thick oilcloth.
In addition, no strangers, children, or pets should be present in the room during cleaning. After completing the procedure, you should not enter the bathroom for several more hours.
At the same time, we recommend reading the article on the topic - How to clean a toilet from urinary stones, where you will find step-by-step instructions for cleaning the toilet, as well as practical tips for care.