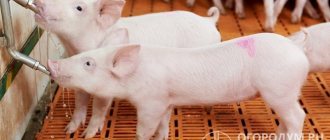
It is unlikely that anyone will argue with the statement that domestic chickens need constant care. And special attention should be paid to watering the bird, since water is vital for the normal functioning of all metabolic processes in the bird’s body.
Proper organization of watering for chickens is no less important than feeding and setting up a chicken coop or nests for laying hens, because the well-being of the livestock depends on this.
You can buy drinking bowls for chickens in many specialized stores, but why do this if the same drinking bowl can be made from scrap materials?
Why is a good waterer important?
Most farmers face a certain list of problems when watering poultry. Chickens often turn over containers of water that are too light , trying to stand with their feet on them.
The water spills onto the ground, so the livestock owner has to refill it.
As a way out of this situation, it would be possible to use heavier drinking bowls, but they need to be filled with too much water. Chickens are physically unable to drink such a large volume of liquid, so the water stagnates and spoils . After just a day, it should not be given to birds, otherwise they may get sick.
There is also a problem with chickens jumping into drinking bowls. Particularly active individuals often try to squeeze through other chickens to get to the water. At the same time, they can easily step into it with dirty feet. Dirt immediately reduces the quality of water , so it needs to be changed.
In winter, the water in open drinking bowls freezes . Thus, the birds cannot satisfy their water needs. The farmer often has to break the ice or supply new water.
All the problems listed above can be solved once and for all by nipple drinkers for chickens. They significantly reduce water consumption and are also very convenient to use.
Primary requirements
It doesn’t matter what breed of birds are raised, when making drinking bowls you need to follow some rules
Harmless materials. When making a structure from metal elements, you need to know that they come into contact with certain medications and create chemical compounds that are harmful to the health of the bird. In addition, all sharp parts must be processed to avoid injury to the birds.
Pure water. Open drinking bowls often harbor various microorganisms, which ultimately contributes to the development of infections. Designs with an insulated container will help avoid this.
Reliability and stability of the structure. Drinkers must prevent access for unauthorized animals and birds and withstand their pressure.
They must also be resilient. Otherwise, when it turns over, water will flow out of the device, as a result, the birds will remain unwatered, and dampness will develop in their location.
- How to make a cold smoked smokehouse - various options and detailed instructions on how to make it yourself! (Photo and video)
- Form for paths - is it worth using and why?! Find out the answer to this question in the review and see the instructions for working with the form in the photo.
- Do-it-yourself water supply at the dacha - how to do it correctly and everything you need to know for proper water supply (photos and videos)
Before you make a drinking bowl, you need to decide on its suitable design.
What is needed to make a nipple?
At first glance, it may seem that drinking bowls of this type are complex devices that cannot be assembled at home. In fact, it turns out that even in the conditions of a dacha it is possible to build workable mechanisms.
To make them you will need:
- screwdriver or drill with a 9 mm drill diameter;
- square pipe for nipple drinking, 1 m long and dimensions 22x22 mm;
- nipples 1800 and 3600;
- pipe plug;
- roulette;
- adapter from round to square pipe;
- drip eliminator;
- micro cup drinker;
- long flexible hose;
- water tank.
Each homemade nipple shelf consists of the elements listed above. The 1800 nipple only works when moving up and down, so it is suitable for watering adults. As for the 3600 nipple, it can work in any direction, which allows it to be used for watering chickens.
The photo below shows some elements of the nipple drinker:
Elements of nipple drinker
We do it ourselves
There are no issues with purchased drinking bowls. I selected the one I needed, bought it and installed it according to the instructions for the product. But, often, beginning poultry farmers simply do not have enough money. Or the poultry population is not large enough to install watering systems like on large poultry farms. Find out about Iodinol for laying hens here.
If you spend just a little time and labor, you can make some popular types of drinkers yourself.
First, you need to know what they are:
- Vacuum. The principle of its operation is the difference between atmospheric and water pressure.
- Siphon. The principle of operation is very similar to a vacuum one, but a siphon is used to avoid spillage.
- Nipple drinking system. A popular type of supplying water to living creatures, where liquid is supplied drop by drop through nipples.
- Float The principle of its operation is similar to the mechanism in the toilet. When a sufficient amount of water is collected in the drinking tank, the valve shuts off its supply.
- Regular. To do this, use any available containers. Bowls, trimmed barrels, plastic bottles cut along car tires. This drinking bowl is filled with water using a bucket or hose from the water supply.
A regular drinker is also called a drinker for lazy poultry farmers. Its advantage is that you do not need to spend time and money on production. The disadvantage of this type of watering is the frequent overturning of the container by birds, as well as contamination of the water in it with their paws. In a closed room, excess moisture appears due to constant liquid spills. This often leads to illness in birds.
Vacuum
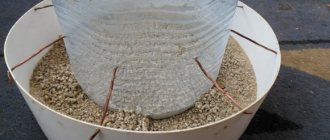
In vacuum drinkers, water is supplied by changing pressure. The simplest solution is to take a full liter or three liter jar of water (depending on the number of young animals) and turn it upside down into a bowl. Young Cornish, Brown Nick and other breeds will drink water from a bowl, and the level in it will be replenished by water in the jar. But such a shaky structure can tip over if the bird stands high, for example, on top of a jar. Therefore, it is necessary to make something more sustainable. To do this you will need two plastic bottles, but of different sizes. Preferably a five-liter flask and a two-liter one. Or a liter container. Step-by-step installation:
- Cut off the part with the cork from a larger bottle. That's about a third. In the future, the workpiece will serve as a bowl;
- Then turn the smaller bottle over and insert it, with the cork down, into the resulting bowl;
- Drill two holes in both covers with an 8 mm drill, and tighten them with two bolts, screwing on the nuts;
- In a smaller, upside-down bottle, drill a hole approximately 10 cm from the cork. The main thing is that it should not be higher than the edge of the bowl from a large bottle;
- Then fill a smaller container with water up to the drilled hole, screw the bowl on top and turn it over.
Water will begin to rapidly flow through the hole. When the bowl is completely filled, the liquid will stop pouring. As soon as the birds drink a certain amount of water and its level decreases, water will again fill the bowl through the hole from the smaller bottle.
This bird watering device must be securely mounted on the wall so that the chickens cannot knock it over. This can be done using rings rolled up from wire, which will be the same in diameter as a flask. The rings are attached to the wall and hold the device. From such a drinking bowl you can always see how much water is left inside the container and poultry will never be left without drinking. Read about the description of the Manchurian quail breed here.
Nipple
Most poultry farmers use nipple devices for watering their livestock.
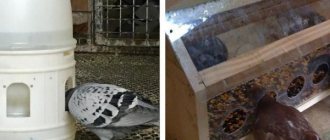
True, you will need to buy nipples for this. If there are few chickens, then you can install drinking bowls on liter bottles. That is, drill a hole in the bottle and screw in the nipple. Attach the drinking bowl to a post in the chicken coop. But if the livestock is large, then bottles will not help. In this case, a metal-plastic or plastic pipe is used.
Pipes for nipple drinkers are purchased at the rate of one linear meter per 4 laying hens.
Installation sequence:
Holes are drilled in the pipe (every 25–30 cm), having previously compared them with the diameter of the nipples. The holes should be slightly smaller. A plug is placed on one side, and any water tank is attached to the other, using a plumbing elbow for the transition.
Such a device cannot be attached to the water supply without a pressure regulator.
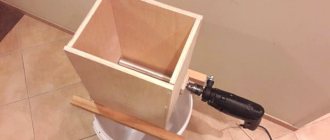
Made from PVC pipes
Drinkers made from PVC pipes are easy to use, reliable, and easy to make yourself. To do this, you will need a 1.5 - 2 meter plastic pipe with a diameter of 15 cm. A plug is installed on one side of it, and an elbow on the other. To cut holes in the pipe, from which birds will then drink, you can use a rectangular block. It is applied and outlined with a marker. Then holes are cut along the marked lines on the pipe using a jigsaw. Find out about the characteristics of the Texas quail breed from this article.
In order not to spoil the entire structure, you need to use a marker to put crosses on those parts of the pipe that will be cut out, and then start working with a jigsaw. The cut rectangular holes must be carefully sanded to smooth out any irregularities.
A drinking bowl made of PVC pipes is secured with clamps of the same diameter at a height of 15-20 cm from the floor, with a slight slope, so that during the cleaning process the water drains by gravity.
To fill or rinse the drinker without any effort, it can be connected to the water supply. If necessary, you just need to open the tap and the structure will fill with water.
This type of drinker is not suitable for chickens. They may choke and drown.
From a bucket and other available materials
The simplest drinking bowls for poultry, which can often be seen in rural farmsteads and summer cottages, are ordinary buckets, bowls, metal basins, cut plastic flasks, sawn along car tires. Of course, this type of watering of chickens is distinguished by its simplicity and cheapness, but it has significant disadvantages. The water needs to be changed several times a day, as various debris gets into it, birds get in with dirty paws, and if the container is small, chickens often knock it over. In the hot summer, dirty and stagnant water in such drinking bowls often becomes a breeding ground for various pathogenic microorganisms. This link will tell you how to keep Japanese quails in an apartment.
It is advisable to use small containers for watering chicks. You just need to carefully ensure that the water does not spill and the chickens do not get wet.
Siphon
A small number of birds (7–10 birds) can be fed with siphon drinkers. To make this simple system you will need the following:
- Shallow plastic or metal bowl;
- Five liter plastic flask.
A hole is drilled in the flask at the very bottom. It should not be higher than the sides of the bowl.
To fill the drinking bowl with water, you need to close the hole at the bottom of the flask with your finger and fill it. Place the bottle in the prepared bowl. The water will flow into the container and stop at a certain level. The volume of liquid the birds drink from the bowl will again be filled with water from a five-liter flask. For ten chickens, five liters of water per day will be enough. This water supply system is not thorough, because debris often gets into the open container of the drinking bowl. Nipple fluid supply is superior to siphon supply in many respects.
Automatic
Automatic drinkers include:
- Vacuum and siphon;
- Nipple;
- Float
Often these drinking bowls are connected directly to the water supply. For example, a nipple watering system for poultry. If you connect it to the water supply, you don’t have to constantly carry water in a bucket and fill the container from which the liquid flows through the pipe to the nipples. Or the simplest vacuum drinking system. A hose connected to a small container will allow you to fill it by opening the tap. Even a water supply pipe can be connected to a drinking bowl made of PVC pipe. When filling it with water, you will not need to make any special efforts, and this drinking system can be easily washed when it gets dirty. Find out about the care and raising of Phoenix quails in this material.
Float
Such a device can constantly provide a constant water level of 10 to 20 mm. In this case, both transfusion and splashing are completely absent. And this has a positive effect on the microclimate in the chicken coop. Because air humidity does not rise above normal and parasitic or infectious foci do not appear in the room. Such drinkers are reliable and durable. In this case, it is better not to make them yourself, but to buy a finished product.
Moreover, its cost is low. The maximum operating pressure in the drinkers is about 0.5 bar. To increase it, you can connect the product to a large container of water, which should be placed at a height of at least 3-4 meters from the ground.
The drinking bowl for broilers can be used either suspended or placed on the floor.
A chicken drinker consists of a lid, a float, a plate, and a filter. With a gutter diameter of 20 cm, one is enough for a population of 100 chickens.
Manufacturing technology
To make normal homemade drinking bowls for chickens, you should buy nipples in advance. They can be found in specialized stores at a price of about 30 rubles per piece.
Experts recommend purchasing nipples from foreign manufacturers, since domestic ones often become clogged and break during the first month of operation.
Before starting work, it is necessary to mark with a marker the places on the pipe where holes will be made for inserting nipples. The distance between the holes should not be less than 30 cm , otherwise the birds will crowd around the drinker, pushing each other.
On average, 3 nipples can be placed on one meter pipe, but in no case should you install more than 5. It is very important to drill holes only on the side where there are internal grooves. This will reduce the risk of water leakage.
In the photo you can see a diagram of the operation of a nipple drinker for chickens:
Operating diagram of a nipple drinker
Immediately after drilling the hole for the nipple, it is necessary to cut the thread using a conical tap. Then the nipples are screwed in. For additional protection against leakage, you can cover them with Teflon tape.
A plug is attached to the end of the pipe. Now you can start preparing the water tank. For these purposes, it is better to choose a plastic tank with a lid. A small hole is cut in its bottom for the hose. A thread is cut in it and the hose is screwed in tightly.
The function of the hose is to connect the tank to the pipe. If there are cracks or any other imperfections in it, they are sealed with Teflon tape.
The final stage is the installation of drip eliminators under nipples 3600 and microcup drinkers under nipples 1800. Only now can we say that the drip drinker for chickens is ready for use in the backyard.
Take a closer look at the video:
Space layout
No matter how small the chicken coop is, it must have:
- perch;
- nests;
- sippy cup;
- feeders;
- ventilation;
- lighting;
- ash pan;
- sandbox;
- entrance hole for passage into the enclosure;
- “infirmary” - a place for separating sick birds;
- storage space for equipment.
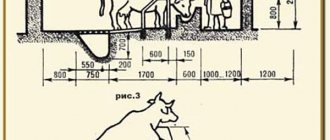
When planning the placement of work areas, it is customary to proceed from the calculation of the number of birds per square meter of room.
Special reference books usually provide different data, since most of them are designed for industrial poultry keeping. Amateur poultry farmers should proceed from the calculation of the required number of eggs, and, accordingly, birds. 2–3 chickens per square meter of area seems comfortable enough for year-round keeping of laying hens at home.
Wall-mounted sippy cups take up virtually no space; the container is usually placed on shelves at higher points. Hanging or wall-mounted feeders also occupy a small area along the walls.
It is best to hang the equipment or place it on a separate shelf where the bird could not fly into. The most important thing for winter indoor maintenance is an open, uncluttered floor area.
It is on the floor that the bird should not feel crowded. 0.25–0.4 sq. a meter is usually occupied by a box of sand or ash for ash baths. The vertical placement of perches and nests depends on the height of the existing room.
Laying hens, being healthy throughout their lives, are able to fly to a perch to a height of 70 to 110 cm, depending on the breed. The take-off is carried out almost vertically, in contrast to the “flying off” from the perch, which occurs along an inclined trajectory.
It is important that there is nothing sticking out and interfering with the hens when they take their place on the roost.
Some birds, regardless of breed, like to walk along an inclined ladder and take their place on the perch by moving along it. Others prefer to take off directly between birds that have already roosted for the night. The bird lands on a hard floor, and to reduce injuries, it is better to provide a soft floor surface by first covering the floor with shavings.
Laying hens, in the process of establishing a hierarchy, will certainly chase each other in the cramped space of the chicken coop, causing a chicken commotion. Therefore, when planning and arranging a room, it is advisable to avoid sharp and protruding corners that could injure the bird.
Simpler watering methods
Many farmsteads still use simpler methods of watering poultry. Cup drinking bowls for chickens are often used for these purposes in the form of any containers into which water can be poured.
However, it has many disadvantages, as chickens can easily overturn the water container. It is better to use a regular pipe as a simple drinking bowl.
It must be said right away that drinking water for chickens from a pipe is made quite quickly . It is enough to take a plastic pipe with a diameter of 100 mm and a length of 200 cm, plugs, mounting brackets and an outlet.
Holes are cut in this pipe using an electric jigsaw or a heated knife. After the process is completed, the edges of the holes must undergo additional processing, as they remain very sharp.
Once all the holes have been made and machined, you can attach brackets to the pipe that will hold it at a comfortable height.
Pipe drinking bowl for chickens
This drinker is very convenient for farmers who keep a large number of poultry at the same time. However, there are also disadvantages: the pipe will have to be periodically cleaned with a sponge, as it quickly becomes dirty after precipitation.
Varieties
You can use a small saucepan or small bowl as a drinking bowl. It is easy to maintain, but this design is dangerous for the bird.
Dirt easily gets into it, food spills out and dust flies in. A chicken can enter the pan and stain the water with its paws, which will lead to the proliferation of microbes and intestinal disorders.
Vacuum drinker (siphon)
Vacuum drinker (siphon) for chickens This is a simple product - a container filled with water and mounted on a stand.
To work you need to prepare:
- plastic bottle;
- bottle stand;
- shallow bowl;
- legs.
Manufacturing:
- Clean water is poured into the bottle.
- Place it neck down in a bowl so that it does not touch the bottom by a few millimeters.
- The cut part is covered.
Water will begin to flow into the bowl. When its level rises to the height of the neck, the liquid will stop flowing; it will be retained by atmospheric pressure. The liquid gradually flows into the pan in such an amount as the bird will drink.
To make the drinker stable, it must be securely mounted on a pallet. You don’t have to make a vacuum drinker yourself, but buy one in a store.
Be sure to read: How to quickly catch a wild ferret or marten in a chicken coop and how to get rid of the predator. The main disadvantage of such a product is that dirt from the chicken’s beak and paws can get into the bowl.
Simple drinking bowl from a bucket
Bucket drinking bowl for chickens You will need to buy nipples and find an old but intact plastic bucket.
The work is performed in this order:
- In the bottom of the bucket, holes are drilled around the perimeter to install nipples.
- In the drilled areas, a thread is cut according to the diameter of the nipple thread.
- The nipple is installed in place.
- The bucket is attached to the ceiling using a rope or any fastener.
- Pour water.
- The drinking bowl is ready for use.
In winter, the water in an unheated poultry house freezes, and the birds will have nothing to drink. Of course, you can pour a new portion after each feeding.
But this will have to be done only if there is no electricity supplied to the chicken coop. But if there is an electrical network, then you can easily make several different heated drinkers, and the chickens will be provided with clean water at any time.
Heated drinking bowls for winter, non-freezing, with heating cable
The principle of operation is simple - a simple light bulb is mounted in a tin box. A small hole is cut at the top of the box, a bowl is placed on the box and water is poured. Warm air coming from the light bulb heats the drinker, and the liquid does not freeze.
If there is no box, then the drinking bowl is made simpler: a light bulb is installed in a hollow foam block (or cinder block) and a bowl of water is placed on top.
You can heat the container with a heating cable designed for heating underfloor heating. It is easy to purchase in the store.
Heated drinking bowl for winter
The container is wrapped with a cable (a nipple drinker with a heating cable is shown at the top of the image), the connections are reliably isolated and plugged into the network.
Nipple drinker
To ensure that water flows to the birds without interruption, nipple drinkers are installed. They are well suited not only for adult chickens, but also for young animals. You just need to purchase special nipples and assemble the device.
The nipples are made so that when they move, liquid begins to flow out. To reduce water costs, some poultry farmers additionally use special drip eliminators in their design.
Cup devices
To make a simple product, you need to take a small metal basin, bowl or bucket. But cheapness and simplicity lead to disadvantages.
The owner of the poultry house will have to change the water at least 2-3 times a day, the reason is that dirt gets into the container. The product turns out to be unstable and it is easy for the bird to knock it over.
Industrial cup drinkers look like this:
Cup drinker
Drinker made of plastic pipes
Drinking bowl from plastic pipes How to make a drinking bowl from a sewer pipe:
- A longitudinal line is drawn along the length of the pipe; holes will be located along it.
- Mark the outlines of the holes with a marker: you need to make them elongated, 20-30 cm long.
- Cut holes along the drawn line, then secure the drinker.
- The edges of the pipe are sealed or raised branches are installed, through which dirty water is poured or drained. The edges of the holes must be cleaned of burrs so that the bird is not injured.
- A drinking bowl made from a sewer pipe can be used.
Be sure to read: How to disinfect a chicken coop at home: treatment and means
A simple model of an automatic drinker is made using a nipple, aluminum wire, a metal plate and a wine stopper:
An automatic drinking bowl can be made differently, using fittings removed from an old toilet cistern:
Automatic drinking bowl for chickens
Peculiarities
Nipple drinkers for chickens consist of several main parts:
- water container;
- connecting tubes;
- shut-off valves;
- nipples.
The presence of certain parts, as well as their quantity, is determined by the design features of a particular drinker model and the characteristics of the chicken population.
A hermetically sealed container for containing liquid is a special tank, the internal volume of which allows you to hold a sufficient amount of water without losing it through evaporation or splashing. May be located outside the household space in which chickens are kept. In this case, water flows from the container to the dispensing point through tubes.
Tubes are made of metal, plastic, metal-plastic, polypropylene, rubber, silicone, polyvinyl chloride (PVC). The liquid, under the influence of gravity, flows from the tank to the discharge point or points. For normal operation of this hydraulic system, the main water container must be located at a level above the nipples. The pressure force pressing on the nipple from the inside depends on the difference in the height of these parts of the drinker.
Shut-off valves allow you to regulate the volume of liquid supplied. A pressure level that exceeds the norm contributes to overflow, increased consumption and humidification of the adjacent space. The adjustment makes it possible to control water flow and eliminates the factor of wetting the surrounding area, contributing to the cleanliness of the chickens' keeping conditions.
The nipple is the main design detail. This is a mechanism that works on the principle of a check valve, preventing water from flowing freely from the system. Nipples installed in chicken drinkers are a device consisting of a metal or plastic tube with a diameter of 4 to 8 mm. It has the edge of the outer edge bent inward along the entire diameter. This allows you to hold the main locking element in it - a metal rod. The size of its diameter and the special expansion of one of the sides have an optimal ratio with the diameter of the inner bend of the edge of the tube, which allows the ball not to fall out of the tube, resting against the bend, thereby ensuring clogging of the outer edge of the tube.
The opposite edge of the nipple device is adapted for its connection to the water supply system.
The connection can be made using a threaded or union connection.
Bunker
A duck feeder hopper is usually constructed from metal or chipboard sheets.
The bottom of the bunker structure resembles a tray structure. It is better to attach the container for bulk food to the wall, so you can only approach it from one side. It is more convenient to hang on metal hinges for hanging cabinets.
What you need to make a feeder:
- Sheet or plate.
- Slats or bars.
- Saw or jigsaw.
- Drill and screws.
- Ruler.
- Pen.
- Two loops.
For manufacturing, take 4 sheets: 2 - for the side walls (the same size), 2 - for the front and back walls (also the same size). All sheets are fastened so that they form a quadrilateral shape. In this case, the front should be diagonally, going deep into the structure - this will ensure a gradual supply of feed. It will be possible to fill the bunker completely and it will slowly roll down to the tray.
Principle of operation
The nipple drinker for chickens operates on the principle of continuous dosed liquid supply. The water, which is in a special container, completely fills the system when the valves are open.
Under the influence of gravity, the liquid, being at the lowest point of the system, presses on the rod located inside the nipple. The thickening of the inner edge of the rod rests against the bend of the edge of the tube and creates a seal that prevents water from leaking out.
The chicken, wanting to drink water, presses with its beak the edge of the rod protruding from the nipple tube. The seal is broken, causing water to leak out. Due to its properties, the liquid does not splash randomly, but flows down the rod, falling directly into the bird’s beak.
Security measures
High-quality, comfortable drinkers for chickens should be safe and not injure the birds’ beaks. You should maintain safety in the chicken coop. Drinkers should be made of high-quality plastic material. It is not allowed to make a metal container with burrs to avoid injury to the bird.
When making drinkers for chickens, hens, and broilers, the edges of the drinker must be carefully processed so that the birds cannot get hurt. The edge of the bowl should be smooth or have a rubber rim around it.
There are safety measures in winter. There must be protection to prevent water from freezing in cold weather. You can provide heat by making a heating element, which must be placed under a container of water, or by using an aquarium heater.
Manufacturing
Let's consider the process of making a drinking bowl yourself.
Selection of materials
The design of a homemade nipple drinker for chickens can be extremely simple. However, when making it, it is worth taking into account the factors of environmental friendliness, hygiene and practicality.
It is not recommended to use materials whose properties suggest the subsequent appearance of rust, oxidation, or siltation. The list of non-recommended materials includes:
- metal parts (pipes, connections and others);
- technical materials (hoses, fittings, containers intended for use in combination with aggressive liquids).
It is recommended to use materials intended for household use that comply with the parameters of GOST standards that determine the characteristics of materials for food use.
Properly selected materials from which the drinker is made will not emit any substances that could have a negative effect on the bird’s body and egg production.
Plastic is considered a suitable material for storing and transmitting liquids consumed by humans. As the main container, you can use a plastic canister or barrel, the volume of which will satisfy the needs of the available number of animals. To create a pipeline system for the drinking bowl, polypropylene pipes are used, which are used for installing domestic water supply.
These materials are not subject to any types of corrosion, do not emit toxic substances, and are resistant to temperature changes.
To assemble a plastic drinker you will need the following set of components:
- liquid storage container;
- transition coupling from plastic to metal connection;
- polypropylene pipes with a diameter of at least 32 mm;
- PP corners, couplings, plugs;
- nipple mechanisms.
Equipment
The equipment usually has the necessary elements necessary for the bird and devices that make it easier to care for the bird.
Perches
Starting from the age of four months, laying hens not only know how, but also prefer to spend the night on a roost. The age of up to three months is usually characterized by the bird flocking together in a corner to roost for the night. It is advisable that the walls in this place are wooden, not metal or brick.
On hot days, the bird sits according to an established hierarchy with intervals. In colder times, chickens on the roost, snuggling, warm each other. A 2.5 meter pole can accommodate 20 medium laying hens.
Some birds prefer to sleep in nests, which is undesirable because, by involuntarily defecating at night, they pollute the nests.
The diameter of the perch can be 40–70 mm. It is desirable that it be made of wood, since sometimes in the process of fighting various skin and down-feather pests, the perch is smeared with tar. Metal or plastic will not absorb the solution.
Nests
Laying hens in an unpredictable way manage to create a stir in front of everyone's favorite nest, when the neighbors are free. It is impossible to find logic in a chicken's choice of nest, because what is popular this week becomes ignored by the chicken community a few days later.
Laying hens are able to lay eggs even in a plastic box covered with shavings or straw. But it’s more correct to make nests according to simple requirements:
- there should be several nests;
- The height of placement for chickens does not play a special role, so it is better to raise them to the height of the perch for ease of egg collection and maintenance;
- the chicken, if necessary, is able to fit into a relatively small opening;
- It’s better if there is a step in front of the nests at a distance of a chicken’s step; a perch can serve as a perch for them;
- nests must be cleaned of droppings;
- Sometimes dummy eggs are placed to mark the place of the sock, but many chickens throw them away.
Feeders and drinkers
Depending on the preferences of the poultry farmer, feeders and drinkers can be bunker, homemade, hanging, or plastic. Chickens will eat food from any food, but with a different spread. All types of feeders have their own advantages and disadvantages - in bunker feeders, some types of feed stick when the atmospheric humidity is high. In plastic buckets, purchased granulated food crumbles perfectly, and homemade compound feed sticks just like in plywood feeders.
There are many drawings of various feeders on the Internet. It’s up to the poultry farmer to decide what type of equipment to give preference, because feeders also need to be periodically cleaned and disinfected, tinted and modified in order to reduce the supply and scattering of feed on the litter.
Sippy cups usually come in two types - inverted bucket and nipple sippy cups. Both are convenient. An overturned bucket, or even a bowl, despite the fact that it quickly becomes dirty with food stuck to the beaks of laying hens, is convenient when you need to give the bird serum or diluted medicine or vitamins.
We invite you to check out Salads with chicken and mushrooms - simple and tasty!
Nipple-type, can be made independently - the nipples themselves are purchased, the pipeline and container are made from plumbing plastic pipes. The advantages of this type of drinking bowl are that the water is always clean, and the drinking process can be automated for a relatively long period of time.
Swimming area
Laying hens love sand and chip treatments. Poultry farmers use this property of birds to combat skin insects by adding sulfur to the ashes.
The bathing area is usually a box with sides 15–20 cm high, half filled with dry sand mixed with ash. Birds bury themselves in dry sand or dust. If possible, the location of the ash pit is fenced off or taken out into the enclosure.
Laying hens remember changes in their environment usually on the second or third day. And if the enclosure is not located directly next to the chicken coop, laying hens are able to walk a couple of meters even through an improvised transition tunnel.
The walking space should be protected from rain, at least partially. For the winter it must be covered with a special canopy. Have feeders and waterers, a perch, so that in warm weather the chicken coop can be disinfected. The floor in the enclosure is usually earthen. Therefore, it is necessary to ensure that the chickens do not dig their way to freedom.
Nipple drinker device
The main components of this type of drinker are a water tank and nipples, which can be purchased at the store. The nipple consists of a plastic body, as well as a valve and stem made of stainless metal. When a bird wants to drink, it approaches the drinking bowl, presses the stem and receives the required amount of water. This system is simple and very effective.
Elements of nipple drinker
Chickens do not need to be specially trained to use drinkers - they learn this intuitively when they notice drops of water on the nipples. The question of how a bird will cope with a nipple drinker arises for almost everyone who is just about to try drinking systems of this type. However, no problems arise here - even one-day-old chickens solve this problem without much difficulty.
Diagram of a nipple drinker for chickens
Training chickens
Before installing nipple drinkers to provide water for broiler chickens and other breeds, you should familiarize yourself with the rules for their placement. If the chicks find it inconvenient to use, then it will not be possible to teach them to drink from nipple devices.
To water newly hatched chicks, place the drinker so that it is at eye level. Starting from 2-3 days it should be raised higher - the chick should reach a little towards the “nose”. The recommended angle of the beak relative to the pipe is 60 degrees. From a week of age, the angle should be increased to 75 degrees.
If this rule is followed, it will be as convenient as possible for the chicks to use the watering system. There is no need to specially train them. Chicks are attracted to a shiny object (stock). By hitting it with their beak, they get a drop of water. After this, they will repeat the action to quench their thirst. It is enough for one chick to gain such experience - the rest will follow suit. If you still have difficulties, you can put some water into the drip tray. After drinking from there, the chicks will become interested in the structure and learn to get water.
Advantages
The main advantages of the nipple drinker:
- convenience;
- sustainability;
- water purity;
- dosed water supply.
Due to the holes in the guides, the drinker can be lowered/raised as the bird grows
All you need to do to maintain a nipple drinker is to periodically add new water to it. If the design was chosen correctly, this operation will not take much time. As a rule, the drinker is attached to the cage lattice; secure fixation allows you to avoid any problems with them - you do not have to worry about anything happening to it.
No debris can get inside and spoil the water, and clean water is the key to the health of the bird. Most nipple drinkers use a closed tank; this design prevents the proliferation of organisms that can become infectious agents.
Nipple drinkers on a farm
When using a nipple drinker, water consumption is reduced by 30-40 times compared to other drinking systems. The effect is achieved thanks to dosed feeding, each bird can get exactly as much as it wants, and not a bit more. It is worth noting that the nipples leak a little, but thanks to the use of drip eliminators, these losses can be reduced to zero. Low water consumption will save you from unnecessary hassle - in the case of a nipple drinker, there is no need to frequently fill the tank.
Operating principle of nipple drinkers for chickens
Reviews
Vacuum drinker for chickens, make a hole at the bottom of the bottle, two or three centimeters from the bottom and pour water and it will automatically be poured into the basin. Irina https://www.kury-nesushki.ru/viewtopic.php?f=28&t=462&start=20# p1729
There is nothing better than a nipple for drinking. For a hundred chickens, put a tank of 30-40 liters. Enough for a day. There are about a dozen nipples on the pipe. And a feeder from a sewer pipe is not bad. What they scatter will be plucked from the floor. Zeke https://fermer.ru/comment/1076557709#comment-1076557709
Source: sampit.ru
A simple drinker option
Nipple drinker from a bucket
In order to make a simple nipple drinker, you will need:
- plastic bucket or bottle;
- nipples;
- Teflon thread for plumbing.
Special nipples for chicken drinkers
In addition, you need to think about mounting the selected container in the right place in the chicken coop. To do this, you can use plastic ties, another option is bolted fastening. To make a drinking bowl for an adult bird, nipples 180 are suitable, for chickens - 360. The former work up and down, the latter - in all directions. The tools you will need are a drill with a nine-millimeter drill bit and a tap, as well as everything you need to secure the drinker.
Water quality and standards
Most types of farm animals need clean and fresh water, especially in the hot season. This is due to the structural features of the digestive system of animals and birds. For laying hens and broilers, some errors in the organization of the drinking regime may be allowed; for rabbits, the water must be exceptionally clean.
The norms for the amount of drinking depend on a number of factors:
On average, 0.5-1.0 liters is enough for one bird to avoid dehydration. For rabbits, this figure ranges from 1.0 l to 2.0 l.
Drinker with central tank location
In order to make a drinking bowl with a water container located in the center, you will need:
- pipe;
- T-shaped adapter for pipe;
- nipples;
- two pipe plugs;
- Teflon thread;
- plastic clamps for attaching the drinking bowl.
There are special square pipes for making drinkers, which can be purchased along with nipples. But high-quality plastic plumbing pipes, plugs and adapters are also great for making drinking systems with your own hands. You shouldn’t take the first pipes you come across—there shouldn’t be any harmful emissions from the plastic.
Drinker with square pipe
The more chickens you have, the more nipples you will need. For 10-20 birds, one or two will be enough. At the same time, 4 pieces can be placed on a meter pipe; for most chicken coops, this amount will be more than enough.
From the tools you need to prepare a drill with a drill and a tap, as well as a hacksaw to cut a piece of pipe to the required length.
In order to make a drinking bowl, you need:
- cut three pieces of pipe - the first two will be located horizontally, nipples will be inserted into them, the second, which will act as a tank, will be vertical;
- in the first two sections of the pipe, you need to drill holes for the nipples and cut the threads with a tap, and then blow them thoroughly, making sure that there are no chips left inside;
Snap the clamps tightly
Connect the pipes and install the drinker on the mount
The option using a pipe as a tank has one significant disadvantage - small capacity. Water will have to be added quite often. To smooth out this drawback, you need to use a large diameter pipe under the tank. If desired, you can make a lid in its upper part.
The design will look like this
Video - Nipple drinker for chickens for two cages
Drinker made of plastic pipes
This do-it-yourself drinking bowl for chickens is available on the portal about construction and repairs. As a rule, all ingenious inventions are distinguished by their simplicity. This can also be said about the use of plastic pipes to make drinking bowls. There are many advantages of such drinking bowls for chickens - first of all, they are simplicity of design, low cost of materials and reliability. Let's look at the step-by-step process of making a drinking bowl from plastic pipes.
Step 1.
For the drinking bowl you will need a plastic pipe. In this case, a 1.5-meter pipe with a diameter of 15 cm is used. A plug is installed at one end, and a bend is installed at the other. Using a building level, draw a straight line on the pipe (on both sides of the level) with a marker.
A line is drawn on the pipe.
Step 2.
Next you will need a small rectangular block.
Use it to make marks for future holes, as shown in the figure. Mark with a cross those parts that do not need to be cut, or vice versa, so as not to make a mistake and not damage the pipe. Marks for future holes. Step 3. Along the edges of the marked rectangle, make small holes with a drill or screwdriver.
To prevent the drill from jumping off, you can first make a small indentation with a nail or awl. Drilling holes in accordance with the markings. Step 4.
After making the holes, use a jigsaw to cut out the desired shape on the surface of the pipe.
All resulting irregularities at the cut site must be treated with sandpaper. Using a jigsaw for cutting.
Step 5.
After cutting all the necessary holes, install special clamps or latches, which you then attach to the wooden stand. You shouldn’t skimp on these elements so that you don’t have to pay twice later. After this, the finished structure can be placed on the ground, and water can be added through the bend.
Installation of clamps.
Drinker with side tank
The design of this drinking system differs slightly from the previous one: the tank is located not in the center, but at one of the ends of the pipe. Its role can also be played by a piece of the same pipe or a plastic bottle. Let's consider the second option.
In order to assemble the drinking bowl, you will need:
- tank bottle;
- flexible hose;
- adapter from hose to pipe;
- plastic pipe;
Square plastic pipe
There should be a fitting in the cap of the plastic bottle to which the hose will be attached. If you can’t find a suitable one, you’ll have to make the fitting yourself. To do this, you can solder a piece of plastic tube to the cap.
How to assemble a nipple drinker with a side tank:
- it is necessary to drill holes in the plastic pipe and cut threads into them;
Carefully drill the pipe
You have to shake the tube thoroughly so that the chips fall out.
Draw a line in advance so that the holes are in the same plane
Use a tap to cut the thread for the nipple
We screw either a fitting or an end plug into a threaded pipe
Fittings for connecting to the water supply tube
Adapter to hose
To connect round pipes without threads, use a soldering iron (a plug is installed in the photo)
In the photo the adapter for the hose is screwed on
All connections are reinforced with Teflon thread to eliminate the possibility of leakage.
Vide - Instructions for assembling the drinking bowl
How to make automatic water supply to drinking bowls
Water is automatically supplied to birds in both nipple and vacuum drinking bowls. To ensure automatic supply of water to the drinking bowl, it must be connected to the water supply system. But this model has more disadvantages than advantages:
- sooner or later, any water pipe becomes contaminated with organic deposits, particles of heavy metals, etc.; a drinking bowl connected to a water supply cannot be washed or disinfected;
- If such a system is used by an infected bird, you will introduce the infection into the water supply system of the house.
Therefore, we do not recommend that you install automatic water supply to your birds' drinking bowls.
Learn how to make a nest and perch for chickens.
Drop eliminators
In order to reduce water consumption to a minimum, it is recommended to equip the drinker with drip eliminators. They are small cups that are located under each nipple. Thanks to drip eliminators, water will not fall on the floor of the cage; in addition, it will be spent more efficiently: the birds will always be able to drink the water that has lingered in them. These drip containers can be purchased together with nipples.
They are also quite easy to make yourself. For this purpose, plastic profiles for dry construction are usually used. Another option is to make drip trays from regular half-liter plastic bottles.
You can do without drip eliminators. A simple option is to place a cloth under the drinker, which will need to be wrung out periodically. You can also place the drinker not inside, but outside the cage, but so that the chickens can reach the nipples and drink from it freely. In this case, all excess water will fall on the ground.
Nipple drinkers in a broiler cage
Tips for setting up a chicken coop
Connections of drinking bowl elements can be made using aluminum wire or strong rope.
Many people make an original simple drinker according to their individual designs.
To equip a poultry house from the inside with your own hands, it is important to designate an area for the temporary placement of sick birds. We are talking about laying hens, which for various reasons need to be isolated from the rest of the poultry. The quarantine must be equipped with a separate drinking bowl, feeder, perch or stand, and nest.
Floor, walls, ceiling
The floor can be earthen, concrete or wood. In any case, it will need to be treated with special disinfectants. Even covered with straw or shavings, laying hens tear the top layer, and droppings of various states end up on the floor. You need to be prepared to carry out a total disinfection of the chicken coop every year if the chickens are purchased from factories and not bred independently.
A wooden floor is convenient from the point of view of installing various structures - a screwdriver with screws is enough. Durability depends on the thickness of the chip layer and the frequency of its change.
We suggest you read at what height to hang birdhouses
The walls of the chicken coop can be wooden, plywood, concrete, brick, or aerated concrete. Painted surfaces absorb odor less and are better disinfected. It is advisable to pre-equip stone walls with horizontal wooden panels to which various poultry house equipment will be attached.
The ceiling is used to place hooks on which feeders and waterers, dried herbs, nettles are hung, electrical wiring is placed, and infrared film heaters are hung.
It is almost impossible to foresee in advance the placement of all suspended equipment, therefore, it is better to designate the wooden power frames of the ceiling in order to securely screw various hooks into them.
Ventilation
A sufficient amount of air, natural or forced, is the key to bird health. Natural ventilation can be organized using openable windows or vents, barred holes in the corners of the chicken coop, and pipelines installed at different heights.
It is very convenient to use sewer pipes with a diameter of 110 mm. They are much cheaper than rectangular ventilation units and have different standard sizes of fittings and fasteners. To organize the grille, it is enough to drill holes in the plastic plug.
Forced ventilation is made from standard low-noise household fans installed in bathrooms, toilets and kitchens. A budget option for solving the problem is to use fans from computer power supplies. Their voltage is 12 volts, which will require an additional voltage converter of 220 volts AC to 12 volts DC.
Installing a programmable electronic or mechanical timer in the circuit allows you to periodically turn on the ventilation at the most convenient time.
The production and use of a recuperator in the ventilation equipment of a poultry house significantly reduces winter heating costs.
With properly adjusted air exchange, there is no persistent smell of ammonia in the chicken coop. If the smell does not disappear when the ventilation is constantly turned on, it is necessary to change the litter. At human height, the smell is usually not felt as strongly as at 30 cm from the floor.
Lighting
When arranging the lighting, natural and artificial lighting is used. In some breeds, the spring period of increasing sunlight is marked by dangerous pecking of eggs and other chickens. If the poultry house has large windows, it is recommended to temporarily slightly reduce natural light.
Laying hens are very sensitive to lighting conditions. By artificially increasing the duration of daylight hours, egg production in winter is improved. If the chicken coop is small and the bird behaves aggressively towards other laying hens, then you can highlight the working areas - feeders, ash pan, sippy cup.
The currently available LED strip and spotlights are ideal for chicken coops due to their low power consumption and the ability to be placed everywhere.
The Internet is full of video tutorials and tips on arranging a poultry house. But there are many moments that every novice poultry farmer will go through in his own way through trial and error.
If a bird gets sick or newbies are being pecked, we erect new partitions. Cover brick walls with nothing except corrugated sheeting - no problem; we cover the places where birds touch the metal in winter with plywood.
We made few nests - added a couple more. We made the perch high, but they don’t reach it – no problem, let’s lower it a little lower.
Tired of adjusting the height of the suspension of the sippy cup or feeder - we hang the chain and rearrange the hook as necessary.
The chicken coop is a place where scraps and leftover building materials come in handy. It doesn't matter that no one does this. This is your chicken coop, and you can at least lay parquet or linoleum on the floor. Cover with shavings anyway.
Homemade chicken feeder
In addition to creating comfortable conditions for the birds, proper arrangement of the chicken coop is necessary for ease of maintenance. The interior of the chicken coop includes perches, nests, feeders and waterers. With proper arrangement of the poultry house, the perches should be located at a minimum at a height of 60-90 cm from the floor (but not more than 1 meter) and 24 cm from the walls. They should be placed opposite the nests.
Nests are places where hens will hatch their eggs. All birds do not lay eggs at the same time, so the quantity should be 1 nest for 3-5 hens; for egg-bearing breeds this quantity can be doubled. They need to be placed so that nothing distracts the hen from hatching her eggs. Therefore, they need to be placed in the darkest and most secluded place, at a height of 40-50 cm from the floor.
The location of feeders and drinkers should be at a distance of 20 cm from the floor so that birds do not climb into them with their feet. These can be wooden or plastic containers with rounded edges to prevent food from scattering. It is most convenient to place drinkers and feeders near the wall between perches and nests, in the visibility zone of the maximum number of chickens. Drinkers and feeders can also be hung on the wall, equipped with ladders. The photo below shows modern plastic bird drinkers.
Modern types of drinking bowls for chickens
There are several types of perches that are easy to make with your own hands:
- Perches located at different levels parallel to the floor, attached between the walls. With such a perch, space in the chicken coop is saved, especially if it is small.
- Bars - placed along the perimeter of the chicken coop in one level.
- Hygienic perch, or portable. It is made in the form of a portable table with perches. With such a device, cleaning the chicken coop is much easier; the shelf under the poles can simply be replaced. However, making it with your own hands is more difficult. Such a perch will accommodate more chickens, but it also requires much more space in the chicken coop.
Hygienic perch
The correct perch is one that is made in compliance with the conditions for proper rest for the birds, when they do not interfere with each other and do not experience discomfort. Therefore, before making perches in the chicken coop, it is recommended to abandon the multi-level structure and perches in the form of shelves. In the first case, any of the birds will strive to take a place at the very top, and those located below will be stained with droppings. In the second case, the design of the shelves will not allow you to comfortably wrap your fingers around the perch, which is why the chickens will experience constant discomfort.
We suggest you familiarize yourself with the Type of chicken feathers
The correct thickness of the perch should be equal to half the length of the chicken foot when opened. If this condition is not met, it is necessary to reduce the diameter of the bar or round the side parts.
The production of resting places for chickens is carried out in this way:
- A drawing of the location of the beams is drawn up in accordance with the number and size of chickens. Its height above the floor, length, cross-sectional diameter, as well as its placement relative to the places where you will place the feeder and drinker are determined.
- Support strips are installed on the side walls at a distance of 60-90 cm from the floor.
- The beams are treated with sandpaper so that the bird does not get hurt.
- The sanded beams are attached to the support strips at a distance of 30 cm from each other and from the wall.
- Build a ladder from the remaining bars and place a perch on the side.
- Under the bars, at a distance of 50 cm from the floor, you can nail a smooth board to collect droppings. It can be made retractable to make collecting waste even more convenient.
A portable perch can be made from an old table. To do this, two strips are nailed to the sides, to its legs, on which grooves are pre-made. Two bars are inserted into them and secured. A tray with sand or sawdust is placed below to maintain hygiene.
In order not to come up with anything new, some poultry farmers use improvised materials to make resting areas for chickens, for example:
- Ordinary wooden staircase;
- Wooden pallets (in this case, the crossbars should be slightly reduced in size by cutting off some of the wood);
- Cuttings from shovels, forks, rakes. They do not need to be processed; simply fasten them between the walls and cut them to the required length.
Suitable Perch Size
For proper arrangement, the perches should be located in those parts of the chicken coops where it is warm enough and where a lot of light does not penetrate. There should be no doors or windows nearby.
The correct location of resting perches is considered to be one that takes into account all the nuances:
- The height of the perch, which should be proportional to the size of one individual.
- Perch size
- The distance between adjacent perches when multi-level perches are made.
Place perches in accordance with other recommendations:
- If chickens lay eggs without leaving the perch, it should be placed on a slope so that the eggs roll down. You install a special groove or nest under the perch with your own hands.
- It is not recommended to place the perches directly on top of each other. If the area of the chicken coop is not large, it is better to place them in one row around the perimeter.
- For a small chicken coop, the best option would also be a resting structure made of vertical posts 1 meter high, on which small beams made of timber are attached.
Drinker maintenance
All you need to do to maintain such a drinker is to regularly add water to the tank, and sometimes completely rinse the structure so that it is always clean from the inside. The lifespan of the drinking system is practically unlimited - both the plastic and the waterproof metal used in the manufacture of nipples are not subject to the effects of time. As a rule, drinkers fail due to careless handling.
It is worth noting that during industrial breeding of birds, drinking bowls connected to the water supply are used. They are filled automatically.
Nipple drinkers in a chicken cage
Making a simple nipple drinker with your own hands is not at all difficult. To do this, you will only need the simplest tools and raw materials, which can easily be found in the store, as well as a little of your effort. Nipple drinking systems are convenient and practical - it is not surprising that they are so common among Russian poultry farmers. A nipple drinker will provide 10 or more birds with fresh water without problems and with virtually no effort on your part, as a result the chickens will grow at a good pace and produce a lot of eggs.
Nipple drinker for chickens
Recommendations for installing and maintaining drinkers
- Author: Maria Sukhorukikh
Rate this article:
- 5
- 4
- 3
- 2
- 1
(0 votes, average: 0 out of 5)
Share with your friends!
Do-it-yourself drinking bowls for chickens - instructions, assembly diagrams
Chickens, like other animals, need proper and careful care, because they bring us eggs and meat. Breeding healthy chickens is not complete without water and balanced feed.
When the population of laying hens is impressive, it becomes necessary to install an automatic waterer for chickens. She will give the daily requirement for the chicken. A high-quality automatic drinker does not allow the container to tip over and get the chicken wet. In our article we will talk about the types of drinking bowls, what requirements apply to them and help you make a drinking bowl with your own hands.
Requirements for drinking bowls
A good automatic drinker should please the farmer with its convenience, durability, clean water and safety. Let's take a closer look here:
- For greater convenience, the drinking bowl is filled automatically from the water supply. The most important thing is that it does not bother the farmer with constant supervision;
- To prevent chickens from accidentally damaging the drinking bowl and leaving their “colleagues” without water, it is worth making it durable and resistant to attacks;
- clean water along with nutritious feed is essential for healthy chickens. When liquid is served in portions, harmful microorganisms are not diluted. Therefore, drinking must be protected from the influences of the surrounding world;
- It is also important to secure the device so that the edges of the self-drinker do not injure the chickens and do not release harmful substances - the best material is high-quality food-grade plastic, which can be easily washed off from sediment.
Fluid consumption directly depends on the ambient temperature, the type and humidity of the feed, and the age of the laying hens. The average amount of water required for a healthy individual is at least 500 milliliters per day, which is twice the amount of food.
In northern regions, drinking bowls must be protected from freezing. This problem can be solved by manufacturing and installing a small heater under the drinking bowl tank.
Main types of self-drinkers for chickens
According to the principle and scheme of action, automatic drinkers are:
- with nipple mechanism,
- with water bowls,
- with siphon principle (vacuum),
- ordinary drinking containers.
Simple containers do not require much effort and time to maintain. Usually these are simple plastic basins and zinc troughs. Each chicken tries to knock over such containers or even plunge into the drinking bowl. As a result, the hen gets wet, spoils the water with her paws and makes it unfit for drinking.
A wet chicken loses heat and gets sick. Frozen birds may die.
Making a drinking bowl for chickens with your own hands
Drinkers with nipples
The main principle of such an automatic drinker is that liquid is supplied when the chicken triggers the nipple mechanism. Thus, water does not stagnate and is supplied fresh gradually, which reduces its consumption. It is also used to feed barely hatched broiler chickens.
There are several types of such drinkers:
- conventional ones, in which the mechanism operates at an angle of 90 degrees;
- rotational, in which the mechanism operates at any angle;
- with a drip eliminator, in which a small bowl is installed under the flowing water;
- with fixation on the pipe, looks like a regular drinking bowl, sometimes with a drip eliminator, the locks are attached to the pipe.
To make a nipple self-drinker, you need a plastic bulk bucket. The required number of holes with a diameter of 9 mm is drilled. Nipples are screwed into them, the drinking bowl itself is suspended to the required height and filled. Among the advantages, we note the fast production.
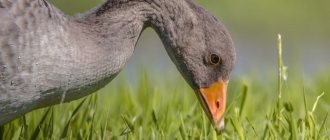
Water for rearing poultry
For the healthy and full development of poultry, the quality of drinking water is of great importance, because the development of poultry occurs very intensively, and it drinks twice as much water compared to the weight of food consumed. Water is the main element of a bird’s diet, and is also involved in transporting nutrients into the bird’s body, regulating body temperature, and removing toxins. Therefore, the supply of good quality water is very important for poultry health and high productivity.