Slaughter
Before slaughter, cattle are kept in condition: feed is stopped one day before slaughter, and water is stopped 2-3 hours before slaughter.
These measures are necessary to reduce the volume of the contents of the gastrointestinal tract, which reduces the risk of rupture when removing the entrails (guts) and contamination of the meat. In addition, before slaughter, it is necessary to clean the skin of cattle as completely as possible. To do this, first mechanically clean the skin, then wash it and the limbs. A veterinarian must measure the temperature and examine the animal. Slaughter of livestock is not permitted without the permission of a veterinarian.
For some particularly dangerous infectious diseases (anthrax, emphysematous carbuncle, etc.), slaughter of livestock is prohibited .
Tanning
Tanning is a very important process, as it consolidates the achieved state of the skin. In addition, this makes it more resistant to moisture, chemicals and temperature. For tanning, you need to get a substance called chromium, which will act as a tanning agent. Potassium chromium is green, and sodium chromium is white.
You need to make a solution: for 1 liter of water 40-50 g of salt, 7-10 g of tanning agent. Aluminum or chrome alum can be used as a tanning agent for tanning leather. The solution must be mixed until all components are completely dissolved, and then the skins must be placed in it for 12 hours.
After tanning, the skins must be removed and squeezed. They need to be placed fur side up and left to rest for 12 hours. After this, the skins can be washed using detergent or shampoo. It is necessary to make a breakdown of the mezdra.
Bleeding of livestock carcasses.
Bleeding of livestock carcasses. The blood vessels (carotid arteries) in the neck of the stunned animal are cut with a knife. Then it is suspended by the hind legs and a large basin or bucket is placed to collect the flowing blood. If it is impossible to bleed the animal in a vertical position, this is done in a horizontal position. Bleeding the carcass takes only 6-8 minutes, but this is a mandatory procedure: poorly bled meat is not suitable for long-term storage.
After bleeding, skinning begins. But before this, the esophagus is clamped or tied (separation from adjacent tissues) so that there is no leakage of stomach contents. It is better to remove the skin with the carcass in a vertical position. At slaughterhouses, slaughterhouses and at home, skins are forced to be removed while the carcasses are lying down. Remove the skin carefully, avoiding cuts and without damaging the surface of the carcass. Skinning is divided into two operations: whitening and final skinning.
Sneak attacks, critical hits and luring enemies
Go to Settings -> Controls and make sure Toggle Crouch is enabled. If you press a bound key, you can stay crouched indefinitely without holding the button. This is very useful if you are trying to sneak up to get a clear headshot (which deals critical damage).
However, before checking a dead animal, you can simply leave the carcass. After some time, other predators, such as wolves, will appear. You can keep shooting at these new victims to earn more XP.
How to remove the skin.
Whitening and skinning during vertical cutting of carcasses is carried out in the following sequence. First, they are removed from the head, then from the hind legs, groin and abdominal parts of the right and left sides of the carcass, then from the forelimbs, chest, forearm, shoulder blades and neck from the right and left sides.
After this, the head and fetlock joints of the front and hind limbs are cut off. Whitening the carcass and removing the skin during horizontal cutting is carried out in the same sequence manually on the carcass fixed on the floor on the forks with its back down. To hold the carcass in a horizontal position, props are placed. First, the skin is removed from the front and hind limbs, while the limbs are broken at the wrists (knees) and hock joints.
After separating the limbs, a whitewash is made in the area of the udder (or scrotum) and groin, and then a longitudinal incision is made in the skin along the white line of the abdomen to the chest, without damaging the abdominal muscles and at the same time separating the right edge of the skin to a width of 4-5 cm along the entire length of the incision. The skin is removed from the right side, and then in the same way from the left. Next, the skin is removed from the neck, first from the left side, then from the forearm, from the front part of the chest near the neck, from the neck itself to its upper part at the withers. In the same order, remove the skin from the right side of the neck.
Then the sternum is sawed or cut exactly along the midline of the sternum, having first made an incision starting from the cap. In this case, the integrity of the internal organs should not be compromised. After this, the carcass is raised to a semi-vertical position for final skinning.
The skin is pulled back at the hock joint and separated from the upper part of the thigh to the top of the thigh towards the head of the hip joint. After the thigh is skinned, it is separated from the side of the belly and the upper back (sacrum) down to the spinal column. The skin from the left side (up to the lumbar vertebrae) begins to be removed from the maklok. In the same sequence, remove the skin from the right side of the carcass.
Skinning is completed by sealing the tail. To do this, make a longitudinal cut in the skin along the underside of the tail to its root, close the skin on the rump around the root of the tail, and then, with a sharp jerk, pull the tail out of the skin. The rectum is separated from the walls of the pelvic bone, squeezing its contents into the intestines. In this case, cuts to the bladder and rectum should not be allowed.
Before skinning the shoulder blades, it is advisable to raise the carcass to its full height. The skin is finally removed from the outside of the shoulder, from the side of the chest and partially from the back (to the ridge); They also remove the skin from the right shoulder blade, the side of the chest and the back.
Layover
Pikel penetrates the skin almost immediately after getting wet. The rest of the time, the product is evenly distributed over the skin. Curing is the period that the skin will spend in the solution. It must be at least 24 hours. To speed up pickling, you can increase the amount of acid to 20 g per liter of water. But at the same time there is a chance to worsen the quality of the final result.
The process is considered complete when, when squeezed with fingers, a white stripe forms at the fold of the flesh. At the same time, it should not go away for quite a long time.
Nutrovka.
After skinning, evisceration is carried out. Proper removal of entrails during the cutting process is important in preventing the contamination of meat by microorganisms. Delayed nutrification creates conditions for the spread of microflora into surrounding tissues. Therefore, the internal organs are removed no later than after 30-40 minutes. after bleeding. The gastrointestinal tract and thoracic organs are removed entirely with preliminary double ligation of the esophagus, duodenum, bladder and rectum.
At the same time, cuts and damage to the stomach and intestines are avoided, which could contaminate the carcass. If such contamination occurs, the carcass is cleaned. It is better to perform evisceration with the carcass in a vertical position over a clean container (dish).
First, the connections of the rectum, bladder and genitals with the walls of the pelvic cavity are released. The abdominal wall is then cut along the midline alba and all organs are removed.
If you cut up a livestock carcass in a horizontal position, take special precautions when removing the entrails. Then the carcass is sawn or cut along the spine into two equal halves (right, left half carcass). Sometimes each half carcass is divided with a knife between the 12th and 13th rib into two quarters.
Finally, the carcass is dry cleaned, carefully cutting off with a knife and removing contaminated areas, bruises, bruises, blood clots, remnants of the diaphragm, and scraps of tissue, paying special attention to the area of the cut and limbs.
Some owners use a wet toilet (wash) of the carcass, pouring a stream of cold water over it and cleaning it with a brush. However, this should not be done, since washing leads to the contamination of the entire surface of the carcass (or half-carcass) with microflora, although outwardly it looks very clean and attractive.
Soaking
The next stage of dressing the skin is to soak it. For 1 kg of trophy it is worth preparing about 8 liters of solution. Furacilin and salt will prevent the growth of bacteria in the solution. The detergent removes dirt and softens. Before laying the skins, the solution must be moved very well.
For skins with short fur, you can use a little less solution, but for long pile, on the contrary, you need more liquid so that the fur does not get tangled. Do not try to straighten dry skins before soaking, otherwise they may break. The soaking process takes quite a long time. Periodically, the skins need to be stirred a little. If they are very dry, then they need to be taken out and straightened. Depending on the initial condition of the skins, the solution should be changed several times to a new one. Steamed skins (only removed) and soaked in salt should be soaked for about 2 days; well-dried skins should be soaked for at least three days. As soon as, with little effort, the hairs pop out of the skin along with the bulbs, the process can be considered complete. The skin needs to be squeezed out well.
What tools and materials will be needed?
Dressing rabbit skins will require some knowledge, skills, materials and tools. This process cannot be accomplished without the use of chemicals.
There are several processing recipe options that use different tools. An approximate list of components is as follows:
- much water;
- table salt – 10 packs;
- a little more than a liter of electrolyte;
- baking soda – 3 packs;
- formaldehyde, ammonia, chrome alum;
- laundry soap or washing powder;
- to draw the skin you will need blanks;
- wooden spatula for mixing skins;
- knives: sharp, dull and with replaceable blades;
- table top;
- hammers, nails;
- large bowls;
- latex gloves.
When working with chemicals, compliance with safety rules is imperative. The order of priority is also important: acid is poured into the water. After finishing the work, the tool must be processed, thoroughly washed and dried.
Removing the skin from the hind legs.
We begin to “undress” the hind legs.
Using the tip of a knife, make a U-shaped semicircular cut in the skin on the hind legs. It happens that a rabbit’s feet are very dirty, in this case we cut off the ends of the front paws at the wrist joint. The mark of the knife should begin at one of the hocks, pass through the anus and end at the second hock. If the rabbit's feet are well spread with a properly selected spacer, then this will not seem difficult to you. Now there is an opportunity to expose the hind legs, which is what needs to be done. Most likely, you will have to make additional ring cuts around the anus and genital area. The smaller the diameters of these cuts, the better. But you can simply slide the blade under the bridge of the crotch area and cut the skin in this place, holding the blade upward.
Alternative finishing options
The process of preparing rabbit skins is the same everywhere. Many craftsmen adhere to the old methods of making leather, which were used by their fathers and grandfathers. Two methods are of interest.
Using sour milk
The step-by-step process looks like this:
- Rub the skin generously with salt.
- Turn inside out and leave for 3 days.
- Then thoroughly shake off the salt, pour week-long sour milk into a container, and immerse the skins in it. For each skin, use 1 liter of acidic product.
- Leave for another 3 days.
- Finish the job by washing the canvas, cleaning the core and drying.
Fresh dry method
The fresh-dry method speaks for itself. No solutions are used. Step-by-step recommendations:
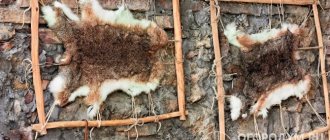
- Place the removed stockings on the rules. When distributing the fabric, the length should be three times the width.
- Carefully attach the product with small nails.
- Treat the inner and outer covers with sawdust mixed with gasoline, clean the fur from various debris.
- Wipe everything with a clean rag and dry thoroughly.
Criterias of choice
Skinning knives must meet the following requirements:
- Ease of cutting the skin.
- Sufficient blade hardness. The optimal metal hardness is 55 HRC or more.
- Blade wear resistance.
- Ability to resist corrosion. The process of skinning prey involves a moist, viscous environment.
- No need for frequent sharpening.
- Ergonomic handle. The ideal skinner handle should be straight and have no bends or grooves. The best material for the handle is wood. The types of wood used are Karelian birch, walnut, wenge and some others. When making handles for good knives, plexiglass is not used, since it is a slippery and uncomfortable material.
- There should be no engravings or patterns on the handle or blade. Decorations are suitable for collectible knives, but they only get in the way when doing work.
GOST requirements allow the use of the following metals for the production of skinning blades:
- steel and its alloys (low-carbon, alloy or Damascus steel, damask steel);
- composite compositions (for example, steel with the addition of titanium nitride);
- other materials (including zirconium).
Some types of steel undergo additional processing, including grinding, heat treatment or burnishing. This gives the material additional performance characteristics.
From the point of view of working features, Damascus steel is best suited for making a skinner. However, this metal is not resistant to moisture and must be thoroughly wiped dry after use.
Notes[edit]
- Churchill 1983, p.2.
- Burch 2002, p.63
- ↑
Burch 2002, p.66. - ↑
Churchill, 1983, p.44. - Burch 2002, p.63
- ↑
Churchill, 1983, p.44. - ↑
Churchill, 1983, p.44. - Vince, Ray. "Tips and Tricks for Taxidermy and Field Care". Hunting Tips and Tricks
. Retrieved March 17, 2013. - Triplett 2006, p.52
- Triplett 2006, p.53
- Vince, Ray. "Tips and Tricks for Taxidermy and Field Care". Hunting Tips and Tricks
. Retrieved March 17, 2013. - Pritzer, Barry. Encyclopedia of Native Americans: History, Culture and Peoples. New York: Oxford University Press, 2000. Print.
- ↑
Carlos, Anne M., Frank D. Lewis (February 1, 2011).
"Economic history of the fur trade: 1670–1870". EH.net Encyclopedia
. Archived from the original on March 8, 2013. Retrieved March 17, 2013.CS1 maint: multiple names: authors list (link) - ↑
Carlos, Anne M., Frank D. Lewis (February 1, 2011).
"Economic history of the fur trade: 1670–1870". EH.net Encyclopedia
. Archived from the original on March 8, 2013. Retrieved March 17, 2013.CS1 maint: multiple names: authors list (link)
Links[edit]
- Birch, Monte. The Complete Guide to Skinning and Tanning: A Complete Guide to Working with Hides, Fur, and Leather
. Guildford: Lyons Press, 2002. Print. - James E. Churchill. The Complete Book on Tanning Hides and Furs
. Mecanicsburg: Stackpole Books, 1983. Print. - Pritzer, Barry. Encyclopedia of Native Americans: History, Culture and Peoples. New York: Oxford University Press, 2000. Print.
- Triplett, Todd. Big Game Taxidermy: A Complete Guide to Deer, Antelope, and Elk. United States of America: Lyons Press, 2006. Print.
Veterinary technique
This technique involves the use of specialized medications that are administered by injection. This leads to the immobilization of cattle for a certain amount of time, during which it is necessary to proceed directly to bleeding and cutting up the carcass.
The use of this technique is accompanied by increased risks during the bleeding procedure. This is due to the ambiguous reaction of each individual individual to the administered drug. In this regard, it is necessary to take additional safety measures when carrying out work. Also, the introduced drug negatively affects the taste of meat products.