Instructions for creating evidence from polystyrene foam
The quality of the design will directly depend on compliance with the basic rules of construction and assembly. After preparing all the parts, you can begin assembly. Assembly is carried out in a certain sequence:
- along each edge of the wall, cut out a “four”, it is necessary for a tight connection of the fragments;
- We glue the walls with liquid nails and press them tightly together;
- We make the screed using self-tapping screws, observing a step of 9-12 cm, the caps need to be deepened by 6 mm;
- We assemble housings;
- We check for gaps and gaps, if any, fill them with polyurethane foam. If this is not done, light will enter the cracks and there will be a draft in the housing.
At first glance, there is nothing complicated about this, but you need to figure out what is included in the design and what the weight of the finished hive will be. The weight of the finished hive body without frames made of polystyrene foam is significantly lower than that of a wooden hive. Its weight is 14 kg, as a result, a weighting agent is needed for the stability of the hive.
Expanded polystyrene hives consist of the following parts:
- Ten-frame case (435x230 mm) – 4 pieces.
- Roof.
- Bottom – consists of a bottom, a hole for ventilation, a notch, a landing board and a tray.
The pallet is necessary to control wintering and is made of galvanized sheet. Thanks to this device, it is possible to prevent serious diseases in time and detect parasitic insects. During transportation, the pallets are removed so that the bee colonies do not become steamed. After removing the tray, it is washed and disinfected.
When making a hive with your own hands, you need to approach the thickness of the walls very carefully: the front and back walls are 35mm, the side walls are 25mm. Handles are cut out on the side walls for better carrying. The entrance is made with an aluminum valve.
It is better to make a feeder from nomadic mesh, with a cell size of 3x3mm. The roof is done last. For this you can use: plywood, polystyrene foam or wood. After building the hive, it needs to be painted a certain color.
When making a hive with your own hands, you need to remember that polystyrene foam is sensitive to some organic compounds. When gluing parts, you must strictly follow the instructions for using glue.
After making the house, it is left to dry for 24 hours.
If the task was set to make a multi-tiered hive, then before assembling the solid frame, you need to thoroughly wipe all the components. Only after this can you begin to connect all parts of the multi-level structure.
Assembling a hive from polyurethane foam
To create the body, 8 metal sheets are taken: 4 external and 4 internal. Spacers (bars) are placed between the slabs located inside, and the outer sheets are connected with bolts. On their inner side, pads are attached to form recesses.
The lid and base are equipped with grooves to insert sheets. To do this, you need to attach metal strips along the edges and bolt them to the part. Holes are made along the perimeter of the base into which metal rods are placed and bolts are screwed onto them. Additional holes are made in the lid for filling the material and a valve for closing.
The roof is assembled from two rectangular sheets. One is equipped with protruding sides, the second - with a protruding inner part. The bottom consists of a frame and a mesh in the center.
Pouring molds for the body, roof and base:
- Treat the internal surfaces with a lubricant, for example, a wax solution.
- Pour the polyurethane mixture into the mold through the hole made.
- The foam gradually expands. Once outside, close the hole with a valve.
- Let the mixture harden (30 minutes).
- Remove the bolts, knock down the top of the mold, remove the spacers and the remaining sheets.
- Trim off excess and clean edges.
To protect against sunlight, it is recommended to coat polyurethane sheets with protective paint.
Basic principles for making hives
How to make potholders with your own hands - choosing a shape, material, good advice and photo ideas
Making beehives at home involves the following rules:
- Parts for the future product must be smoothly planed. Burrs and nicks are not allowed. The cut points should be at right angles to the longitudinal edges.
- It is necessary to ensure that when sewing the bodies together, the cut from the core side is on the outside.
- The planks are connected using nails. Their thickness is selected taking into account to avoid splitting of the material.
- Dried wood may develop cracks. To avoid this, it is recommended to prime the outer walls of the hives with a drying oil-based primer. A light shade of paint is added to it: white, blue or yellow.
- Bee houses can be made from boards of any width. It is recommended to make the walls from the inside from one solid board or from two, which are connected by a tongue or groove. The outer cladding can be made of planks of any size. They should be located at different levels.
- Do-it-yourself beehives are made according to the pattern. Drawings are of paramount importance. Without them, it will be very difficult for the master to imagine what he is doing.
Impact on honey quality
How to make a craft from tinsel with your own hands. garland decoration. how to make a Christmas tree with your own hands at home for school or kindergarten
Polyurethane foam itself is an environmentally friendly material. Therefore, it is safe not only for bee colonies, but also for humans, from the point of view of its possible effect on honey.
Numerous studies have shown that polyurethane foam does not emit any foreign chemical elements around itself that can pollute the air or beekeeping products.
But one main feature must be taken into account - low-quality polyurethane foam can emit a specific unpleasant odor. Bees, due to the fact that they are very sensitive to any odors, can react very negatively to such a design.
Therefore, before buying polyurethane foam hives, you need to carefully smell the inside of the products, as the smell accumulates there. If the human sense of smell detects the slightest odors, such products should be discarded. It is necessary to choose those that are truly made of high-quality material.
Also, honey itself and other bee products are prone to the accumulation of foreign odors. Therefore, even if the bees accept such a house, in the future the honey may acquire a subtle smell that is formed inside such a synthetic product.
The use of high-quality polyurethane blanks eliminates these negative aspects.
Design features of polyurethane foam hives Nizhny Novgorod
In Russia, hives can also be made of artificial synthetic material - polyurethane foam. This design has long been valued in Sweden, Germany, Finland, and Poland.
Russian polyurethane foam hive Nizhny Novgorod, manufactured using molds, is not exposed to acid, alkali, salt, or paints. The PU hive does not require additional painting; it only needs to be primed at the molding stage. You can paint the hive with various paints (even with solvents) if desired. Beehives made of polyurethane foam are not subject to destruction by rodents.
The design of Nizhny Novgorod is not cellular. If dropped, the housing with frames may break at the joints. It has low thermal conductivity, which allows bees to feel comfortable in the cold season.
The Nizhny Novgorod polyurethane foam hive is made from environmentally friendly material, for which a sanitary certificate is given. The manufacturer pays attention to all shortcomings. All structural elements are solid. The polyurethane foam body is rigid, durable, and does not collapse over time.
All elements are connected using seam joints, which ensure strength and reliability. The Nizhegorodets hive provides for a backlash horizontally located between the housings. This way you can quickly separate the polished structure.
Beehives made of polyurethane foam are characterized by increased density. There is no need to place inserts under the frames. There are elongated handles on the sides for the beekeeper’s convenience when lifting the hive using an apilift, which is reliable and safe.
It is important to choose a mesh bottom complete with a sliding full-fledged tap hole. The PU hive can be painted with different paints. For technological purposes, when making a hive using molds, an anti-adhesive lubricant is used, so the polyurethane foam does not stick to the mold. Acrylic paint is not suitable in this case, as it often comes off in whole pieces. Afterwards, fuzzy edges and blurred edges appear.
However, sometimes wax may remain on some structural parts of the hive after production. The manufacturer takes this into account and uses sandpaper to burn the wax in the sun.
If you decide to make a polyurethane hive using molds, you must take into account all the nuances. This is the only way you will get a lightweight, durable, reliable, comfortable design. In Russia, such a hive has just begun to become popular; abroad it has long been valued in beekeeping. During production, it is necessary to rely on the experience of beekeepers from different countries.
When making a polyurethane foam hive with your own hands, be sure to use high-quality molds. This design is distinguished by its thermal insulation and waterproofing.
Hives - today, appearance and advantages
How to make your own brooder for chickens
It is generally accepted that the first to invent a hive using frames was the beekeeper P.I. Prokopovich in 1814. However, the first patent, which was registered in 1851, was assigned to the American L.L. Langstroth. It is he who is considered the inventor of hives with frames removed from above. This method is still relevant today.
In our open spaces you can see the following types of hives:
- Horned is very simple and easy to use. It holds 10 frames and this species is very common in apiaries;
- Cebro is a multi-body hive. This type of house tolerates severe frosts well down to -40, as well as extreme heat up to +35 degrees;
- Cassette is a rather rare model. It looks like shelves in a closet, which is very convenient when pulling them out of the house;
- Japanese hive or Varre - this structure completely lacks frame material. With a good harvest, the weight of one body together with honey is 15 kilograms;
- The Russian hive - the original model has not been used for a long time. It was modernized many times and became approximately the same as we see it today in apiaries;
- Vee Voh - Finnish bee houses. Made from lightweight polystyrene foam material. Today it is gaining popularity here too.
How to make propolis ointment: its properties and usesRead
So, as you can see, there are a lot of beehive models. You yourself can come up with something and modernize it so that the manufactured hives are suitable for your climatic conditions.
Costing and equipment
The calculations presented below are just averages. Some deviations in price, quality of materials, and production technology are possible. The costs of producing polyurethane foam hives are not difficult to calculate.
Calculation for making a bee house cover from polyurethane foam
Dimensions:
- length - 450 mm;
- width - 540 mm;
- thickness -70 mm.
The total V of the required polyurethane foam with a density of 60 kg/m³ is 0.01701 m³. Total mass of polyurethane foam components: m = p × V = 60 × 0.01701 = 1.0206 kg.
Any technological process is accompanied by losses. As a percentage, this is approximately 10 to 20% of the estimate. You need to understand that the risk of culling also exists.
- The reason may be:
- low mold heating;
- the amount of poured material does not meet the requirements;
- excess of poured material.
The total weight of a hive for bees made of polyurethane foam is no more than 7 kg.
Calculation of the number of parts required for the manufacture of bee houses with a wall thickness of 40 mm:
- cover : length 540 mm, width 450 mm, height 70 mm, weight (p=60 kg/m³) - 1100 g, weight (p=100 kg/m³) - 1320 g;
- base (bottom) : length 560 mm, width 450 mm, height 105 mm, weight (p=60 kg/m³) - 1400 g, weight (p=100 kg/m³) - 612 g;
- body (for frame 300) : length 540 mm, width 450 mm, height 300 mm, weight (p=60 kg/m³) - 2800 g, weight (p=100 kg/m³) - 1944 g;
- body (for frame 230) : length 540 mm, width 450 mm, height 230 mm, weight (p=60 kg/m³) - 2100 g, weight (p=100 kg/m³) - 1636 g;
- magazine (for frame 155) : length 540 mm, width 450 mm, height 155 mm, weight (p=60 kg/m³) - 1400 g, weight (p=100 kg/m³) - 1080 g.
Check out
Polyurethane foam hives: features, how to make them yourself
To calculate accurate cost data, it is recommended to familiarize yourself with the price list of companies and resort to the services of a competent estimator.
What equipment is needed for pouring polyurethane foam depends on the mold for making hives from this material. The volume of products produced depends on the performance of the filling machine.
Use:
- foam generator “NAST – 7M”;
- foam generator “NAST – 10” - a unit of increased productivity;
- foam generator TMS – 5, it is distinguished by its compactness and the ability to carry out both pouring and spraying;
- UZK-22 device - the kit includes a pouring block that allows you to produce molded structures by pouring polyurethane foam into a mold or formwork.
Preparing to create a hive with your own hands
How to make a beehive yourself, according to existing drawings? To start making a bee house with your own hands, you will need certain materials and tools:
- metal ruler;
- extruded polystyrene foam (sheet);
- stationery knife;
- steel corner;
- liquid Nails;
- a circular saw;
- screwdriver;
- self-tapping screws;
- sandpaper (fine-grained).
After preparing the necessary materials and tools, we begin to work on the drawings. When working, you should perform all actions according to the diagram:
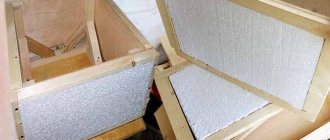
- Initially, we mark the polystyrene foam sheet according to the size of the planned bee house. Here we need a felt-tip pen and a metal ruler.
- We cut out the required number of parts along the intended lines using a stationery knife or a circular saw.
- To ensure that the future product has a neat appearance, it is recommended to sand the edges using the sandpaper we prepared.
Features of keeping bees in polystyrene foam hives
Wintering in multi-hull hives made of polystyrene foam does not involve bringing the hives into a special winter hive. Otherwise, there is a risk that the bees will become exhausted. When preparing families for cold weather, it is enough to move the boxes towards each other. This will keep you warm.
If there are wooden hives in the apiary, it is recommended to plant strong families in them. And leave the weakened layering in polyurethane foam boxes. With the approach of spring, the houses are placed in their places. It is worth noting that the activity of bees in polyurethane hives begins earlier than in wooden hives.
Basic requirements for homemade hives
1. The presence of a ventilation window in the bottom, covered with a fine-mesh metal mesh, and having dimensions of no less than 300 by 300 mm. This window is kept open all year round so that the bees do not get tired during the winter and do not start swarming in the summer from the stuffiness.
2.Use canvas, possibly polyethylene. Some homemade models are equipped with ventilation under the lid:
This is a universal roof that is used in two positions:
- mesh down - for ventilation in summer;
- with the mesh facing up - to ensure a solid ceiling in winter.
3. Ensuring a tight fit of the body sections vertically - there should be no gaps that the bees will begin to insulate with propolis! Removing tightly glued parts with a chisel can damage them.
4. A small horizontal play is a mandatory design feature that allows you to carefully remove the body sections. When tearing off the body, you can carefully move it back and forth and left and right. For non-rebated models, no backlash is needed!
Features of beekeeping
In order not to be unfounded, here is a review from Czech beekeeper Petr Havlicek, who tested polyurethane foam hives for several years.
- a microclimate that is exceptional in its properties is created in a bee’s home - nests develop rapidly, starting in early spring;
- each hive rebuilds at least one body of foundation;
- all bee colonies in the multi-hull systems with 4-5 extensions used are quite strong and produce up to 90 kg of marketable honey per season;
- for the winter, the nests do not require reduction, which simplifies the maintenance of the apiary - there is no need to store dry matter, protecting it from moths;
- to prevent swarming, layering should be done in mid-May, reuniting separated families by winter;
- The quality of the hive is enhanced by the use of aluminum foil - it covers the structure from the inside and outside.
Characteristics of hives
Domestic beekeepers rarely make houses from polystyrene foam and polyurethane foam. The boards are used in the construction sector for laying high thermal insulation. However, private apiaries are still testing a new type of structure made of lightweight and durable material.
Externally, hives made of polyurethane foam and polystyrene foam are similar. The plates differ in their characteristics. Penoplex hives are not durable. Because the density of the material is low and susceptible to crumbling. But polyurethane foam is denser in composition. At the same time, houses made from both types of slabs are warm. In winter, beehives do not need additional insulation. And in summer the walls create a protective barrier from the heat.
Structures made from polyurethane foam and polypropylene foam are resistant to:
- moisture;
- swelling;
- rotting;
- deformation.
Important:
A hive made of polyurethane foam should be protected from open fire. Because this material is highly flammable.
Houses made from factory-made polyurethane foam are practical. They are easy to maintain and replace parts if parts wear out. A beekeeper can make hives from polystyrene foam with his own hands. At the same time, there is no need to additionally insulate bee houses.
Made from expanded polystyrene (PPS)
Beehives made of polystyrene foam have been manufactured relatively recently. The material is popular because:
- PPS is resistant to moisture;
- well ventilated in winter and summer;
- if polystyrene foam hives are damaged, repairs can be made;
- economical in operation.
Bees living in a house made of PPS less often go into a swarm state and develop better. Expanded polystyrene houses are easier to transport to a new site.
To make hives from polystyrene foam you will need drawings. The technique for producing bee houses is not complicated. But it should be noted that polystyrene foam is a fragile material that must be handled carefully.
Made from polyurethane foam (PPU)
PPU hives are structures made from modern material. In European countries, polyurethane foam boards are widely used in apiaries. Although polyurethane foam is a synthetic material, it is completely safe for insects. Czech beekeeper Petr Havlíček tested hives made of polyurethane foam for several years and determined:
- in such a house, insects develop their own microclimate and families begin to develop in early spring;
- each bee colony rebuilds at least 1 building of foundation;
- all families are strong and produce up to 90 kg of honey in one season;
- There is no need to reduce the nest for the winter. This simplifies the maintenance of the apiary;
- To avoid swarming, beekeepers make layering from mid-May. And by winter, separated families are united.
For protection, the structure is covered with aluminum foil.
Polyurethane foam hives: advantages
Although hives made of polyurethane foam appeared on the Russian market relatively recently, they managed to gain popularity among the majority of beekeepers due to a number of positive qualities:
- High degree of thermal insulation. In hives made from this material, bees do not overheat in extreme heat, and in cold weather, polyurethane foam retains heat well;
- Good sound insulation. For a bee family, especially during wintering, sound insulation means being at peace, and, therefore, preserving the strength to respond to an imaginary or real threat;
- Versatility of design. Thanks to the interchangeability of parts, the hive can shrink in winter or expand in summer, giving the bee colony free space to develop;
- Lightness of the material. This is an important detail, since when working with wooden structures, the beekeeper often has to resort to outside help. Three hive bodies made of polyurethane foam weigh no more than 17 kg, and its parts are so light that it is impossible to crush a bee with them;
- Ease of transportation. Such hives have special fastening devices and ventilation holes;
- Environmental friendliness. If you purchased a hive with a quality certificate, this guarantees its harmlessness to bees and humans, since such material does not emit harmful chemical odors;
- Durability. Thanks to the smooth surface after hardening, polyurethane foam is not damaged by mice, moths and other insects (including bees), unlike the same foam. Therefore, it can serve for a very long time, up to 25 years;
- Inert to chemical influences. This is also an important factor that allows you to paint the material on the outside and treat the hives from diseases inside.
About the material
PPU and PPS boards are more in demand in industrial construction than other foamed polymers. The structure of the material is similar to expanded foam. It consists of polyurethane foam and polypropylene foam from synthetic polymers filled with gas.
Expanded polystyrene and polyurethane foam have a number of advantages:
- high waterproofing;
- good adhesion;
- low vapor penetration;
- low thermal conductivity.
The material does not become moldy. It is not spoiled by rodents. PPU and PPS are resistant to mechanical stress, have a low specific gravity and provide good sound insulation. But it is worth emphasizing that beehives made of polystyrene foam are easily flammable and deformed from direct rays of the sun. Therefore, the material is hidden from aggressive ultraviolet radiation.
What is the feature
The sides of the case have a smooth surface. Attracts a beautiful white color. Such hives do not require additional insulation, such as pillows.
Most beekeepers recommend using polystyrene foam evidence in the summer, when pollen is actively collected. The entrance in such a hive is quite wide open, which allows air to penetrate inside. In this case, the bees do not feel hot, and they breathe freely in any opening.
During the winter period, or in a humid climate, special bottoms are created that help to establish taphole barriers.
The current apiary does not use various rags, cotton wool or small hand-made blocks to reduce the entrances. They are not practical and difficult to use.
Manufacturing
In order to save on purchasing polyurethane foam hives, you can assemble them yourself.
This is quite easy to do, but only if you follow a certain sequence of actions:
- Make a preliminary drawing of the hive (you can get it on the Internet).
- Then draw the individual structural elements.
- Buy high-quality polyurethane foam.
- Cut out individual elements, maintaining the dimensions from the drawing.
- Degrease the entire surface of each element.
- Paint the outer surface and allow to dry completely.
- Assemble the product.
How to make a beehive from PPS with your own hands
To make a beehive from polystyrene foam with your own hands, you will need drawings and polyurethane foam boards. For bee houses, a material with a thickness of 50 mm is chosen. The higher the density of the slab, the better the sound insulation and the lower the thermal conductivity.
Penoplex or polystyrene foam is suitable for building a hive. The structure of expanded polystyrene resembles a foam sponge. And penoplex consists of small balls.
It is more convenient to assemble a foam plastic structure with your own hands according to the drawings. This will allow you to correctly calculate the amount of material and economically cut out all the elements.
Preparation of tools and materials
For foam hives, you need to purchase material. The standard size of the slabs is 1.2 m by 0.6 meters. To fix the cut parts you need:
- glue;
- liquid Nails;
- 70 cm self-tapping screws.
To prevent the folds from breaking from the inside, they are reinforced with metal corners. First, the dimensions of the parts are drawn on whatman paper. They are then transferred to slabs. To cut the material you will need:
- meter ruler or tape measure;
- felt-tip pen;
- knife;
- fine-grained sandpaper.
Additionally, the beekeeper will need a fine-mesh metal mesh. It is used to close holes intended for ventilation.
Dimensions
The easiest way is to make a 6-frame hive from polyurethane foam. Experienced beekeepers recommend using Dadanov’s scheme for assembly. If desired, you can make a sun lounger. But a common design is for 10 frames measuring 375 by 450 mm.
For experienced beekeepers, drawings for 16 frames measuring 300 by 435 mm are suitable. This hive provides:
- nesting section 690 by 540 and 320 mm;
- half-frame magazine 690 by 540 and 165;
- cover and bottom 690 by 540 by 80.
These parameters are considered optimal. Moreover, domestic manufacturers produce compact modular houses for insects using similar parameters.
Drawings of polystyrene foam hives
The dimensions of the hive directly depend on its design. You can make a multi-body lounger according to Dadan. To do this, prepare the elements:
- cover 535 by 610 mm;
- strapping under the lid. The front and back are cut 610 m, the sides 535;
- the floor is cut 600 by 375 mm;
- ventilation holes intended for the floor are 200 by 300;
- the rear trim piece is cut 375 mm in length, 130 mm in height and 50 mm in thickness.
In addition, you will need to make side parts 650 mm long and 130 mm high.
Build process
Making beehives from polystyrene foam is carried out as follows:
- drawings are applied to paper, all elements are cut out and transferred to the slab;
- the sheet is cut according to the markings transferred from the patterns;
- the cut parts are polished;
- folds for installing frames are mounted on the parts of the back and front walls;
- finished structural elements are glued together. To strengthen the joints, self-tapping screws are inserted;
- From the outside of the box, recesses are cut along the handle.
The finished box is secured with straps. The belts are not removed until the glue has completely hardened. The cracks are filled with polyurethane foam.
The final stage of work
After two days the glue will completely harden. Then the belts are removed. Ventilation holes are covered with metal mesh. On the inside, the folds are fixed with steel corners. then the hives are painted with façade paint.
Polyurethane hives
A hive made of polyurethane, just like a polyurethane foam one, is distinguished by its lightweight design and excellent quality. They consist of the following elements:
- The bottom has an anti-mite mesh, which is made of galvanized material with 2 mm cells. There is also a bottom and a high-quality tray.
- To save a little money, you can make the pallet yourself. Materials such as MDF, plexiglass, plywood, and galvanized sheet are perfect for this. It would seem, why do you need a pallet? But, in reality, it performs important functions. Firstly, it is possible to accurately determine the degree of presence of mites, and secondly, to control the number of mummies from the brood (if there is ascopherosis). If there is a need to move the hives over long distances, the pallet is removed, which ensures complete ventilation.
Polyurethane foam hive
- The main body can have different sizes, but the wall thickness is the same - 40 mm. As a rule, such hives have special convenient handles for carrying on all 4 sides.
- The lid in polyurethane models has 2 degrees of adjustment. As a rule, this is a working (permanent) position and one in which it is most convenient to move the hives. If they are moved, then there is a need to install a protective mesh.
- The transitional bottom, that is, the frame, implies the use of two queen bees, which is very important for an apiary. In this way, families are separated: a plastic mesh is installed directly on the body, on top of which a frame is placed.
The body elements can be assembled with self-tapping screws (80-100 mm), but all joining points are glued with a special glue. Polyurethane does not tolerate exposure to direct sunlight, so it requires mandatory painting. A huge disadvantage of this hive is its short operational life: a maximum of 5 years. Therefore, the price of polyurethane hives is lower. It is worth noting that, having decided to buy such a model, you must choose only high-quality material, because low-quality material is characterized by high rigidity and susceptibility to temperature changes.
Polyurethane structures
A hive made from a material such as polyurethane is distinguished by its extraordinary lightness, high quality and extraordinary strength.
Such insect housing contains the following components:
- bottom equipped with anti-mite galvanized mesh;
- pallet made of plexiglass, galvanized sheet, plywood or MDF;
- main body;
- cover with two levels of adjustment;
- a frame that will allow you to breed two queens.
All components of the case are assembled using special screws, but it is advisable to coat the joint areas with appropriate glue. This type of material, such as polyurethane, deteriorates when directly exposed to sunlight, so it is painted. The construction made of polyurethane foam has a significant drawback, which is associated with the short period of its use, namely, no more than five years. For this reason, the cost of such bee hives is much lower than others.
These structures are made using environmentally friendly material that has a sanitary certificate. Each element is fastened with a seam connection in accordance with the drawing, which increases the reliability and strength of the structure.
It is important to note the high density of the house. Handles are built on the sides. No inserts are placed under the frames. During the assembly process, as a rule, a mesh bottom is selected, which is equipped with a full-fledged sliding taphole.
If you take into account technological goals and use molds, you will need an anti-adhesive lubricant so that the raw materials do not stick to the molds.
When constructing such hives, do not use acrylic paint, as it comes off in pieces over time.
Pay attention to the quality and strength of the mold, as the quality of operation depends on this. In this way, you can provide reliable and effective waterproofing, as well as thermal insulation, which is important for the microclimate in bee houses.
If you want to purchase a similar model for your own apiary, choose the highest quality, harmless materials so as not to harm the inhabitants of these houses. It’s easy in such hives
Assembly
Assembling the hive structure is as follows:
- A pallet with a mesh is assembled; it is advisable to make it from wooden boards. At this stage, take into account that its height should be 120 mm.
- Install a liner to control passage in winter and summer.
- Then the walls of the housings are assembled. The fasteners are assembled using polyurethane foam glue.
- For fixation, the upper and lower trims are made of wooden planks.
- Ventilation is installed in the corners, which should preferably be equipped with a mesh to prevent bees from flying out.
- The last part of the structure is assembled the lid, which must be protected from moisture. Most often, galvanized iron is used for this.
Advantages and disadvantages
Traditional wooden structures are in many ways inferior to houses made of polyurethane foam and polypropylene foam:
- polystyrene foam hives do not rot or mold;
- high thermal insulation characteristics;
- polyurethane foam hives are safe for insects and people;
- good sound insulation;
- light weight of the finished hive;
- the house is spacious and suitable for a large bee colony;
- easy to assemble and disassemble;
- protected from overheating in summer;
- strength.
Bee hives made of polyurethane foam are easy to disassemble. Since all elements are interchangeable, the finished structure can be increased or decreased in size.
Houses made from polyurethane foam also have disadvantages:
- the hulls are not cleaned of propolis. Along with the valuable substance, crumbs of PPS and PU foam fall off;
- problems with performing disinfection;
- The condensate released accumulates at the bottom of the hive. Since the material does not absorb moisture;
- low strength.
Another disadvantage of PU foam is its lightness. In strong gusts of wind or storms, hives can be blown away. Therefore, it is necessary to strengthen the structures.
Making beehives from polyurethane foam with your own hands at home
The process of making a hive at home.
The first step is to purchase pine boards. Their thickness must be at least 25 millimeters
It is important that they are dried as best as possible. Humidity should not exceed 15 percent
Next, a pallet is made from the boards, the height of which should be 120 millimeters. There should be a grid in the floor. There should also be a rear debris removal door and a front slot caster. You should also take care of the liner to control the winter or summer passage.
The walls of the housings must be mounted using solid five-centimeter polyurethane foam covered with aluminum foil. All parts must be attached to the groove with polyurethane glue. A fold is selected separately for the upper cut, the height of which is approximately 10 millimeters. It is necessary for more reliable hanging of frames. All this is secured using a wooden insert, which should be installed in the grooves.
Next, two wooden straps in the form of an upper and lower frame are fixed to the outside of the hive body. The parts must be secured with glue, however, for greater reliability, it does not hurt to fix them with screws. Their length should not exceed 9 centimeters.
To ensure ventilation, small holes should be made in the corners of the structure. To prevent the bees from flying out, the holes can be covered with a net. There should be no free space under the frames, but above the frame it should be no more than 7 millimeters.
The last detail for the future hive is the lid. In order to make it, you need to stuff the shield onto the harness
It is also important to ensure that the cover is protected from rain and snow - for this it is best to use galvanized iron or any other protective materials
Now the hive is ready and you can paint it. Making a hive according to this plan is quite easy, which is why all novice beekeepers use it.
Beehives made of polyurethane foam can be purchased ready-made. Today there are many models on the market from various ones, “Khimekselen”, “Bdzholyar”, “Nastusya”, “Khimtrast”, etc. It is also possible to make houses for bees with your own hands, starting from pouring the body.
You can quickly make a hive from polyurethane foam, but you will need certain knowledge and skills
It is important to prepare the necessary materials, tools and components for pouring, and also strictly follow the manufacturing instructions. The recommended temperature in the room where the hive is made is +18…+25°С
Necessary materials and tools for work
To make a polyurethane foam house for bees you will need:
- molds for making the body;
- release agent;
- roller;
- 2 containers for filling components (0.5 l plastic buckets are suitable);
- a wooden spatula (kitchen) or trowel for cleaning out the remaining filler from the bottom;
- a special mixer or drill with an attachment for mixing paint and concrete;
- components for pouring polyurethane foam - polyol and isocyanate;
- kitchen scales for accurately measuring doses of components;
- screwdriver (screwdriver);
- self-tapping screws
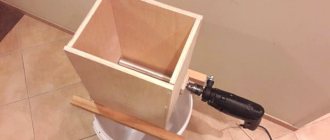
Step-by-step manufacturing instructions
It takes about 1.5 hours to make parts for the body of one hive. No additional drawings are required, since pouring using ready-made molds and assembling the body is quite simple.
To make the walls, roof and bottom, you need to perform the following steps:
- Coat the insides and projections of all molds well with release agent using a roller.
- Leave until the grease dries completely.
- Place the molds at a slight angle for better distribution of the potting mixture.
- Prepare the required number of components for pouring.
- Pour the isocyanate into the polyol and very quickly - within 10-20 seconds - mix the components until smooth with a drill attachment and pour into one of the molds.
- Cover the mold with a lid and secure with latches.
- Open the lid after 40–60 minutes.
- Fill the molds for the walls, roof and bottom in the same way. Before each subsequent pouring, the mold must be cooled to +45°C and below.
Assemble the hive body as follows:
- Connect the dovetail joints of the walls.
- Alternately connect each pair of upper and lower joints, central parts using self-tapping screws.
- Apply paint used for exterior use, such as ENAMEL, PF, etc., to the outer casing.
maintain an optimal climate for insects.
Using casting molds
If you use a self-foaming composition at home, you will need special forms for hives made of polyurethane foam. Two-component polyurethane foam is suitable for filling, for example, the Vladimur 3017-1p or Izolan system.
To prevent the polyurethane foam from sticking to the mold parts, the inside is treated with wax dissolved in gasoline. There is enough lubricant to assemble four housings. Then the processing is repeated. This is the advice of one of the folk craftsmen, whose video lesson is given at the end of the article.
To manufacture mold parts for a 10-frame Dadan, sheet metal is used, from which blanks of suitable height are cut using a grinder, a template, a ruler and clamps (for example, for a half-frame magazine, the height is 155 mm).
If the workpiece has bends, it is leveled with a hammer - straightened on a flat surface. Four parts are cut from the blanks for the inner and outer walls of the mold, which are temporarily grabbed for assembly - welded using a corner.
All joints are checked with an angle - maintained strictly at 90 degrees. The top and bottom of the mold are also welded from sheet iron. Holes for filling are drilled at the top.
The length of the upper and lower parts in the example given is: 500 mm front and rear walls, 410 mm sidewalls. Stops for the wall are 12 mm squares.
On the outside of the inner walls, 12 by 12 mm stops are welded under the hangers of the frames. Interwall space 40 mm.
Rings are also welded onto the inner walls from the inside of the structure to install the screed during pouring of the body. The top and bottom of the form are fastened with pins. Temporary clamps on the corners are cut off with a grinder
During the pouring process, the mounting holes are covered with plugs for a while.
Using a grinder allows you to save on cutting sheets with a guillotine. But for work you will need a supply of disks. On average, one cut (cutting out one workpiece in the form of a long sheet) takes 15 minutes.
Useful tips and construction features
Polystyrene foam hives can be an excellent home for your insects. This material is environmentally friendly, retains heat well, does not rot, and does not crack. It will make a quiet and cozy home for bees. Very light in weight. When you try to make beehives from polystyrene foam with your own hands, you will see all the benefits of your work.
The downside of such hives is their lack of durability.
If you are buying a ready-made hive made from fragile polystyrene foam, pay attention to the hole in the bottom. It is very large, so rodents can get in there, and this is very dangerous for the bee colony
Using a blowtorch to control pests is not possible in these hives.
Of course, bee houses made of wood will last much longer, but caring for them is more labor-intensive, their weight is heavy, and this causes difficulties during transportation. In winter, you need to carefully insulate it: with pillows, blankets and cotton wool. Very often, birds pull out insulation materials from evidence cracks, so regular checking should be mandatory.
What is good about polystyrene foam?
- The result is a quiet, cozy hive, protected from excess heat in summer and from frostbite in winter.
- Such a durable bee house does not have voids (as happens with wooden options).
- High resistance to moisture, absence of chips and knots that prevent insects from living.
- The design of the polystyrene foam hives is easy to disassemble; if desired, the compartments can be swapped.
- Expanded polystyrene is quite light. Therefore, in the future, the hive can be easily carried and moved if necessary.
- The material is quite durable: it does not rot. Thanks to this advantage, an optimal microclimate is maintained inside.
- Finally, working with this material is a pleasure. Beehives made of polystyrene foam are easy and quick to make. If repairs are subsequently required, it is also not difficult to deal with.
The part of the house that will be exposed to sunlight must be covered with water-based paint. This way the house will live longer. It is necessary that the paint does not emit an odor (or that it is weak). Calculate the number of slabs purchased “in reserve”. Sometimes it’s not possible to make the perfect beehive from polystyrene foam with your own hands the first time. But in any case, in the future some parts will have to be replaced.
On average, the weight of such a house when finished is no more than 1.5 kg.
Video. Homemade polystyrene foam hive
If we consider evidence made from polystyrene foam, it is worth noting that they have their own characteristics and advantages that distinguish them from traditional wooden ones. These include:
- Long service life, without changes in basic characteristics.
- Expanded polystyrene is a material that is not susceptible to the growth of mold and fungal infections.
- Due to the fact that polystyrene foam hives do not emit toxic substances into the environment, they are completely safe not only for insects, but also for humans. This material does not produce substances that could then be absorbed by the honey components.
- Unlike wood, mice, rats and other animals do not experience any urge to chew polystyrene foam, penoplex and polystyrene foam boards.
- Due to the fact that foam plastic boards are produced with increased rigidity, there are hive designs that can withstand a load of several hundred kilograms. And this significantly increases not only the service life, but also the safety of the product when exposed to external adverse factors.
- Light weight allows for convenient transportation when moving the apiary to a new place for collecting honey.
- Polystyrene hives create an ideal microclimate for insects. Bees feel quite comfortable in it, both warm in winter and cool in summer.
- The material does not rot and is resistant to external sources of moisture.
- Due to the fact that in the summer heat it is not so hot inside the hive, insect swarming occurs much less frequently.
- Thanks to the smooth surfaces on the inside of the evidence, the process of care and cleaning is easier.
- It is also necessary to note the cost-effectiveness of the plastic construction. True, this is only true in the case of home-made products, since there are designs, for example, from Bee Box, the price of which is quite high.
Beekeepers' opinion
The attitude towards polyurethane foam in the beekeeping environment, as well as towards any artificial material, is wary and ambiguous.
There are the most opposite opinions - from moderately positive to sharply negative. Bee hives made of polyurethane foam are considered a source of toxic emissions - the material emits them under the influence of sunlight, as well as as it wears out during use.
But laboratory tests do not show any impurities in commercial honey. To which opponents of polyurethane foam respond - laboratory technicians are not looking for what is needed in the samples to confirm the harmfulness of this material to bees and humans. After all, it is well known that polyurethane foam is not recommended for installation in residential premises in the same way as polystyrene foam or expanded polystyrene such as Penoplex.
All these are insulation materials for external installation on buildings, including residential ones, as well as thermal insulation of various communications and ventilation systems. And in hives made of polyurethane foam or expanded polystyrene, bees are forced to come into direct contact with the building material. It is not known for certain how exactly polyurethane foam affects the resulting bee products.
Another important point is the arrangement of proper ventilation. The PPU construction is in many ways reminiscent of a thermos - it does not “breathe”, which requires the installation of a mesh on the bottom of the hive.
But at the same time, you should not be overzealous with round tap holes in the buildings - unwanted drafts may arise. It is enough to have a lower entrance slot, ventilation in the bottom and lid. However, this also causes heated debate - each beekeeper acts at his own discretion based on his own experience of using polymer hives.
Many people are put off by the price. One Dadanovsky building will cost the owners an average of 1,110-1,250 rubles (that’s what the well-known Nizhegorodets on the market costs).
Cassette keeping of bees
Manufacturing
Purchased high-quality EPP products from well-known manufacturers are quite expensive. But hives made of polystyrene foam (expanded polystyrene) can be made independently, with your own hands, with very little effort.
It is important to purchase high-quality polystyrene foam (expanded polystyrene) - this will ensure that the insect hive will meet all the standards required for such structures and remain environmentally friendly
Materials and tools
Before you begin directly to work, you need to prepare the materials for making hives from PPS. You need to get:
- Polystyrene foam, polystyrene, with a thickness of at least 5 cm.
- An adhesive suitable for gluing plastics. You can also use liquid nails.
- Metal corners that will ensure convenient use of evidence. Thanks to them, it will be easier to remove and install frames. In addition, it is these metal parts that will help maintain the folds over a long service life without damage.
- It is also necessary to prepare a sufficiently dense Whatman paper on which it will be possible to cut the structure according to the completed drawing.
- Measuring tools, marking pencils or markers.
- A knife with a sharp blade that can be used to cut material.
- Sandpaper with medium or fine grain, with which the edges are processed to bring them to the desired level of smoothness. Thanks to this manipulation, it will be possible to achieve a tight fit between two adjacent elements and the absence of gaps.
Preparation
The most important thing that needs to be done when deciding to make hives from PPS yourself is to choose the design of the hive.
After this, you should make all the necessary calculations and create a drawing based on them. At this stage, it is necessary to provide all the important elements, not only the main hive box, but also the entrances, tray, ventilation holes, as well as a mesh that will plug additional holes.
Dimensions and drawings
Before you start making a bee hive from polyurethane foam with your own hands, you need to decide on the shape. It can be done in the form:
- Dadana.
- Hive bed.
After this, you need to decide on the required sizes. They will depend on the number of frames included in the design. But, regardless of the size, it is worth considering that the thickness of the main walls must be at least 5 cm.
In the vast majority of cases, the standard housing design has the following dimensions:
- Height about 650 mm.
- Length – 870 mm.
- Depth about 530 mm.
But, in addition to these three main parameters, all other dimensions must be reflected in the drawing.
Assembly
During assembly, perform the following manipulations:
- First, assemble the body from the front, rear and side walls. It is mandatory to make edging or so-called strapping to enhance the rigidity of the structure.
- Then the folds for the honeycomb frames are cut out.
- After this, the lid is constructed structurally, not forgetting to strap it and cover it with material that protects it from moisture from the outside.
- Then the bottom is designed and executed.
- Then all the elements are assembled.
The main fastening elements are liquid nails and self-tapping screws where necessary. All small structural elements are cut out after the main assembly or fixed with glue, such as the handles of a hive.
After complete assembly, the entire structure is tied with belts. This is necessary in order to fix the product for a certain moment so that the glue dries completely.
Step-by-step manufacturing instructions, drawings
To cast polyurethane foam structures, you will need a metal mold. You can make it yourself. Most often they are made of tin and shaped like a trough. In such bases, ordinary rectangular PU foam sheets are obtained. The houses of the houses are later assembled from them. The height of the sides is made more than 9-10 mm. If you make the sides smaller, the output will be thin sheets of polyurethane foam, which will later sag.
Find out how to make your own apiary.
Making beehives from polyurethane foam using a casting mold
To work with the form you need to perform certain actions.
Step-by-step instruction:
- Lubricate the inner surface of the base with a product that can prevent the frozen foam from sticking to the metal.
- The mold is not filled to the top, because during the hardening period the volume of foam will increase. The foam hardening process lasts approximately 30 minutes.
- The finished workpiece is removed from the mold. If it is difficult to reach, you need to lightly tap it with a hammer.
- Sand the polyurethane foam part with sandpaper.
- Degrease the product and coat it with water-based paint or acrylic-based paint. It is advisable to add green color.
Video: Making beehives from polyurethane foam for your apiary
A set of Argon molds for the production of 10-frame hives
10-frame hives and accessories for them can be purchased from.
The casting molds are of good quality; the set includes:
- side walls;
- end walls;
- covers;
- bottom;
- clamps.