The entrance is the so-called entrance door to the bee house, which performs many functions in organizing the necessary microclimate inside the hive. Therefore, this element will require special attention from beekeepers. That is, you need to know how hive entrances are made with your own hands, what requirements are imposed on them, what shape and location they should have.
What it is?
The scientific literature on beekeeping states that the entrance is a hole in the hive, which is made on the front wall of the body and performs the following functions:
- provides honeybees with unimpeded access to the outside world and return access to the hive;
- reliably protects bees from predators, rodents and other pests;
- allows you to regulate ventilation and natural air exchange inside the nest;
- can participate in the creation of forced ventilation;
- briefly delays the shoulders that fly in with the bribe and fly out;
- allows you to quickly and comfortably clean hives of debris and dead bees.
The entrance is an important part of the hive, as it provides bees with comfortable entry and exit into the house, and also promotes good ventilation at any time of the year.
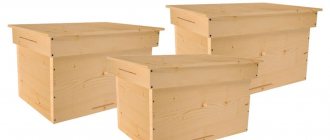
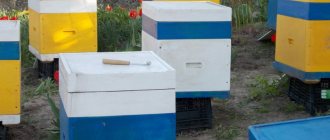
Hives “Dadan-Blatt”
History has revealed attempts to keep honey insects since the middle of the last millennium. Decks were used. In the 19th century, professionals began to think about creating devices for transportation and versatility. An emigrant from France, Dadan came to the conclusion that the most rational would be a 10-frame hive for bees with dimensions (hereinafter in all drawings everything is given in mm) 450x450. He did not have enough remaining years of his life to complete his research. What was started was continued by another American, originally from Switzerland, Blatt. He patented the brainchild, nobly mentioning his predecessor. Officially, their first-born was given the name Dadan-Blatta.
In principle, the classic twelve-frame standard with a frame of 300x450 mm is generally accepted. However, these also include 8- and 10-frame beehives. Some beekeepers prefer weanable bottoms. They are easier to change and clean
It is important to note that detachable bottoms for bee hives require special care: precision manufacturing of the component parts (to avoid blowing and moisture penetration). Others prefer tightly nailed bottoms
Some people like single-case ones with 2-3 magazine extensions. Such hives with finding bees are subject to a man with average static physical indicators. Convenient to lift and rearrange. Store-bought half-frames are filled with solid honey, without bee brood. Therefore, time wastage is greatly reduced.
Classification by shape and location
These are important characteristics of the “door”, on which the microclimate inside the case will depend.
By shape
The hole can have a different shape, depending on the design of the hive, the climate and the preferences of the beekeeper himself. Here are the popular types:
- Round . It is considered a universal option and, according to many beekeepers, allows bees to fly out and fly into the house comfortably. Can be located in the upper, central or lower part of the body.
- Rectangular . It has a length of 60-70 mm and a height of about 10 mm. Provides good ventilation to the shoulders, located both at the top and bottom of the body. Mostly found in southern latitudes.
- Square . This form is not very popular and is more often used by beekeepers from the southern regions.
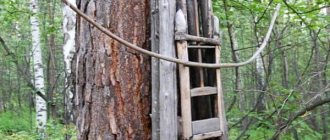
- Triangular . It is considered the most natural, since this is exactly the kind of gap that bees make for themselves in the tree. Thus, many beekeepers who strive to create the most natural conditions for their insects cut out a triangular entrance in the evidence.
- For the entire width of the wall . Such holes are typical for regions with warm climates. They are not used in cold areas, since it is extremely difficult to maintain optimal temperature conditions in hives with such an entrance in winter. If a passage across the entire width is made in multi-body “Dadanov” hives, they greatly facilitate the work of the bees, and also allow them not to waste energy on ventilation in hot weather.
By location
According to this parameter, tapholes are often of two types:
- Lower . They are located slightly above the “floor” of the bee house. The optimal distance from the bottom edge is 6-7 cm. Popularly, such holes are often called “garbage” holes, since insects use them to remove dead wood and debris. However, the lower entrances are the main ones, since they allow the main volumes of pollen and nectar to pass through. In accordance with the standard, the size of such a hole should be 200x10 mm, but in multi-hull hives it is made across the entire width of the bottom.
- Upper . They help protect the hive from thieving bees and promote good air exchange. They come in different sizes and shapes, but are often made round (up to 20-25 mm in diameter) or longitudinal (12x10 mm in size). Such holes are drilled at a distance of 4-5 cm from the top edge of the case. In summer, their length is adjusted using a barrier, and in winter they are completely closed. For greater convenience, the upper taphole is made rectangular in shape, and its size is adjusted using a movable wooden block of the same shape.
The entrance should be made at the front of the hive so that the bees, especially the queen bees, do not wander around looking for the “door”.
A little history
The famous beekeeper, from whose surname the name of this hive came, was born in France. Since 1863 he lived in America, where he began breeding and keeping bees.
Using simple calculations, Charles Dadan determined that at least 1,600 empty cells are required to store the collected nectar daily. At the same time, a high-quality “queen” lays up to 3,000 eggs per day. That is, a productive bee house should accommodate two honey bees, nine honey and brood frames. Each of the eleven frames holds 10,500 cells.
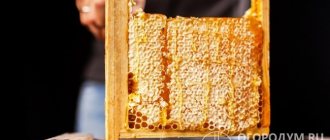
All about printed brood
In such a house there is space for an insert board (diaphragm), instead of which you can install a 12th hundred frame. Bees collect commercial honey in half-frames placed in a magazine placed on top of the body.
The beekeeper used a Queanby frame with dimensions of 470 by 286 millimeters (47 by 28.6 cm) as the basis for his design.
The Swiss Blatt improved the new hive to suit the needs of European bees - he shortened the frames. The result was a modern standard:
- the size of the Dadanovsky hive frame for the nest is 435 by 300 millimeters (43.5 by 30 cm);
- and half-magazine frames or magazine frames used for commercial honey measure 435 by 145 millimeters (43.5 by 14.5 cm).
Standard sizes
They are determined depending on the shape of the hive, but it is believed that the optimal diameter of a round entrance is 20 mm, and the convenient dimensions of a rectangular one are 65-70 mm in width and 10 mm in height. At the same time, the size of the entrance can be changed depending on the strength of the family and the time of year. So, in spring it can be narrowed to 50 mm, and in summer it can be expanded to 150 mm. However, excesses should not be allowed in either direction, as this is fraught with negative consequences:
- If the hole is very small, it will be difficult for insects to get inside the house and fly out. Considering that bees overcome such an obstacle a couple of dozen times throughout the day, the hairs on their legs wear out faster and their wings may even break off. In addition, with a small hole in the evidence, there will be a lack of fresh air, which will affect the amount of honey. To correct such an oversight, the beekeeper will have to start ventilating the nest, which will require a lot of time and effort.
A narrow opening in summer will impede air exchange, which threatens to reduce the strength of the family and its death.
- If the hole is too large, drafts may occur in the house, which pose a mortal danger to the bee colony. In hot weather, ventilation can be quite intense, but in winter the air flow must be reduced, otherwise the hive will be cold and damp.
Keeping bees and making 16 frame hives
Beekeeping is one of the most profitable types of agriculture. The efficiency of honey production largely depends on the design of the hives in specific climatic and weather conditions, which allows optimizing the care of bees: wintering, swarming, maintenance and much more.
The 16 frame hive is one of the most popular types of beehives used in the central climate zone of Russia, so you need to understand how you can build a 16 frame hive yourself.
How to make a taphole with your own hands?
When making a tap hole, the beekeeper must pay special attention to calculating its optimal parameters, since any mistake will negatively affect the performance and productivity of bees. We will consider different options for its manufacture below.
Round
The diameter should not exceed 2 cm. It can be prepared without additional installations, following these instructions:
- Drill a hole with a large drill of the appropriate diameter.
- Manually expand it to the desired size.
- Sand the edges of the hole with sandpaper to make them smooth, otherwise the bees may get injured by getting caught on sharp protrusions.
- Attach a valve of larger diameter to the edges using the latch principle.
How to make a round entrance slot and attach a landing board is shown in the video below:
Square
The size is determined depending on the strength of the bee colony and climatic conditions. According to the standard, the length of the sides of the square should not be less than 2.5 cm.
A square taphole is made according to the same principle as a round one. So, initially you need to cut out a hole with a drill, and then manually sharpen its corners and sand the sides.
Rectangular
Slots of this shape are made simultaneously at the top and bottom of the body. Their optimal sizes depend on the location:
| Location | Length, cm | Width, cm |
| Upper | 6-7 | 1 |
| Lower | 20 | 1 |
To create such a tray, you need to cut out the required shape with a sharp wood saw, and then carefully seal its edges. The top tray should be cut 4-5 cm from the ceiling, and the bottom tray should be cut at a distance of 6-7 cm to the bottom.
Triangular
A triangle-shaped slot is often made with the following parameters:
- bottom side – 3-4 cm;
- hips – 1-2 cm.
It must also be cut with a saw, and then all sides must be sanded so that there are no protrusions on them. The valve must be attached with screws, and its dimensions should be slightly larger than the taphole itself.
Full width
As a rule, it is done in multi-building “Dadanov” structures in the lower part of each building, and over its entire width. Its height is about 2 cm.
To make such a gap, you need to prepare the following materials and tools in advance:
- wood blanks for the “floor” (bars, sheet of plywood);
- a gate valve on guides or a barrier mesh with perforation;
- fasteners (nails or dowels);
- small screws for screwing the mesh;
- saw;
- drill.
The instructions for preparing a taphole for the entire width of the hull are as follows:
- Assemble the frame of the lower part (bottom) of the hive from 6 wooden blocks. They need to be carefully put together.
- Place a sheet of plywood cut to size on the frame, and attach 3 more bars on top of it.
- Install the first tier on the resulting structure, and the subsequent floors on top of it.
- The distance between the plywood and the bottom of the next tier is the entire length of the entrance, which must be covered with a valve or mesh.
The plywood structure has a service life of no more than 3 seasons, since over time it gets wet and collapses.
Hive Lezhak
The simplest and most common type of hive, usually designed for 24 frames, less often for 16 or another number. A structure such as a beehive does not require complex structures, is easy to maintain, and provides large free space for the successful development of families. It looks like a rectangular case, inside of which there are:
- stationary bottom;
- liner;
- roof;
- frame;
- frames for queens.
A spacious, simple hive that has a beneficial effect on the development of offspring and a solid harvest. Crowded nests oppress families and reduce their productivity. Therefore, many beekeepers prefer to equip their apiaries with beehives.
Varieties
According to many professionals, a 24-frame hive is a convenient home for the development of families and for maintenance. The appearance of such a hive is a small box with dimensions of 450x390 mm. Inside the hive there is a solid bottom on which two protruding bars are nailed, serving as a support for the landing area. There are other types designed for 16, 20 frames.
There are two folds installed in the upper part of the body. Frames are attached to one. The other is used for installing ceiling planks. There are several dividing boards with which the space is divided into several compartments. The roof is gable and simply fits onto the body. Having a little carpentry experience, making such a hive yourself is not difficult. The presented image makes it possible to understand the structure of the sunbed hive.
Selection of materials
Prepare the necessary materials in advance. For this you will need:
- plywood or pine boards treated with an antiseptic;
- fasteners;
- roulette;
- screwdriver;
- pliers.
Choose well-dried boards without traces of knots for the body. During service they will not be deformed. Some beekeepers use polymer materials, but bees do not always like this.
Advantages
In nature, bees create spacious homes. The collected honey is stored in the upper part of the natural nest, and cells for brood are created below. Just below there are free honeycombs where the bees carry nectar and keep it just in case. When creating hives for apiaries, people have always strived to make them as close as possible to natural nests. Has advantages:
- the ability to contain two families in one hive;
- does not present difficulties in caring for and harvesting;
- a large internal space allows bees to work more productively and actively develop families, create large food reserves for the wintering period;
- the space stimulates the uterus to a high level of egg production;
- serves as a reliable home in adverse weather conditions.
Gate valve and landing board
Previously, special gate valves for the taphole, which are also called barriers or limiters, were repeatedly mentioned. They should be given special attention because they perform important functions:
- allow you to narrow or expand the passage, adjusting its limits to the potential of the bee colony;
- participate in maintaining an optimal microclimate in the hive;
- protect insects from “uninvited guests”.
Externally, these are small plates, one of which has cutouts and moves freely. Store-bought copies are often made of wood or plastic. As a rule, they are equipped with perforated grilles for air exchange, but not for the escape of bees. Such a device can be nailed to the wall of the hive through the central hole using a screw or self-tapping screw.
Of course, you can also make the valve yourself using the following raw materials:
- plastic;
- wood;
- a dense metal grid (preferably stainless);
- thin tin plate.
The valve is made according to the principle of two parallel parts - a profile and a cover. The procedure is as follows:
- Fit the selected material to the shape of the tap hole, but in slightly increased sizes, and then drill numerous holes with a diameter of up to 8 mm along its perimeter for perforation.
- Bend one side 180° to form a guide panel.
- Place the part on the landing board and secure it to the wall of the hive using screws.
Inexperienced beekeepers neglect the landing board, but this approach is wrong, since it guarantees the bees a comfortable landing. If it is absent, then the overloaded insects will fall, which will certainly affect the pace and productivity of the bee colony.
To make it easier for insects to plant, some beekeepers also place inclined boards to the ground.
You can learn about what the entrance gap and landing board should be like from the video below:
Installation of a taphole barrier
Before making a taphole barrier, it is necessary to make a hole in the valve with a diameter of up to 5 mm. So, if the “houses” are transported, the required amount of air will enter them.
For production you will need galvanized sheets with a thickness of 1 mm and a width of 25 cm.
Making your own rectangular barrier looks like this::
- you will need a galvanized sheet with the specified dimensions;
- holes are made in the plate, so bees can fly in and out through them, while the hive is protected from parasites and rodents;
- Next, it must be equipped with a valve, this ensures air circulation; if this is not done, then dampness and fungus will form in the hive.
Different types of structures are used in apiaries. The choice is explained, first of all, by the conditions of use, the direction of beekeeping, as well as the breed of insects. It is for this reason that when choosing the type of entrance, beekeepers initially turn to their experience, taking into account the temperatures and characteristics of the location of the bees.
Adjusting the tapholes at different times of the year
Prepared “doors” do not always have to be wide open, because the ventilation mode needs to be adjusted depending on the time of year.
in winter
The entrances must be handled with particular care during the wintering period, when the bees are locked in the nest and do not have the opportunity to influence the air exchange flows. At this time, the greatest danger is not even the cold, but the dampness and stuffiness that forms under the canvas. How to properly prepare bees for winter, read here.
After eating the food, the bees, along with the vapors, release a large amount of carbon dioxide, which settles as frost on the walls of the hive and has the following characteristics:
- has the highest thermal insulation properties among all gases (3 times higher than the thermal insulation of felt);
- heavier than air, so it settles at the bottom of the nest;
- in increased quantities it contributes to a slower metabolism in the body of bees, therefore driving them into a state of half-sleep, in which they spend vital resources more economically.
Thus, some beekeepers make hives with a hermetically sealed lower entrance or over-insulate them. They hope that carbon dioxide will displace the air from below and fill the hive, creating a feather bed for the bees, which will force out its excess through the open upper entrance. However, this approach does not meet the expectations of beekeepers, since excessive insulation leads to the following negative consequences:
- air circulation and weathering of water vapor are disrupted, so mold and dampness appear on the walls;
- Excess carbon dioxide is produced, causing the bees to become too restless and eventually die.
To prevent such consequences, you need to organize a good winter entrance, which will prevent the rapid weathering of carbon dioxide, but will not allow its excess, as well as excessive dampness inside the nest.
To do this, the lower entrance should be opened to the length of the protective grille against mice, and the upper one should be opened completely. In addition, at the rear wall you can bend the canvas about 1 cm to allow air to escape under the roof. However, during severe frosts, especially during the period from the beginning of wintering to the first weeks of February, the lower entrance can be covered, but then reopened in the future to provide insects with fresh air during the egg-laying period. In this case, you need to ensure that the temperature inside the hive does not fall below 4°C.
Experienced beekeepers note that strong bees in the garden or in the yard overwinter much better with open holes. Only in severe frosts should they be covered with a net or liquid canvas. If the bee colony is weak or incomplete, and overwinters in the cold, the entrances can be pushed back to the third part or tightly plugged. In particularly severe frosts, which are accompanied by winds, the holes should also be covered with reeds or straw. Such coating must be removed immediately with the onset of a thaw.
You can learn more about how to organize the wintering of bees in the wild here.
in spring
Until the full development of the bee colony, there remains free space outside the nest, so it is better to narrow the entrance somewhat, leaving about 5 cm. As the colony grows and brood is added, it should be gradually increased in order to provide the insects with access to the required amount of fresh air.
In the spring, you can release bees to fly around while there is snow. As a rule, this happens in March. If the tapholes are covered, initially it is worth completely opening not the lower one, but the upper one. The fact is that the bees climb up the nest and actively move under the canvas, since it is in this part that the food is located and it becomes warm, while below it is still cold. After flying around, the bees will begin to warm up and ventilate the nest, so the lower entrance can also be opened wide.
In the case of weak bee colonies in the spring, the lower entrances should be closed, otherwise thieving insects can plunder the entire nest.
In summer
At this time of year, raspberries, acacias and other honey plants bloom, so the supply of nectar exceeds its consumption. In this regard, the bee colony grows, so experienced beekeepers prepare both the second and third floors above the nests, that is, a multi-hull hive is created.
In this case, you need to leave all the entrances open. The bees on the arrival board will actively wave their wings, pumping fresh air into the nest. However, even this will not be enough during the most active season of the bribe, so it is worth putting wedges between the buildings, and creating special slots for additional ventilation.
In summer, special attention should also be paid to which direction the entrances face. If it's south, then they need to be moved north. The fact is that the southern side is the hottest, so the bees will pump heated air into the hive, while they need cooler air more.
It is necessary to turn the hive over to the north side not in one, but in several steps, otherwise the bees will fly to their usual place with a heavy burden and stumble not on the door, but on a blank wall. In this case, they will begin to crawl along it in search of a crack. If they never come across it, they may scatter among neighboring families.
If in the summer a “beard” of insects forms on the flight board, it means that it is too hot inside the hive, so all the entrances need to be opened at full strength, and the holes must be prepared to increase ventilation.
in autumn
During this season, special attention should also be paid to the direction of the entrances. The optimal side is considered to be the west, since it is where the late autumn sun falls.
The fact is that in the period from September to October the mood of the bees becomes pre-winter. Every day they fly less and less, but they need to have time to make the last supplies and close the pantries with a safety seal, otherwise in winter the honey will breathe, increasing the humidity in the nest.
A bee entrance is part of a technological apparatus with which the beekeeper controls the life processes of the family, including their wintering, spring reproduction and bribe-bearing. So, the manufacture of such cracks must be approached with all responsibility, as well as their adjustment at different times of the year.
0
0
Copy link
Insulating diaphragm for the hive
It's the end of March, and the frosts at night are pressing - 12 degrees. We also have frosts in May, and I plan to do layering right at this time. And they will need to be properly insulated. I personally liked the insulating diaphragm for the hive, which I saw from Gennady Stepanenko in one of his videos.
A layer is a young colony on several frames; at first it does not occupy the entire body of the hive, and the bees need to additionally heat the free space.
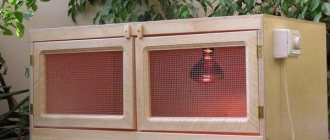
To help warm the nest, they do things differently. They squeeze it on the sides with guard boards - solid wooden plates in the shape of a hive frame, with hangers, but slightly wider. And insulation pads, like these, are placed in the space between the guard board and the side wall of the evidence.
The diaphragm that I will make today will allow you to do without pillows. At least, I really hope so; there’s almost no free space left in the garage.
I put diaphragms into empty housings, but where would I put another fifty pillows? Besides, they still need to be sewn and stuffed with something...
How I made an insulating diaphragm for a hive.
The frame requires the same parts as the hive frame. The top bar and bottom bar are exactly the same size.
And the side strips are like this, smooth without any thickening.
They are 5 mm longer than the frame strips, so that the finished diaphragm, placed in the second housing, is pressed closely against the frames of the lower housing. The thickness of the slats is also greater - 14 mm, in order to close the passages between the frame and the wall of the hive; later on in the photographs this will become clearly visible.
I knock down the frame like a regular frame, only I take stronger nails - 50 mm. We get a frame with external dimensions of 235 by 443 mm (for a multi-body hive).
That is, if you put it in the case, then there will be 6 mm gaps between the side bars and the wall of the evidence, and 5 mm between the bottom bar and the frames of the case at the bottom (if it stands). These cracks will then also be closed with rubber seals.
Types and advantages of Granovsky honey extractor
Next, I take a sheet of dense polystyrene 20 mm thick and cut it into pieces according to the internal size of the frame - 415 by 200 mm.
I put it inside the frame.
I cut pieces of four-millimeter plywood, the dimensions are the same as the outer dimensions of the frame.
And with this plywood I cover the polystyrene from the bees. I sew it with a stapler. Very fast and convenient. Staples 14 mm long.
It happens that not all the staples are hammered in completely, but then I finish them off with a hammer.
It's still faster than using nails, and the plywood doesn't split. All that remains is to adjust the seal so that the insulating diaphragm fits into the hive without gaps. For this purpose, I take a regular rubber seal for windows and doors, which is sold in hardware stores.
Hollow tube with adhesive tape. The diameter of the tube is about 6-7 mm. I attach it to the diaphragm on the sides and bottom, first on the adhesive base itself.
And then I secure it with staples, only smaller ones – 6-8 mm long.
I sew the tube on both sides to make sure it doesn’t come off.
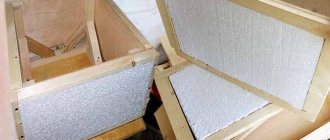
That's it, the insulating diaphragm for the hive is ready, it is also the separation diaphragm. By squeezing the nest, we at the same time insulate it.
The location in the hive is like this, it fits tightly between the walls.
If there is a lower housing, the diaphragm, with its seal, is adjacent to the lower frame.
If there is no housing at the bottom, there is a passage for bees between the bottom and the seal. I'll do layering and test it.
Manufacturing
Creating a frame for a diaphragm is similar to making a regular frame for a hive. Interestingly, the upper and lower bars will completely coincide with the size of the frame, so choosing suitable bars will not be difficult.
It is necessary to knock down a frame from the prepared slats. This process is almost the same as when making frames, only slightly larger nails are required to implement it. The best option would be a 50 mm nail.
As a result of simple manipulations, you get a kind of frame of a size suitable for a particular hive, which will fit almost tightly into its body. When installed, small gaps will remain between the frame and the walls of the hive, which in the future will be closed with insulation, and then the expected effect from the frame will be obtained.
Second phase
To carry out the next stage, you will need a piece of dense insulation, which is cut exactly to the size of the inside of the previously made frame. You can immediately insert this part into the frame. After this, a piece of plywood is cut out, the size suitable for the outer border of the frame, that is, completely corresponding to its dimensions.
We attach the plywood that protects the insulation material from bees using a construction stapler so that it holds tightly and does not move out.
Next, you should install a rubber seal on the side of the entire frame, which will eliminate the gaps from the finished diaphragm. It will become the dividing element in the design. A similar seal can be purchased at any hardware store, so there should be no problems with the choice. As a rule, such elements have adhesive tape, which will help complete the creation of the structure.
For reliability, this element can be additionally secured using a construction stapler, only in this case you will have to use smaller staples. It is recommended to fix the elastic on both sides so that it does not come off during use.
Video: warm diaphragm for the hive.
Flaws
The main disadvantages of 16 frame sun loungers are:
- Large size, heavy weight and inconvenient operation;
- Reduced rate of increase in bee strength compared to hives with 12 frames;
- Reducing the volume of honey collection, especially in spring;
- High risk of swarming - separation of the family into parts;
- The complexity of care increases if 2 families are accommodated;
- Impossibility of use in nomadic beekeeping.
Also, bee colonies exclusively develop the first 12 frames, so the level of development of the swarm and the volume of honey collection between 12 frame and 16 frame hives are the same, which increases cost inefficiency.
Wire stringing process
The wire acts as reinforcement when welding frames. Tensioning begins after the wooden frames with installed spacers are made. For this you will need:
- a coil of steel wire (1.5-2 mm in diameter);
- a drill of the same diameter, a screwdriver or a drill;
- hammer;
- pliers;
- conductor or template;
- nails for fastening wire (shoe).
Step by step procedure for stringing:
- using a template drawing or a jig, drill holes in opposite poles;
- a tension nail must be driven into the frame;
- pull the wire through the drilled holes;
- the end of the wire is wrapped around a driven nail;
- Using pliers, the wire is pulled and secured to the appropriate nail.
Important! When twitched with a finger, a stretched string should produce sounds of a musical tone. If this is not the case, then the string needs to be tightened further.
Wood or plastic
Beekeepers prefer the classics and use frames made of wood. More modern owners do not disdain plastic or equip their hives with both types. Both have characteristic advantages and disadvantages.
Wooden bee frames are a tribute to tradition, the preservation of old technologies. Many beekeepers are sure that the best honey can only be found on a wooden bee frame. This has a number of characteristic advantages:
- environmental cleanliness;
- low price;
- ease of self-assembly.
in winter
Holes for bees in winter are a topic of debate between experienced and novice beekeepers. Successful wintering of a bee colony is reflected in a small loss of community members and dryness inside the hive. The entrance has a significant impact on these indicators. It needs to be insulated for the winter, but this must be done within reason. Bees also breathe and therefore produce carbon dioxide. If you clog the holes, it will accumulate inside the nest. Overly zealous insulation can interfere with the circulation of oxygen and the removal of excess moisture. Because of this, an accumulation of dampness and mold can form inside the hive.
At the same time, the entrance in winter should prevent too much carbon dioxide from being removed from the hive, because thanks to this gas the bees are in a state of half-asleep. If you over-insulate or plug the hole, the bees will eat more, and if not enough, the bees will freeze, curl up in balls and produce even more carbon dioxide. As a result, the insects will die.
Design
To construct a 16-frame hive with your own hands, you need to know the features of the device, dimensions and much more. The 16-frame beehive bed has the following design:
- Frame;
- The bottom, which can be either removable or non-removable;
- Lid;
- A sheet of plywood covering the top surface of the frames;
- Framework;
- If necessary, a vertical partition;
- A partition separating bee colonies;
- Shop;
- Insulating structures to retain heat for successful wintering;
- Boards attached to the exit holes;
- Feeders.
The design is quite simple, so if you have experience, knowledge and suitable tools, you can easily create an apiary from 16 frames.
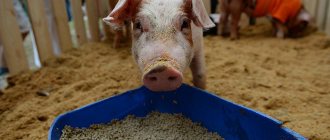
Stand for frames with honey
The stand directly under the frames with honey is used during printing or drying by bees. During the inspection process, the beekeeper needs to get at least one frame so that it is convenient to operate the rest in the hive. To avoid having to simply place the frame on the ground, you can assemble your own stand or buy a specially made one.
Stand for frames with honey
Making a stand for frames with honey begins with measuring the frames themselves, since a smaller stand will definitely not be useful. The first thing you need to do is make the base: you can take a ready-made baking sheet, suitable in size, a trough, a tray, you can carve it out of wood, but this is extremely labor-intensive and not everyone can do it. Next you will need two supports, for the first frame and dividers for the subsequent ones. The supports are made of thick wire and boards.