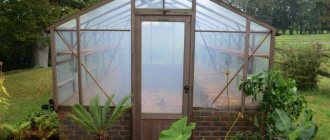
Fresh vegetables and fruits grown with your own hands are always preferable to store-bought ones. However, a greenhouse or greenhouse requires a lot of effort and energy. High humidity and relatively high temperatures are fertile ground for the proliferation of pathogens. Proper treatment of a polycarbonate greenhouse in the spring will help to avoid this problem.
The main goals of spring processing of a polycarbonate greenhouse
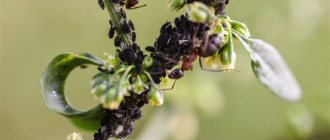
The likelihood of concentrations of insects, microorganisms and fungi requires annual disinfection of the soil and the structure itself. If you do not carry out seasonal treatments of the greenhouse, you may encounter a lot of problems in the new season:
- abundance of pests;
- fungal infections of plants;
- deterioration of crops due to exposure to weeds;
- temperature violation;
- low yield.
The main goals of seasonal processing of a polycarbonate greenhouse are:
- keeping the premises clean;
- mold protection;
- clearing weeds and their seeds;
- pest control;
- conservation of perennial crops;
- ensuring the required level of lighting and temperature;
- taking care of the integrity of the structure and maintaining its functionality.
The key to effective greenhouse treatment is frequency and adherence to deadlines.
How to clean a greenhouse in spring, inside and out
Cleanliness is the key to health. This statement is as true for plants as it is for people. If the greenhouse was washed in the fall, then in the spring there will be much less hassle. All that remains is to update the result: go over all the details of the coating with clean water using a regular rag. You can also use an electric sprayer charged with clean water or a washing system, if available.
Polycarbonate requires tenderness! Washing a greenhouse made of cellular polycarbonate should be done carefully, using microfiber cloths or soft sponges. This will prevent scratches and cracks. The water pressure in the washing station when using it should be minimal.
How to wash a greenhouse in the spring if it has been dirty for the winter? Ordinary soapy water is best suited for these purposes (it is better to use laundry soap or special garden soap). You can add a drug to the water against a particularly annoying disease or pest from last season, if there were any.
First, you can go through the greenhouse inside, then outside, leaving the foam on the surfaces for at least 10 minutes. Just when you've finished washing the outside, it's time to go back inside. In the same sequence, rinse all surfaces clean. When washing inside, you should be careful so that the soap solution does not fall on the ground.
Advice! Before you start wet cleaning, dry clean to remove dust and dirt. Then washing will be faster and easier.
How to wash a greenhouse with a washing station
Processing times
Typically, a greenhouse structure made of polycarbonate sufficiently protects the interior space from external pollution, so many gardeners do not consider general cleaning of the greenhouse important before the start of the new planting season. In fact, preparation can change everything for the better.
The main principle for choosing the timing of treatment is based on the fact that it is necessary to clear the room of pests at the moment of their transition to the active phase of life. To do this, individuals and their larvae need time and a favorable temperature regime to wake up. The effectiveness of processing soil that has not yet thawed is reduced to zero.
If treatment with chemicals is planned, it is best to carry out it after a layer of soil 10 cm deep has thawed. It is important to maintain an interval between treatment and planting. It is better if it is at least 10 days before the planned planting of crops in the greenhouse.
The soil must be treated several weeks before planting seedlings and seeds. This is usually the period from late February to early March.
Preparing a greenhouse for winter: advice from summer residents
The experience of summer residents who use similar structures on their plots is useful:
- Experienced owners of polycarbonate greenhouses, when talking about how to care for them in the fall, recommend using dishwashing detergent, soda or formaldehyde in a ratio of 0.25 g per bucket of water to wash the polycarbonate covering and frame elements, in addition to a solution of laundry soap.
- They also believe that it is not necessary to dismantle a polycarbonate structure for the winter. But in order to avoid its deformation during heavy snowfalls, it is recommended to strengthen the greenhouse roof with wooden supports in the shape of the letter “T”.
- When asked whether it is necessary to bring snow into the greenhouse in winter, the answers vary. The absence of snow allows the soil to freeze as deeply as possible in winter, which destroys pests hiding in the ground. But, on the other hand, snow in a greenhouse in the spring turns into melt water, which is an excellent stimulator of plant growth.
- The greenhouse frame should be cleaned of dirt and, if necessary, painted regularly to prevent the appearance of lichens and fungi on it, which are subsequently very difficult to get rid of.
Autumn processing of polycarbonate greenhouses is a troublesome and quite labor-intensive task. But the friendly growth of greenhouse plants next spring, with the complete absence of diseases and pests on them, fully pays for the efforts expended.
Sequencing
Processing stages
Spring preparation of a polycarbonate greenhouse for the new planting season includes 6 main stages:
- General cleaning of the area where the greenhouse is located.
- Installation of the structure.
- Cleaning the frame and polycarbonate (acting as glass).
- Disinfection inside the building.
- If necessary, minor repairs to the structure (strengthening, strengthening of load-bearing foundations).
- Soil cultivation. It involves the introduction of chemicals, insecticides, fertilizing, digging or replacing the fertile layer.
If no treatment was carried out in the fall, spring cleaning should begin with the removal of old plants. These include not only tops and fallen fruits, but also weeds, their large seeds and roots.
Next, you should get rid of all pegs, trellises, ropes, pieces of twine and other garter material. Pathogenic bacteria can multiply in it and immediately attack new seedlings. They should be taken out of the greenhouse and burned. By leaving them on the site, gardeners risk the occurrence of diseases in other parts of the site.
After this, the polycarbonate structure itself is cleaned. The most thorough treatment will be if the structure is disassembled into its components and all surfaces are disinfected. If an epidemic of diseases has been noted inside the greenhouse, the structure must be treated with a disinfectant. It is recommended to treat metal structures with warm water and vinegar.
Polycarbonate is a transparent material that loses its appearance and transparency when exposed to moisture and dirt. To return it to its original appearance, it is necessary to wash the coating with soapy water or detergents without abrasive components. You can also use a light solution of potassium permanganate. At the end of the procedure, you should thoroughly rinse off the detergents with clean running water.
To clean the polycarbonate coating, do not use hard sponges, metal brushes or mechanical abrasives. The coating is vulnerable to scratches.
Inside the greenhouse, all racks, equipment and containers should be cleaned. To do this, you can use boiling water, as well as some chemicals (formalin, vitriol, bleach).
Fumigation as a method of cleaning a greenhouse
Fumigation is an effective method of pest control in a closed greenhouse structure. To do this, entrances and windows are tightly closed, small cracks are sealed and a smoky fire is lit. If this is not enough, you will need several sulfur bombs. They are laid out on metal sheets. You can replace them with lumpy sulfur, which should be combined with a small amount of kerosene.
Disinfection using fumigation is carried out for 4-5 days, after which the room is ventilated.
It is dangerous for a person to be in a greenhouse during such treatment, since the gas released during fumigation can cause serious respiratory diseases. If it becomes necessary to enter the greenhouse, personal protective equipment should be used.
Basic methods of soil disinfection
The next step is soil disinfection. Three types of processing can be used for this:
- temperature;
- chemical;
- biological.
The effectiveness of the fight against bacteria, fungi and insects depends on the chosen processing method. The choice of purification method is influenced by the type of crops grown in the greenhouse. This procedure is quite labor-intensive.
Changing the temperature
If the end of winter and the beginning of March are frosty, you can take advantage of this natural blessing and freeze the ground. To do this, you need to open the greenhouse and leave it open for several days. Low temperatures can lead to the death of harmful bacteria and fungi that abundantly infect plants. Frost can also neutralize insect larvae deposited in the ground in the fall.
If we are talking about a small area for seedlings, then you don’t have to start working with chemicals, but treat the soil with boiling water. This is enough to destroy most types of pathogens and pest larvae. Find more information about tilling the soil before planting seedlings here.
Biological control method
Biological treatment is usually carried out using the following drugs:
- "Fitosporin";
- "Phytocide";
- "Biodestructor of stubble."
The following drugs are also used:
- "Baikal M", effective against rot, fungi and lichens;
- "Fitolavin" against rot and pathogens;
- “Carbation”, which helps cope with clubroot and blackleg, as well as verticillium and fusarium wilt;
- "Acrobat MC" to combat powdery mildew and late blight;
- "Bayleton" for gray rot.
To clean the soil, it is enough to shed only the top layer. For treatment, you need to prepare the solution according to the instructions, then carry out disinfection. After the solution is absorbed, use a rake to dig up the treated area a little. Then the disinfected soil must be covered with a covering material (film or spunbond).
After using biological preparations, it is necessary to take care of the soil structure and replenish it with beneficial bacteria artificially.
Chemical method of disinfection
The use of chemicals is usually due to the desire of site owners to get rid of pests for a long time. However, it must be understood that any exposure to such substances has significant consequences for the crops grown.
Chemical treatment is best carried out during the coolest part of the day, ideally at night.
There are a number of chemicals widely used for soil disinfection:
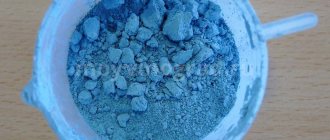
- Bleached lime is considered the most accessible. It is affordable and has earned the trust of gardeners for its effectiveness. To prepare it, just dilute 400 grams of quicklime in a 10-liter bucket of water. The solution is infused for 8 hours: 4 - with occasional stirring, 4 - without stirring. After this, the upper liquid layer is selected for soil treatment. The remainder of the solution can be used to whitewash any wooden frames in the garden.
- A chlorine solution prepared in a proportion of 1 kilogram per 10 liters of water is effective in combating spider mites.
- Formalin is applied 2 weeks before planting. After applying it, the soil must be covered with polyethylene for 3 days. The cleaned soil is dug up and the greenhouse is ventilated.
- “Bordeaux mixture” is a powder for dilution in water. The main condition is its proper application on the soil according to the instructions.
- “Iprodione” is a powder for soil disinfection in the spring to prevent diseases such as gray and white rot, Phomopsis, and oidium.
- Hexachloran is effective against caterpillars and butterflies.
- Treatment with copper sulfate can be used as radical methods. It is quite aggressive against all bacteria (not only those harmful to plants). After its application, the soil is considered infertile, so it will need artificial fertilizing for several years. Copper sulfate solution is most often used to treat the internal surfaces of the greenhouse and cracks in the base of the structure. With its help you can fight late blight, powdery mildew, and scab.
You can purchase ready-made medications in specialized stores:
- “Lightning” against spider mites;
- “Thunderstorm” from snails and other types of slugs;
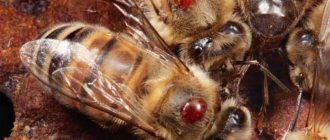
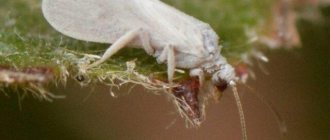
- "Marshall" against aphids and thrips.
Before using chemicals, it is important to carefully study the instructions and strictly follow the proportions when diluting poisons. To spray them, special equipment and protective equipment or improvised equipment can be used.
Stage #1 – freeing the area from fixtures
Everything that could be subject to thorough processing will need to be removed from the room. Portable trellises, inventory buckets, racks, vessels for transplanting seedlings. If wooden supports or analogs offered by most manufacturers of industrial greenhouses or polycarbonate were installed to support the roof in case of heavy snowfall, they should be dismantled.
With racks, trellises, racks, and supports removed from the greenhouse, we proceed as follows:
- Wooden support structures should be carefully inspected. Identified rotten and fungus-affected parts must be mercilessly replaced. After repair, wood fixtures should be whitewashed with settled slaked lime with the addition of paint glue.
- Metal structures need to be studied with equal care. Detected pockets of rust must be treated with a rust remover. In the absence of a factory-made product, we remove rust with half a potato. It contains enough oxalic acid to cope with minor rust crust. Baking soda or a mixture of vinegar and lemon juice will work. But the result of the latter option will be visible only a couple of hours after application. Have you removed the rust? Primer was applied and paint was applied.
After removing the various fixtures, it's time to examine the condition of the metal supports to which the polycarbonate sheets are attached. Corroded areas are also treated and painted. It is clear that undamaged devices do not need to be repaired or restored.
While there are no plants in the greenhouse, an inspection of the stove and plumbing equipment, if any, should be carried out. The potbelly stove is taken outside, where its condition is thoroughly examined. If the first bend of the chimney burns out, install a metal sheet bent into a cylinder inside. It can be changed again before the next season without any problems. Happy owners of polycarbonate buildings with a heating system need to repaint the pipes with aluminum paint diluted with a solvent or acetone. Drying oils should be added to the coloring composition to optimize adhesion. Heating equipment should not be painted with oils: this will impair heat transfer.
Features of processing a greenhouse in which perennial plants grow
If perennial plants grow in a polycarbonate greenhouse, its treatment must be carried out in the spring. For this purpose, it is necessary to use special means that will not harm the plants themselves and the soil in which they grow. You need to select them in a specialized store, adhering to the concentration depending on the type and condition of the plant.
In addition to pest control, mechanical cleaning can be carried out in a greenhouse with perennial crops: cleaning, minor repairs, digging up free areas, cleaning the structure with mild means. To do this, unnecessary objects and small structures are removed from the greenhouse and then cleaned individually.
Then the internal surfaces of the greenhouse and structures that cannot be removed for treatment are cleaned. Cleaning ends by washing the outside of the structure. This is necessary both for the aesthetic appearance in the garden and for stopping hypothetical insect infestations.
In spring, the shoots of perennial greenhouse plants are partially cut off and the weeds around are removed.
Thermal method
It involves pouring hot water onto the greenhouse soil.
- It is advisable to dig it up first for deeper penetration of boiling water.
- Usually they are shed at least 3 times, after which the entire watered surface is covered with film to maintain the elevated temperature for a longer period of time.
The method is simple, but it is difficult to determine whether it brings more benefit or harm. Indeed, under the influence of high temperatures, the beneficial microflora is almost completely destroyed. I think this technique is more appropriate for small areas.
Recommendations for preserving soil in a greenhouse
In some recommendations from gardeners, you can find advice to use the tops of greenhouse crops to create compost. This is possible, but only if several conditions are met:
- During the previous two seasons, there was no increase in the number of insects or outbreaks of infectious plant diseases in the greenhouse.
- A garden plot makes it possible to freely place a certain amount of compost for a period of 4 years to “process” pathogens without using it.
- The resulting compost will not be used for growing crops from the tops of which it was obtained.
To prevent pests from entering the soil, you must adhere to some rules:
- For processing, you should have a separate set of garden tools. All tools (shovel, rake, fork) should not be used outside the greenhouse.
- It is worth taking care of a separate set of shoes with gardening gloves. Its use will protect the microclimate of the enclosed space from external influences.
- After treatment, you should not bring newly purchased plants into the greenhouse. They must be kept in quarantine for at least two days. During this time, they may show signs of disease. If this happens, the shoots must be disposed of on neutral territory to prevent their seeds from getting into the soil.
Following simple recommendations will allow you to preserve existing plants and prevent soil contamination by harmful insects.
How to treat a polycarbonate greenhouse in the spring is described in this video:
Even greenhouses made of modern polycarbonate material require careful processing in the spring. The use of mechanical, biological and chemical processing methods will preserve soil fertility and increase the productivity of planted plants.
0
0
Copy link
Stage #2 – garbage collection and disposal
It is absolutely necessary to remove last year’s pegs, pieces of twine used for tying cucumbers or tomatoes and other disposable devices. Definitely, the roots of bushes that have completed fruiting should not remain in the soil, nor should their stems and leaves remain on the surface. It is not difficult to guess the fate of the weeds. Although, according to unspoken greenhouse rules, they are removed along with the remains of cultivated plants in the fall.
All greenhouse waste, including rotted wooden parts from repaired structures, must be burned. Moreover, the resulting ash will serve as an excellent mineral fertilizer. And the good news is that the soil can be enriched with potassium, magnesium, sulfur, iron, calcium, phosphorus, etc. absolutely free of charge. Only there will be no nitrogen in this homemade fertilizer, because it evaporates when burned.
Suitable for burning waste:
- homemade stove made from a metal barrel without a bottom. Its construction begins with the installation of brick pillars, on which a metal grating is first placed, then a barrel is erected. The draft is excellent, sparks do not scatter, and an improvised grate will ensure accurate collection of ash;
- a site with a dirt or other non-flammable surface with a diameter of 3-4 m, cleared of dry grass and wood; paper scraps. There should be no stains of spilled gasoline, diesel, kerosene or other fuel on it;
- an open fireplace lined with bricks, for the manufacture of which you can take broken or defective material.
Ash will require 3-5 cups per 1 m² if it is applied dry as fertilizer. Scatter it before digging. If ash is used for feeding, dissolve one glass of dry matter in a bucket of water.