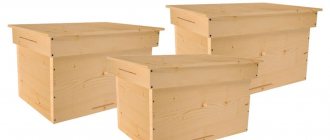
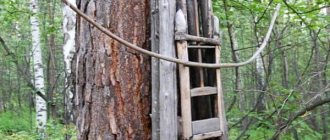
Beekeepers use evidence of several designs. When choosing a house, attention is paid to functionality, the possibility of further expansion, as well as the internal structure. The design of the beehive bed resembles a horizontal box with a sliding or hinged lid. Inside there are various compartments for keeping bees, four entrances, as well as a store for trays.
The uniqueness of this design
The traditional version is a bit like a long box with a solid bottom, two compartments where the insects themselves are kept, and two upper and lower entrances in the body. Looking at these dimensions, we see that it turns out to be a large structure .
But why do many novice beekeepers like working with a hive? Making a beehive with your own hands is very simple. Working with this design is many times more comfortable and easier. Classic hives are heavy and more difficult to move to different places. Today, beekeepers most often use Dadan frames. There are different numbers of these frames in the building.
If we take the standard type, then there are 20 and 24 frames, non-standard ones with 14, 18 and 32 sections. The most popular types include a drawing of a hive-bed with 16 frames. In addition to Dadan's frames, Rutov's frames and many others are also used. A hive-lounger is a structure that is wider than it is tall. Keeping your swarm in such small houses is much easier and more profitable.
Insulation
Beekeeping in different regions requires different degrees of insulation of the house for these insects. Moreover, this is done both for multi-body structures and for horizontal arrangement and expansion of frames.
Both with one and the other design proceed as follows:
- On top of the main body, boards with a thickness of at least 40 mm are placed. This must be done in such a way that air space is maintained between the two formed walls, that is, a gap is formed.
- When the honey collection process is completed or since the onset of the first cold days and nights, this gap is filled with straw. You can also use sawdust.
- This is how a special pillow is formed, which helps to insulate the evidence.
- But it is necessary to take into account that with the onset of heat, it is necessary to immediately remove this insulation.
Advantages and disadvantages of keeping bees in bees
This method of keeping bees has its own characteristics. Let's look at some of them .
We also recommend reading:
The Cebro method in beekeeping: breeding queens and more Making hive frames with your own hands Bee diseases, their signs and methods of treatment Catching wild bee swarms using traps and empty hives
- In such spacious houses, bees can easily grow their strong colonies.
- Such spacious hives help bees to develop faster and work much more productively.
- Large space helps bees store more food.
The beekeeper is only required to place empty frames in time.
A very important advantage in this design is that a large amount of space stimulates high egg production in the uterus. And, of course, the weather. These beds are great at protecting insects from harsh weather. There are many advantages, and there are also some disadvantages. One of them is that a small underframe space can greatly impair ventilation. In this regard, it is necessary to ensure good air flow, so you should definitely place a device for ventilation holes in the lid in the house. They are also large, which makes it necessary to allocate more space in the room in winter. Not every person has this opportunity. Another disadvantage is that expansion is limited. If the hive has 24 frames, then you can’t put more frames in it. And with this in mind, it is necessary to pump the hive more often.
In order to quickly grow a colony, it is important to practice keeping the main colony and an additional colony in one part of the hive before the early honey flow.
Advantages and disadvantages
If we consider the advantages of this design, we can highlight the following positive characteristics:
- It will be quite convenient for the beekeeper to work, since they can simply be moved by sliding them to the side. This makes it convenient to inspect the product inside;
- All elements are intuitively located, so it is easier to maintain;
- Large size allows you to accommodate 2 families;
- In addition, due to the increased internal space, you can easily acquire new brood;
- There is always the possibility of increasing the dimensions;
- It has been experimentally established that the amount of honey that bees are able to store in such a house will be greater than in other variations;
- When moving the apiary to another place in the spring, it is easy to move and put into transport. After all, such houses are easily installed one on top of the other, which allows you to significantly save space;
- Due to the fact that two families can be accommodated in such a bee hive, wintering is more comfortable - after all, they will warm each other;
- Frames are easily added to evidence without unnecessary disturbance to insects.
But, despite the many positive aspects, there are still some disadvantages to the beehive:
- Although this arrangement is lightweight, its footprint is larger than other types.
- The reduced air cushion that must be present can create some problems for the bee colony during wintering.
- Working with bees here will require taking into account certain design aspects. So, due to the fact that there is nowhere to install an additional extension here, with a large bribe you will have to collect honey earlier.
- When breeding bees, it should be taken into account that they are more prone to swarming. Therefore, it will be necessary to apply a set of special measures to eliminate this phenomenon.
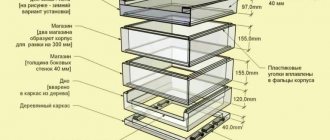
Making a beehive for 24 frames with your own hands
You can buy it in the store, but how to make a beehive bed?
Of course, when creating any structure, you simply need to decide on the size of the structure. There is nothing complicated in making a beehive with your own hands; at the base there is a regular rectangle and frames that are in a horizontal position. Let's move on to the dimensions of the hive of the lounger:
The width of the body should be 450 millimeters. The frame itself will be 435 millimeters, and the distance between the rear and front planes will be 7.5 millimeters.
The size of the frame is 300 millimeters, we add the height of the above-ceiling space and the ceiling, as well as the above-frame and under-frame space. The dimensions of these data can be taken arbitrarily, but so that in the end the box is equal to 390 millimeters.
It is important to consider the diaphragm and the number of sections. This all adds up to 810 mm.
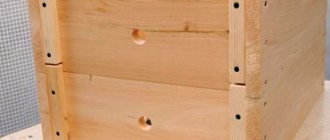
Where to start assembling? It is best to start construction from the bottom. The bottom is tightly connected to the walls of the body. The front wall is brought forward a little. It serves as a landing board for bees. They also install four entrance holes in a 24-frame hive. The tapholes that will be located below should be up to 250 mm in size, 12 mm high and the top two with a diameter of 25 mm.
It is imperative to separate the accommodation of two families; it is best to do this with a diaphragm. It needs to be installed in the middle of the body. The partition should hold tightly and not have any gaps.
It will be better if you start assembling the body after the cutting is ready. For complete confidence in fastening, you can use self-tapping screws or ordinary nails. The walls of the house must have a corner connection of strictly 90 degrees. If you do not adhere to this standard, then working with these hives will be very difficult.
This hive has a collapsible ceiling. To make it easier to remove the ceiling, the boards should be 10 mm thick and approximately 4 frames wide.
To make it easier and more reliable to carry this structure, strong handles can be attached to the side walls.
Another option for collecting 20 and 24 frame hives
24-frame with extension
Houses of this type can be used to keep two bee colonies at once, separated by a blind diaphragm (plywood divider). In case of abundant honey collection, you can install one magazine on a standard half-frame (435 by 145 mm). Disadvantages include heavy weight when fully loaded with honeycombs.
You can assemble a beehive bed for 24 frames with your own hands according to the following drawings:
Along the front wall there are two lower entrances in the form of a slot (width 18, height 1 cm) and two upper ones in the form of holes with a diameter of 2.5 cm. For the convenience of the bees, each of the entrances is equipped with boards for arrival.
There are lower and upper grooves along the side walls for installing the bottom and the pressure board at the top. The length of each wall and, accordingly, the width of the finished house is 488 mm.
The back and front walls have two folds along the upper inner side: the lower one is for installing frames, and the upper one is for placing ceiling boards. The length of these parts and the entire house outside is 977 mm.
The bottom is assembled from several boards and has the form of a shield that is firmly attached to the body. All boards are provided with grooves for a tight fit (quarter-jointed). Floor seams are glued with glue, for example PVA. The main thing is to protect the house from moisture penetration from below.
The role of the legs is played by bars 500 mm long, 50 mm wide and 22 mm high.
The lid also has the shape of a shield attached to the trim and low walls.
Boards no thicker than 2 cm (20) are suitable for strapping. This part of the design allows you to put the cover on the body without any additional fasteners.
The lid shield is fused into a quarter. To protect against moisture, upholstery with tin or galvanized iron is used. Finished dimensions: length 1.14, width 66 cm and height 2.2 cm. The width of the boards used is 14 cm.
The walls make it possible to give the lid a slope of 3.5 degrees, which is necessary for the removal of precipitation.
The front and rear parts are equal in length - 988 mm (98.8 cm), but have different heights: at the back it is 11 cm (110), and at the front - 14.5 cm (145). The thickness of the boards used is 2.2 cm (22).
End length 58 cm (580), height: front 14.5 cm (145), rear 11 cm (110).
Appearance and drawing of the lower landing boards:
Upper landing boards:
Note: If desired, their dimensions can be changed! In this case, it is not necessary to adhere to the drawing.
If there is a need to use a magazine extension, it is assembled according to the following drawing (designed for 24 half-frames!):
Inside the front and back walls there are folds for honeycomb frames, and at the bottom there are quarters that make installation on the body easier.
According to the vseopaseke.ru project team, this is one of the simplest ways to make a hive for a lounger.
20-frame with extension
This hive is assembled according to standard design 3.808-1 and is very popular among beekeepers.
The presence of a diaphragm allows you to keep two bee colonies under one roof at once. In the summer there is a colony and a brood, and in the winter there are two colonies, or a colony and a nucleus with a spare “queen” bee.
A magazine extension with twenty half-frames (435 by 145) significantly facilitates the beekeeper’s work during periods of heavy harvest. Of course, you don’t have to use it - it all depends on the preferences of the beekeeper.
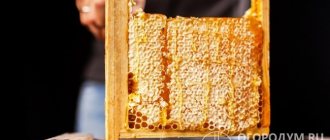
The nest is formed from twenty standard (Dadanov) honeycomb frames with dimensions of 435 by 300 mm.
Different kinds
But in order to start preparing drawings, you need to study
the types of such sunbeds . Let's start with the Vladimir hive-lounger:
- This hive differs from others in its large size. One frame can be up to 45 centimeters. And about thirty such frames can fit in one house. Looking at the data, we can conclude that this is not the smallest hive;
- There are also Kenyan bed hives. These hives have a strange but very unique design. It is made from tree bark. This is an incredibly productive house , one hive can accommodate forty frames;
- Twenty-four frame hives are designed only for regular frames;
- The Polish hive-lounger is designed for twenty high frames.
Content Features
It is necessary to take into account the features of keeping bees in such hives:
- The nest must be insulated in winter. This is especially true when houses are left under the snow.
- It will be better for the health of the insects if the owner leaves them a sufficient amount of beebread and honey for the winter.
- For a novice beekeeper, it is important to monitor carefully enough to ensure that bees do not swarm - measures against this must be taken in a timely manner.
- When active egg laying begins, additional light brown combs should be installed in the hive.
- Rearrange the sealed brood and the nest with the queen in the following sequence - the queen is closer to the entrance, the sealed brood deeper. There should be a sufficient number of gratings between them. This will increase your honey supply.
- In order for insects to enter the spring in a healthy state, they should be left with at least 20 kg of honey for the winter.
- Consider wintering methods in which a very tight frame should be placed between two families in one house. Keeping bees in beds in the amount of 2 families must be accompanied by this partition. Otherwise, in the spring there will be not two families, but one with one queen.
- Around mid-summer, replace the queen with a young individual. And in the late summer season, make sure that the family is enlarged.
Materials and tools needed to create a hive-lounger
Before you start manufacturing, you need to make sure that you have all the necessary materials. So what do we need?
- Hammer
- File
- Pliers
- Nails or if there are screws
- The main materials we will build from are plywood and wood.
- Fastening elements
- Tape measure for precise measurements.
Wood will last much longer than plywood, so it will serve us as a better material. What should the tree be like? Ideally, the wood should be well dried. During the drying process, it will not change shape, thereby the hive will not be crooked. When choosing boards, you need to make sure that they are level and free of branches. Thanks to this product, the product will be made with high quality and over time, cracks and holes will not appear in the hive.
Hive materials
The bee is a finicky insect. And as long as he doesn’t have a place to live. Therefore, hives are made from natural material – wood.
It has low thermal conductivity, as a result of which it keeps warm on cold days and cool on hot days. The tree “breathes”. It is well processed and durable.
- Modern building materials like chipboard are completely unsuitable for construction.
- Attractive monolithic slabs contain toxic volatile substances that make our bees so sick that they can be lost forever.
- However, polyurethane foam materials have appeared that have their fans. The industry has adopted them and produces lightweight, heat-retaining hives. This is a significant relief to the beekeeper's work.
There is still a drawback - these models require careful handling, since even a small impact can lead to loss of performance properties due to various deformations.
Manufacturing procedure
Why is it important to know where to start? If you start manufacturing incorrectly, then you will not be able to achieve the expected result. So let's start from the beginning:
- Let's start our construction from the bottom
- Next comes attaching the body to the bottom,
- Of course, let's not forget about the roof
- Extension boards
- And small flying boards.
To complete the work, we will put all the necessary planks in place. To ensure that the details are even and beautiful, you should use a tape measure. in this design .
For such delicate work, you need a well-sharpened file so as not to accidentally get out of the drawing. A little above is a plan on how to start collecting correctly, but we will now go a little deeper into this. To properly make the bottom, we first need to knock down the slatted frame and fill it with boards, then fasten it all with tongue and groove and nails. After we have made the bottom, we will move on to making the walls of the house. It is necessary to make sure that the walls fit snugly against each other and also fasten them with tongues. When the walls are secured, it is necessary to make grooves in the upper part in which the frames will stand. The size of these grooves should be 18 x 11 millimeters. In order not to return to the walls later, you can immediately cut the tapholes.
The next step will be the lid. There are several ways to make it . Not the most difficult way is to prepare a frame and fill it completely with boards. But this option is not very good. Gaps may form between the laid boards. The other way is the easiest. You can simply make a frame and cover it with plywood. This is not the best idea in terms of durability, and it will only last a couple of years. The most reliable way is to cut grooves in the boards, and then build a roof from the boards. It will take more effort to make the grooves, but in subsequent years you don’t have to worry about it leaking.
Tip: make the roof so that it can be opened like a chest. In this way, working with bees and the hive will become much more comfortable. Well, of course, you need to attach the legs to the bottom on which the house will stand. Why is it important? Under no circumstances should you place the beehive on the ground . This can cause the bottom to rot very quickly. It will be bad for the bees and you will have to spend your energy and money to repair it; even worse, this process may begin to manifest itself in winter, which will lead to the death of the bees. The legs can also provide some space through which air can flow, thereby providing some ventilation. And of course, it will increase the service life of the hive.
Final cooking process
An important process is to:
- Cover the roof of the hive with tin,
- For complete convenience, attach the handles on the sides,
- Don't forget to secure the landing boards,
- Be sure to nail the valves onto the tapholes,
- And an integral part of every building is painting.
Why cover the roof with tin?
It is the tin that will help protect the bees from moisture. Wood is not iron, so it can get wet and over time begin to let in unnecessary water, and tin will prevent this process. You can beat it with other materials, but as practice shows, it is best to do it with tin. Of course, this material is more expensive, but it is better to spend money once than to do it every year. Why attach arrival boards? The word “migrant” speaks for itself. These boards are needed to make it easy for insects to fly into the hive. The landing zone must be made not too low so that the bees do not fall from the entrance.
It is also necessary to monitor the valves that are located on the tap holes so that they close and open freely. When working with bees, they will have to be reduced and expanded depending on the circumstances.
What paint is best to paint a bee hive?
Painting a hive is an important step in caring for it. It allows not only to protect the wood from aggressive external influences, but also creates a kind of landmark for insects so that they can get home faster.
The most important question is what paint to paint the hives with. Particular attention should be paid to color. Bees do not distinguish between red and its shades, so it is better to use yellow, blue or green. The paint can be anything except water-soluble, since natural precipitation will quickly destroy the protective layer.
Beehive bed for 20 frames: drawing
You don’t have to buy a hive in a store; you can just create a simple one with your own hands. What is this lounger made of? Let's start from the bottom:
- Bottom,
- Nest frame,
- Diaphragm,
- It is followed by a magazine frame,
- The building itself
- Then the store
- Liner,
- And of course, the lid.
As we have seen, it is very simple and easy to create a beehive with your own hands. In such delicate work, it is important to monitor the millimeters so that the hive does not turn out crooked or uncomfortable.
Preparation for construction
To make your own beehive you will need:
| Tool | Construction and consumable materials |
| 1. Traditional tools for woodworking - saws, hacksaws (for sawing boards), planes, jointers, folding saws, rabbet (for planing, removing folds and making tongues and ridges), rasp, chisel, chisel, sandpaper (for chiseling and stripping ). Having a beekeeper with a circular saw, thickness planer, grinder and other equipment will greatly simplify the task. 2. Carpentry workbench or work table with clamps. 3. Screwdriver, drill with drills. 4. Measuring tape, ruler and pencil | 1. Dried pine boards without knots 10x150 mm, 22x150 mm and 38x150 mm of various lengths. 2. Bars – two bars each (22x50x500 mm, 20x38x248 mm; 20x38x988 mm). 3. Plywood. 4. Roofing felt, roofing felt, linoleum, tin or other material for roof covering. 5. Self-tapping screws. 6. PVA glue. 7. Drying oil, oil paint. 8. Accessories (hinges, handles, etc.) |