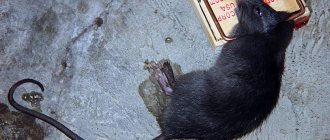
It is useful to keep in mind that a homemade rat trap can be even more effective than standard purchased products - this fact has been repeatedly confirmed in practice. A typical example is when rats bypass a conventional mousetrap, feeling that this device is fraught with danger, but quickly fall into the trap of a new design that is not yet familiar to them.
At the same time, to catch a pest it is not at all necessary to make something complex, cumbersome and requiring serious skills. It is known that everything ingenious is simple, and rat traps assembled with your own hands from scrap materials are the best proof of this: the lack of expensive parts, time or skills here is compensated by the ingenuity of the creator and the ingenuity of the design itself.
As you will see below, a very effective trap can be assembled in just a few minutes from ordinary plastic bottles, a bucket or a pan, and there are many options for such traps.
Below are descriptions of the 8 most effective simple homemade rat traps and illustrative examples of their work in practice...
Option #1: Tilting Trap
The operating principle of this design is that the animal, approaching the bait, falls into the trap. This mechanism can be implemented in many ways.
Here's the simplest one:
- Make a tunnel out of cardboard (you can also use a piece of wide plastic pipe);
- Place it on the edge of the table so that half of the tunnel overhangs the edge (it helps to lightly tape it to the table so the rat can't move it);
- Place bait at the very edge of the tunnel;
- Place a barrel or deep bucket under the site of the expected capsize.
The animal, attracted by the smell of the bait, will climb along the tunnel, knock it over at the edge of the table and fall into the container with it. The video below shows how this happens:
Agree, what could be simpler?
There may be several options for making such a homemade rat trap. For example, a tilting bridge can be placed directly on the edge of a bucket, and a ladder can be connected to it:
For this purpose, you can use a piece of whatman paper with slits to cover the bucket. The rat climbs onto the Whatman paper for the bait and falls through the slits into the bucket:
On a note
If you use a bucket or can to catch a rat, it is useful to first pour water into it - without water, the animal will easily jump out of the trap. In addition, it will be easier to catch the pest in water (just don’t forget to wear thick construction gloves before doing this).
By the way, you can make a mousetrap using the same principle with your own hands from a plastic bottle. In this case, a bottle with an open neck is placed on the edge of the table (or you can make a special inlet hole), bait is placed in it, and the bottle is tied by the neck with a thread to something heavy on the table itself. The mouse climbs into the bottle, halfway to the bait, knocks it over with its weight, and the entire trap with the prey hangs on a thread:
On a note
It will not be possible to catch a rat in a bottle in this way - the animal will easily jump out of the overturned trap. Perhaps, as an option, you can make a tunnel out of a bottle like the paper one discussed above, cutting off its bottom and neck, and then catch the pest in a bucket or barrel.
Types of adhesive tapes
The design of the adhesive tape is the same, but different manufacturers have their own recipe for the viscous layer. The effectiveness of the product and its price depend on this. The cheapest copies have a short shelf life and are not able to meet the hopes of buyers to exterminate as many flies as possible. The cardboard roll is packed in a plastic case in the form of a sleeve.
Fumitox
Sticky tape against flies Fumitox
The manufacturer of the sticky tape is a Russian company known for its insecticidal products, whose products have already won the trust of many people. Fumitox cardboard tape is rolled into a cylindrical box. To deploy the weapon against the flying vile, you need to pull the red loop. At the other end of the tape there is a hook for securing the flytrap in any convenient place.
Precautionary measures include insulating the sticky trap from open flames, heating devices, and direct sunlight. This is due to the easily flammable base of the tape and the active drying of the adhesive layer
Main parameters of the Fumitox product:
- coverage area of one Velcro – up to 5 square meters. m.
- validity period of the sticky substance is 1-1.5 months;
- release form - 4 pieces in one cardboard package;
- shelf life 4 years;
- packaging price is 70 rubles.
Flop!
Fly sticky from a Chinese manufacturer is one of the cheapest. You can buy it for 10-15 rubles. The working condition of the adhesive layer is maintained for one month. The toxicity of the components used belongs to the 4th class of chemical hazard, which is safe for the health of people and pets. Shelf life 3 years in unopened containers.
Clean house
The popular Russian manufacturer of insect repellents has long established its products as reliable protection against unwanted pests. The effectiveness of the product has been proven for 30 days. The cardboard tape is packaged in a sleeve, on which instructions for use are indicated. The average price for adhesive tape is 15 rubles per piece.
Fly tape
destructive force
The name of the Russian product speaks for itself: Velcro is an effective weapon against most flying insects. The cardboard product is packed in a sleeve. At one end, which you need to pull, there is a special button for fastening. To prevent household members from falling into the trap and getting dirty with glue, you need to hang the Lethal Power product in places where contact with the adhesive layer is unlikely.
Main product parameters:
- low toxicity;
- validity period – up to 6 months;
- release form - 4 pieces in one package;
- the average price for 4 copies is about 50 rubles;
- shelf life 3 years.
DIY sticky trap
If you don’t trust industrial products, you can make the tape yourself. You can use thick cardboard or a piece of oilcloth as the basis for the trap, after cutting it into long strips. The bait will require several ingredients: rosin and castor oil, 50 g of each component, honey or jam, a couple of teaspoons. Place rosin and castor oil in an enamel bowl and keep in a water bath until the mixture turns into a homogeneous viscous mass. Then you need to add sweet filling.
The resulting homemade hot glue needs to be spread on the prepared strips on both sides. After this, the tapes must be secured in places where flies accumulate, but so that a person cannot touch them with his head. The stickiness of the substance should remain for several weeks.
Option number 2: rat traps made of plastic bottles
The traditional version of this trap looks like this:
- The top part of the bottle is cut, it opens slightly, a long rod is attached to it, to which, in turn, a tourniquet is attached, which plays the role of a spring;
- Near the bottom of the bottle, through a hole in the wall, a trigger is attached, to which the bait is attached;
- The door from the neck of the bottle is attracted by a rope to the body of the bottle - this will allow it to slam shut when the animal pulls the bait.
Capture is simple: the rat climbs into the bottle, pulls the bait, and the rubber band slams the door. That's it, the animal is caught. The video shows how this design works and how to assemble it:
And here is another example of a simple but very effective rat trap, which you can easily make with your own hands from a plastic bottle:
- The bottle is strung on a rod (for example, on a thick wire);
- Then the outside of the bottle is coated with bait - sour cream, porridge, stew;
- The rod is placed on the edges of a bucket or barrel;
- A bridge made of boards is connected to the bottle.
It is also useful to read: What are rats afraid of and what folk remedies are most effective against them
Then everything is simple: the rat climbs along the bridge to the bottle, climbs on it to lick the bait, the bottle spins, and the animal falls into the bucket. Like this:
A similar design can be made from a bucket and a beer can. The photo below shows a corresponding example:
The disadvantage of rat traps with a rotating bottle (or jar) is that they are bulky - it is not always convenient to use them at home.
It’s easier with mice - for lovers of beautiful solutions, a compact mousetrap made from a plastic bottle has been invented, which, if desired, can be placed under a table or in a closet. The following video shows how to assemble such a trap from available materials:
The main thing in this design is to correctly guess the center of gravity of the bottle.
If you take a suitable bottle, you can use it to make a rat trap using the same principle. It is only important to keep in mind that, given enough time, the animal may try to gnaw through the walls of the trap and thereby get out of it.
Interesting Facts
This is what our grandfathers did. Even before plastic bottles were invented, our ancestors also designed various traps and traps. They took a large iron bucket and filled it with water - up to about half. They exposed it to the cold, when the top layer froze, they brought the bucket into the house. A hole was made in the ice crust and the water was drained.
A piece of food was placed on the center of the ice sheet. Such a trap was placed in households. block where the rodents were located. The principle of the folk trap is simple: when mice or rats get to food on the ice, they fall to the bottom under the weight of their bodies. The only downside of this invention is that it can be used in winter.
Source
Option number 3: covering live trap
This is perhaps the simplest version of a homemade rat trap. To catch a rat or mouse with it, just take a pan and a coin of suitable size - turn the pan upside down, tilt it slightly and rest one edge of it against a coin placed on its edge.
Bait is placed under the pan. When the rodent climbs for the bait, it will certainly touch the coin, it will tip over and the pan will cover the animal.
Here is an example of an implementation where a jar is used instead of a pan:
The disadvantage of the design is frequent false alarms (when a rat touches a container or coin before it has climbed inside the rat trap).
A more sophisticated homemade trap of this type is the improved “coin container.” For example, a container can be rested on an unstable stand, a thread can be tied to the stand, the thread can be thrown over a spacer in the container and the bait can be tied to it:
The rat will sneak under the container, pull the bait and move the “guard”.
Another option is to use a strip of cardboard of sufficient height instead of a coin with a special corner for attaching bait:
Here the animal, pulling the bait, knocks over the cardboard and covers itself with the trap.
It is only important to keep in mind that to make homemade rat traps you need to take a container that is heavy enough so that the rat cannot move it.
The video below shows another interesting example of such a rat trap:
Killing Loop
A convenient killing device for catching pests is made from bars and wire. These homemade rat traps are put together step by step:
- Prepare a wide beam 40 cm long.
- A hole with a diameter of 9 cm is made in the material.
- Stepping back from the edge of the workpiece by 6 cm, create a notch with a large depression.
- A powerful spring is attached to the top of the device with metal brackets.
- 4 cm are removed from the cut, 2 small symmetrical holes are made in the upper part.
- 2 more holes are drilled at the bottom of the wood, a strong thread is inserted into them, passed through the upper holes and tied to a spring.
- A loop is made from thin steel wire. It is installed in the file and tied to the edge of the spring.
- The structure is installed opposite the hole and equipped with food.
The principle of the noose trap is to suffocate the rodent
The principle of operation is simple: the animal will head towards the bait, and the stretched threads will block its path. The rat will gnaw through the obstacle, at that second the spring will be released, rise sharply upward along with the loop and strangle the pest.
Option #4: cage traps
Such designs are characterized by high reliability, durability and efficiency, but they are quite difficult to make yourself. Their manufacture requires special materials and parts: the body itself is made of durable steel mesh, metal or wood panels, and the trigger mechanism is based on a spring. However, with sufficient desire and skill, assembling such a device with your own hands will not take much time.
The principle of operation of the rat trap is as follows:
- The cage has a rising door with a guard - when alert, the trap door opens upward with spring tension;
- At the end of the cage, a bait is attached to a hook, the other end of the hook holds a guard;
- When the rat pulls the bait, the gate lowers and the door slams shut.
The video below shows examples of manufactured rat traps of this type:
Preventing the appearance of rats in the house
For preventive actions to prevent the appearance of rodents in your home, you need to follow the following recommendations:
- seal openings and cracks in the house;
- get a cat;
- throw away garbage on time;
- tidy up the apartment;
- Do not flush food waste down the toilet;
- find a separate place for products and cereals, where there is no access for pests.
Cats are an effective rat repellent.
Rodents really don't like the smell of cats. Homemade products for fighting rats have proven themselves to be excellent. They are effective even in comparison with some factory products. If “uninvited guests” appear in the house, there is a way out - the complete extermination of the entire colony using simple, homemade devices!
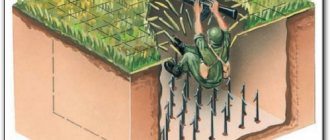
Option #5: Tunnel Trap
The entrance hole of the tunnel rat trap is made in the form of a valve with sharp petals. The operating principle of such a device is as follows:
Such structures are often used to catch courts, mice and rats in garden plots - in this case, the structure is made from a piece of pipe, at each end of which a valve is installed. The trap is then installed in the underground wormhole. In the end, it doesn’t matter from which side the mole (or rat) approaches the trap - the animal will still be caught.
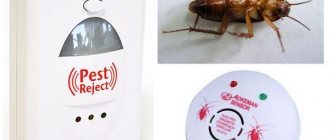
It is also useful to read: Choosing an effective electronic rat and mouse repeller
Here is another example of a trap of this type:
Electrical device
Without special skills and knowledge in the field of electrical engineering, it is difficult to make such a homemade product. Materials for the electric trap:
- plug;
- socket;
- 2 capacitors;
- resistor R2;
- diodes;
- 2 getinax s1 plates;
- resistor R1;
- the wire.
Strictly adhere to the electrical trap assembly diagram, otherwise there is a risk of a short circuit (such current is not dangerous for humans).
To make the device, buy a pair of getinkas plates, 1 mm thick, with foil on one side. You can get by with a budget option and build a device from metal strips. The structure is installed on a wooden floor. The width of one strip is 1 cm, length - 50 cm. The gap between the elements is 1 cm. The procedure according to the diagram and drawing:
- Electric capacitors are used to secure the edges of the strips. A soldering iron and tin are used to solder the leads of the parts to the plates. As a result, a battery is formed.
- Take the wire connected to the outlet and attach it to two strips.
- An adapter is constructed from two plugs to provide the capacitors with an electrical charge.
- The current strength is reduced by installing a resistor with a resistance of 8 kOhm. It is placed in front of the diodes.
- One terminal of the 10 kOhm resistor must be fixed, but the other edge is left free. If you press a two-watt electric element with a wooden stick, it will charge in 5 seconds.
Before hunting rats, the device is charged with a rectifier up to 300 V. They look for the pest's hole and place the device in front of it at night. The bait is placed there. The next morning there will be a corpse in the trap.
Option number 6: snare
Generally speaking, catching rats with snares is quite problematic due to the small size of the animals. However, if you try, you can still catch the pest, and there is even a small life hack that allows you to make such a rat trap with your own hands from improvised means.
For this you need:
- Cable tie;
- A piece of fishing line;
- Heavy load - for example, a wrench;
- Paper clip;
- Bait - for example, a crust of bread.
This is how a homemade rat trap made from a cable tie works in practice:
On a note
When making this trap, it is important to choose the right weight of the load. If it is too small, it will not tighten the tie with the necessary force, and the rat will run away. If the load is too heavy, then using such a structure as a live trap will not work - the animal’s ribs will be broken by the loop.
The advantage of handmade
The main advantage of a homemade trap is that you yourself know how it works, how it works, and you yourself can make a number of changes and modifications aimed at improving the performance of the trap for rodents. Most often, these are rather simple designs for catching rats, which can be made by spending a minimum of time and materials on manufacturing. The appearance of these parasites, unfortunately, is not uncommon in apartment buildings with a garbage chute. I myself often encountered a tailed beast jumping up the steps of a flight of stairs. It is best to deal with this type of problem yourself to be sure of the result.
Option #7: Zürner trap
This classic trap works on the same principle as the tipping rat traps described above. Its difference lies only in the completeness of the design and appearance: the Zürner trap is a wooden house with two entrances, in which the bait is located in the middle of the “corridor”, and the floor on both sides of it is made of boards on hinges. When the animal approaches the bait, the board collapses under its weight, the animal falls into a large closed chamber, after which the board returns to its original position on a hinge.
The figure below shows a diagram of such a rat trap:
Thanks to its successful design, the Zürner trap can catch several rats at once.
As a rule, such a trap is made independently from wood, since the industry has not established the production of Zürner traps. Despite its effectiveness and certain advantages, the Zürner trap is rarely used in practice, largely due to the complexity of manufacturing.
Some tricks and features
Simple mousetraps can be made in other ways. The role of the most elementary of them can be played by a glass jar (or a bottle with a wide neck) with bait at the bottom. You can use a bucket or other container, on top of which you place a strong wire, and on it - a ruler with food at the end. When catching rodents, no tricks will be superfluous.
Among other methods, as well as features, the following can be noted:
- A caught rodent can be released, but this must be done away from home, otherwise the pest is likely to return.
- If you decide to fight rodents “to the death,” then when using a system with a bucket, you should pour water into it. To prevent the pest from escaping, do not fill the bucket completely.
- The wire rack above the bucket can be made rotating. This will make the trap reusable.
- The neck of the jar can be sealed with paper cut crosswise: this will make it more difficult for the rodent to escape.
- A jar or cake box can even be used in combination with an elementary support (a twig, a coin). The animal, making its way to the food, will disturb the balance of the structure and end up in a trap. For greater guarantee, the bait can be secured to the wall of the box.
- You can catch a rodent using a champagne bottle with a small amount of oil poured into it.
- The smell of food is important to rodents. Therefore, fried seeds, salted or smoked lard, cheese, bread, nuts, meat, and sausage are good baits. Rice, wheat, and buckwheat are also used.
Option No. 8: glue rat trap
Ready-to-use glue traps for rodents are available on sale today. However, such a trap is often prepared independently.
Making a glue rat trap is simple: take a special glue for rodents (for example, RaTrap, Alt, EuroGuard), spread it on a piece of cardboard, and place bait on it in the middle. The rat, attracted by the smell, tries to get the bait and puts at least one paw on the glue. Realizing that she cannot come unstuck, she begins to frantically try to escape, puts her other paws in the glue, or even sticks her head. After this she can no longer get out.
If the rat is not freed, it will die of thirst only after a few days. This is the main disadvantage of glue traps: often you have to throw out such a rat trap with a still living rodent (sometimes squealing periodically), which is difficult for especially impressionable people.
On a note
A significant disadvantage of glue traps for rodents is also the possibility of pets getting into them - a cat or dog can easily get dirty in the glue. Washing off the sticky mass is very problematic; it’s easier to cut off the sticky piece of wool.
What bait to use
It is necessary to lure rodent pests to an improvised trap correctly. You need to select treats that most attract mice. There is an opinion that the favorite food of mice is cheese. In fact, rodents prefer foods that have a stronger odor. Bulk products are excellent for luring animals: buckwheat, wheat or rice. Mice are attracted to various oils: sesame, vegetable. They are not averse to eating fresh meat.
Some tips will help you achieve positive results when catching rodents. Thus, it is recommended to place a homemade trap in those places where the largest concentration of pests is observed. The best results will be if you place the trap near the mouse nest.
It is not difficult to create a device for exterminating rodents in the house. It is necessary to make a little effort and use available materials. Homemade traps are not only profitable from a financial point of view, but also absolutely safe for health. The use of environmentally friendly mousetraps is especially important for those who have pets or children at home.
To get rid of rodents, you can use the help of professionals by ordering a pest control service to your home or buy pesticides for baiting mice in a specialized store.
And also a few words about commercially available lethal rat traps (traps)
All of the homemade rat traps described above have an important feature - they allow you to catch the animal alive (the so-called live traps).
However, you can also effectively fight rats using commercially produced traps that will kill rats. For example, among the most popular are the following:
- A standard trap-press (popularly often called a mousetrap) - it can have several modifications;
- Tunnel trap similar to Clean Kill Mouse Trap from Victor;
- Electric rat trap (battery-powered, and there are models that automatically place a killed rat in a special compartment, allowing you to destroy several rodents at once).
In conclusion, it is worth noting that the effectiveness of a particular trap, be it homemade or industrially produced, largely depends on the correct choice of bait. Read more about choosing baits in a separate article: The best baits for rats and mice.
Useful video: a clear example of how an electric rat trap works
How to install correctly
Traps should be installed in places where pests appear; they can be identified by a large accumulation of excrement. In an apartment, it is best to place a trap in the kitchen. If we are talking about a private house, then a cellar or basement would be the best choice for placing mousetraps.
10 Best and Unique Rat Traps
In homes with garbage disposals, the best advice is to place traps on the floors behind waste disposal areas. Particular attention must be paid to the first floor, where all garbage is dumped.
Mousetrap Mr.Mouse
This is a classic version of a mousetrap, but with an improved design of the bait area. It is made of plastic that does not get dirty and does not absorb odors. Therefore, the design can be used repeatedly.
This design is safe compared to steel traps, since it functions on the principle of a large clothespin. As customer reviews indicate, such devices are easy to use. The cost of the product is about 80 rubles.
The effective functionality of rat traps allows you to quickly remove rodents from your home. Thanks to your skills, you can make the device yourself. According to reviews, these are effective devices that will also save money.
Steel mousetrap FIT
The classic option is a mousetrap in the form of a wooden base with a durable steel mechanism. It has maximum sensitivity, so theft of the bait is eliminated, since the device slams shut instantly. These traps are the most popular among the people: they are cheap and work effectively.
But they also have disadvantages. This is not the fastest way: sometimes mice do not die immediately, but after a few hours. The tree absorbs the smell of dead pests, so after some time this design will be unsuitable for use. The cost is up to 70 rubles.
Mousetraps
Which rat traps and traps to choose depends on personal preference. Considering the reviews, mousetraps are in demand. The characteristics of rat traps vary, but they are usually made of wood, plastic, or steel. The devices have a long service life, as well as the ability not to touch the caught pest. But you should take into account the dimensions of the device, since a very small mousetrap will not be harmful to the rat.
As confirmed, the “Super Cat” device works effectively. Inside the trap there is bait, thanks to which the rat gets inside. The mechanism is automatically activated and slammed shut. It will not be difficult to remove a dead rodent: you just need to shake it out.
Do not use contaminated rat traps. You can install a rat trap after treatment with a solution of baking soda and drying.
Live trap is a popular type of mouse trap that is in demand among consumers. This is a trap cage with a tin door. In the middle there is a bait, the smell of which attracts the rodent. When an animal wants to take a treat, the trap is closed with a metal spring. As a result, the beast will be locked inside.