Rabbits are not only valuable fur, but also 2-4 kg of tender dietary meat. And anyone who is thinking about starting a business raising these animals should understand that rabbits are very capricious in terms of their maintenance. They reproduce quickly, but are subject to high mortality. Therefore, special attention must be paid to the construction of a rabbitry. Although this structure is not very complicated, that is, making a rabbitry with your own hands is not a problem, there are certain requirements for this building.
Requirements and features of a rabbitry
The term “rabbitry” refers to two types of enclosures:
- This is a full-fledged room in which cages with animals are installed.
- These are several cells located on the street and standing under a canopy.
Usually the first option is used if the business is established year-round. At the same time, the room is equipped with well-functioning ventilation and lighting. In it, the cells are stacked on top of each other in two or three tiers.
The requirements for a rabbitry are simple:
- creating comfortable living conditions for rabbits;
- organization of convenient cell maintenance;
- a developed system for cleaning and recycling animal waste.
Planning the future livestock
How to build a good rabbitry without knowing how many rabbits will live in it? If you just want to have animals “for testing”, one rabbit with offspring is enough. They can easily get by with 1-3 cells on the site. In order for the supply of meat to be regular and uninterrupted, 20-30 individuals of different ages of different categories are needed.
To begin with, you can get a few rabbits and care for them throughout the warm season to determine how well this activity fits your plans
Rules for choosing a place for a rabbitry
Before you make a rabbitry with your own hands, choose a place for it. And this is regardless of whether a large farm is being built or several cages are installed. The choice of location is based on building regulations. They state that buildings in which animals or birds are kept must be within 40 m² in area and be at least 15 m away from the main house.
Quite recently, our website published a detailed post on how to make a chicken coop for 10-20 chickens with your own hands; at the end of the article there is a detailed photo report on the work done by our reader, follow the link if you have not read it yet.
The remaining requirements for the installation site of the rabbitry are as follows:
- there should not be high humidity on the site, optimally an elevated place;
- minimal influence of wind, so the rabbitry is built as a room or impenetrable fencing structures are installed;
- on the site, groundwater should not lie higher than 1.5 m (you can check this yourself by drilling a well with a garden drill);
- the soil should not be dense and clayey so that rain or melt water does not linger on the surface;
- A quiet place is the key to the health of the animals.
Attention! If there is no such place in the suburban area, then choose the one that would best meet the requirements described above. Minor deviations can be neglected.
Types of rabbitry designs
To start building a rabbitry with your own hands, you need to understand its design features, and also take into account some of its varieties.
Rabbit hutch in a hole
It should be noted that this is the simplest and least expensive project, which has its adherents and the same number of opponents. The thing is that the advantages and disadvantages of this structure are almost the same. The advantages include:
- a microclimate that practically does not change and is natural for rabbits;
- in burrows, animals reproduce well, and the litter has a high survival rate (almost one hundred percent);
- in the pit, food is distributed to all animals at the same time, so they gain weight well;
- a good microclimate and a satisfying life are the key to the health of rabbits.
The disadvantages of this content include:
- it is very difficult to monitor each animal individually;
- it is almost impossible to control mating;
- difficult to catch;
- there is a high probability that the rabbits will start digging holes and running away.
The simplest version of a hole is a pit dug to the required dimensions in the ground with a depth of 1-2 m. The dimensions in the plane are limited only to the suburban area. The walls and floor of the pit must be concreted or covered with brick (stone) masonry so that the animals do not dig holes. The bottom is covered with sand 20-30 cm thick, on which a net is laid for easy cleaning of the rabbitry. Drinkers and feeders are also installed here. The photo below shows just such an option for keeping rabbits.
All-season option
Russia's harsh winters are not intended for keeping animals outdoors or in unheated rooms. Therefore, it is recommended to use two options:
- Organize heating for the rabbitry.
- Carry out thermal insulation measures for cells.
Temperature -5C for rabbits is considered critical. That is, below this indicator, animals stop reproducing and gaining weight. The optimal temperature is +15C. And in the mother liquor, the temperature should not fall below +10C. Therefore, anyone who has set up a business for breeding rabbits must adhere to the second temperature indicator.
There are a large number of different options on how to create optimal living conditions for the animals inside the rabbitry. One of them, which is also the simplest, is to install an EG-1 electric heating element under the bottom of the cage. It is connected to the AC mains through a transformer, which will step down the voltage or step it up depending on the ambient temperature.
The photo below shows how you can insulate cages with polystyrene foam. This option does not require electricity, but it is expensive in terms of the use of additional building materials.
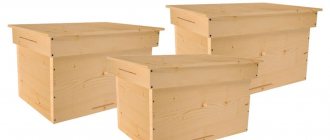
Mini farm
When farmers are faced with the question of how to make a rabbitry with their own hands, many choose mini-farms. This is a universal design that can be used even in winter if insulation is carried out correctly. This structure is a large two- or three-tier cage, divided into several compartments. It is installed on legs with a minimum height of 1 m.
The most important advantage of such a farm is its compactness. But it should be noted that, for example, up to 40 rabbits can be accommodated inside a farm with an area of 2 m². The farm can be expanded indefinitely in length. It is convenient for cleaning and feeding. The bottom photo shows the diagram and dimensions of the smallest rabbit farm.
Insulation
Rabbits feel comfortable at a temperature of 10-20º. Therefore, for the winter you need to either move the house standing in the fresh air to a warm place, or insulate the existing home.
Cover the door with plywood. It’s even better if you glaze it - this option will allow the animals to receive more sunlight. Add a layer of hay to the wooden flooring. The walls can be insulated with ordinary polystyrene foam.
An alternative approach is to build a special shed with heating. Be sure to make a foundation, and the room itself can be wooden or brick. The main thing is that there are no drafts anywhere. The doors should also fit tightly in their frames and protect the shed from the cold. On the south side, arrange a walking area.
For a summer residence, the second option for organizing a rabbitry is more convenient.
Types of cages and enclosures for rabbits
Rabbit cages offer a huge variety in terms of design solutions. But they are all divided into three categories depending on their purpose:
- queen cell;
- for keeping males;
- for young animals.
Queen cell
This is the cage where the female lambs and where she raises the born rabbits for 20 days. Essentially, it is a box made of plywood sheets or OSB boards measuring 40x40x30 cm, insulated, with a round hole in one of the walls. It should be noted that the sizes are selected for rabbits. That is, the above-designated box is also suitable for decorative ones. For larger ones, you need to build a larger cage.
Making a queen cell with your own hands is not difficult. We invite you to watch a video that tells you how to do this.
Two-section cage
Usually these are built for males, because an adult rabbit will not tolerate being near them. Typically, such a cage is constructed in the form of a two-section structure, in which one section is a box with one mesh wall. The second section is a completely blind room with a hole in the wall that delimits the sections.
The female is released into such a cage, where mating occurs. But mostly males live in them alone.
Group cells
These are cages for young animals that live there after reaching the age of 6 months. The typical size of such a cage is 120x50x40 cm. They are made of mesh or sheet (plate) material. They can contain both same-sex and bisexual animals. The main task of the farmer is not to miss the moment when the males begin to show attention to other individuals. At this time, they must be immediately transplanted into separate cells.
Useful tips
Despite the fact that housing is made for animals, you should still carefully consider all the details down to the smallest detail. The building itself must be sufficiently reliable and dense so that there are no drafts or sudden temperature changes inside. Ventilated windows will ensure air circulation. It is best to build a pitched roof, then in the summer you can dry hay on it. Give preference to double doors, one part of which will be made of mesh, and the second should be reliable and dense. After all, these animals are afraid of drafts, so you need to reduce the likelihood of their occurrence to a minimum.
In addition, take care of a specially designated place where you will later put drinkers and feeders, and also make a pit for manure. This will make your work easier, and everything in the barn will be neatly laid out in its place. In general, cages are usually not very bulky, but not small either; there must be partitions and separate feeders. If they are located in several tiers, then make sure that manure from the “houses” of the top row does not fall into the cells of the previous tier. Are you planning to breed rabbits? Consider also a special space where the young animals will be walked.
How to calculate cell size
Rabbit breeding is a whole science. Therefore, in Soviet times, there were institutes that were engaged in a scientific approach to breeding rabbits. So, one research institute developed recommendations regarding the size of rabbit cages.
It was considered optimal that a rabbit cage should have two sections. Feeders and drinkers were installed in one section, and hay was placed in the second. It was a nest for breeding offspring.
So the dimensions of such a cage were: length 220-240 cm, width 65 cm, but the heights of the front and back walls were different. In this way, the construction of a sloping roof was achieved. So the height of the front wall was 65 cm, the back 35 cm.
Today, rabbit breeders are not so responsible when it comes to size. But experts believe that one animal should have a certain space. And it should not be less than 0.8 m³.
How to assemble a three-section rabbitry with your own hands
First of all, it is recommended to sketch out a small drawing, which indicates the dimensions of the rabbitry, as well as the locations of the sections. After which building material is purchased and tools are prepared.
Typical rabbitries are frame structures made of bars with a cross-section of at least 50x50 mm, which are sheathed with mesh or sheet material (moisture-resistant plywood, OSB boards, boards, etc.).
Attention! It is better to give preference to boards; they do not delaminate under the influence of humidity.
Frame assembly
Strictly according to the drawing, the bars must be cut to length in the required quantity.
- Four racks are installed, which are connected by lower and upper trim, consisting of longitudinal and transverse elements. The photo below shows a frame for a two-section rabbitry. There should be three such sections. In this case, under each wall of the section it is necessary to install racks, which will form the compartments separately.
- After which the intermediate walls of the rabbitry are sheathed. Boards are used for this.
- Next, the sides of the structure and the rear common wall are sheathed.
- If each section consists of two compartments, then a fence with a hole with a minimum diameter of 16 cm is installed between them.
- The front part of the structure is covered with a mesh with small cells.
Roof construction
A single-pitch roof structure is the best option. It is formed by different heights of the front and rear walls of the rabbitry. But you can raise the front part of the roof with a small truss, which is a rectangle assembled from bars.
There are no restrictions on the use of any particular roofing material. The main task is to make the roof warm, so thermal insulation material is laid under the roofing. But more often, ordinary boards 30 mm thick are used to construct the roof. They are laid along the rabbitry, and roofing felt or bitumen shingles are mounted on top. The photo below shows just such a version of the structure.
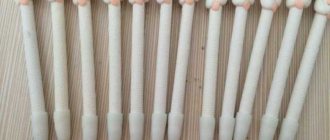
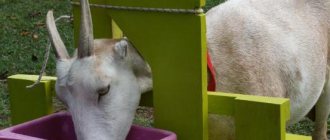
Feeders and drinkers
Take a look at the top photo again. It clearly shows that the feeder is a V-shaped structure, which is formed by metal rods located across the rabbitry. It is constructed in one into two sections. The rabbit will not be able to crawl through the bars, but he can easily get the hay or grass placed in it.
To form a feeder, you need to install two bars at an angle to each other. This is done at the frame assembly stage. Then it is partially covered from the front side with boards.
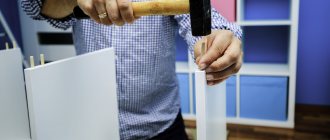
When it comes to drinking bowls, there are a huge number of options. For example, one of them is shown in the photo below.
Doors
These are structures assembled from bars exactly to the dimensions of the opening. They are sheathed with boards, mesh or sheet material. Install a convenient handle and locking device. Particular attention to the latter. It should be simple but reliable. The doors are hung on regular hinges.
Step-by-step instruction
The process of constructing a shed for rabbits in itself does not involve any particular difficulties. During operation, follow these instructions:
- Clean the area where construction will take place. Remove all debris, stones, growth and bushes from it.
- When building a wooden rabbitry, a frame is installed on the ground that will support the entire structure. For heavier stone and brick buildings, a trench should be excavated and a foundation poured under the supporting walls.
- The walls are built on the basis of the formed frame (foundation). In the case of a wooden shed, a number of dug-in supports are provided in advance, onto which boards, logs or thick sheets of plywood will be placed. For a rabbitry, walls are built gradually from stone and brick. Moreover, in both cases, the main condition is the complete absence of cracks. At the same stage, window and door openings are rebuilt.
- Next they make the floor, pouring it with concrete at an angle. A slatted base is also an acceptable option. It is made by stuffing slats onto timber guides with a pitch between them of 15 mm. A wide tray is installed under such a flooring, into which manure is collected.
- Upon completion of these works, the roof is made. The best option is a pitched roof. The roofing material is fixed on a frame made of timber. Moreover, you should choose exclusively strong structures and materials. In this case, the roof will not break under heavy rainfall. You should also make a ladder to it, along which it is convenient to throw hay to dry.
- If wood was used to build the shed, it should be additionally treated with compounds that prevent rotting. This measure does not apply to concrete and brick structures.
- Inside the room, a separate area for storing tools is fenced off using a partition or in any other way.
- Put windows and doors in place.
- They bring them inside, arrange and securely fix the cells in accordance with the developed drawing.
If necessary, the walls are insulated with mineral wool. After this, if desired, you can finish the room.
Mineral wool for wall insulation
It is worth noting that in the absence of a separate room or the possibility of building it on an accessible plot, rabbits can also be bred in a barn where chickens are kept. But in this case, it is necessary to separate the place where the animals will be kept, and also to provide them with a separate run from the chickens.
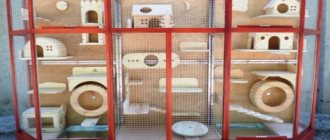
Cages for rabbits, with three queen cells. Step-by-step work from our reader.
The construction of the three-story building took 1 month by one person. Full dimensions: length 3 m, width 0.8 m, height 2.5 m. Material used: wooden beams 50x50, boards: 25x100 and 50x150, chipboards, welded mesh 50x50, 25x25, 8x8, slate. Tools used: screwdriver, chainsaw, square, hacksaw, hammer, axe, level, tape measure.
Additional materials: curtains, latches, handles, screws, cables, nails, screws, profile 60x27, galvanized steel 0.55 mm, brackets for furniture lamps with motion sensors.
Beginning of work:
First, you need to decide on the place where the rabbitry will be located, since due to its size and dimensions it will not be easy to move it.
We build the frame of the structure. We build from bars measuring 50x50. We did this in different ways, as it was convenient, and in such a way that there was as little waste as possible. The frame is three-level. With space for drawers - for rabbit waste. In the places of the drawers we attach a 60x27 profile (guides for drawers). We also lay floors from mesh measuring 8x8 ml.
After work on the main frame, we placed it on gas silicate blocks to prevent the legs from rotting. Next, 50x50 nets were installed in the hay feeders. (The photo shows that the floors for rabbits are made of mesh. At the beginning we did just that, but since we had rabbits of a large breed, they started having problems with their paws - they damaged them, so we changed all the floors to slatted floors measuring 25x50 , at a distance of 0.5 cm from each other.)
Next, we covered the back wall with chipboard and other materials. We had old cabinet doors. Next are the partitions inside the houses, the side walls outside, and the roof.
Here we started making the front part of the house: windows for rabbits, preparing a place for doors, and on the right there are three queen cells with houses. In the houses for the rabbits, a wooden and solid floor was laid at once (the rabbits should not freeze in winter, and it is also not advisable to make cracks due to the strong pickiness of the rabbits).
The process of installing doors and drawers. We made them in advance. Nothing complicated. They hung bolts, BUT the first winter put everything in its place, and instead of bolts, nails came to replace them. And they turned out to be very comfortable. Tree latches are a waste of money. The tree becomes damp over the winter, then dries out over the summer, and the structure becomes deformed.
Installation of remaining doors and drawers. As well as LED lamps with a motion sensor and photocells (to save electricity).
Photo for today. The construction is already 3 years old.
The second construction of a rabbitry, albeit on a different principle.
Naturally, construction was not without pitfalls:
- The first point is that the floor in the houses was laid with mesh, perhaps somewhere on farms this is much simpler in technology, but in experience it turned out to be a bad idea for large breed rabbits, they damaged their paws, and it was very inconvenient to redo it when the rabbitry had already been built ;
- The latches turned out to be a useless thing; they began to break due to frequent use of the doors, or simply did not close properly;
- We got into trouble with the food feeders, without thinking through this point in advance, we suffered for a long time, and in the end we made them separately. The only plus is that it was convenient to wash and clean them, since the little rabbits only sat in these feeders.