Design idea
Mobile and stationary pavilions for bee families will help save space in the apiary.
In addition, with their help you can make wintering and keeping bees easier, as well as significantly increase the percentage of yield. You can build it yourself, but you will need special drawings. The mobile pavilion is mobile, so it can be easily moved to suitable locations, such as flowering centers at specific times. When designing, you can use vans or truck trailers, drawing up a drawing of the device according to the appropriate size. As for the stationary pavilion for bees, it does not have high mobility. It is not put on wheels. It is installed at a specific location in the apiary for a long period of time. The main purpose of the device is to facilitate the wintering and maintenance of bees, as well as to save space.
In beekeeping, there is a rule that implies that all bees must be completely safe, especially during the winter. Cassette pavilions are extremely popular. You can make them yourself
When constructing them, it is important to take into account the main features of the parameters of the automotive equipment acting as the tractor of the device. A self-made cassette pavilion for bees must fit into a van or trailer so that there is free space for the beekeeper to work (small cubbyhole)
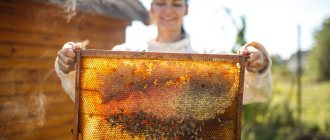
The cassette bee pavilion resembles a kind of chest of drawers, in which hives with bees are located in separate cabinets, independent of each other. Thus, the process of keeping and wintering bees is simplified, and it is easy for the beekeeper to carry out all the necessary activities. The cassette structure can be easily moved to a specific area with honey plants. The beekeeper can do this manipulation independently, without using a face mask or a smoker.
Types of bee pavilions
Bee pavilions come in two types: stationary and cassette.
The stationary bee pavilion does not provide for moments of movement. It is a solid structure made of metal panels, with evidence rooms made of plywood. This beehouse has a utility room in which the beekeeper stores his working equipment. It is possible to reconstruct a stationary pavilion into a mobile one, but in this case you should select wheels. Another disadvantage of converting a stationary beehouse into a mobile one is that it will be too heavy and inconvenient.
On a note! The mobile version of the bee house is practically no different from the stationary one in terms of the floor plan. The same utility room for storing equipment, the same location of evidence along two walls. What distinguishes a mobile pavilion from a stationary structure is the presence of a wheel pair in the first, with the help of which the structure can be moved from place to place.
Differences between houses for insects
Stationary and cassette types of bee pavilions still differ from each other; before constructing a pavilion with your own hands in your apiary, you should give preference to one type.
These two types of insect houses are undeniably good. Their main differences end in the availability of one wheel pair option. They save space in the apiary, their presence calms the beekeeper in the winter, since the bees are kept warm, life in the bee pavilion increases honey production by 30%. In them you can divide the bees into brood and broodless ones and place them on both sides of the aisle.
Recently, beekeepers have given greater preference to the mobile variety of bee houses. Because of its transportability, the cassette type is more profitable to maintain. A stationary view can be reconstructed into a mobile view, but it will cost several times more than creating a pavilion with your own hands. The cassette house for honey insects is easy to use and maintain. It can be transported closer to the flower stalks; it is more convenient to treat walls and floors against bee diseases such as nosematosis.
Thus, it becomes clear that it is not so difficult to build a house for honey insects with your own hands. This is a very advantageous design in terms of caring for bees and collecting honey.
Types of cassette pavilions
There may not be many design differences between cassette pavilions. They are divided into stationary and mobile . Secondary differences are the size, the material from which they are made, the presence of heating, lighting and design features of the cassettes.
Did you know? Cassette hives, made of wood and impregnated with wax, show lower incidence of bee diseases than other types of structures.
Any type of structure should be placed with the long side facing southwest or southeast. The roof can be single-pitch or gable . The second one is more convenient, since snow does not accumulate on it in winter. A distinctive feature of a stationary building is that it is installed on a foundation. And mobile is that it is installed on a chassis.
Mobile
The mobile pavilion is a house in which there are 2 rows of hives (cassettes), united by a common roof. On the inside there is a passage between the hives for servicing the apiary. The structure is installed on a chassis. This could be a trailer from a car, in which the bottom and chassis are preserved, the sides are removed and a frame (frame) is made on which the entire pavilion will be mounted. To make the structure stable, it will be mounted on a welded frame. The cladding is made of chipboard or other materials.
Stationary
The stationary cassette design is no different in functionality from the mobile one. But it is installed on the foundation. The advantages of a permanent building are that it can provide lighting, plumbing and heating for heating in winter. This is a definite plus in regions with frosty winters. Communications facilitate the maintenance of the apiary: water supply, heating, electricity.
Important! Hives made of aspen and linden require additional insulation in winter.
It can also include side windows. Bees do not need lighting in the corridor between the hives, but it helps the beekeeper in working with the cassettes. Here you can also organize good air exchange and equip a place to store frames and other equipment.
How to make it yourself
Cassette pavilion “Berendey” The beekeeper, regardless of his experience, is thinking about making a pavilion for bees with his own hands.
The solution will make his work easier and will provide an opportunity to increase the productivity of the apiary. Initially, stationary buildings were created. Today, old vans and trailers are actively used. The solution significantly increases the level of honey yield of individual apiaries and industrial production. Regardless of whether the pavilion is planned to be mobile or stationary, preference should be given to cassette ones. They can be installed permanently on site, mounted on a trailer, or retrofitted into an old van. But it is the cassette ones that make it possible to optimize the work of the beekeeper, minimizing the process of caring for the apiary as a whole and for each family at any time of the year.
Blueprints
All beekeepers know that the more a worker bee flies around honey plants, the higher the bribes will be. Therefore, it is beneficial to have mobile pavilions. They can be mounted on a car trailer and transported from one flowering field to another. The presented drawings will give more insight into how to implement the idea.
After creating the drawing, you can begin the main work. It is better to do it in such a way that there is a passage in the center and enough height. This will make it easier for the owner to care for bees and hives. He must move freely inside with the honey extractor in his hands, which means the passage width is at least 90 cm.
Decor
Wanting to create ideal conditions for families, the beekeeper must be patient, have the desire and the necessary tools. There are not many drawings on the Internet, so you can use the drawings of the Berendey pavilion as a basis and reproduce it yourself.
- Level the trailer and secure it in place.
- Dismantle the sides and floor.
- Lower the level of the passage between the hives slightly.
- Weld the metal base and secure it.
- Attach the bars to the frame and fill the boards.
- Cover with USB or fiberboard panels.
- Cover the roof with roofing felt.
- Design the doorway, hatches.
- Leave a gap around the perimeter of the floor and place the hive as close to the frame as possible.
- Make ventilation hatches in the ceiling.
The lighting system should be thought out at the drawing stage.
Beekeeper's closet
The beekeeper has to stay near his apiary for a long time and move with it. Often the owner accompanies families throughout the season. He needs proper rest and a point to realize the harvest. Therefore, it is necessary to provide such places in this building. This is ideally thought out in the Berendey model. Even with minimal dimensions, there is enough space for everyone.
The beekeeper's area is located at the front or end of the trailer so as not to place additional load on the trailer axle.
Insulation
The wall and floor are made double to fill the space with insulation. This solution will help save the apiary from overheating in the summer and ensure optimal conditions in the winter. If you use OSB panels, then you don’t have to think through the insulation. They already have a layer of insulation inside.
Preparation for the construction of the pavilion
Before creating such a structure, you must carefully select the type, determine the dimensions, and study the drawings. Without a thorough approach, it will not be possible to take the process seriously.
At the preparatory stage it is also worth considering:
- number of families, optimally up to 20 for one room;
- for a stationary one, carefully choose a place closer to where honey plants grow and away from noise;
- prepare material and tools.
Properly constructed bee housing makes it possible to optimize the complex process of honey production in an apiary. It is enough to open the entrance to start the active work of the worker bee.
What are the benefits of cassette beekeeping?
Over several decades, a friend of mine has tested almost all types and systems of hives and came to the conclusion that cassette beekeeping is very convenient and profitable. And it was like this...
Closer to the mid-80s of the last century, he built himself a mobile pavilion, designed for multi-hull hives, designed to keep bees all year round. However, the working conditions in the pavilion turned out to be not entirely convenient, and to be more precise, completely uncomfortable. After all, to inspect the lower building, he had to move all the upper buildings to the floor, and after finishing the work he had to do it all in reverse order. This took a lot of time and effort. In addition, inconvenience was caused to the bees.
Towards the end of the 80s, an acquaintance of mine saw a cassette hive in Moscow. He really liked this hive and by the end of 1990 he had completely remodeled his pavilion for cassette hives and started cassette beekeeping, so to speak.
On the side walls he placed stationary cassette compartments of the hives according to the principle of a chest of drawers. In each of the compartments he placed six retractable cassettes, independent of each other, vertically. Each cassette was designed for 10 frames with dimensions of 435x230. The convenience here is that each cassette can be pulled out for inspection without disturbing the bees in the other cassettes.
At the end of the work, the cassette is simply pushed into place. Agree that this is very convenient. Cassette beekeeping significantly reduces and facilitates the work of the beekeeper, and also minimizes unnecessary disturbance to the bees. Using a cassette system of hive compartments in the pavilion, you can keep bees using any technology.
Cassette pavilions for bees abroad
The concept of cassette pavilions does not exist abroad. The cassette type hive was invented by domestic beekeepers and is designed to make it easier for the beekeeper to transport bees to the honey collection site. The trailer can accommodate a structure for 24 bee colonies. They are combined into 4 sections in 2 rows. Multi-body hives are used abroad. Several main types of hives are also actively used: Dadana, Varre, Ruta.
Important! The designs of Dadan or Rut hives are standard. They produce many components and accessories, so the bee pavilion is usually designed to fit such standard frames.
Drawings of a mobile pavilion for 14 bee families
The number of sections must correspond to the parameters of the pavilion. Skilled beekeepers advise using no more than 20 sections, otherwise the bees will constantly interfere with each other. First you need to assemble the body to divide it into the number of sections. They are allocated for placing frames according to construction plans. Then all the elements are assembled into a single device, covered with a roof. To do this, you will need certain experience and skill in working with various raw materials, namely metal, wood and other materials.
If the device for bees will be placed in a van, then 3 tiers of hives should be mounted on 2 sides, leaving a passage between them for the beekeeper. For convenience, hatches or windows can be placed above the working passage to provide natural light. To obtain artificial light, you can use a solar panel, batteries and transformers. However, many beekeepers use simple flashlights.
Wintering plays an important role in beekeeping, since the future harvest and the condition of bee families depend on it.
In order for wintering to be successful, it is necessary to pay special attention to the insulation of the structure. You can install a layer using conventional building insulation
If desired, you can use sheets of roofing felt, placing them above the floor and between the plywood ones. For a warmer winter in beekeeping, the front door is insulated using roofing iron.
Considering the easy flammability of all materials, competent beekeepers do not recommend using fire indoors.
Pavilions for bees are a simple structure that can be built even by inexperienced beekeepers. The main thing is to correctly calculate the parameters of the room and use durable materials. If you wish, you can buy a ready-made structure or order its construction from professionals.
The classic apiary occupies a large space. Pavilions for bees can significantly reduce the location of hives, located vertically in several rows.
You can make budget versions of such structures (both mobile and stationary) yourself. To do this, you should draw up a drawing with exact measurements, stock up on the necessary materials and strictly follow the construction plan.
Bee pavilions can replace a large farm and greatly increase the level of honey collection. On each square meter you can place 5-10 times more families of insects than in the classic apiary version. The main types of pavilions are Berendey and Kolosok. Each has its own pros and cons. In the first version, the hives are located parallel to the corridor, and in the second - at some angle.
The industry produces both types in stationary and mobile versions, but some are quite expensive. For example, the average price of the Berendey bee pavilion fluctuates around 1/3 million rubles. Therefore, beekeepers build the necessary structures themselves.
Internal device
Equipped at their own discretion, taking into account the basic conditions necessary for comfortable work:
- hives are installed in 2 or 3 floors on the sides of the van;
- there must be a passage between the rows that will allow bee colonies to be served;
- space is left between the hives so that frames can be stored;
- a room is equipped in which the beekeeper spends his working and free time.
- In such pavilions, bees can spend winters peacefully - no additional investments will be required for the construction of winter quarters.
Ventilation in the pavilion for bees
Natural ventilation from spring to autumn is provided by ventilation through windows and doors. In winter, a lot of dampness accumulates inside and around the cassette modules. Humidity increases greatly in stationary houses on strip foundations. Based on reasonable considerations, it is better to install non-mobile buildings on columnar or pile foundations. Additionally, supply and exhaust ducts with adjustable dampers are equipped. Natural ventilation is arranged so that in winter moisture escapes along with stale air, and heat is retained in the modules.
Rules for keeping bees in pavilions
The first important rule for keeping bees is the presence of high-quality heating and ventilation inside the pavilion. In winter, death is detected by inspection. If a good microclimate is maintained inside the pavilion, the bees practically do not die. Feeding is carried out through feeders. They are attached to the doors of cassette modules. The amount of feed is checked by inspection through the transparent wall of the feeder. In February, Kandy is used for feeding. To prevent the food from drying out, it is covered with film on top.
Lighting
The light in the bee pavilion can be artificial or natural. Most beekeepers don't bother with this point. If there is a lack of natural light, use a regular headlamp or autonomous solar-powered lamps, for example, like this one:
A full charge lasts for several hours of lamp operation.
The wire length is about 3.5 meters. This is quite enough to mount the solar panel on the street and hang the lamp itself in a change house or in a tent. Yes, anywhere.Link to the seller's page on Aliexpress
For beekeepers living in the northern regions, it is better to install electrical wiring so that the heater can be turned on in winter. It’s better not to use it than for the bees to freeze.
Construction of a permanent structure
This design is installed in a specific place for a long period of time. Its purpose is to save space, make it easier to keep insects and their wintering. The stationary structure is erected away from animal grazing and people in a dry area.
Pros of construction:
- It is easy to connect water and sewerage to it.
- If such an apiary is located in a courtyard, it makes sense to install heating pipes into it.
Ideally, the walls of the room (side walls) will “look” to the southwest and southeast. They will be illuminated by the sun most of the day.
Beginning beekeepers often pour a strip foundation, then make a concrete floor. The increased humidity of such a coating negatively affects the activity of bees. The main condition is a dry floor, which is why most specialists make houses on stilts.
Two-story pavilion
How to make a hive-lounger: DIY instructions
2.0.1
Roof construction
The roof in the pavilion can be solid (ordinary) and with opening hatch windows.
Option 1:
- after building the frame, an additional beam is stuffed on top as a mauerlat;
- then rafters are made from 5x5 cm beams at the desired angle and the roof is covered with waterproof material.
In this case, windows are made in the walls of the building. Not everyone likes this option, since part of the space on which hives can be installed is lost.
Option 2:
- draw a roof design, providing holes for hatches in it and marking the dimensions;
- the roof is made flat (horizontal);
- install hatches with opening or sliding windows.
In this case, the entire wall space can be used for hives.
How to make a chicken feeder with your own hands?
Wintering bees in pavilions: practical advice
Whether the insects will be able to fully survive the winter and remain functional in the spring will depend on how well and reliably you build the bee pavilion and how you insulate the structure. To insulate the pavilion, you can use building roofing felt - the most affordable, but very effective material. Do not forget about insulating windows, if they are provided for in the design, and the entrance door - since they are the main sources of heat loss. Carefully “walk” through all the cracks - extra vigilance will never hurt if the issue concerns the health and comfort of striped workers who provide you with one of the healthiest products in the world - aromatic and sweet honey.
Features of bee pavilion care
Depending on whether “Berendey” is used as a stationary or mobile structure, caring for the bee pavilion has some peculiarities, although in general the rules for handling the structure and its inhabitants are standard.
By installing a bee pavilion on your site for permanent use, you can get a reliable, strong and well-protected apiary that takes up minimal space and is very easy to use. For nomadic beekeeping, in addition to the pavilion itself, it is also necessary to have a vehicle of suitable carrying capacity, but in this case the honey collection period can be extended almost throughout the summer and, in addition, different types of honey can be obtained.
Important! The only inconvenience that distinguishes working in a bee pavilion from a conventional apiary with many free-standing hives is that all actions have to be performed in a very limited space. The rest of the care is standard and consists of:
The rest of the care is standard and consists of:
- conducting a thorough spring inspection of families in order to inspect their condition and number;
- regular sanitization of cassettes, racks and all equipment used in work;
- feeding insects as needed and constantly monitoring the state of food supplies;
- formation of layering (for this, brood intended for placement in the second tier is used);
- swarming control;
- timely replacement of cassettes, expansion of nests due to new frames and compartments;
- regular pumping of honey;
- ensuring constant cleanliness inside the pavilion;
- feeding insects for the winter and insulating the pavilion for the winter with protective shields.
Mobile bee pavilion
A properly organized apiary on wheels can become an effective tool in the work of beekeepers. This design allows you to collect the maximum amount of honey. A mobile pavilion for bees is a trailer, although it can often be organized in the back of a van. Regardless of the size, it is necessary to provide a place for the employee to rest. Frames, food, clothes and other useful tools are also stored there. Such a closet takes up a little useful space, but without it it will be completely sad.
Self-production of a mobile beehouse “Berendey”: step-by-step instructions
To make a pavilion for bees, you need to find detailed drawings. Or draw a construction plan yourself.
The scheme should take into account everything that is needed for the comfortable living of bee colonies and their maintenance:
- trailer dimensions;
- change house (optional);
- possibility of heating;
- wall insulation;
- lighting of the passage between cassettes;
- ventilation;
- luggage compartments;
- stairs and ramps.
When the planning is completed and all the necessary materials and tools have been collected, it is time to begin construction.
Construction stages
If there is a need to place a place for a beekeeper in the structure, then the trailer will have to be extended. And to unload the rear axle, the change house needs to be located in front.
Next, the following work is performed:
- Using a metal profile or timber, a frame is made. Then the ceiling, floor and walls are covered with boards.
- To insulate the room, the sheathing of the boards is covered with ordinary roofing felt, and then sheathed with fiberboard. Double walls can cope with frost more easily.
- A waterproof material is used for the roof, and insulation is laid underneath it.
- The beekeeper's cabin is always separated by a blank wall from the bee's housing. Therefore, the pavilion is equipped with two doors from different ends of the room.
- For interior lighting, ordinary light bulbs are used. But if you want to save money, then use LED lamps.
Cassette modules are located in the room.
New design hives are assembled from:
- Cases.
- Cassette. They slide out on a sled, and bees live in them.
- Framework. They are placed inside the cassette and contain honeycombs.
- Covers for cassettes. They separate bee colonies.
- Insulation.
- Protective cover - from rodents.
- Cassette box - for ventilation.
How to make a design
The arrangement of modular cassettes inside the pavilion is similar to barley. The grains are directed in one direction and depart from the stem (passage) at an angle of 50 degrees. The entrance to the beekeeper should be directed to the south. Then one row of cassettes will be oriented to the southeast, and the other to the southwest.
There is an industrial version of the pavilion in which the roof is movable. Once in place, telescopic poles raise the roof to allow air and light in and for bees to move around. And while camping, the roof rests on cassette sections.
Frame making
The frame is mounted on a trailer or truck bed. You can assemble it from a wooden beam. Or weld from a corner, profile or pipe. When sheathing it with wood, you need to alternate layers with insulation. This way the building will be better protected from heat or cold.
The roof can be retractable. Secure it on one side with hinges. When necessary, manually lift it and place it on supports. Therefore, it is better to make it from lightweight plastic using light insulation.
There is additional protection from heat, weather and animals in the form of additional overhead external walls. Plywood is used throughout. It is sheathed with foam plastic, which is used to insulate walls, nests, sections and roofs.
Location of sections and feeders
When placing feeders and nesting sections, the convention is taken into account. The feeders are positioned so that they are heated by heated air. The bee happily climbs into the warm feeder.
If there is one feeder on several nets, then it is necessary to delimit the feeding zone with nets. This will protect bee colonies from conflicts.
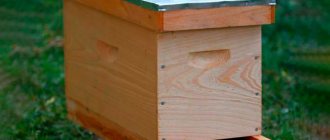
Hive sizes
The following figures are taken as the standard size of a bee house: 75x31.6x47 cm. Store dimensions: 75x31.6x22 cm. Inside, 29 frames for honeycombs and 2 sugar stores are installed. The ceiling should have a hole and is best adjustable. This makes it easier to control the bees. Sawdust is poured on top of the ceiling, then the roof is installed.
Ventilation
Evidence is ventilated thanks to:
- The entrances are kept open all the time during honey collection.
- Air passing under the frame through the mesh.
- Mesh ceiling on verandas.
- A mesh located at a distance of 2 cm below the tap hole. The link is only 3 mm.
Ceilings and verandas, in addition to ventilation, also help during the treatment of bee housing with chemicals, as well as during transportation. During disinfection, insects wait in an open space.
Today, purchasing a ready-made pavilion is not problematic in any region. It's another matter when there is a desire to save money. Any person who has the skills to work with wood and metal can independently make a mobile apiary. Fantasy will be limited only by financial possibilities.
Necessary materials
In the construction of bee pavilions, a standard set of materials is used. To make a metal frame, you will need cutting equipment and a welding machine, plumbing and carpentry tools. In addition you will need:
- boards;
- plywood;
- several sheets of fiberboard or chipboard;
- polystyrene foam as insulation;
- fine mesh (nylon or metal - it doesn’t matter);
- roofing iron or roofing felt;
- Nails, screws, and fasteners are required for assembly.
DIY pavilion
It is quite possible to make a pavilion for bees with your own hands. You need to start by preparing or finding well-designed drawings that satisfy the basic conditions:
- Suitable sizes for van or trailer;
- Equipment for working and living compartments;
- Possibility of heating inside;
- Provide thermal insulation for the roof and walls of the structure, making it a layer of any suitable insulation;
- Lighting of the working passage between the hives and the hives;
- Ventilation – to avoid dampness in the pavilion;
- The technical tier above the hives and below the bottom of the pavilion is the luggage compartment. They are useful for storing equipment, hives for layering;
- The need and availability of ladders and folding platforms.
Now let’s tell you a little more about the arrangement of the structure. The number of sections should be based on the size of the pavilion, but experienced beekeepers do not recommend making more than twenty, otherwise the bees will interfere with each other. At the very beginning, the body is assembled and divided into sections. Frames are placed in them according to the accepted drawings. Everything is assembled into a single structure and covered with a roof.
It’s not very easy to do it yourself; you need certain skills in working with wood, metal and related equipment. But the result of the work is difficult to overestimate.
If your bee pavilion is located in a van, then it is better to mount the hives in the working compartment in three tiers on both sides, leaving a working passage between them. It is convenient to make glass windows or hatches above the passage in the roof to create natural light. The same windows should be provided in the cabins. Artificial lighting can be done using batteries, transformers or using solar panels. Some beekeepers make do with ordinary flashlights.
In a stationary design, the compartments can be arranged in one row, without a second row opposite. In this case, the valves cover the hives, practically closing with them.
Pay attention to the insulation of the pavilion, since the bees will have to spend the winter here. Make a layer of insulating material (any construction household insulation) or roofing felt between two sheets of plywood along the walls and above the floor of the pavilion
Then keeping bees in winter will not cause concern. The entrance door is also insulated with roofing iron. Double walls will help you not to overheat in the summer.
It’s good if the beekeeper’s cabin has two exits – one outside, the other into the room with the hives. In the second case, doors on hinges are inconvenient; it is better to make them sliding, or to separate the compartments with a curtain. The living compartment should have a place to work, a table for printing honeycombs, and lockers.
We give you another practical advice from an experienced beekeeper:
Particular attention should be paid to the fact that all materials used for the construction of the pavilion are flammable. There is a high risk of fire, so experienced beekeepers do not recommend using open fire inside the pavilion
Buying ready-made pavilions today will not be a problem. The market offers various designs of different sizes, from different materials, the price accordingly - from cheap to expensive options.
We hope that our practical recommendations will help you prepare for the next season of keeping bees in new conditions.
- We advise you to be concerned about the wintering of bees in hives.
- What are the pros and cons of a mobile apiary?
Where to start construction
At the first stages of building a bee pavilion, you will need to assemble the frame of the room and divide it into the required number of sections corresponding to the number of bee colonies. Then the pavilion is sheathed, all its parts are assembled into a single structure and roofing work is carried out.
Constructing a pollen trap with your own hands
At the final stage, the pavilion is painted with multi-colored oil paint - different colors are necessary so that the bees can navigate in space and do not wander among other pavilions.
The design of the bee pavilion allows the use of windows or hatches - they will serve as additional sources of lighting. As a source of artificial light, you can use lanterns, solar panels, or connect to the electrical network.
Construction work to build the pavilion will take you at least 3-4 months. This is provided that you will not be distracted by other matters. To build a structure, you must first make a drawing on which everything will be marked down to the smallest detail. This will make the work much easier later.
Note! To ensure that bee families do not interfere with each other, it is recommended to construct a pavilion for no more than 25 families.
The beehouse plan has some requirements for the appearance and internal contents:
- The dimensions of the structure should be correctly calculated;
- The bee house must be equipped with both working premises and premises for household needs;
- The drawing must include a ventilation system;
- It is recommended to consider lighting for the beehouse and its heating during the cold season;
- It is imperative to allocate a place in which work equipment will be stored.
You will also need the material from which the bee pavilion will be created:
- Tools for working with metal (cutting, welding, etc.);
- Jack for raising the van;
- Metal corners and channels;
- Wood beams, boards;
- Material for covering the roof of the structure;
- Nails;
- Plywood.
You can construct a pavilion designed for bees with your own hands. First you need to select competent drawings and mini-schemes (shown below) that will meet all construction conditions:
- optimal trailer or van size;
- internal heating function;
- presence of living and working compartments;
- mandatory lighting of the passage located between the change house and the hive with bees;
- the presence of a folding platform and ladders;
- the main condition is ventilation, since without it unwanted dampness and mold will appear;
- luggage compartment - a kind of tier above the hives where the bees are located, as well as under the bottom of the device, they can be used to store all the necessary things and equipment;
- thermal insulation for walls and roofs, which can be constructed using a layer of various insulation materials.
Design idea
Pavilions for bees, both mobile and stationary, help not only save time and space in the apiary, but also increase productivity, simplify preparation for wintering and make it easier to keep bees in the apiary.
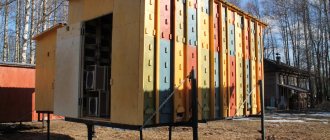
Mobile pavilion in a truck trailer
Content Tips
The houses in the cells are securely fastened; they should not dangle. It is advisable to insulate each cassette hive with a sheet of roofing felt or film, but in such a way that this does not interfere with air circulation.
The stationary pavilion can be equipped with electricity and lighting
Pay special attention to the wiring, as the structure is made of flammable materials
Plumbing can also be installed. It is not necessary to lay pipes. It is enough to place a barrel nearby, like a summer shower, and equip a drain.
The outside of the entire structure needs to be painted to protect it from moisture. It is better to cover the outer walls of the hives with paint of different colors, which are sharply different. You can draw large multi-colored symbols on the front walls: crosses, circles, stripes, triangles, etc.
Otherwise, pavilion maintenance is not much different from beekeeping in single hives.
Pavilion keeping of bees is an excellent solution for medium and large-sized apiaries. Stationary pavilions have proven themselves well in northern regions, and a mobile platform is the best option if the meadows in your region do not have a variety of honey plants.
Tips and tricks
When constructing a structure, it is necessary to take into account the number of families that will be contained in it. Professional beekeepers recommend sticking to the drawings and the dimensions indicated in them. It is necessary to consider the lighting, ventilation, and heating systems.
Before starting construction, you should prepare boards, plywood sheets, metal products, nails and other tools and materials. First, a metal frame is constructed, then the roof and walls of the pavilion are sheathed.
There are mobile and non-mobile houses for keeping bee families. If it is important for the beekeeper to be able to move the pavilion to select areas with a large number of honey collections, it is better to choose a mobile type. When the beekeeper allows his insects to take care of finding pollination sites on their own, a permanent pavilion can be set up.
Mobile
This type of pavilion resembles a trailer. There is a beekeeper's pantry and beehives on it. It is recommended to arrange the beekeeper’s room in such a way that it has a passageway - this way the beekeeper will have easy access to the houses.
The main structure of a mobile pavilion is no different from a stationary bee house. The same wooden building with a flat or gable roof. The main difference is the lower part. If a foundation is poured for a stationary house, then the mobile structure is placed on a chassis.
Usually the chassis is a trailer of a truck or agricultural equipment. During construction, it is jacked up and placed horizontally on supports. The sides of the trailer are removed, leaving only the frame. It will serve as a foundation. The metal frame of the future house is welded to the size of the frame. Sheathing is done with chipboard, boards or other material.
For stationary use, the building can stand on supports. At the beginning of the season, the structure is raised with jacks. The supports are removed from under the trailer. The pavilion with the bees is hooked to the car and taken out to the field closer to the honey plants.
The cassette mobile design has many advantages:
- Increasing the harvest due to the access of the apiary directly to the seasonal flowering honey plants. Honey yield doubles. Overcoming a shorter distance, the bees bring 100% of the collected product to the honeycombs.
- The beekeeper is given the opportunity to obtain pure honey from one variety of honey plant. Bees will only carry the product from flowers growing nearby. During the season, with frequent moves, you can get several varieties of pure honey, for example: acacia, sunflower, buckwheat.
- The ease of maintenance of a mobile pavilion is the same as that of a stationary structure. The bees remain in their houses for the winter.
The only disadvantage of the mobile pavilion can be considered the impossibility of supplying communications. However, plumbing and sewerage are not so important for bees. Elements of comfort are in demand by beekeepers. As for lighting and heating, wiring is needed. During the winter, the house stands in the yard. The cable is connected to the home electrical network. Light appears inside the pavilion. Heating for bees is provided by electric heaters.
Advantages and disadvantages
Advantages
Positive qualities of both types of construction:
- take up little space;
- it’s easy to insulate all hives at once;
- there is an opportunity to work in any weather;
- you can treat all the houses and relocate the bee colony if necessary;
- there is free access to any insect home from inside and outside;
- quick collection of honey from all filled frames and stores;
- separate rooms for bees are small-sized and light.
Pavilions, in addition to collecting honey, have other additional functions: they are often used for obtaining and storing queen jelly, pollination and creating layering.
- Good mobility of the mobile pavilion during migration.
- Easy to maintain. During the move, hives constantly need to be loaded and unloaded from the car trailer. It is enough to transport the pavilion to another location.
- The pavilion always maintains optimal conditions for hatching the uterus. There is no such possibility in hives. The process will depend on weather conditions.
- The presence of a mobile house helps to increase honey collection.
- An optimal microclimate for bees is created inside the pavilion. Insects overwinter and develop better.
- Bee families living in one large pavilion create less danger to humans and animals than insects whose hives are scattered over a large area.
Stationary and mobile pavilions are primarily compact. In a small area you can support a large number of bee colonies.
Disadvantages of both types
| Regular option | Mobile design |
| To install the structure you need a foundation | You need a trailer to place the structure in it |
| To fly to remote areas and collect nectar, insects need to expend a lot of effort. To restore them, many individuals eat part of the prey on their way home. | Fuel costs are required to move the pavilion to another location. |
| If a beekeeper spends the whole summer at a mobile apiary, he needs to stock up on food or travel to the nearest town for food and other necessary goods | |
| Due to the proximity of the location, bees may confuse the houses | |
| Some bees can parasitize on fellow bees from other families: they will steal honey from neighboring hives | |
| The structures are fire hazards. They consist of wood, foam or other flammable materials. If the pavilion catches fire, all the bees will not be saved | |
One of the beekeeping technologies
Each beekeeper uses his own technology, which is most convenient for him.
A friend of mine liked the technology he developed himself.
He divides bee colonies into two parts: one of them is brood, the second is sterile.
This technology facilitates the creation of families of honey bees with annual replacement of queens, without wasting time searching for them in a huge mass of bees.
Anti-swarming measures, 100% anti-varroa treatment of bees, as well as mite control also do not take much time. During the entire period, from early spring to late autumn, all of the above procedures take a minimum of time.
The pavilion is very convenient because even in late autumn, in the absence of brood, it is possible to carry out complete anti-varroa heat treatment of all bee colonies at the same time, and this can be done directly in the hive compartments. This procedure will not be particularly difficult. If there is no need to treat all bee colonies, you can get by with treating individual hive compartments, the mite infestation of which exceeds the permissible norm.
Cassette beekeeping is especially convenient in cases where you have to frequently move from place to place. When using a cassette pavilion, the beekeeper does not need to load, unload the hives and arrange them upon arrival at the honey plants.
One beekeeper can easily handle the preparations for the move in any weather. In this case, there is no need to use a smoker and a face mesh.
Upon arrival at the site, it will be enough to install the pavilion on a horizontal platform and open the entrance. This is all that is needed to prepare the bees for honey collection in a new place. I would also like to note that at the end of the honey harvest, my friend takes honey from bee colonies, practically without using a face net.
The use of both mobile and stationary pavilions allows the beekeeper to avoid moving hives to the winter hut in the fall and removing and placing them in the spring. If desired, constant heating of the hive compartments can be provided inside the pavilion.
Insulation
For comfortable wintering of bees, it is necessary to take care of insulating their home. The insulation is laid between plywood walls. It is convenient to use foam or mineral wool as insulation. The cracks are foamed with polyurethane foam, or sealed with tape with insulation padding, so that all compartments will be warm.
In the summer, double walls will save you from overheating.
If you nevertheless decide to build a pavilion with your own hands, then it is better to complete its construction before the first spring inspection. Let it sit a little and air out. Bees do not like foreign odors (paint, polyurethane foam, etc.). And when you remove the hives, immediately move the bees to the pavilion.
Safety precautions
- The mobile pavilion must have a braking system.
- During construction, all safety regulations must be observed.
- Among the materials for construction there are highly flammable ones. A fire extinguisher is required.
When organizing a nomadic apiary (what else can you call a moving platform with bees?) there are many points that need to be taken into account. To increase the useful space in the trailer, you can install columns with bee colonies in 2 tiers. For ease of movement, the change house is often made through.
Large bee pavilions (for 48 families or more) are difficult to transport on bad roads. Because of this, it may be impossible to deliver them to particularly “tasty” areas. For this purpose, it is better to use compact trailers for 12 families.
This will not happen with stationary pavilions. They are worth it and worth it. They don't go anywhere.
When choosing bees, you should give preference to local breeds; in Russia, Karpatka Carpathian and black mountain bees work well.
Pros and cons of cassette beekeeping
The cassette system is a covered pavilion. It can be stationary or placed in a trailer to a car. The second one is convenient to transport and place closer to flowering honey plants. This allows you to significantly increase bribes.
The pavilion is divided into sections. In each of them, as in a regular hive, slats are attached on which cassettes are installed, which perform the same function as the body of a regular bee house. The cassette can be designed for 8, 10 or 12 frames. The design can be made for frames of any size. The distance between the cassette walls and the mounting height of the slats depend on the size of the frames used.
Ventilation holes and tap holes are made on the outer wall of the cassette. The wall that is located inside the pavilion structure can be separate for each cassette or common. The second type is convenient if you need to simultaneously prevent varroatosis or assess the condition of bee colonies.
- Advantages of a cassette-type pavilion:
- there is no need to build a winter hut: due to the microclimate created in the pavilion, the bees maintain the temperature quite comfortably and winter well;
- convenient for storing additional frames or equipment, for which the upper part of the structure can be used;
- easy to move and transport the entire apiary at the same time;
- saves space for installing an apiary;
- allows you to increase the volume of honey collection;
- allows you to maintain a more comfortable microclimate for bees;
- allows the bee colony to develop faster;
- reduces the risk of swarming;
- makes it easier to maintain the apiary and care for the bees.
Pavilion for keeping bees: how effective is it?
Keeping insects in cassette-type pavilions has many advantages. The main ones include:
- Easy to maintain and keep insects.
- Increase in honey yield by one and a half to two times.
- Creating optimal conditions for safe wintering of bees.
- Maintaining the desired temperature regime and reliable protection from adverse weather conditions, which ensures the strengthening and development of bee colonies.
- Possibility of using the pavilion as a mobile apiary.
- Durability and reliability of the design.