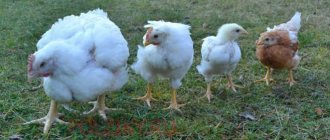
Artificial incubation of eggs is an important process when breeding chickens, and for some breeds it is generally the only way to replenish the flock population. The latter applies to broiler chicken breeds. For this purpose, purchased incubators or self-assembled devices are used. Among the factory models, the most popular is the Layer device from a domestic manufacturer, which has become widespread due to its low price and high quality of work. In addition, the device is small in size, which is convenient for small farms. In the article we will look at the features of the device, the pros and cons of this incubator.
Comparison with Kvochka incubators
The Layer Layer device (the incubator design of this brand is quite simple and therefore reliable) is very popular among summer residents and village residents.
However, of course, there are other brands of units on the market that are also in demand among homestead owners. For example, very often incubators “Cinderella”, “BLITZ” and “Kvochka” are ordered on suppliers’ websites. Next, we will give a comparative description of all these three models. Kvochka incubators are available in different price categories and can have different equipment. The most popular models are simple ones with a thermostat and automatic egg turning mode. They are marked as “Kvochka MI-31”. They cost about the same as the Layer. The incubator of this brand has the difference that the revolution in it is carried out not by moving the grid, but by tilting the body (manually). For this purpose, the models are equipped with specially shaped legs. Instead of bars, partitions are used inside. Most homestead owners consider this method more effective. In this case, the hatchability rate increases. Although the manual method of turning over is, of course, not very convenient.
Unlike the Layer, the Kvochka does not have a humidity regulator. Instead, special napkins are used in holders, moistened with water from the provided container. “Kvochka” has some advantage over “Laying One” in that it is equipped with a small fan. That is, this incubator does not have such a disadvantage as not very uniform heating of the air inside the device.
What are the advantages of automatic and manual modes?
We recommend reading our other articles
- Pickled plums
- What is the best way to feed goslings from birth?
- Spider mites on cucumbers
- Description of the eggplant variety Black Beauty
Layer incubators have automatic, semi-automatic and manual operating modes. Not all models have such a variety, but if you look, you can find it. What are the features of each of these modes?
The automatic incubator is equipped with a digital display
- The automatic incubator is equipped with a digital display and special buttons so that you can set the egg turning time, the desired temperature, and humidity, which the machine remembers. Thus, the breeder only needs to enter the required indicators once, and then the incubator does everything itself.
- The semi-automatic mode allows you to set the time for turning the eggs, but as for temperature and humidity, they need to be adjusted all the time.
- Manual mode does not allow you to leave for a long time. The breeder must constantly turn the eggs manually and monitor all indicators in the incubator. On the other hand, the system is under complete human control and the result largely depends on the actions of the breeder, and not the machine, which can significantly increase the hatchability of birds.
These are the features of different models of Layer incubator; the choice, of course, depends on the capabilities and preferences of the breeder. The most expensive models are fully automated, the cheapest ones are manual.
Incubation periods
There are 4 incubation periods in total:
- Days 1-7 – the first day is taken to be the moment of laying. The temperature 37.8-38.0 and humidity 60% do not need to be changed at this stage - the developing embryo needs comfortable, stable conditions. The only thing you have to do is turn the eggs.
- 8-14 days – reduce the humidity and continue to constantly turn the incubated material.
- 15-18 – start ventilating the incubator 2 times a day, gradually reducing the air temperature in it in order to speed up metabolism and improve gas exchange. The ovoscope at this stage shows a densely filled internal space. A squeak is already coming from the eggs, the chick is trying to stretch its neck towards the blunt end of the egg and, as it were, break through the air chamber.
- 19-21 – temperature drops to 37.5-37.7 degrees, humidity rises to 70%. During this period, it is advisable not to touch the eggs at all.
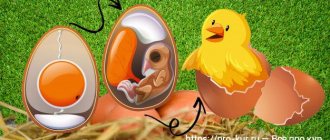
Development of a chicken embryo by day.
For the first three periods, the incubated material is turned constantly - ideally every hour, but keep in mind that the time intervals between turns should be the same. Excess eggs are removed based on the results of ovoscopy at the first stage.
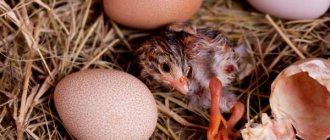
Chicks normally hatch at 21 days. A healthy chicken breaks the shell with three strong blows, placing its head at the blunt end and its neck at the sharp end (this way it can rest its paws against the walls of the shell and break it). The chicks dry out on their own and are then placed in a dry, warm place.
Features of tables
The most important parameters of the table are temperature, incubation period and type of bird. Chicken eggs require 21 days to begin the hatching process. In this case, the first week will pass with periodic ventilation for 5 minutes and turning the eggs 4 times a day. The temperature should be about 37.8⁰С.
In the second week, you must adhere to the same regimen. The eggs must not be disturbed for the remaining days before hatching. The temperature can be within 37.0 degrees. This will require periodic ventilation for 15 minutes twice a day. If we are talking about another bird, then the parameters change slightly, depending on the number of days before the chicks appear. It is also worth considering that waterfowl eggs should be sprinkled with water so that the shell is more pliable when the young hatch.
Chicken eggs
| Period | Duration | Temperature, C | Humidity | Turn | Ventilation |
| 1 | 1 - 11 days | 37,9 | 66% | 4 times a day | No |
| 2 | 12 - 17 days | 37,3 | 53% | 4 times a day | 2 times a day for 5 minutes |
| 3 | 18 - 19 days | 37,3 | 47% | 4 times a day | 2 times a day for 20 minutes |
| 4 | 20 - 21 days | 37,0 | 66% | No | 2 times a day for 5 minutes |
Quail
| Duration of incubation (days) | Dry bulb temperature, C | Wet bulb temperature, C | Humidity |
| 1 — 12 | 37,5 | 30,5 | 50 — 60 |
| 13 — 15 | 37,2 | 29,5 | 54 — 55 |
| 16 — 18 | 37,0 | 32,0 | 65 — 90 |
Duck
| Period | Deadlines | Temperature, C | Humidity | Turn | Egg cooling |
| 1 | 1 - 6 days | 38,2 — 37,8 | 60 — 70% | 4 times a day | No |
| 2 | 7 - 14 days | 37,8 — 37,5 | 55 — 60% | 4 - 6 times a day | No |
| 3 | 15 - 25 days | 37,5 | 55 — 60% | 4 - 6 times a day | 2 - 3 times a day for 10-20 minutes |
| 4 | 26 - 28 days | 37,2 — 37,4 | 70 — 85% | No | No |
Goose
| Period | Duration | Temperature, C | Humidity | Turn | Ventilation |
| 1 | 1 - 7 days | 37,8 | 67% | every 120 minutes | No |
| 2 | 8 - 14 days | 37,8 | 54% | every 120 minutes | 2 times a day for 5 minutes |
| 3 | 15 - 27 days | 37,5 | 54% | every 120 minutes | 2 times a day for 20 minutes |
| 4 | 28 - 29 days | 37,2 | 72% | No | 2 times a day for 10 minutes |
Turkey
| Incubation days | Temperature | Turning eggs | Cooling | Humidity |
| 1 — 6 | 38.0 | every 2 hours | Do not refrigerate | Water in the grooves, spray with warm water once a day 70% |
| 7 — 8 | 37.5 | every 2 hours | Do not refrigerate | Water in grooves 70% |
| 9 — 12 | 37.5 | every 2 hours | For 5-10 minutes 1 time per day | Water in grooves 70% |
| 13 — 21 | 37.5 | every 2 hours | For 20-30 minutes 2 times a day | Water in the grooves, spray with warm water once a day 70% |
| 22 — 28 | 37.0 | don't turn | For 20-30 minutes 2 times a day | Water in the grooves, spray with warm water 2 times a day 85% |
Malfunctions and repairs of household incubators BI1 (BI2) Laying hen
Cinderella incubator The manufacturer of the Nesushka incubator has established a 24-month warranty on its products. During this period, failed devices must be replaced at the expense of the manufacturer. In general, the mechanical units in the incubator are quite reliable and almost never break down. If the automation or thermostat fails, it is better to replace these parts entirely - fortunately, they are not in short supply and are inexpensive.
Separately, it is necessary to say about the body itself. Still, it is made of foam plastic, albeit very dense. Therefore, you need to handle it carefully. Of course, damage to the housing in the form of dents, cracks and broken pieces does not apply to warranty cases; the manufacturer will not replace the old collapsed incubator housing with a new one for free.
To summarize, the Nesushka household incubator has the following advantages:
- Due to the material it is quite light;
- For the same reason, its price is very affordable;
- The device is reliable and, if used carefully, durable;
- All components, in the event of a breakdown, can be easily replaced independently, so repair costs are significantly reduced;
- A very wide range of models with a large selection of additional options, which allows you to almost completely automate the process of breeding chickens.
Note. The disadvantages of the BI1 (BI2) incubator, oddly enough, include the same material from which the body is made
Expanded polystyrene is very fragile and can be easily damaged. In addition, it is quite porous and harmful bacteria and mold multiply very quickly in it, especially if the incubator body is not disinfected.
In general, the Layer BI1 incubator is quite suitable as a first incubator for a novice amateur poultry farmer. And the BI2 incubator with a digital thermostat and automatic egg turning has every chance of becoming a favorite assistant for an experienced poultry farmer!
Selecting an incubator
For high-quality chick hatching, it is important to choose the right and reliable device. By capacity, incubators are divided into:
By capacity, incubators are divided into:
- Professional – up to five thousand eggs.
- Industrial - the number is not limited, everything depends on the size of the room. The disadvantage of such incubators is that if a breakdown or power failure occurs, the entire brood will die.
Homemade (farm) - holds from several dozen to one and a half hundred eggs.
The incubator selection criteria are as follows:
- manual or automatic maintenance of humidity level or temperature;
- body material;
- capacity;
- method of turning trays;
- is there insulation;
- Is it possible to connect backup power?
The main functions of a quality incubator are:
- maintain the required level of air humidity with an error of no more than 5%;
- maintaining the programmed temperature within the permissible fluctuation – no more than 0.1 degrees;
- rotating eggs at set times;
- providing cooling in case of overheating;
- ventilation in accordance with the established program;
- sound signal if the incubator has a technical failure.
Preparation for use
At least 12 hours before the start of incubation, the device must:
- clean;
- wash;
- disinfect;
- heat to the desired temperature;
- install elements that will maintain the desired level of humidity;
- check ventilation operation.
Technical characteristics of the household incubator BI1 BI2 Laying hen
General characteristics for all models of laying hen incubators:
- Power supply from 220V network.
- Power consumption 30-60 W depending on the model.
- The operating range of the thermostat is +33°С+43°С.
- The heating element is incandescent lamps or heating elements.
Laying incubators for 36 and 63 eggs are intended exclusively for domestic use. There is no need to talk about any farming, much less industrial use. Therefore, in the simplest configurations, nothing except an analog temperature controller is supplied.
Important! The owner of such a BI1 incubator must be prepared for the fact that round-the-clock monitoring of temperature and moisture in the incubator will fall on his shoulders. And at the same time, regular, up to eight times a day, turning of incubated eggs
Such a device is only suitable for young children in a zoo corner. The right decision would be to purchase an incubator that comes with:
- Digital thermostat, because its error does not exceed ±0.2°C. The analogue one has ±1°C, and such an error can very often cause the death of embryos.
- Hygrometer. Allows you to control the humidity in the incubator, which also increases the percentage of hatched chicks. This device only monitors and does not regulate the humidity level in the incubation chamber.
- Mechanism for automatically turning eggs after a specified period of time. It is necessary to turn the eggs regularly, otherwise the embryo may stick to the inner film of the egg. In this case, the chick will not develop and will not hatch.
- Additional output for connecting 12V autonomous power supply. A very useful option, especially where power outages occur.
With this configuration, the cost of a BI1 household incubator will be only 30 percent more expensive than stock. But this money more than pays off when using the device.
BI2 incubators for 77 and 104 eggs are technically more equipped devices. Although they remain formally household items, they can already be found in small farms as spare ones. And for beginning farmers, BI2 is often the first incubator. Here, a digital thermostat, for example, is installed not as an option, but as a basic feature. The line of models even includes a complete set - “BI2 incubator is 100% automatic.”
Note! Everything in this incubator is automated, right down to programming temperature changes depending on the incubation period, and an alarm system, thanks to which the poultry farmer will immediately be aware if something in the incubation compartment has gone wrong. However, the manufacturer also has budget BI2 configurations: incubators without auto-rotation and without a hygrometer
However, the manufacturer also has budget BI2 configurations: incubators without auto-rotation and without a hygrometer.
Unfortunately, household incubators BI1 and BI2 do not have fans installed and there is no automatic water supply to regulate the humidity in the incubation chamber. To air the eggs daily, you just need to remove the lid for a certain time, and to maintain the required humidity, manually add water to the trays at the bottom of the case.
The range of domestic inexpensive household incubators is not limited to Layer incubators. For example, the Blitz-norm incubator is a very worthy competitor. Its body is also made of extruded polystyrene foam, with a transparent plastic cover on top. Inside the incubator there are two water trays at the bottom and a tray for 72 chicken eggs is installed on the rotating mechanism. The control unit is mounted on the side panel, outside the incubation chamber. The device is equipped with:
- digital thermostat with a temperature control range of +35°C...+40°C and an error of no more than 0.1°C;
- hygrometer;
- automatic rotation mechanism of the tray with eggs;
- fan;
- additional output for connecting 12V autonomous power supply;
- information display with a digital display of temperature, a graphic display of the humidity level, light indicators of the operation of the heating element and the tray rotation mechanism;
- sound alarm.
The disadvantages of the Blitz-norm model include quite noticeable noise from the operation of the tray rotation mechanism and the constantly running fan, as well as the not very convenient design of adding water to the baths
The lineup
The model range includes several varieties. They are all easy to use, but work on the same principle. The only difference is the dimensions and, due to this, the capacity of the eggs.
Incubator Layer BI-1-36
| Operating voltages | 220 V |
| Power | 28 W |
| Temperature error | 0.1 ºС |
| Operating temperature range | 33–45 ºС |
| Capacity | 36 pcs |
| Mass without eggs | 2.8 kg |
| Dimensions | 540*340*310 mm |
Incubator Layer BI-1-63
| Operating voltages | 220–12 V |
| Power | 30 W |
| Temperature error | 0.1 ºС |
| Operating temperature range | 33–45 ºС |
| Capacity | 63 chicken or 40 goose |
| Mass without eggs | 3.3 kg |
| Dimensions | 670*520*290 mm |
Incubator Layer BI-2-77
| Operating voltages | 220–12 V |
| Power | 40 W |
| Temperature error | 0.1 ºС |
| Operating temperature range | 33–45 ºС |
| Capacity | 77 chicken or 40 goose |
| Mass without eggs | 4.3 kg |
| Dimensions | 720*520*290 mm |
Incubator Layer BI-2-104
| Operating voltages | 220–12 V |
| Power | 60 W |
| Temperature error | 0.2 ºС |
| Operating temperature range | 33–45 ºС |
| Capacity | 104 chicken or 50 goose |
| Mass without eggs | 5.3 kg |
| Dimensions | 810*600*310 mm |
All devices are designed for 10 years of uninterrupted operation, but this does not mean that after this period the device will become unusable.
Monitoring the operation of the incubator
Let's consider the main parameters of the incubator that need to be monitored during its operation.
Temperature
The optimal indicator for indoor air is 18 degrees. Please note that there is always an error in the readings of household incubators - the temperature cannot be the same in the container. Strong deviations should not be allowed, as they negatively affect the breeding of young animals.
In the incubator, the temperature should be 37.8-38.0 °C in the first three stages of incubation and 37.5-37.7 °C in the last.
Humidity
The humidity level at all stages of incubation is different and ranges from 45% (see table above). You can adjust the indicators using baths filled with water. In small incubators, humidity usually does not exceed 60-63%. Often high air temperatures are combined with low humidity levels, and vice versa.
Ventilation
At the very beginning of incubation, ventilation is limited because rapid warm-up is required. In the future, the embryos already require a sufficient amount of oxygen, otherwise the embryo will form incorrectly and turn its head towards the sharp end of the egg.
Turning eggs
It is necessary to turn the eggs over so that the embryo does not stick to the inner shell of the shell. He can be:
- Manual - opens the container lid.
- Mechanical - when you pull the wire, the grid where the eggs are located moves.
- Automatic - all operations are carried out automatically using an electric motor.
Turning the eggs ensures proper development of the chick.
Cooling
Incubation is a complex process from a technological point of view, the key influence on the results of which is compliance with humidity and temperature conditions. Therefore, monitor the temperature indicators and promptly cool the eggs in accordance with the requirements for each stage of incubation. Cooling of eggs is carried out twice a day, starting from the 9-10th day of incubation to reduce the shell temperature to 28-30°. Cooling is carried out with the heaters turned off and the doors of the incubation device open. Cooling is not carried out for more than an hour.
What you need to know when operating, instructions for use
Humidity during the incubation process must be maintained optimal for a particular type of bird. For chickens, the one provided with the baths included with the device will be enough. If ducks or geese are incubated, they will need to additionally spray the shells with water at room temperature. Eggs need to be turned before day 16 of incubation. Starting from the 16th day, they are left alone so as not to interfere with the chicks taking the correct position for pipping. If there is a power outage and there is no way to connect the battery, the incubator is wrapped in a blanket. Additionally, you can put bottles of warm water in it, so that they do not overheat the eggs located next to them more than normal. Find out about the Cornish chicken breed in this article.
From the 7th day of incubation, the temperature on the eggs should be lowered to 37.9o. From days 10 to 18, the temperature is gradually lowered to 37.5 ° C on the eggs. From the 18th day it is increased by 3 tenths of a degree and left this way until the chickens hatch.
Electric drive of the ideal hen incubator and its connection
For proper operation of the device, it is necessary to connect the electric drive to the side surface of the incubator.
The drive itself operates in 2 modes:
- turning the eggs 180° every 4 hours;
- Standby mode.
It is a small electric motor. Consumes a small amount of energy - about 30 W for one turning movement, and during standby - no more than 0.5 W.
The electrical installation of the incubator is shown in the diagram.
The picture shows a diagram of the electrical installation of the incubator.
The following elements are indicated by numbers in the figure:
- Electric drive installation.
- Indicator.
- Incubator body.
- Device for turning eggs.
- Rotator grid pin.
- Screw.
- Washer.
- Fastening screw.
- Electric drive traction.
Before installing the electric drive, it is necessary to extend the rod from the incubator body (3) by 5 cm. To do this, connect the cord (9) with a plug to the socket, and hold the rod with your hand. In almost a few seconds, the engine will start running, and the rod will rotate slowly. Accordingly, the plug must be turned off from the socket when the required length is reached.
Next, you need to mount the electric drive itself on the housing.
To do this you need to do the following:
- Open the lid.
- Insert the rod into the holes on the side surface of the incubator. The fastening screw also goes there.
- You need to put a washer on this screw and a nut on top, tightening it until it stops. It is necessary that the electric drive is securely attached to the wall of the incubator.
- The rod is connected to the rotating device using a pin, which goes into the outer hole located at the end of the rod.
- Then close the incubator lid and connect the device to the network. Control signal - the indicator light lights up, after which we can assume that the electric drive is completely ready for operation.
Before starting operation, the electric drive must be installed correctly. Note! If the electric drive is not mounted with a rotary device, the motor will turn off after 8 seconds in automatic mode. The rod will rotate, but will stop moving.
Rotary device for automation: automatic functionality
Before starting work, you should carefully study the instructions for use, since the quality and speed of operation of the device directly depends on this. The most important part of the functionality is manual or automatic rotation of the eggs. The manual process is extremely inconvenient and is not suitable for large bookmarks. Below is the procedure for connecting the rotation.
How to install
First you need to place the incubator in a horizontal position, which is an important requirement from the manufacturer, and disconnect it from the network (remove the battery). Step-by-step algorithm for setting the lattice rotation:
- Connect the rotary device connector to the thermostat.
- Plug in the incubator.
- Within 7-15 seconds, the grid should move from one wall of the incubator to the other.
- If this does not happen, you need to turn on the thermostat connector with the AUP output to the network, wait for the grille to move, and then turn off the power.
- Normally, the next turning cycle should occur within an hour. Only after this can you start laying eggs.
Selection and preparation of incubation material
The success of incubation at home is determined by the quality of the starting material. The selection of viable embryos is carried out by assessing all possible characteristics of the eggs for study.
Table No. 1. Parameters for assessing the quality of chicken eggs for incubation.
| Characteristic | Description |
| Form | The egg must have the correct outline. Round, cone-shaped, ellipsoidal and overly elongated specimens are discarded. |
| Size and weight | Samples that are too large or small are removed; the average egg weight must correspond to the breed (usually in the range of 50–70 g). |
| External view of the shell | The surface must be smooth, leveled, without foreign inclusions or growths. Eggs with cracked shells are not allowed for incubation, as they will not be able to develop and will become a breeding ground for microorganisms. |
The collection of incubation material is carried out at intervals of 1.5-2 hours.
Examining the contents of eggs using an ovoscope
The ovoscope helps to notice all the defects of the shell, as well as evaluate the internal potential of each specimen. You can use industrially produced devices or those assembled at home.
The simplest ovoscope can be made from an LED lamp (flashlight) and a toilet paper roll. The main thing is that the lighting device does not heat the eggs too much during inspection.
You need to pay attention to the following signs of defective material:
- spots, marbling of the shell, small cracks invisible under normal lighting;
- incorrect location of the air chamber (normally it is at the blunt end), its mobility when the egg rotates around its axis;
- the adhesion of the yolk to the subshell membranes (it should be located strictly in the center), its inability to return to its original position after turning during inspection.
Minor damage to the shells of expensive broiler hatching eggs and rare breeds of chickens can be coated with starch-based glue. Marbling is also not a serious obstacle to attempting to get chicks, but in this case they will form more slowly and subsequently have reduced vitality.
Storage rules
The development of the embryo begins in the chicken's oviduct; after it exits into the external environment, it stops. For the entire time before the start of incubation, it is necessary to create favorable conditions to preserve its ability to resume growth.
To do this, eggs are placed in a cool room at above-zero temperatures (8-12 °C) and relative air humidity of 75-80%. Good results are obtained by laying them on their side, provided that they are rotated daily around their axis. For short-term storage, it is optimal to place the material with the blunt end facing up.
The optimal storage period for eggs does not exceed 6 days. If necessary, it can be extended up to a month, but the hatchability rate of chickens will decrease every day.
Disinfection of material
It is not advisable to use heavily contaminated eggs for hatching chicks, since it will not be possible to wash them without damaging the integrity of the cuticle covering the shell.
A freshly laid embryo should be touched as little as possible; dry debris and droppings can be shaken off with a knife. For chemical treatment of incubation material, special compounds are used, for example, Virocide.
Instructions
Strict adherence to incubation instructions allows you to obtain a 100% hatch with high-quality eggs. In the future, a small loss of chicks of the Phoenix and Bielefelder breeds, as well as other breeds, is allowed, which is the norm. An instruction manual is included with each device. The equipment of the device and its functionality should be checked upon purchase.
Preparing for work
this link
If the air humidity in the room with the incubator is high, then it is enough to pour water only into 2 recesses that are located in the bottom. They must be chosen correctly: they must be equally distant from the heaters and located symmetrically. When the humidity is low, you need to pour water into all the depressions at the bottom.
After filling the containers with water, a plastic grid-mat is installed. Next, a mesh is placed to turn the eggs and connected to a device for movement. Next, the entire structure is covered with a lid and plugged into an outlet. The turning device comes into action after 5 seconds and moves the grate. Then it goes into a waiting state for 4 hours.
The thermostat that hangs from the lid must be straightened. After the eggs are laid, he can touch the one located below him. However, to obtain accurate data on the temperature in the incubator, you will need to place a thermometer on the eggs in the morning and evening. Overheating eggs poses a serious danger. Immediately before laying them, it is necessary to warm up the incubator. It is also necessary to adjust the sensor readings so that the inside temperature is 38.2 ° C. During the first week of incubation, the eggs should be at this temperature.
When removing the cover, the thermostat must be turned off so that the heating element does not rupture due to a sharp temperature change.
Laying eggs
To incubate quail eggs of the Pharaoh, English Black and other breeds, eggs are laid no older than 10 days. Ideally, they should not be older than 5 days. Eggs sold in stores are not suitable for incubation, since they are usually not fertilized.
Hatching eggs are purchased specifically from a poultry farm or private farm. The incubation material must be stored at a temperature strictly +10°C. Before placing them in the incubator, they must be warmed to room temperature.
Material for incubation is selected that is homogeneous and without damage to the shell. When viewed on an ovoscope, all defects are immediately visible. The air chamber, medium in size, should be located at the blunt end of the egg. They cannot be washed, as this will wash away the natural protective film. This material will tell you about the Wyandotte chicken breed.
In order to control the revolution, they write a date on one side of the shell with a pencil or simply put a mark. The incubation material is laid upward with this sign. Next, after turning, you need to check that all the eggs are shifted sideways by 90 degrees.
How to bookmark?
Selected eggs must be kept indoors before being placed in the incubator. Otherwise, when immersing them in a heated chamber, condensation will form.
This will lead to climate disruption and the appearance of mold, which is fatal for the embryo. Therefore, 8-12 hours before incubation, eggs are kept at a temperature of 25 ° C, avoiding drafts. It is advisable to lay chicken eggs horizontally (you can find out more about the incubation period of chicken eggs and what its duration depends on here).
Then they heat up evenly. Although vertical installation is acceptable. The eggs are placed on trays in groups at regular intervals (4 hours): first large, then medium, and finally small.
Bookmark algorithm:
- Warm up the incubator to the set temperature.
- Treat eggs with an antiseptic or disinfect with ultraviolet light.
- Distribute the eggs on the tray.
- Place the tray into the incubator.
- Close the device doors tightly.
Many incubator models provide automatic egg turning. If there is no such function, the eggs are turned over manually 10 to 12 times a day.
Chick hatching periods
First, you need to know what day the chicks hatch. After pipping, they need to be moved to pre-prepared brooders. The incubation time of chicken eggs is 20-22 days after laying. Sometimes this period can increase by 1-2 days, for example, at low temperatures in the chamber. But there is no point in waiting longer than the 25th day.
Before laying, you can make marks on the shell with a marker - this will make it clearer whether the trays are upside down or not.
Incubation of chicken eggs at home is conventionally divided into four periods. They differ in the required microclimate conditions in the chamber
It is important to maintain the required temperature in the egg incubator throughout the entire period.
- Incubation of chicken eggs: incubation mode in the first days. The incubation period of chicken eggs lasts 5-6 days after laying. The temperature is set at 38 ° C, humidity – 60-70%. It is recommended to turn the eggs every 3-4 hours. You can do a longer interval - but at least 2 times a day. If the egg incubator is not equipped with automatic turning, it is better not to be lazy. Under natural conditions, the hen turns them over almost every hour. On the 4th day you need to set the temperature to 37.5 ° C and the humidity to 55%.
- Incubation of chicken eggs: incubation mode in the second period – 7-11 days. The humidity in the incubator should be reduced to 35-46%, temperature - 37.5-37.7 degrees. At this time, the chick's skeleton begins to form.
- The third period is 12-20 days. Temperature – 37.3-37.5 degrees, humidity in the incubator 70-80%. The final stage of chick formation. On days 15-16, it is advisable to check the correct development of the embryos using an ovoscope. To increase humidity, eggs can be sprayed with water. From the 18th day it is necessary to increase ventilation - you can turn on the fans to maximum. You also need to ventilate the chicken incubator twice a day - open it for 10-15 minutes.
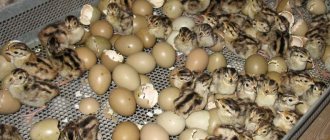
- Incubation of chicken eggs: incubation mode in the fourth period. The chicks are pecked and hatched in the incubator. You need to wait until all the chickens hatch and dry out. Before this, the chamber cannot be opened - all the chicks must be taken at the same time.
Development of a chicken embryo by day
Typically, the chick hatching process is completed within 24 hours. At this point, incubation of eggs at home is considered complete. The main indicators of healthy chicks are activity, reaction to sounds, and a neat appearance. A slight fading of the down and a slight increase in the belly are allowed.
If, in general, the chicks from the incubator appear healthy and strong, you should not cull them. It is best to get rid of weak individuals immediately - the likelihood of their full development is very low.
Chicken eggs can be placed in the incubator in vertical and horizontal positions - this does not affect hatchability.
Viewing with an ovoscope during incubation
The hatching of chicks in the incubator should be controlled by scanning the embryos on an ovoscope at different stages of incubation. Because from the first day you can see changes and control the development process.
Usually, the first candling is done on the 7th day from laying. At this time, you can already see the network of blood vessels. If the development is good, they will be evenly distributed, a little worse if the vessels are concentrated in the center. If the embryo looks more like a spot, it is discarded.
Ovoscoping can be done before biting, on the 19th-20th day. The embryo should not be visible, and in size it occupies 2/3 of the volume of the egg.
It is also worth watching how the chickens hatch in the incubator. If the chick emerges quickly and breaks off large pieces of the shell, it is healthy and strong, but if not, it is most likely a weak individual.
Checking eggs before laying
Checking chicken eggs is called ovoscoping. This process involves transilluminating the eggs with a beam of directed light, which allows the contents to be seen.
It often happens that an apparently ideal testicle has pathology.
Ovoscoping minimizes the laying of eggs with internal pathology. Experienced farmers examine eggs with an ovoscope.
If this special device is not available, you can use a candle, lantern or any lamp. The eggs are ovoscoped for the first time before they are placed in the incubator. At this stage, fertilization and the presence of microcracks in the shell are determined.