A self-made electric grater allows you to get finely chopped vegetables and fruits.
Although the original goal was to have our own starch, that is, to make it at home. To do this, it was necessary to make a grater equipped with an electric motor and starting equipment.
The hopper and casing can be completely riveted by yourself, but the driving and driven pulleys had to be taken from an old Riga-60 washing machine. The design of an electric grater is very simple; anyone with even a little knowledge of technology can make it.
Caring for Apple Choppers
If you made an apple chopper with your own hands, then caring for it will be as easy as shelling pears. The most important rule is cleanliness. Wash the unit thoroughly after each use . Even all hard-to-reach places should be washed and cleaned. There should be no apples, since their remains can produce blossoms, and when the machine is started again, the blossoms will get into the mixture, and then into the juice, which will lead to its rapid spoilage.
Do not leave the shredder outside in the rain. Moisture will not only rust the metal, but also damage the engine. If your crusher is made of wood, then moisture is also contraindicated for it . After each use, unplug the shredder, wash it well and hide it indoors.
Some tips:
- Although the knives are strong and wear-resistant, they are made of high-carbon steel. This means they are more susceptible to corrosion, so try to keep the knives dry, clean and periodically lubricate them, for example, with castor oil
- In order to guarantee the crushed fraction, use sieves with cells of a given diameter from 2 to 6 mm. For chickens - fine grinding, for crushing calves - coarser.
- To chop grass or hay: before putting them in the chopper, fold them into small bunches - this is faster and more convenient.
- If the sieve becomes clogged when crushing grain, there is only one explanation - damp grain. Having received porridge, instead of crushed grains, stop the process, clean the sieve, knife, change the grain to dry.
- Experiment : when crushing grain, by choosing different speeds of rotation of the knife, you can achieve the desired fraction sizes; when cutting root vegetables, apples, pumpkins, watermelon rinds, you can also get thinly sliced “chips” or “porridge” - everything is in your hands
- Keep your books: measure how much grain you took, how much crushed grain came out, weigh the rolls of hay sold to you - often what they sell weighs not 500 kg, but 250-350 kg.
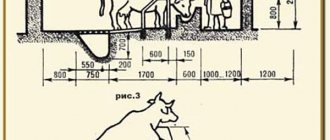
- If you want good milk yield in winter, pamper your cows , and don’t just steam the hay overnight: add chopped fodder beets, carrots, raw potatoes, pumpkin, Jerusalem artichoke. If you have silage, diversify the cow’s menu with it. The need of poultry and cattle for protein and high-calorie feed can be satisfied with meal. Due to the rise in price of imported soybean meal, it is worth paying attention to equally effective and less expensive rapeseed meal and cake. Research mineral supplements, test, for example, the famous felucene
Drill grass cutter
A simple, but quite productive homemade grass cutter can be made from an electric tool such as a drill as follows:
- A hole with a diameter of 12 mm is made in the middle of the seat of a simple wooden stool.
- A UPC 201 bearing assembly is attached to the narrow wooden end of a 20x40 mm wooden block.
- The block, together with the bearing assembly, is attached to the back of the stool seat. In this case, the inner hole of the bearing and the similar one drilled in the seat of the stool must completely coincide (be coaxial).
- A galvanized 12-liter bucket with a 12 mm hole drilled in the center of its bottom is secured to the stool using short self-tapping screws.
- The shaft for the grass cutter knife is made from a durable rod with a diameter of 12 mm. To do this, an M12 thread is cut at one end of it, after which. By pushing it with the other end through the holes in the bottom of the bucket and the seat of the stool, it is pressed into the bearing. In this case, the length of the threaded rod protruding inside the bucket should be no more than 10-15 mm. The length of the lower end is selected taking into account the size of the drill used: it should be such that when the shaft is clamped in the chuck of a vertically installed tool, it rests on the floor and is stable.
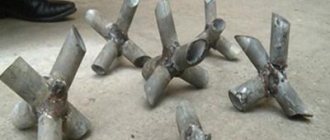
- A diamond-shaped knife 10-180 mm long and 35-40 mm wide is cut from durable tool steel.
- The narrow ends and ends of the knife are sharpened on one side.
- The knife is installed on the working shaft and secured with a nut.
A simple drill with a power of 850-1000 W is used as a drive for such a grass cutter. The chopped grass is loaded in small portions when the drive is turned on, and the container must be closed with a lid.
After the working chamber of the grass cutter is filled with chopped food, tilt the stool with the bucket and pour it into a larger container.
Important! If there is no metal bucket available, under no circumstances should it be replaced with a plastic one - such a seemingly profitable and simple way out of the current situation can lead to disastrous consequences in the future. The fact is that if the knife is destroyed, this material will not be able to protect a person nearby from metal fragments flying at high speed.
Read also: Bird feeder made from a milk carton
Specifications:
| Modification | Optimus |
| Dry grain up to, (kg/hour) | 155 |
| Root vegetables up to, (kg/hour) | 280 |
| Grass up to, (kg/hour) | 54 |
| Hay/straw up to, (kg/hour) | 30 |
| Voltage, (V) | 220 |
| Net power of the electric motor, (W) | 750 |
| Power consumption, (W) | 1200 |
| Overall dimensions, mm) | 780x330x330 |
| Net weight no more, (kg) | 10 |
| Hopper volume (dm3) | 7,7 |
| Electrical safety class | I |
| Warranty period, (months) | 6 |
You can read the instructions for Farmer "Optimus" DKU-05 here:
Control unit assembly
To do this, you will need special ballast equipment. Don’t be scared by the loud name - this is a button responsible for issuing commands: “turn on” and “turn off”.
The electric motor is mounted on the side of the structure so that liquid and splashes from the processed fruit do not fall on it.
Made with your own hands, the crusher from scrap materials is no worse than purchased models, but differs only in appearance. By the way, sometimes homemade devices show greater productivity and technicality than units developed by specialists.
To save on design costs, you don’t even have to buy a motor, but take an old unit from a washing machine.
How to make a grater for beetroot?
A feed cutter is a simple and very convenient unit, which is indispensable for anyone who has a large number of livestock and poultry.
Designed for grinding various vegetables, herbs and grains, the unit can be not only factory-produced, but also made independently.
At the same time, a do-it-yourself feed cutter may not be inferior to purchased analogues in terms of reliability and performance. It can be made quite simply and quickly from almost any available materials.
Making an apple chopper with your own hands, drawing and diagrams
Shredders can be of different types, some are metal, others are wooden, and others combine both materials. But the main thing is not what the crusher is made of, but how it works .
First we need a sheet of metal, stainless steel, d 80 mm . From this blank we make steps for the shaft exit and for the bearings. The work is carried out on a lathe.
Drawing of manufacturing a gear shaft on a milling machine
Next we will need a milling machine to make the gear shaft. As shown in the drawing, remove 8 faces. To enhance the crushing effect, take a grinder and make triangular notches along the entire length of the teeth .
You can use a washing machine as a body, namely its outer part. The washing machine must be top-loading, made of stainless steel with a wall thickness of 1.5-2 mm. Then we cut it into four parts and get 2 end and 2 side parts. We put all the parts together, making a box, and weld it. Before finishing welding the side parts, we bend the sheets of metal slightly below, making a small gap between the working shaft and the wall of the chopper.
To ensure that the shaft rotates smoothly and is well secured, we use conventional bearing units, which are present in circular machines. We make a support frame from the corners. The base of the machine is made of wood. The board base is located at the bottom, since containers are placed on it to receive the exiting mass from the chopper.
To create a control unit we use special ballasts , mainly a button responsible for turning it on and off. The belt is tensioned by fixing it with a special bolt for clamping and by moving the body along the guides. It is necessary to screw the handle and rollers onto the frame, which increase the comfort of using the device and allow you to independently transport the chopper to any place.
The crusher body is attached to the upper corners of the frame using bolts, which eliminates its bending under pressure, since the apples have their own weight. To reduce splashing, use a wide basin and make the frame low . The electric motor is placed on the side so that liquid does not get on it.
Diagram of a finished apple crusher, front and side views
1 – housing, 2 – stiffener, 3 – working shaft, 4 – bearing axle boxes, 5 – belt pulley, 6 – belt, 7 – electric motor, 8 – frame, 9 – rollers, 10 – control unit, 11 – transportation handle , 12 – housing mounting bolts with stiffening angles
Such a crusher, made with your own hands, is practically no different from the factory one, due to its productivity and technicality. To avoid buying a motor, you can use a motor from an old and unnecessary washing machine or other equipment. The chopper, powered by an electric motor, is used for crushing apples not only for juice, but also for wine . Such a crusher will always come in handy on the farm. After passing through the crusher once, even the hardest apples turn into a monotonous mass that can be loaded under a press and squeezed out the juice.
Description of the device and its functions
A crusher is a device with a manual or electric drive.
It consists of a chute for supplying raw materials, a chamber with a grater, disk, knives or drum for chopping and a device for discharging cut fruits into a prepared container.
Depending on the design, units may have different performance, purpose and cost.
For domestic use, there are models up to 10 thousand rubles, and to ensure industrial scale for such a crusher you will need to pay over 30 thousand rubles.
Design options
For processing apples with a soft structure, high-speed knife drum devices are used. Grinding is carried out through the interaction of pressing pads with several rows of comb knives of different thicknesses.
Hard fruits are crushed more efficiently by hammer machines. It is based on a shaft with hammers that crush the raw materials as a result of their movement. The rotor location can be horizontal or vertical.
As a rule, professional and semi-professional machines are equipped for filtration with a special replaceable sieve.
Depending on the required volume of raw materials at the output, a sieve with the required mesh size is selected.
Making an Apple Chopper
Made of metal
A do-it-yourself apple crusher is made from materials that are available in almost every household, and not many tools are needed for the work.
It is better to start manufacturing by studying the drawings; they can easily be found on specialized forums.
The drawings will help you get an idea of the fastening of parts, dimensions, and features of the device. Typically, the crusher is made of wood, metal, or metal but with wooden parts.
The first step is to take a sheet of metal, from which steps are made on a lathe for the subsequent fastening of bearings and a steel shaft. Using a milling machine, eight edges are removed from the shaft, and then small notches in the shape of a triangle are made with a grinder on the entire surface of the shaft.
The body is most often made from the frame of a vertical washing machine, with a wall thickness of at least two millimeters. The lower part of the sides must be bent slightly so that there is a small gap between the walls and the installed working shaft. For better fastening of the shaft and its free rotation, it is better to use a bearing torque mechanism, which is found in any circular machine.
The next step is to weld a strong frame from corners or a metal profile, and make a base from boards. It is needed so that you can conveniently place buckets for the finished apple mass. When the frame is ready, begin assembling the control panel. It consists of a start and stop toggle switch. A handle and several rollers are attached to the bottom of the frame - this will allow you to easily move the device. The frame is bolted to the upper corners of the frame. If you use the frame of the device without a support frame, then under the pressure of the apples the bottom and walls of the case will begin to deform. The engine is attached to the body from the side and covered with a reliable casing.
You can use a motor from a washing machine or vacuum cleaner as a motor.
Made of wood
A wooden model is easier to assemble than a metal one.
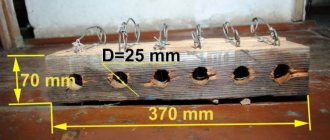
An important point is that the wood must have water-repellent properties. The hopper for loading apples is made of three horizontal and one inclined wall. This design will make it easier to pour apples into the device. The main working element of a wood crusher is the shaft, which can be made of very durable wood or metal. Screws are screwed into the shaft - the caps will play the role of working teeth, which chop the apples. To increase productivity, the screws are arranged in a spiral.
The working chamber is also made of durable boards. The size of the chamber is selected individually based on the planned number of apples for processing. For greater convenience, the working chamber is installed on a special stand with legs. On one side of the working chamber, a hole is cut out for the exit of the finished apple mass, under which a container is placed.
The shaft can be put into operation using a conventional drill without a drill. The axis of rotation is brought out from the working chamber and the tip of the drill is mounted on it. This device will allow the shaft to rotate at high speed, which will ensure good performance. The crusher is ready!
Where to buy
There is no big difference (unless, of course, we are talking about professional kitchen accessories for chefs) - in a supermarket, specialized offline or online store. It’s just that the likelihood that in the second case you will have to overpay is higher.
If you order online, on large marketplaces, be sure to compare prices - it happens that the same model is sold under different names, changing the price by 50-100%.
It is also worth paying attention to reviews of the store. Often there are no complaints about the product itself, but there are many complaints about the quality of the packaging.
The advantage of a homemade crusher
A finely chopped apple is much easier to crush, and it gives many times more juice. One of the main advantages of the device is the ability to obtain a homogeneous apple mass.
In addition, the device has the following advantages:
- In a short time it allows you to process a large number of fruits,
- Waste-free production: after processing, only a little cake remains,
- The device minimizes human physical work,
- Practicality and reliability,
- You can process absolutely any number of apples.
A homemade device adds such advantages to the general list as:
- Minimum manufacturing costs,
- Ease of repair and replacement of faulty parts.
Tags
varieties of apples Processing apples for apples with your own harvest of apples and for apples for apples with your own for apples with your own for apples with your own hands for the handle. with your own hands with your own hands with your own hands with your own hands with your own hands with your own hands apples with your own hands apples with your own hands from your own site productivity with your own hands processing your personal space of your gardens you give your consent and your nearest one change your settings fruits with your own hands How to make a grater How to make a grater How to make a grater Made it easy to do it yourself.
disk homemade adaptation process photos we will further products similar noscript