The electric drive for the honey extractor is used in apiaries for the production of commercial honey. Operating conditions are stationary or field. The device performs two functions.
The first - increases the volume of products received, increases production. The second one makes the process of pumping out the product easier, more mechanical, thanks to which the human factor is eliminated.
The honey extractor control unit provides direction to the motor. The speed of rotation of the motor and the time spent on this process depend on it. It also determines the minimum supply pressure.
Required materials and tools
When choosing a suitable material, its resistance to various influences and the permissibility of contact with food are important.
The design can be based on: wood - the device can be assembled entirely on your own or use an ordinary barrel;
plywood – the material is attractive due to its lightness, which is important during operation and the need to transport the honey extractor;
aluminum - light and durable material, low price;
Stainless steel is a durable and affordable material that attracts with its long service life and ease of maintenance;
plastic – light weight, easy to maintain, economical.
For a honey extractor, it is convenient to use an old washing machine, or rather a drum from it. It is better to take the Soviet equipment “Alma-Ata” or “Siberia” as a basis.
Regardless of the material for the installation body, be sure to prepare the following elements:
- container for the final product;
- fittings or metal rods of suitable sizes;
- bearing;
- pulley;
- shaft(axis);
- belt;
- faucet for draining honey;
- nut for fixing the faucet;
- universal silicone sealant;
- mesh on cassettes or wire or thin metal rods for its manufacture;
- corners and aluminum rivets for fixation;
- electric motor for drive;
- protective mesh;
- rotor;
- rheostat (nichrome spiral);
- bracket (vertical movement).
The list of necessary tools depends on the material used to make the honey extractor:
- For woodworking, it is better to use a jigsaw or a circular saw, but you can get by with a regular hacksaw. As fastening materials, stock up on self-tapping screws or nails and the appropriate tool - a screwdriver or drill or hammer. You can use glue instead of fasteners. To level the material, you need a plane (if possible, a jointer).
- When making a plastic honey extractor, you can use a hacksaw, soldering iron, or welding machine.
- When using aluminum or stainless steel, you need an angle grinder.
Principle of operation
The electric drive has a simple operating principle. The prepared frames are placed in a drum with cassettes. Next, the drum is given rotation. The process is carried out using a handle or a motor with a voltage of 12 volts, which has a gearbox and has a couple of hundred watts.
To organize complete flow, the drum should be rotated for at least twelve minutes, and the frames should be turned over cyclically. When an apiary has about ten hives, the work can be done manually. If the quantity is larger, you will need to install an electric drive on the honey extractor, which has a special gearbox of 220 volts. The motor itself has lower pressure, so it is recommended to equip the entire mechanism with an inverter.
The honey extractor drive can have several operating modes. The automation itself will slow down when the process is completely finished. The life of a beekeeper is greatly simplified. After all, you no longer need to monitor the process all the time. Making this device yourself will help you save a lot of money.
Features of the device
The honey extractor, equipped with a drive, operates on electricity through:
- electrical network;
- 12 volt battery;
- solar battery.
The device is supplemented with a block that allows you to regulate the engine rotation speed.
The device operates like a centrifuge, where honey flies out of the filled cells as it moves in a circle. Did you know? Honey obtained using a honey extractor is called centrifugal honey.
Radial honey extractor
Honey extractors are classified according to the location of the cassettes into which printed honeycombs are inserted. For radial honey extractors, the cassettes are located along the radii of the body circumference.
The radial honey extractor has certain design features. What are they? This is a newer design compared to the chordial, which is now considered obsolete. With its help, you can significantly increase the speed of pumping out honey products.
The radial design, like the chordal one, can be used in the Granovsky honey extractor, which stands out among others for its high productivity. Thus, you know what types of this equipment you need to focus on when choosing a tool for collecting honey for use on the territory of your apiary farm.
When using this design, the harvesting speed significantly increases. In beekeeping, the productivity of an apiary farm is largely determined by the amount of collected sweet substance known as honey.
Radial inventory allows you to increase the collection speed by 2 times or more. For example, if you have a hive with 8 frames, the time it takes to completely process it will be 3 minutes.
The time savings will be especially noticeable if you own a large apiary farm. The rotations of the radial design are made so quickly that you won’t even notice how you’ve collected absolutely all the honey from your plot.
Timer for honey extractor
Separately, I want to talk about how I made a timer for a honey extractor. I believe that it is necessary, since manually controlling the rotation is not very convenient, and it will also save battery power. Of course, you could use the same 11-second timer that I talked about above. It is enough to select several electrolytic capacitors and display a variable resistor on the front panel. By switching capacitors and selecting the required time using a variable resistor, you can achieve the desired rotation time. But we are not looking for easy ways, besides, I had two control units from different microwave ovens. These units are completely different, one was from a German-made microwave oven. The other one is purely Chinese, but I liked it better, since its panel is covered with film and it does not have buttons, like in the first block, so you don’t have to worry about honey getting inside the device. In addition, this block has a minimal number of buttons themselves, which does not confuse the eye and is easier to configure; as they say, press it and the timer starts.
Attaching the timer to the honey extractor took a little fiddling. The fact is that when you pick up the microwave control unit, everything becomes clear; just measure what voltage comes out of the transformer, and it will become clear how you can supply power to this unit. Actually, there were no problems with this. As a result of measurements on the diode bridges, it turned out that power output was rated at 14 volts and 9 volts. High voltage is used to control the electromagnetic relay and limit sensors, and lower voltage is used to power the microcontroller of the timer unit.
After that, I dismantled the transformer and installed a Soviet kr142en8A stabilizer on the 9-volt power bus, which produces 9 volts. Then I applied 12 volts to the entire circuit and was pleasantly surprised: the circuit did not work at all, the display did not even light up. After this, I had to turn to the datasheet for the microcontroller of this timer. I found out that for normal operation of the microcontroller it is necessary to supply it with a reference frequency equal to 50 hertz, which it took through a resistor directly from the secondary winding of the transformer. This reference frequency is necessary in order to synchronize the timer with the variable network frequency, as well as to start it.
To get out of this situation, I had to use a Chinese multivibrator assembled on the most common NE555 chip:
This scheme had to be slightly modified. Armed with an oscilloscope, I set about setting the desired frequency of 50 Hz. The fact is that it was not possible to set the desired frequency. By moving the jumpers and tightening the resistors, the frequency was either lower or higher than 50 Hz. I had to replace one SMD ceramic capacitor. As a result, the desired frequency was obtained and the timer started working. But the adventures didn't end there.
It was necessary to ensure the stability of the frequency of 50 Hz within certain limits when the ambient temperature changes. Since if the frequency goes plus or minus 10 Hz, the timer simply stops and its operation stops. Using a soldering station hair dryer, it turned out that the frequency drift occurs due to a change in the capacitance of the ceramic capacitors. Namely, when heated, the capacitance decreases, and the frequency begins to increase, rising above 70 Hz. Since I was familiar with this, like any radio amateur, I decided to do the following. I removed a couple of capacitors with the opposite TKE from an old radio and soldered them parallel to the ceramic one. As a result, when the ambient temperature changes, the capacity of this sandwich cannot change:
Both heating and cooling of the entire board were performed. To reduce the impact of air movement on the entire board, I placed it on a sheet of PCB and covered it with a glass jar. In this form it carried out heating and cooling. I monitored the frequency drift using an oscilloscope, the result was excellent, the frequency practically did not drift:
The configured boards were placed in the microwave oven control unit:
The pulse-width speed controller and tachometer for the honey extractor were placed in the housing under the electric meter. The installation turned out to be quite tight. In principle, the case would need to be more spacious:
After testing, it turned out that the Schottky diode heats up significantly more than 3 field-effect transistors. In this regard, it was decided to install another diode (in the VD5 circuit) in parallel with the drain diode VD3. I borrowed it from an old computer power supply. As a result, the heating decreased significantly; it was almost barely noticeable to the touch:
Power transistors do not heat up much either. During long-term operation at an ambient temperature of 30 degrees, the transistors heated up to around 50 degrees. This is clearly visible on an electronic thermometer:
The electronic tachometer was connected according to the following scheme:
We are done with electronics, now I’ll tell you a little about the mechanical part of the honey extractor.
Recommendations for use
- “Manual” device - before work, clean the gears from rust and lubricate them. Be sure to use a guard to prevent grease from falling into the honey.
- Reinforce the homemade model with hoops (the tank is outside) - at high speeds the honey extractor may collapse.
- You should not immediately select the maximum speed - in the first minutes, set low speed for 1 minute, then medium speed for 1 minute, and then increase.
- There is honey left - the cassette does not need to be cleaned, just put it in for a second cycle.
- Use frames with 4-5 lines of tensioned wire (there are 2 wires in a magazine frame).
Making a stand for a honey extractor
The stand is a necessary accessory for both large and small honey extractors. This simple device allows you to install a container below into which honey will fall.
Homemade stand
simple in design
- First, a ring is made from the reinforcement, the diameter of which should be slightly larger than the honey extractor vat.
- A holder is welded to the bottom of the ring, and 3 or 4 legs are welded to it, depending on your desire. Their height can also vary due to the characteristics of the apiary and the size of the honey extractor.
In general, the procedure for making a honey extractor is quite simple and accessible to everyone. A homemade honey extractor can turn out to be more powerful than a purchased one, and in addition, it is much cheaper in cost, because almost all the parts can be found at hand.
Varieties
There are 4 types of drives. Each of them has its own characteristics:
- A gear drive for a honey extractor is used to mechanize a procedure consisting of pumping out a sweet liquid. It can be replaced with a manual drive. Makes the beekeeper's work easier, while productivity increases. Power is supplied from batteries through a specific unit. The current of rotation is absolutely any.
- The worm drive for the honey extractor has touch control, the pumping process is completely mechanical, the body is made of aluminum. Power can be supplied from the mains or a battery. Provides the ability to perform different directions of rotation. The rotor produces speeds that can be adjusted.
- The belt drive is installed on all models that have a rotor shaft output through a crossbar. During prolonged use, the honey extractor control unit may overheat. Then a special emergency mode begins to turn on. It consists of a motor, a toothed belt, and the base is a sheet of steel three millimeters thick. All parts are mounted on ball bearings.
- The manual two-way rotation gearbox of the honey extractor is compatible with all types of models. The main role of the mechanism is to transmit the rotation of the handle to the axis of the product. Cassettes with special frames begin to move.
Gear selection and speed control for honey extractor
The V-belt type of transmission includes pulleys that are adjustable, a belt, a pin, driven and driven types of shafts, a transmission that helps the device speed up or slow down.
Based on the principle of circular speed, the type of transmission is selected, it can increase significantly when the tank used in the machine is large. If the tank has a diameter of 80 cm, small revolutions are needed so that when the beekeeper pumps out honey, the honeycombs are not damaged.
It is convenient to electrically regulate the speed; for this you will need an electric motor, it has a voltage of 220 volts. The manual drive is first dismantled.
Please note that the axle clearance must be placed between the chucks or the shaft and be of optimal dimensions. The bearing below must not be reloaded.
Some people use a battery from a car for electric drive; there is no need to remove it, you can take one side of the cable, on which the generator switch is, and the other side is inserted into a plug socket. So the honey extractor will have two speeds.
Most often, an electric drive is used, which has alternating and direct current, a voltage of 220 volts.
The speed can be adjusted either manually or automatically. Using the automatic mode, you can configure the device for different work, adjust the time and completely adjust the pumping of honey.
So, an electric drive is necessary for the mechanized process of pumping out large amounts of honey. Power most often comes from a 220 volt network; power supplies are used for this. It is better when the rotor speed can be adjusted and the rotation can also be controlled. The electric drive includes a belt, gearbox, block, and rotor. Despite the fact that it is quite difficult to construct a device with your own hands, you can try to do it. You will need a special drawing, a diagram that you will focus on. An electric honey extractor works much faster than a manual device.
Construction of an electric honey extractor with your own hands
Technological progress, progressing by leaps and bounds in the 21st century, has affected almost all spheres of life of modern man. The advanced technologies of our time simply could not pass by such an industry as beekeeping.
It is worth noting that everything new is well forgotten old, and this is the case with the honey extractor, which was first invented in 1865 in Austria. Over the past period, many designs have been developed.
Every beekeeper knows how difficult it is to pump out honey without the use of special technical improvements, namely a honey extractor (there are two types: radial and chordial, depending on the location of the cassettes). A honey extractor is a special mechanism for pumping honey from centrifugal honeycombs, which allows the beekeeper to extract honey and enjoy pumping it out.
Although there are hundreds of honey extractor designs, they all have common features, such as the presence of an outer container, a rotor that is used to hold the frame, and a drive. The size of the honey extractor is assessed based on the possibility of pumping honey from the honey frames. The smallest ones are able to pump out 2 frames in one go, and industrial ones – more than 50.
Honey extractors are considered to be the most important part of a beekeeper’s equipment, since not only the safety of the hive frames, but also the quality of the honey depends on the method of pumping out honey. Despite the presence of many advantages, the electric honey extractor has one serious disadvantage - the high cost of electric drives. In view of this, not every beekeeper can acquire a store-bought miracle of technology.
Features of the electric drive
The honey extractor can operate on electricity. Mechanical pumping of honey takes a lot of effort and time. Making a drive with your own hands is difficult. It will require fasteners, 21G, 108G generators, as well as pulleys. Taking into account all the dimensions, it is necessary to make a hole in the drive. Spread the pin bushing and attach it to the hardware plate. The generator on which the pulley is placed plays an important role.
Using a pin, the generator is attached, and a voltage of 12 W is connected. Use a thin file to make a small groove on the shoulder of the pulley. As a result, it is desirable to obtain a wedge-shaped shape, attach a belt and a spring, which should be tensioned. You may also be interested in an article about creating a solar wax melter with your own hands with detailed drawings.
With the help of an electric drive, a huge amount of complex work can be accomplished. A mechanical honey extractor can be converted into an electric one. For this purpose, it is necessary to perform a number of works:
- leave the lid located on the tank;
- grind the body to make a removable cover, about two bearings will be used;
- Make a special groove on the side of the bearing to get a driven pulley. Make the carving;
- equip the other end with a bushing, connect it to the cassette rotor;
- make the stand required for the bearing housing;
- to quickly pump out honey products, use a three-phase electric motor with a power of at least 250 W;
- make a double clamp to attach the motor to the tank;
- Equip the honey extractor with a special stand to drain the honey. It must have at least two wooden crosses connected by four posts. At the intersection of the crosses, you need to make a triangle-shaped fastening using glue and nails.
An electric centrifuge can be assembled even at 100 watts using a gearbox or a car glass cleaner.
Many beekeepers claim that this power is too weak, but for most apiaries with small dimensions, it is enough. Using adapters and brackets, all parts must be fastened together. Professional beekeepers attach a timer to the device to know when the process of pumping out honey will end.
We prepare the necessary tools and parts
The first step to production will be the selection of the necessary honey extractor elements and tools. Do not try to replace the recommended part with a spare part: this may result in the result not meeting your expectations, and in addition, the work process may become dangerous. For the most part, give preference to purchased new parts: this way you will be able to create a device that lasts. So, what do we need for manufacturing:
- You will need any tool with a rotary tip. The ideal option would be a drill or grinder.
- Hammer.
- Have at least 2 wrenches of different sizes ready.
Components of an electric drive for a honey extractor
You will also need different sized pliers. Buy several pulleys of different diameters. Elastic strap to ensure high-quality operation of the device. Depending on the size of your electric drive, you can use a belt from a washing machine: their electric drives with a honey extractor are quite similar. A mandatory and one of the rather difficult elements is a switch with a clock mechanism. Stock up on installation fasteners. Any type of DC generator to choose from: G108 or G21. High-quality work will be ensured by two files - round and triangular. Several electrical wires of different lengths. M8 type pin. Tension spring according to the dimensions of your electric drive.
Only after you have prepared all the tools and parts and are sure of their quality and safety, are you allowed to start directly working on manufacturing.
Types of motors for driving a honey extractor
Manual labor is replaced by the following types of engines:
- low power electric motors;
- electric drill;
- electric current generator.
It is important that the mechanism produces torque; For these purposes, the motor of a washing machine, an electric bicycle, or the gear motor of a car windshield wiper can be useful. They also use devices with reverse (reverse motion), which allows you to pump out honey from both sides without rearranging the frame.
Drive installation
When collecting honey, it is recommended to place the device on a wooden cross so that there is a container under the tap for draining the product. And if there is only one beekeeper working in the apiary, then while he is unsealing the honeycombs, the honey extractor is idle; When pumping out honey on a chordial honey extractor, not only the drum is in motion, but also the mechanism for turning the cassettes, the cassettes themselves, levers and the drive. After this, put on the belt cable and tighten the spring. They can be screwed in parallel.
Using a round file, drill a recess of 0.12 cm in the wheel, then use a triangular tool to give it the final wedge-shaped shape.
However, not every farmer can afford to buy a rather expensive unit, but manufacturing it, as it turns out, is not very difficult.
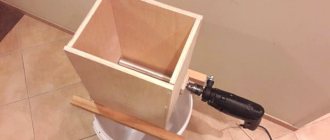
Torque, instead of human hands, is provided by an electric motor powered by rechargeable batteries or from a volt network. Operation of the honey extractor The pulley wheels are tightened with a belt using a spring. The braking of the device is smooth. A lighter model is constructed from plywood, fastened with nails or glue.
The device allows you to adjust the speed and time of pumping out honey.
Rotating, it separates the honey from the honeycomb frames. Review of honey extractor with electric drive ABB-100, apiary
Installation of an electric drive for a honey extractor
The engine is connected to the structure as follows:
- It is necessary to remove the standard drive from the honey extractor.
- Drill the pulley - the same as the diameter of the honey extractor shaft.
- Fasten the M8 pin with the spaced bushing to the plate of the device.
- Put the drive on the pin, secure it and connect the electricity.
- Using a file, cut a wedge-shaped groove 8 mm deep on the shoulder of the pulley.
- Place a belt on the pulleys and create tension using a spring.
- Connect the switch by connecting the motor terminals.
Important! To adjust the speed, the terminal must be connected through one section of the resistance block.
Manufacturing options
Naturally, for novice beekeepers it is better to take a closer look at the simplest designs if you decide to start making a honey extractor with your own hands.
To facilitate the creation of the device, it is necessary to use some existing base and supplement it with an internal structure. It is easy to make a homemade honey extractor from a washing machine, any barrel or tank of the appropriate size.
From the washing machine
Making a honey extractor with your own hands from a washing machine is not quite a hassle. You just need to do the following:
Remove the tank from the washing machine. Special holes are made in the lower part so that the honey flows into a container installed below. For this reason, you need to build a stand for the honey extractor so that the bottom of the washing machine tank does not come into contact with the surface of the ground and there is a gap for the tray. Inside, in the center, you need to set the axis, which will be a rotating pulley
Special holders for frames are attached to it. An important condition is that the axis must be made of a sufficiently thick rod that will be able to withstand the load during rotation. This is especially true for those cases when it is planned to drive the axis not manually, but, for example, using an electric drive
But even with mechanical rotation, it will be subjected to a load equal to the weight of the installed frames along with the honey. The holders also need to be metal due to the weight of the frames. They must be firmly attached to the axis itself. It is better to do this by welding. Then a handle must be attached to the central axis if rotation is carried out manually. Moreover, consider a mounting option so that the handle does not rotate when idling. Most often, 2 bevel gears are used. The larger diameter is mounted on the shaft. And the smaller one is located horizontally when connected to the handle.
Naturally, this is not the only way you can make a honey extractor with your own hands from a washing machine. After all, the described design involves placing the honeycombs radially, that is, they are placed along the radius of the central drum. If desired, you can make a chordal structure. In this case, the cells are placed along chords. Most often it is possible to place 4 or 3 of them in the washing machine tub.
From a plastic barrel
This design can be done in just a couple of hours. In addition, it requires a minimum of funds.
Here's what to do:
- Take a food-grade plastic barrel.
- Aluminum profile - a horizontal bar for fixing the central axis and its vertical holders are made from it.
- A thick enough rod for the central axis of rotation.
- Metal mesh for displaying honeycombs.
- Installing a container that matches the size of the bottom of the tank.
- A nozzle with which the pumped out honey will be drained.
Manufacturing
To make an electric drive for the honey extractor equipment with your own hands, you must follow the special instructions:
- The basis is a motor (you can take it from a washing machine) of one hundred and seventy-two volts with an effort of one hundred and ten watts.
- The honey extractor gearbox is connected to the motor using a special board.
- The drive is connected to the gear axis using a half-coupling.
- The rotating part and the drive axle are connected by a clutch.
- The first side is fixed to the axis, the second is put on the axis of the unit.
- They use a translator, the action is generated from a two hundred and twenty volt network, the semiconductor drive is completely suitable.
Materials and tools
To create an electric drive suitable for a honey extractor exclusively with your own hands, you will need the following tools and materials:
- clamps, belt, friction wheel with a rim;
- converter g-108;
- file, pneumatic drill;
- a switch with a clock mechanism;
- hammer, adjustable wrench;
- pliers.
Making a drive with your own hands is quite simple. Especially if the necessary equipment is present. It is designed to make the task easier and takes a minimum number of hours.
Scheme
To make an electric drive for a honey extractor, a special circuit is used. It is used in everyday life. Assembly of the drive takes little time.
Explanation of the drawing of a honey extractor with an electric drive:
- 1-tank (can be used from a washing machine), 2-cover, 3-plate designed for a special bearing housing;
- 4-housing, 5-removable cover, 6-drive pulley, 7-driven pulley, 8-nut for fastening, 9-fastening device, 10-rotor axle;
- 11-bolt connecting the axles, 12-bolts fixing the motor to the clamp, 13-motor shoe, 14-L-shaped plate;
- 15-bearing, 16-bearing axle, 17-fixation rods, 18-screws, 19-belt, 20-motor;
- 21 clamp tabs, 22 tie bolts, 23 special stands, 24 racks, 25 triangle racks, 26 slots for the tank, 27 passage where the product is drained.
Assembly
A homemade electric drive is attached to the product in this way:
- The standard engine is removed from the product.
- The friction wheel with rim must be equal in diameter to the shaft.
- A quick sleeve and M8 pin are fixed on the unit plate.
- After the mechanism is put on the pin, the electrical network is connected.
- A wedge-shaped groove with a maximum depth of eight millimeters is cut out on the shoulder of the friction wheel using a file.
- The belt is put on the pulley, pressure is created with a spring, and a switch is connected (the terminals are connected to the motor).
How to make an electric drive for a honey extractor
Making an electric honey extractor with your own hands is not a difficult process, and the main thing that may be useful to you is the presence of such personal qualities as attentiveness and determination. First of all, novice beekeepers are recommended to familiarize themselves with the technical characteristics of the operating units, shown in photographs abundantly posted on the Internet, and, based on their principle, recreate for themselves an electric honey extractor with their own hands.
There are few specific design features of the electric drive. To make a honey extractor yourself, you may need the most primitive tools and materials that almost any real owner has in the house:
- grinder and drill;
- a medium-sized barrel, the choice of material from which the barrel will be made is individual for each craftsman and depends on personal preferences;
- small wooden board;
- metal shelves from an old refrigerator;
- chisel;
- paint for metal.
Previously, when choosing the material from which the main container for a honey extractor would consist, many craftsmen chose wood, considering it more environmentally friendly and not capable of robbing honey of its basic taste qualities and beneficial microelements. However, modern beekeepers do not disdain more practical materials, such as stainless steel and aluminum, which are easier to clean after the work has been done, which allows them to comply with the necessary sanitary standards.
Next, two holes are made in the base of the selected container, from which honey will subsequently flow out. Outside, in the central part, a board is attached as a base, and it should not overlap the previously prepared holes.
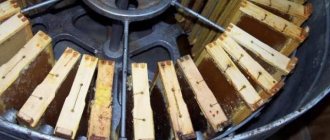
In addition, a cassette drum must be present. The number of cassettes mainly depends on the size of the frame with honeycombs. For production, a dense metal mesh equipped with large cells is used.
When the engine rotates, honey is separated from the honeycomb frames. Rotation can be carried out in two ways, either electrically or manually. Additionally, for mechanization purposes, honeycomb holders and bicycle pedals can be used as a rotational element (when working manually).
Refrigerator frames are often used as honeycomb holders, which are attached to a previously prepared rectangular frame. The resulting structure is connected to a rotational element (pedals) or an electric drive.
It is noteworthy that the described option is not entirely convenient for working in large apiaries, especially if we are talking about industrial production volumes, since it requires enormous physical exertion, which is why it can only be used by amateur beekeepers in small apiaries.
Most often, the electric drive operates from the network, despite this, you can assemble it yourself with your own hands (which is very difficult to do even for an experienced engineer), or it can be purchased at a specialized store, which requires significant financial costs.
Usage
The electric honey extractor is equipped with a toggle switch (control of revolutions), a timer (setting the required time), and revolutions (adjusting the speed of rotation of the cassettes). When you make a unit with an electric drive yourself, it is much easier to work with it.
Before use, the manual gearbox is removed from the structure. The shaft is inserted into the bracket with bearings. The drive is fixed using bolts. Then install the pulley and secure it with nuts. Instead of a drive, a drive is attached, the belt is put on a pulley.
Tips for making a honey extractor
When manufacturing, try to follow the following rules that will help you create a high-quality device:
Housing of the future honey extractor
- In order to give the honey extractor a more aesthetic look and make it more organic, you can paint it with any color you like. For painting, you can use any metal paint or composition in cans.
- Under no circumstances use zinc coating when making a honey extractor! Zinc undergoes oxidation, which can further deteriorate the quality of honey.
- Try to choose parts with a smooth surface for making a honey extractor. If the surface is rough, honey may get stuck in it.
- You can also use wooden parts to make a honey extractor. All parts except bearings, pulleys and axles can be made of wood. Any dry wood without resin will do. You can also use plywood - then the car will be lighter.
Selection of raw materials for honey extractor
The following materials can be used to make a honey extractor:
- the beekeeper must prepare a tool that has a rotating tip, namely a drill or grinder;
- you need to take a special vessel, for example a barrel. An old metal barrel, but not rusty, is ideal;
- to create electrical equipment, you can use old and unnecessary shelves from the refrigerator;
- to make holes, prepare a special chisel;
- all parts will be painted, for this take paint for metal products;
- Wooden boards will also come in handy.