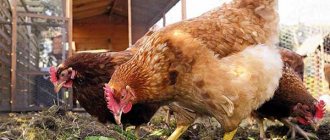
For farmers and people raising chickens, a portable chicken coop is a popular device. Such a mobile structure can be moved from place to place throughout the site. A portable poultry house can be purchased at specialized stores. However, a more budget-friendly and profitable option would be to make a portable chicken coop with your own hands, especially since you can arrange it at your discretion, depending on the time of year.
Features of a portable chicken coop
Mobile poultry farms are in great demand among people involved in farming. Up to ten chickens can be kept in a special building. Before making a portable device, you need to decide what material to build the poultry house from, how to arrange the inside of the poultry farm, and what dimensions the future structure will be.
Any portable chicken coop should consist of several sections: the first will contain birds hatching eggs, the second section is needed for bird walks. When arranging a poultry house, great attention must be paid to ventilation; you cannot build a completely enclosed room, as the birds will not have enough light and air.
Important! A mobile chicken coop must be equipped with a roof, a canopy, or at least a film that can protect the birds from the burning rays of the sun, rain and snow.
Place in the construction world
Since ancient times, the Egyptian triangle has found a place of honor in architecture and construction.
The pyramid design is different in that it allows you to create a building with perfectly correct angles without any additional tools. The task is much easier if you use a protractor or triangle. But, previously only cords and ropes, divided into segments, were used. Thanks to the marks on the rope, it was possible to accurately recreate a rectangular figure. The builders replaced the protractor and square with a rope, for which they marked 12 parts with knots on it and folded a triangle with segments 3,4,5. A right angle was obtained without difficulty. This knowledge helped create many structures, including the pyramids.
The properties of the Egyptian triangular figure obey the truth - the square of the hypotenuse is equal to the squares of the two legs. This Pythagorean theorem is familiar to everyone from school. For example, we multiply 5x5 and get a hypotenuse equal to the number 25. The squares of both sides are 16 and 9, which adds up to 25.
Thanks to these properties, the triangle has found application in construction. You can take any part in order to draw a straight line with the condition that its length must be a multiple of five. After this, notice one edge and draw a line from it that is a multiple of four, and from the other a line that is a multiple of three. In this case, each segment must be at least four and three in length. Intersecting, they form one right angle of 90 degrees. Other angles are 53.13 and 36.87 degrees.
Types of mobile poultry houses
There are several types of mobile poultry farms. Therefore, before building a chicken coop, it is important to decide which type of construction will be most appropriate and optimal.
- By transfer method:
- wheelless structures (carried manually or using a trolley);
- devices with wheels (can be rolled from place to place).
- By dimensions:
- small buildings designed for 5-10 birds;
- large structures designed for 15-20 individuals.
- By device and configuration:
- single-tier;
- two-tier (a small ladder or other device is placed between the tiers).
There are also chicken coops made of wood and metal structures. You can build summer or winter poultry houses. Winter structures differ from summer ones in that during their construction materials were used that provide thermal insulation of the room. Inside, winter poultry houses are equipped with special infrared lamps that maintain light and heat in the building.
Climate
When planning construction, do not forget to take into account climatic weather conditions. If you live in a cool area with frequent rain, then any atmospheric phenomenon poses a threat to the integrity of the building.
Place the chicken coop at the highest point of your site if it rains often in your region - this will ensure high-quality drainage and a moderate amount of moisture. Do not make gaps in the building; ventilate when necessary through a removable roof.
Mosquito nets are placed on the door and windows. This protects not only from insects, but also from foreign birds and dust.
Designs of mobile chicken coops
Arch-type mobile chicken coop on wheels
A mobile arched chicken coop does not take up much space. About ten laying hens can be housed in such a building at the same time. Wheels will make moving the structure much easier. An arched chicken coop on wheels must be equipped with a metal roof and durable mesh. The need for a net is to prevent chickens from running away, as well as to protect poultry from predators.
What should be inside
All mobile homes share common design elements:
- Small kitchen.
- Separate paddock for walking.
- A place for nesting and resting.
There are several standard installations that can be made stationary:
- Two-tier triangular - the rectangular side is located on the ground, but the roof is made in a triangular frame. This allows the liquid to flow down during rain, there are no leaks, such a chicken coop will withstand even the cold. This design is usually calculated for no more than 5 chickens. The structure can be placed in the yard, in addition to contamination, it can be moved to another place along with the bird.
- Arched portable chicken coop - you can build it from everything left in the utility room. A large frame is made of wood, then it is covered with metal mesh. Separately, you need to make a place for sleeping; this is a small rectangle of plywood covered with a tarpaulin. For a seasonal hobby that can accommodate up to 3 people, this is enough.
These are the most popular options for chicken coops in the country if the owners come only for the season.
Positive and negative aspects of using portable chicken coops
Portable poultry farms, like any design, have advantages and disadvantages.
Advantages:
- the portable structure can be moved to another location at any time;
- the building is easy to clean;
- a mobile chicken coop can be equipped depending on the time of year: in winter, you can insulate the building and move it to the wall of the house so that the birds are warmer;
- It’s easy to make a mobile poultry house yourself without much expense;
- The bird house can be decorated and decorated with various decorative elements.
Flaws:
- mobile structures will not be able to accommodate a large number of birds;
- When making a homemade chicken coop, it is possible to make mistakes that can subsequently negatively affect the chickens (an unstable structure can tip over and harm the birds).
Tips and tricks
The advantage of a mobile poultry house is its simplicity of design. However, it is precisely this fact that can bring a lot of trouble to the poultry farmer. Several useful recommendations from experienced poultry farmers will help you better equip your chicken coop:
- Heavy, prolonged rains and sharp gusts of wind contribute to the rapid failure of a light wooden structure. It is better to weld a reliable frame from a profile thin-walled pipe. It will not be heavier in weight, but will withstand greater loads.
- Drafts do more harm to chickens than cold. To prevent birds from getting sick, they try to eliminate all the cracks in a closed house. For ventilation, special windows are installed. The problem of drafts does not exist for an open mesh house.
- When moving the house, a hill is chosen as a new place. The lowlands are always wet and cold, which is bad for chickens' paws. The bird can get sick and egg production will decrease.
- The ventilation vents are lined with mosquito nets. During ventilation, it will become a barrier to harmful insects. However, the net will not save you from fleas. The chicken coop is periodically treated with drugs.
- Typically, a portable or mobile poultry house can accommodate 10 chickens, but young ones. After the young animals grow up, 5 heads are transplanted to another similar house.
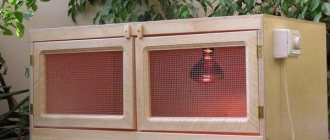
- To keep chickens in the winter, the mini-chicken coop is moved to a barn. All structural elements are additionally insulated with removable panels or mats. Lighting must be provided inside the house. If thermal insulation is not enough, install a safe electric heater.
- When it is intended to keep chickens and adult chickens in one house, it is better to make it two-story. The upper tier is populated by chicks, while the adults remain below.
Following simple maintenance rules will create better comfort for chickens. For this they will thank the owner with good egg production.
What does a mobile poultry house consist of?
Before building a poultry farm, you need to decide on the size of the bird house. So, for three laying hens you will need at least 1 m2 of free space. Therefore, if a farmer plans to build a poultry house intended for 10 birds, it is necessary to allocate at least 4-5 m2 for construction.
The following elements must be present in the chicken coop: a perch, a place for feeders and drinkers, a place for nests, and also a place where the laying hens can walk.
Construction of the foundation
We are starting construction and the first thing we will do is look at the construction of the foundation for the chicken coop.
- First you need to select a suitable site. Do not start construction on wet or dry soil. To ensure a strong foundation, we recommend using a drainage system that needs to be thoroughly filled with concrete.
- Then we begin to align the corners. For these purposes, use a simple construction spatula.
- To keep the coop at a comfortable temperature, use small heating pipes that will touch the base of the foundation and be located under the floor.
Step-by-step instructions for creating a chicken coop
The construction of the chicken coop should take place in stages.
Frame
To make the frame, you need to take three triangular frames measuring 20x40mm. Bottom boards for support and two boards for carrying the structure should be nailed to the frames. The frame must be strong and stable, since it serves as the basis of the entire poultry house.
Walls
The walls can be made of wood. To build walls, you need to install slats with a cross-section of 1.3x3 cm. You need to stretch a chain-link mesh between the walls. One of the walls must be made removable so that if something happens you can easily enter the chicken coop. Don't forget to make a door for the chickens. When installing the door you will need bolts, door hinges and a hook.
If the chicken coop is installed not in summer, but in late autumn or winter, you can insulate the walls and door of the chicken coop using cotton wool or expanded polystyrene foam.
Arrangement of tiers and zones
The structure will consist of two parts: open and closed. The closed part will be equipped with a door and window, and the open part will be equipped with a mesh. To arrange the upper tier, it is enough to place a plywood floor, which will serve as a separator between the two tiers.
The second tier should be divided into zones: part of the tier will be used for perches and nests, and the other part for rest. The main thing is not to forget to make a suitable hole in the plywood ceiling, allowing the birds to climb to the second tier. In order for the hens to be able to climb up, you can build and attach a small ladder to the hole.
Roof
Assembling the roof should be carried out similarly to assembling the frame. The roof can be made from boards and plywood. Part of the roof must be removable or placed on hinges. A removable part of the roof is needed in order to gain access to the chicken coop. When nailing down the roof, it is important to make sure there are no exposed nails that could injure the chickens.
Additional nuances
All parts of the poultry house must be connected to the frame using screws, bolts and nails. To make it easier to move the poultry farm, you can additionally attach side and strong handles. To protect the bird house from precipitation, you can cover the structure with film.
Corral net
The pen net is needed to prevent the chickens from sticking their heads through. The mesh can also serve as protection against insects and small rodents. You can use a plastic, metal or mosquito net. It is mounted on frames. The mesh should be tensioned on the walls and door.
Optimal sizes
If you approach the issue of determining the size of a chicken coop scrupulously, then for each breed of bird there is a certain standard of “living space”. But in a country house or in a private house they rarely keep a purebred bird. Therefore, they start from the average.
There are some general guidelines to follow when creating a chicken coop project.
Estimating the area and dimensions of the building
When building a chicken coop, they usually proceed from the planned number of birds. It is believed that 2-4 chickens can live on 1 square meter of area. If we are talking about broilers, you can take 3-4 pieces per square meter. They are inactive and this area is enough for them. If we talk about laying hens or meat and egg breeds, it is believed that the optimal number is 2-3 birds per square area. So, a chicken coop for 10 broiler chickens can have an area of -2-3 square meters, a poultry house for 10 chickens - when keeping laying hens or meat and egg breeds - requires 4-5 square meters. If you decide to build a chicken coop for 20 chickens, the area for broilers will be 5-7 squares, for eggs and meat - 8-10 squares.
A beautiful chicken coop for 10-20 chickens does not need to be hidden in the backyard
But knowing the area of a chicken coop for 20 chickens or 10 is not everything. We still need to decide on the sizes. Most often they try to make a rectangular building: 3 * 1.5 m; 4*, etc. In this case, you can clean the poultry house without going inside - a rake, scraper, broom will reach even the far corners. Square ones are not so convenient in this regard, although a small chicken coop for 10-20 chickens will still not be large. So a square is fine.
How tall should the chicken coop be?
When building a chicken coop, you still need to decide on the height of the building. For birds, a height of about 140-150 cm is sufficient. But you must remember that you will have to clean the house, collect eggs, and change bedding. So when choosing the height of the poultry house, they proceed from their own convenience. For this reason, the roof is made higher than head level - so that you can walk upright.
The height depends on whether you will go inside for service or not.
No overlap
There are two options when installing a roof. First: if the poultry house is without a ceiling (ceiling), you can remove the walls by about 140-150 cm, make the roof gable and raise the ridge by 180-200 cm (or a little higher, as is convenient for you). In this case, you can move around the center of the room without problems, but we still rarely go to the edges. There is usually a perch and nests there, and there may be bedding
You will have to work carefully in this area, protecting your head.
There may also be no overlap inside
The benefit of this option is that with this arrangement we save on wall material. The downside is that more is spent on insulating the roof: it must be insulated over the entire area, which is significantly more than what is required when insulating the ceiling. But, in general, this option turns out to be less expensive, but also less convenient (you have to take care of your head).
With attic
The second option for how to build a chicken coop for 10-20 chickens is to make a mini-copy of a regular house. In this case, the walls are driven to the height required for free movement inside. This is a person’s height, plus 10-20 cm. But keep in mind that part of the height will go to the ceiling, there will also be a floor and bedding on it. Each requires about 15 cm of height. So, if the owner of the chicken coop is 180 cm tall, you will have to make walls with a minimum height of 220-230 cm.
With overlapping you will have to insulate less
As you can see, this option will require more materials for the walls, but only the ceiling (ceiling) can be insulated, and the attic can be left cold. The attic can also be used to store straw, bedding, etc. But don’t forget about rodents, who love such storage facilities and can become a problem.
On poles
Another option: make a chicken coop for 10 chickens on poles. In this case, 4 beams are dug into the ground at the corners of the building, the floor covering is made at a height of 50-80 cm from the ground level. The roof is made at a height of 180-200 cm. In general, this is a convenient option for a mini-chicken coop for a summer residence. This is more of a summer option, but can be insulated. In order for the bird to be able to get in and out, an inclined ladder is made from boards with thin perches nailed about 10 cm apart to make it easier for the bird to move.
Why not a mini-chicken coop for 5-6 chickens?
In general, you choose the height and general construction plan at your own discretion.
https://www.youtube.com/watch?v=b5aiuIHN9Oc?ecver=1
Interior design of a mobile chicken coop
Perches
Making perches is easy. You need to prepare a round or oval stick and secure it above the floor. You can also make multi-tiered perches, but then there is a chance that the hens will fight for the highest place. It is better to install some smooth surface under the canopy on which droppings will accumulate.
Nests
You can also place nests on the floor, but it is not advisable to do this, since the eggs will be constantly dirty and it will not be very convenient to pick them up. Therefore, it is better to place them at a small height from the floor of the poultry house. It is better to place the nests at the same level as the perches. It will be convenient for the laying hens to walk back and forth.
Litter
During the cold season, hens will need bedding, which can be sawdust, leaves, straw or shavings. However, before making the bedding, you need to pour a thin layer of lime on the floor, which can insulate the cold floor. The bedding will need to be updated periodically.
Feeders and drinkers
In chicken coops, it is better to use bunker feeders rather than periodic feeders. There is always a decent supply of food left in the bunker feeders, so the chickens will definitely not go hungry. A spacious bunker feeder will be made from a piece of plastic pipe. Drinking bowls can also be built from the remains of a pipe or purchased ready-made in the store.
pros
Each chicken coop, whether made by hand or purchased in stores, has a number of pros and cons. Main advantages:
- The design of the mobile chicken coop can be quickly moved to any place in the garden. It follows from this that chickens will always be able to eat animal feed and green herbs - this is an important point in their development.
- Possibility of changing the design of the building. It will be not only functional, but also decorative and will decorate the site.
- The design is easy to clean; you can place it in a convenient place where you can carry out all hygiene procedures.
- A portable chicken coop can be either summer or winter. During the cold season, the structure can be placed close to the house to make it easier to care for.
- The structure is inexpensive and can be easily erected with one’s own hands, with minimal construction skills.
Historical reference
Modular origami most often means figures made from small triangles. However, there are also kusudama balls and polyhedra from the so-called “Sonobe modules.” Both varieties are native to Japan. Kusudama is a paper ball made of several sections sewn or glued together, known since the Middle Ages. It was filled with aromatic herbs that released healing essential oils, and hung in the house to protect against infectious diseases, as well as create a calming atmosphere.
Polyhedra from modules in the form of a parallelogram curved in a special way were developed in the 1960s by the Japanese origami artist Mitsunobu Sonobe and named after him. The master most likely borrowed the idea from his predecessor Hayato Ohoko, who in 1734 first described and presented the diagram of a three-dimensional cube made of several identical elements.
Origami from triangular modules is an invention of Chinese masters. Its origins are precisely unknown, but the Western world had to become acquainted with this unique technique under very sad circumstances. In 1993, 286 illegal immigrants from China arrived in the United States aboard the cargo ship Golden Venture. The “New Homeland” greeted them unkindly. When the ship ran aground near New York's Rockaway Beach, passengers tried to swim to the “promised land”, and 10 of them drowned. The remaining illegal immigrants were arrested by the Immigration and Naturalization Service (INS) and scattered in prisons across America.
While waiting for a response to their request for asylum, Chinese prisoners whiled away their time doing national handicrafts, including origami, which is called “zhezhi” in Pinyin. In the process of work, illegal immigrants invented triangular modules, creating large-scale figures from them: vases, swans, pineapples and ships. Instead of regular paper, they used covers of old magazines and newspapers. Later, when the technology became widespread, Chinese banknotes were often used for modular elements.
Inmates gave modular origami sculptures to those who supported them or sold them to raise funds for legal services. Some of them are presented at the traveling exhibition “Freedom Flight”, organized by the American Immigration Center.
Three models using modular origami technique
Novice craftsmen are not always familiar with the subtleties of “paper art”. The main thing when assembling origami from triangle modules, as in other types of needlework: embroidery, weaving or knitting, is not to rush and strictly follow the pattern at each stage. Then the work will immediately turn out neat and durable, without requiring any rework. There are other significant points:
- The modules must be folded very accurately, otherwise the product will be skewed and sloppy. The smaller the size of the assembly elements, the thinner the paper chosen for them.
- If the pockets are difficult to open, you can use a toothpick.
- It is better to start getting acquainted with modular origami with easy models, gradually moving on to more complex ones.
- Gluing the elements of the product will help preserve it for a long time and protect it from destruction when dropped.
- Finished work should be coated with transparent wood varnish. This is good protection against dust and fading, as well as the ability to do wet cleaning.
Owl
A good model for those who are just starting to get acquainted with the technique of folding origami from small triangles. It will require only 106 blue modules and 24 pink ones.
"Owl" scheme:
Assembly is carried out on the long sides. The 1st row consists of 16 blue elements. Starting from the 2nd, we add pink details for the owl’s “front” (12+4).
The total number of elements in each row is the same. But the color ratio is different.
3rd row: 10 blue and 5 pink pieces.
4th row: 8 blue and 6 pink.
Next, the modules are distributed in reverse order. For the penultimate row we take 16 blue parts, for the last – 15.
Having collected the owl, we make its characteristic “ears”. They consist of 3 parts that are attached to the last row, according to the same principle as the rest. Then we glue on the bird's eyes and nose from a pink modular element.
An “Owl” of bright fairy-tale color will decorate your home for Halloween or another themed holiday. It will also look spectacular in a nursery.
Chinese mini dragon
Following the principle of gradual complication of models, after the super-simple owl, you can just move on to the symbol of the water element, popular in the east. The dragon in China has long been associated with the cult of fertility; not a single rain-making ritual was complete without its images. In addition, this mythical character denoted belonging to the highest strata of society. Only the aristocracy was allowed to decorate clothes with his images, but such “freedom” was not available to commoners.
In order to make a mini dragon, you will need 515 1/16 origami paper triangles:
- 251 blue (C),
- 264 yellow (W).
Head
We start work from the head. Scheme of its assembly:
We move from the “chin” up.
| Row | Number of modules |
| 1 | 3 C |
| 2 | 4 C |
| 3 | 3 C |
| 4 | 4 C |
| 5 | 5 C |
| 6 | 4 C |
| 7 | 1 S+1 F+1 S+1 F+1 S |
| 8 | 6 C |
| 9 | 5 C |
| 10 | 6 C |
We assemble from top to bottom. Having completed the 10th row, we make spikes crowning the dragon’s head. We assemble them symmetrically according to the diagram, making a gap in the middle. We turn the figure over and bend it slightly - the head is almost ready. We cut out a forked tongue from red paper and glue it in the center of the last row from the wrong side.
Dragon body
The flexible body of the mythical animal is a chain of yellow and blue parts. At first there are three of them: S+F+S. To the first yellow piece in the next row, add two more, putting it on each corner.
Then we repeat the initial arrangement of the triangles again and continue until we have collected approximately 88 rows. The body will require 176 blue and 262 yellow elements. Having completed the assembly, two blue fastening modules are added to the back of the head near the eyes.
We make 4 legs from 5 blue parts. We attach the blanks to the body at the support points. First we bend it, like a roller coaster.
Mini dragon is ready!
Swan
This is one of the most beautiful and sought-after models. An origami swan made from modular triangles easily transforms into an elegant vase for dried flowers, although it is gorgeous on its own.
For the two-color model presented in the next video tutorial, you will need 1522 modules, 1/32 in size:
- 1322 white,
- 180 pink.
Minuses
Now about the disadvantages, there are quite a few of them, but it is still worth mentioning possible difficulties:
- Small capacity. If you want to raise a large number of birds, then such a building will not suit you. Since it has small dimensions. It will not be easy to add additional areas to it.
- When building on your own, you can make a number of mistakes. It is important to follow the instructions and make clear plans and drawings, otherwise the chicken coop will not be durable.