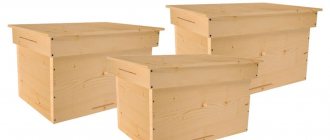
Honey is not only tasty, but also a very healthy product. Today, apiaries are a great success. Quite often, a beekeeper needs to inspect frames, so for greater convenience he needs a box for carrying frames (ramonos). You can buy it, but making it yourself is not difficult. To do this, it is enough to have clear drawings, materials and a desire to make things.
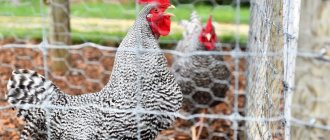
The beekeeper often removes frames from the hive
What is ramonos
Various manipulations with frames are an integral part of beekeeping. Such actions can be facilitated by using a special box for carrying frames, which is called a frame box. You can make the design yourself. There are certain requirements for it and rules of operation.
Requirements for Ramonos
In order for the ramonos to be easy and convenient to use, the design must meet certain requirements:
- lightness - a heavy box will be impossible to use, so it should be small (usually 6-8 frames) and made of light material (usually plywood);
- certain sizes - they must correspond to the dimensions of the frames used in the apiary;
- multifunctionality - in addition to carrying frames, the design can be used to catch swarms;
- ease of carrying - it is necessary to equip the box with handles and a belt;
- moisture resistance - this property is ensured by impregnation with drying oil; it additionally increases the wear resistance of the product.
Ramonos can even be used to keep insects, but only for a short time. This option allows you to replace a special swarm, in the darkness of which the bees are very worried.
Bee scales
Apiary weighing equipment is expensive, and you can’t do without it. It takes a beekeeper's ingenuity to build a bee scale with his own hands. The design is made according to the principle of a suspension system. You will need to hang a set of blocks from a solid ceiling, pull a cable through them and attach scales.
You can get more convenient scales for hives yourself by converting a factory device with a strain gauge. The scales are being dismantled. The removed electronics are taken outside and secured in a convenient place.
The movable scale platform is mounted on levers connected to the frame by springs. To re-equip, you need to weld a frame from a corner with your own hands and equip it with four bearings. The homemade frame is attached to the main frame with four screws.
To lift the scales, a nut is welded onto the frame and a handle is screwed in. For weighing, 55 mm thick bars are placed under the bottom of the hive. Roll the scales into the gap and press the power button. When zeros appear on the display, turn the handle to raise the movable platform by 20 mm. After weighing the hives, the beekeeper turns the handle in the opposite direction.
The bearings of the bee scales are rolled synchronously. To raise or lower the platform, turn the handle about 20 times.
Making your own portable box for frames by hand
Our frame carrier consists of six main parts : front, back, two side walls, as well as a bottom and a lid.
There is nothing complicated in the assembly. First, we assemble the front and back walls. On the inside, at a distance of 15 mm from the top edge, we screw a 300x45x20 rail - it will serve as a stop for the frames (folds). The front and back walls are identical to each other.
In the front we cut (or drill) a taphole.
Front wall of Ramonosa
Then we make the side walls and assemble the frame body (we screw them to the front and back walls).
Ramonosa side wall
Next, we assemble the lid of our frame frame. The bottom will be simply a rectangular piece of plywood cut to size. You can come up with something like legs, rails, etc. from below.
Now screw the bottom and hang the lid on the hinges.
That's all.
Everything should turn out very quickly. This is what I focused on, namely the simplicity and speed of production, as well as the lightness of the product.
Scheme of a finished ramonosa trap
At the beginning of June I will write a detailed article about catching swarms.
Honey is not only tasty, but also a very healthy product. Today, apiaries are a great success. Quite often, a beekeeper needs to inspect frames, so for greater convenience he needs a box for carrying frames (ramonos). You can buy it, but making it yourself is not difficult. To do this, it is enough to have clear drawings, materials and a desire to make things.
The beekeeper often removes frames from the hive. To make a frame frame with your own hands, you will need a little time and, of course, the right raw materials for its manufacture. Do not take heavy materials, because all this will ultimately affect the weight of the finished product. Be sure to consider how your frame drawer will close. Take materials with a reserve; you may need to make not one, but two or more products. With their help, the beekeeper’s household will always be in order, and you won’t have to carry frames with your hands.
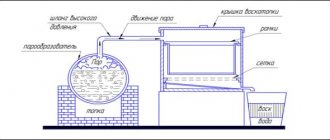
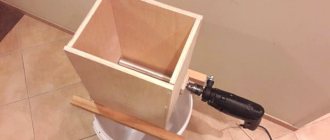
Construction of an electric honey extractor with your own hands
Tools and materials
- The materials for the box will be required as follows: plywood sheets with a thickness of at least 4 mm, as well as slats measuring 45x20 mm (we will nail them inside and outside). Another type of material will not be suitable due to the weight of the product.
- But if you plan to use the box as a beekeeper’s garden chair, take chipboard sheets, the thickness of the product will increase in this case. We will tell you about the manufacture of a plywood carrier designed for eight frames.
- In addition to plywood sheets and slats, you will also need self-tapping screws or thin shoe nails (it is more convenient to carefully hammer them into thin plywood).
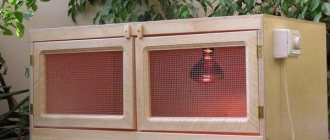
- You will also need an external fastening that will hold the lid so that it does not open on the go and hinges for tilting it. For external fixation, a galvanized fastener (shown in the photo below) will do, and for internal fixation - ordinary small loops, two pieces.
- And the last detail is the belt and external fastenings for it. They are attached to self-tapping screws, just like the hinges inside. You can take stainless steel fasteners, and buy a nylon belt.
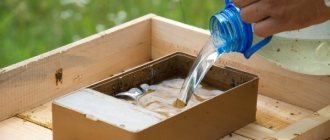
To seal the box, you can stick thermal tape around the entire inner perimeter of the lid (with a tolerance of 4 mm at the edge for the width of the walls). This thermal tape is sold as insulation for windows for the winter and comes in different thicknesses - we will need the thinnest one, about 1 mm thick. It does not touch the frames, which means it will not get dirty and will not be sticky. In addition, the sealed box can be left near the hives for some time, since the bees simply will not reach the frames.
However, a ventilation hole at the bottom of the housing can still be made so that the honey does not “suffocate”, just be sure to cover it with a fine mesh. The mesh will need a very small piece, which can be attached with a regular construction stapler.
Manufacturing instructions
So, below are step-by-step instructions for constructing a box for frames or a frame carrying case.
- In total, the frame carrier has six components - the front, back and two side panels, the lid and the bottom. Wall dimensions (300x330).
- The front wall should be assembled first, and then the back.
- We retreat 15 mm from the top edge of the front wall and nail a pre-prepared strip (length 300, width 45, height 20 - dimensions in mm). This is our future support for frames, that is, folds. We nail the same two planks on the outside - without indentations.
- If you plan to make a ventilation hole in the front part, it must be cut out in advance. However, many beekeepers do without it.
- The back wall is identical in size to the front; the slats are placed on it only from the outside - at the top and bottom without any indentation from the edges.
- The side walls of the same dimensions (300x330) are knocked together from the front and back, and then two slats are also stuffed onto their outer surface - on top and bottom. This way you can comfortably pick up the box.
- Next, the lid is assembled and attached to the hinges. Its dimensions are indicated in the drawing.
- The bottom is measured around the perimeter and nailed down, after which the closing part of the fastener is screwed to the lid, and the stationary part of the fastener is screwed to the side. Detailed drawings, as well as a general view of the product, can be seen in the photo below.
This way, you will have a convenient, tightly closing structure that you can leave near the hive without fear for the safety of the collected honey.
Some beekeepers also use frame bees as a swarm trap, luring bees there as if into a temporary home. The idea of such a temporary replacement of the hive with a box is quite good. So decide for yourself whether you will use your carrier in the same way.
Manufacturing option No. 2
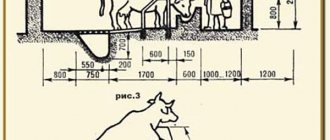
The dimensions of the box, which will include 6 frames, are as follows: 470x300 mm (LxW). Depending on the size of the frames themselves, the parameters of the ramnos are calculated. For example, if the width is 37 mm, then the product will have a width of 222 mm. To calculate the parameter, the width of one frame must be multiplied by their number. It is better to make all side planks from a board whose width is 20 mm. For walls, take plywood 4 mm thick. It is attached using ordinary thin wooden planks.
Before you begin preparing materials, you need to develop a drawing with specific dimensions . The height of a box for storing frames made by yourself is always made with a small margin of 50 mm, so the final height of the structure will be 350 mm. Experienced beekeepers recommend multiplying the rounded figure of the width by the number of frames (i.e., not 37, but 40 mm).
Relocation of a bee colony
The length of the product will depend on the boards used, or more precisely on their thickness. The average size is 510 mm. Thus, the frame carrier will have the following parameters: 510x350 mm. Using a screwdriver, carefully assemble the product.
For the bottom and lid, plywood 4 mm thick is taken. These parts should be cut only after assembling the main sides of the frame storage box. Otherwise, you may make a mistake in the calculations and not take into account the thickness of the planks used. Ultimately, the bottom will be attached to the boards, which will make the structure stronger and more reliable. The lid of the product must fit tightly, so the dimensions of the slats must completely correspond to the inner perimeter of the box. This is where they will subsequently be stuffed.
Handles are screwed onto both sides of the box so that it can be moved freely if necessary. To do this, install the staples and stretch the sling, which, after tension, is tied in a knot. The assembly itself should be moved towards the brackets so that it does not interfere with work in the future. This must be done so that you can hang the sling on your shoulder. After all, sometimes the box reaches a weight of 20 kg, and it is quite difficult to carry such a load in your hands. Frames with honey are quite heavy and sometimes reach 5 kg (Dadana frame).
Drawing of a box for carrying frames in cross sections (a) and longitudinal sections (b)
Uterus caps
Special caps are used for placing queens. Beekeepers can improve factory models with their own hands by making a hole and equipping a lid. The device is pressed into the area of the honeycomb where there is honey, empty cells and young growth.
You can quickly create caps for queen bees in the field with your own hands from PET bottles. First, cut off the bottom with scissors. An awl is used to pierce up to 20 holes with a diameter of 2 mm. Three days after installing the cap, the exit is covered with wax, drilling a hole for the queen. If the queen does not come out on her own, she is released by lifting one edge of the cap.
Product functionality
To avoid problems with getting the box out of the hive, it must be made of plywood, making it much more convenient and easier to get the frames with all the contents. There are 6 frames in the box. After removal, the hive is closed.
- select the necessary materials and tools;
- think over connection work;
- collect elements into a single whole;
- secure the handles;
- coat with a protective compound.
The box's parameters are small. Length from 455 mm; width - 235 mm; in height - 320 mm.
The frames carried by the box are different, so they must be disinfected after each use. Due to the accumulation of moisture on the plywood and in order to avoid rapid wear of the product, the material is impregnated with drying oil. The box itself is installed near or behind the hive so that frames can be placed there while honey is being pumped out. The box should not be heavy, but strong so that it does not break during operation.
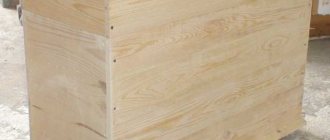
Carrying box for ten frames
Homemade products for the apiary
The main equipment of an apiary is a beehive. Professional beekeepers make them with their own hands from boards. However, without tools and equipment, the beekeeper will not be able to maintain the hive, care for the bees, pump honey, or melt wax. Beekeeping accessories are available for free sale, but they are often overpriced. Another disadvantage is the inconvenience of working with factory products. Sometimes apiary equipment is ill-conceived and made of poor quality materials.
The beekeeper creates the most convenient beekeeping devices with his own hands. They are completely free, and in terms of quality they can compete with their factory counterparts.
Advice! On the forums you can find amazing homemade products for beekeeping, which have no analogues for sale. The only way a beekeeper can get hold of such a thing is to construct it with his own hands.
How boxes are used in beekeeping
In addition to storing the frames themselves, the design is also used for other purposes. For example, to maintain a swarm. Beekeepers consider it a better option than a special swarm, in which bees often suffer from anxiety due to being in the dark for a long time. The swarm is placed directly on the frame after it is removed. The structure itself is installed next to the hive. The queen itself should be placed directly on the frame, while others can be shaken off onto a pre-prepared lower frame. But even in such a box it is not recommended to keep insects for a long time.
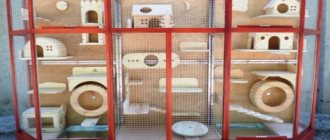
Box made for several people
The design feature of the box for two people is that it is somewhat larger in size. There are already 20 to 22 frames from the hive placed there. Dimensions of this ramon plant: 900x800 mm. Such a large structure can later be adapted for storing something. One beekeeper cannot cope with such a box. The structure itself must be very strong, so the end boards must be of good thickness. It is better to use nails for connections. Using screws, the side strips of the upper part are connected to the walls. From the bottom side, the bottom is nailed directly to the edges of the plank. Finally, handles are attached to the ends. Beekeepers use such structures as temporary hives.
It should be noted that making a structure for containing frames with your own hands is quite simple. To do this, you should have an accurate drawing and a consistent action plan at hand. The right approach to business will save you from many problems and make your work much easier. In the future, such boxes can be conveniently adapted for a temporary additional hive.
Inside view of the work drawer
Cut the bottom and lid to size from 4 mm plywood. It is better to determine the dimensions using a tape measure when the box is already assembled, because... It will be impossible to take into account the thickness of the strips (stiffeners) in advance.
If the length dimension is 510 mm, then the thickness will include: the thickness of the board, plywood and planks stuffed onto the plywood. This needs to be taken into account, because it is to the slats (and side boards) that the bottom will be attached - this way the structure will be more rigid. On the inside of the lid you need to fill the slats that will correspond to the inner perimeter of the work box.
Printing honeycombs in the apiary
This will ensure the lid closes tightly.
Why didn't I use loops? Sometimes when working, you need extra space to open the hinged lid, but by and large, this is a matter of habit. It is more convenient for me to work with such a lid.
Handles must be provided to carry the box. I made one. I nailed strong staples to the side boards and pulled a sling through them.
The result was the following:
I simply pulled the sling around the ring and tied it in a knot. I tried to place the unit closer to the bracket so that it would not interfere during operation.
Carrying work box in hand
Why did I use this carrying method? Yes, very simple. Most often I use the work box to carry frames. And everyone knows that frames, especially with honey, are a heavy thing. Judge for yourself. A full-weight Rutt frame weighs 3-3.5 kg, a Dadan frame weighs 4-5 kg. And if there are at least four of these frames, then the weight increases to 14-16 kg. You can drag such a weight in your hands... twice. What if there are a lot of frames?
The sling can be hung on the shoulder and distribute the load.
Carrying the work box on the shoulder
What else can you use your workbox for?
In addition to carrying frames into the work box, I plant swarms. It is clear that swarmers were specially invented for swarms. But I prefer working with the workbox. I'll explain why. I've used swarm a couple of times. The bees were acting restless. They had to be kept in a dark place for a long time, and once the swarm simply “ran away” from me.
To catch a swarm, I take a work box and put 3-4 frames there, it is better that at least one of them contains honey.
And with this “wealth” I climb the tree where the swarm has taken root. Inconvenient, I agree. And what kind of turns of phrase do I utter when I climb a tree... Each time I stubbornly prove to myself that I’m wrong and that it’s much easier with the swarmers. Apparently I'm incorrigible.
Most often, I leave the work box at the nearest fork, pull out one of the frames and carefully place it on the swarm and just wait. In 90% of cases, the bees begin to actively crawl onto the frame. You can place the frame from below and throw the bulk of the bees onto it. The main thing is that the uterus is on the frame. And then it all depends on how much time the bees need to guess that the queen is no longer on the branch. Many times I have had cases when I put a frame in a working box and all the bees went into it in a formation. Either the most persistent or the most narrow-minded remained on the branch. It happened that I placed a working box under a tree (when the queen was already in the working box) and observed an amazing picture when a swarm was removed from the branch and climbed into the box together.
It also makes no sense to keep bees in a box for a long time. The time required to prepare a new site for the swarm and install the enclosure is sufficient. The bees are carefully transferred to their new home on a frame and after a few minutes they begin to fly around.
To be able to add a comment, register!
Pollen collector
Pollen is a useful beekeeping product. To collect it with his own hands, the beekeeper places pollen collectors on the hives. Professional beekeepers do not like store-bought apiary devices. They have many extra holes or their diameter is too small. The most popular are beekeeping homemade products that help the beekeeper collect a lot of pollen.
A special feature of hand-assembled apiary devices is the presence of a shaped hole. A bee crawling through it is guaranteed to leave all the pollen in the collection.
It’s easy to assemble the apiary device with your own hands according to the drawing. First, for the pollen collector, prepare a bar with holes with a diameter of 5 mm with your own hands. A fishing line will help make them curly. The veins are passed into the holes, braiding them in a ring. Overcoming the obstacle, the bees will cling with their paws and push the fishing line apart. Actions will lead to the tearing off of the pollen.
The apiary pollen collector is placed on the front of the hive so that the lower cut of the entrance coincides with the upper edge of the arrival bar. A strip is placed in the slot on the lid of the beekeeper's pollen trap. The landing board is covered with a mesh with 3x3 mm cells. The torn-off pollen will roll into the ditch.
Advice! The beekeeper regulates the quality of pollen collection with his own hands by changing the length and thickness of the fishing line.
The groove of the apiary pollen collector can be used to install a dividing grid to prevent the queen from flying out.
Collect and install a bottom pollen collector with your own hands in the bee pavilion when the bees bring the maximum amount of pollen. On unfruitful days, the apiary device cannot be used.
The design of the bottom pollen collector consists of a valve. When it is lifted, the bees enter the nest without passing through the grate. When assembling the pollen with your own hands, the valve is lowered.
Electrical booster
To simplify the work with wax, beekeepers created an apiary waxer with their own hands. Its peculiarity is that it runs on electricity. To assemble an electric generator with your own hands, you will need an old working battery and 2 wires with clamp terminals.
The essence of the apiary device is that the terminals are connected to the wire on the frame. When the circuit closes, it begins to heat up. The foundation is placed on a hot wire and pressed with glass. Through the transparent sheet you can see how the strings are soldered into the wax.
What other homemade products can you make for beekeeping with your own hands?
There are many other apiary devices for a beekeeper, and you can make them with your own hands without much difficulty.
A convenient apiary attribute for a beekeeper is a box stool. The base is knocked off the bars. The seat is cut out of the board with your own hands, and a hole for the handle is sawn through. The body of the box is knocked off the plywood. It is convenient for the beekeeper to sit on the stool while servicing frames and hives. All the tools are always at hand in the box.
Beekeepers assemble intra-hive feeders with their own hands from frames. First, the honeycomb and wire are removed. The frame is covered with plywood, the joints are sealed with wax.
Beekeepers make over-frame ceiling feeders in the form of boxes. They are made with their own hands, wooden or plastic.
Important! The feeder is equipped with a floating raft to prevent the bees from drowning in the syrup.
How is the Dadan hive different?
There are horizontal and vertical types of cell arrangement. Frames for Dadan hives belong to the latter option. Their dimensions depend on the width, and their height on the number of modules being used.
This type of frame was invented by Charles Dadant in the early years of the twentieth century. Thanks to a well-thought-out design, it was possible to increase the productivity of bees. The structure and size are similar to the Quinby model. But the internal form is aimed at ensuring a rapid increase in family size.
- Later, the Swiss beekeeping master Johann Blatt improved his colleague's structure. He proved that reducing the length of the frame by 3.5 cm allows you to effectively use 12 units of honeycombs for honey.
- After the changes made, the dimensions of the frame of the Dadanovsky hive in length are 43.5 cm. The height at the base of the nesting body is no more than 30 cm. For honey, a shortened type of foundation is used - 14.5 cm. The width on the side of the slats, on top is around 3.7 cm , closer to the bottom it is shortened by no more than 1 cm.
Now we understand what frames are used for, the permissible quantity and what dimensions are required to obtain the optimal amount of honey. Although wooden modifications are very good, it is more profitable for beginners to start with plastic ones, since they are easier to maintain.
Choosing the right material
The quality and strength of manufactured honeycomb frames directly depend on the materials used for the strips and bars, foundation wire and fasteners.
Planks and bars
In recent years, honeycomb frames made of plastic . Their adherents point to greater durability, resistance to rodents and moths, and the ability to save on foundation. Opponents cite the presence of chemicals in plastic and the reluctance of bees to process the foundation. Those who like to chew comb honey also do not like plastic frames. You can’t build such products with your own hands, and if they break (plastic is quite fragile), they can’t be repaired.
The plastic honeycomb frame has a more durable design and does not require assembly. Before placing it in the hive, you need to apply a thin layer of wax to the plastic foundation.
Most beekeepers adhere to the traditional opinion, considering wood to be the best material for making honeycomb frames. Wood is easily accessible, does not contain harmful impurities, and if it breaks, it is easy to repair or replace. The most suitable types of wood for planks and bars are pine (dried) and cedar . In their absence - poplar, willow, linden and other soft species (less susceptible to splitting). As a blank, it is best to use a straight-layer array without knots, which can create many problems - weigh down the frames, release resin, split during assembly, lead to breakage of a complete honeycomb frame under the weight of honey, etc.
The disadvantages of wooden frames include: drying out at high temperatures, getting wet and rotting in conditions of high humidity; in addition, they are often damaged by insects and rodents.
Wire and bushings
The tension of the wire largely depends on the properties of the metal from which it is made. The available choice is wide, but it should be remembered that the use of copper, aluminum and other wires made of non-ferrous soft metals is unacceptable - after a while the strings begin to sag due to stretching. For hives, special beekeeping wire made of low-carbon steel with a diameter of 0.3 to 0.5 mm is used. You can also find cheaper black wire on sale. Its main disadvantage is its susceptibility to corrosion. Wire made of galvanized steel has become widespread (it does not get tangled, does not break, and bends well).
Wire wound into coils or spools is sold by weight (0.25 kg, 0.5 kg, 1 kg, etc.)
A better, but more expensive option would be to use stainless steel (for example, IM-2 or SM-1). Electrically conductive types of wire made of tungsten and nichrome (X20H80) are even more expensive.
For tensioning, you should immediately purchase additional fastening materials - bushings or brackets.
Bushings must be made of brass or other metal that is not subject to corrosion
During operation or when stretching, the wire cuts into soft wood, which leads to gradual wear of the frame and sagging of the string.
There are two ways to prevent this:
- insert brass bushings with a smooth head (for example, 2.5-2.7 mm in diameter) into the holes, through which then pass the wire;
- Using a construction stapler, place a bracket next to the hole on which the string will rest. The downside is the gradual corrosion of the bracket from moisture.
To roughly calculate the amount of wire required, you need to multiply the length of 0.5 m by the number of “waves” on the hundred frame (magazine - two, Ruta - three to four, Dadan - from four to six).
Material for fastening honeycomb frames
For fastening you will need:
- shoe nails (3.5-4x1.6 mm) or small self-tapping screws;
- PVA glue or another suitable for wood (the label should be marked D-3/D-4).
Manufacturing Instructions
You can assemble a box for bee bags according to different instructions, but you should use plywood or fiberboard as the main material, since this is a light and inexpensive raw material that does not require serious preliminary preparation. We will consider further options for how to assemble a box for transporting bees based on it.
Box for 8 frames
To make the box spacious, but at the same time easy to carry, it is best to make it with 8 frames. Such a box should also be equipped with a straight lid and a special belt attachment to make it easier for the beekeeper to carry. The following drawings will help with assembly: