Story
Science knows for sure that those cliques, which today are called Ukrainian or beehives, were previously very successfully used by those beekeepers who engage in apiary work as a hobby, and not professionally. After all, their design is such that it does not require much time and effort. That is, you can do them “in between” after work. It is because of this factor that a large number of amateur beekeepers have used these structures in the past, and are happy to use them today in the countries of the former USSR.
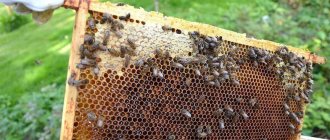
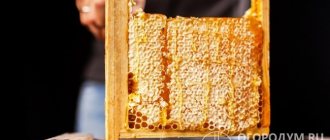
Waxing frames
Foundation is a thin layer of wax on which hexagons are formed using a press (they will serve as cells for honeycombs). When the frames are ready and the wire is stretched, the artificial foundation is attached using a pattern. Typically the dimensions of the pattern are as follows: 295x450x30 mm. The part is stretched onto a board with a fold applied, and thanks to the pattern, the correctness of the folding is determined.
Expert opinion
Ponomarev Sergey Stepanovich
Beekeeper with 30 years of experience, Candidate of Technical Sciences
The frame is expanded by hanging foundation on it. In this case, you need to ensure that the upper rows are filled without fail, otherwise the insects will begin to form honeycombs across.
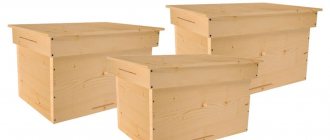
Design Features
The Ukrainian beehive lounger on a high frame is a rectangular house, in appearance it strongly resembles a chest.
Thanks to its good capacity and the presence of two sets of entrances on the front wall, this house is suitable for keeping two bee colonies under one roof. You can keep the mother's nest and a small brood nearby, or the main family and the nucleus.
As the name implies, such bee houses are widespread in Ukraine along with standard hives with a set of hundred-frame frames 435 by 300 millimeters.
The Ukrainian lounger set includes one diaphragm and 20 narrow frames (300 cm wide and 435 cm high). When moving, honeycomb frames are pressed with a special rail.
The classic design does not provide for the installation of a magazine extension. With abundant honey flows, this complicates the work of beekeepers. The Ukrainian beehive on a high frame and its drawings look like this.
The pictures show: 1 – ceiling boards (ceiling); 2 – house cover; 3 – bottom; 4 – honeycomb frame of the nest; 5 – body; 6 – arrival board; 7 – handle for moving the house; 8 – landing board on the side of the house; 9 – diaphragms or insert boards; 10 – rail for fixing honeycomb frames when transporting the house (pressing rail).
Advice from experienced beekeepers
In Ukraine, beekeeping is a developed industry that brings profit to entrepreneurs. If you choose the right bee breed, region and hives, you can achieve financial heights in a short time. The hive lounger has not lost its relevance since the mid-19th century. Keeping bees in such structures does not cause problems, and the product itself does not require a lot of material costs and time to maintain. Here's what experienced beekeepers say:
- “The Ukrainian hive is designed in such a way that it is comfortable for insects to independently arrange a nest for wintering. The beekeeper will not need to do anything extra. If necessary, the frame for hibernation of bees can be increased in height.”
- “Any processes that disrupt the harmony of bees’ lives can lead to a small honey yield. Bed hives help reduce the risk of human intervention and increase the performance of striped insects.”
- “Ukrainian beds allow bees to winter confidently and consume less honey. Taking good care of insects will help them develop faster in the spring before their first flight. The structure should be installed very evenly, observing geometric proportions.”
- “It is better to install the structure on pipes concreted in the ground.”
- “When fruit trees are flowering, you should not forget to use the Chaikin method so that the bees do not “think” about swarming.”
- “You can make a hive yourself. Insulation, such as straw or shavings, is quite easily placed on the non-removable bottom.”
- “Many beekeepers prefer to buy a disassembled hive from professionals. Then collect it on the site with your own hands.
This option is considered one of the most common, as it requires lower costs.”
Today, the Ukrainian lounger has both fans and opponents. Some people like the product, while others prefer modern options. Only after studying all the pros and cons can you make a choice. But, as they say, “If you don’t try, you won’t know!”
How to make a Ukrainian beehive with your own hands
It’s easy to make a hive-bed with your own hands. This does not require any special skills or complex tools.
Necessary tools for manufacturing
Note! Coniferous species cannot be used for these purposes.
To make a lounger, you need to prepare the following tools and materials:
- board 4 cm thick, 84 cm long and 14.5 cm wide - 2 pcs.;
- board 4×84×18.5 cm - 4 pcs.;
- board 4x36.5x13.9 cm - 8 pcs.;
- board 4×81×15 cm - 3 pcs.;
- board 3×40×7 cm - 1 pc.;
- board 2×86×20 cm - 2 pcs.;
- board 2x39.5x20 cm - 2 pcs.;
- roofing boards 1.5×96×13 cm - 4 pcs.;
- rail 1.3×84×3 cm - 8 pcs.;
- hammer;
- nails;
- Stuntgebel;
- selector;
- plane;
- wooden tongues;
- nails 10 cm.
Drawings and dimensions
Below are instructions for making a structure with dimensions 50.7 × 68.6 × 38.1 cm (height × length × width). The thickness of the end and rear walls is 3.3 cm, the sidewalls are 2.8 cm.
To build a hive, you need to perform the following steps:
- Make an end by joining two 18.5 cm wide boards and one 14.5 cm wide board into a tongue, panel or batten.
- At the end, cut out 2 lower tapholes 20 cm long and 1 cm high.
- On the segment between the lower tapholes, in the center, 1.2 cm away from the top edge, make upper tapholes with a diameter of 2.5 cm.
- Make the back part from 84x18.5 cm boards by joining them into tongue or groove. If everything is done correctly, the width of the wall will be 4 cm greater than the width of the end.
- Cut out the bottom tap hole 10 cm long and 1 cm high at a distance of 4 cm from the bottom edge and 9 cm from the end.
- Make the side parts by connecting 4 boards measuring 36.5x13.9 cm into tongue and groove.
- Put together the body.
- Connect the bottom of three 81x15 cm boards into tongue and groove. From the bottom side, combine them with scarves.
- Insert the bottom into the body quarters and nail them in place, using 4 nails per board.
- Plane the protruding part to make a cone.
- Nail a board, which will serve as a tap hole separator, on the outside of the end wall and the part of the bottom on which there is a protrusion.
- Attach guide bars to the upper edge of the taphole.
- Insert 2 tap hole liners into the guide bars.
- Attach a support block to the lower edge of the rear beam.
- Attach a guide bar above the block.
- Insert tap-hole liners between the support and guide bars.
- Attach the landing board using loops.
- Make a pitched roof using strapping and a roofing shield.
- Cover the roof with tin, roofing felt, roofing felt or rubber coating.
- Make 3 holes for ventilation in the sidewalls of the harness, measuring 2 cm in diameter.
- Separate the ventilation holes from the inside with grilles, and cover the outside with turntables.
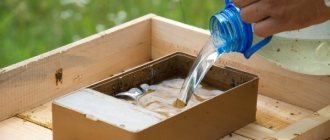
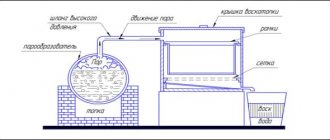
The easiest way to melt wax
Manufacturing
Levitsky's hive was subsequently improved and began to be called Ukrainian. It looks like a body with a roof and a non-removable bottom. The Ukrainian hive is made for the installation of 16-20 frames. If necessary, it can be separated by a diaphragm. The length of the case is 686 mm and the width is 381 mm. Product height 507 mm. The bottom and sides are 28 mm, and the front and rear walls of the structure are 33 mm thick.
When making Ukrainian hives with your own hands, you need to adhere to the dimensions indicated in the drawing and follow the sequence of work.
Ukrainian hive drawing
Housing assembly . The back and front walls of the case are made up of three boards. To connect them to the sidewalls, end quarters are selected. The finished back wall is 40 mm wider than the front wall. During production it is necessary to make a small allowance. It is needed to correct defects.
An vent is made on the bottom right wall, which is closed with a sleeve. A rebate with a depth of 5*16 mm is knocked out on the outer edge of the body. The edge depth for frame hangers is 25 mm with a width of 9 mm.
A taphole is made on the front wall. It should not be located directly in the middle, but slightly to the left (90 mm from the end and 40 from the bottom). It is closed from above with a mesh that folds down. It serves as an arrival board and minelayer. If the structure contains two families, then four entrances are needed.
After trimming the bottom, it is connected to the body and nailed. Four nails are used to secure each board. When the bottom is attached, the protruding parts are given a conical shape, this prevents precipitation from entering the structure.
Ukrainian hive with a store
Roof . In order to make the shield, boards 23 mm thick are used. The top of the roof is covered with roofing iron, the edges of which are curved down. Three holes for ventilation, 20 mm in diameter, are made in the sidewalls of the roof trim. They should be located 50 mm from the bottom edge. The roof is made with a slope back, an elevation towards the front side.
Frames . The hive is designed for 16-20 frames. They are assembled from the top and bottom planks and two side planks. At the top the frame forms hangers, with the help of which it is installed in the hive.
Partition . The separating diaphragm is not permanently present, but is used when it is necessary to separate families. It is made from thin planks, no more than 15 mm thick. During installation, the partition is fixed in the upper part of the structure. Its edges are tightly adjacent to the walls of the hive on the sides, and a space of about 10 mm remains below.
You can make a Ukrainian hive yourself or purchase it. Sometimes it is sold with insulation, which, if desired, can be easily placed on the non-removable bottom and between the walls. For this purpose, shavings, straw and other available materials are used.
Which hive is best for beginner beekeepers?
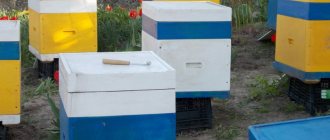
There are three ways to install a bee hive
- Make it yourself according to ready-made drawings for the required number of frames. This process is labor-intensive; it is necessary to measure and cut the boards, and then fasten them using screws, nails, angles and special tools;
- Order a hive-bed in disassembled form and build it directly on the site. The most common and budget option;
- Order a ready-to-use bee house, assembled in a factory by experienced specialists. This is an expensive option, as assembly and transportation are additionally paid.
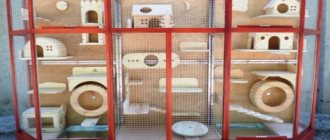
Manufacturing technology
The narrow-tall type of hive consists of the following elements: bottom, roof, nesting frame, removable frames. To make the bees winter more comfortably, it is worth connecting 2 buildings. The main feature of fastening narrow-high frames, which distinguishes this type of hive from many others, is strict perpendicularity with respect to the rectangular section. Each building is equipped with a separate entrance that is closed in the winter to retain heat inside the house.
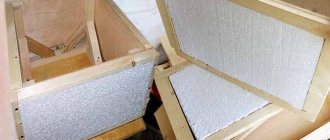
The hive is made from high quality wood: stores and buildings are made of pine beams (3 cm thick), the internal walls of the housing are finished with birch plywood, and the external walls are lined with fiberboard boards (0.4 cm). The total wall thickness of a narrow-tall hive is approximately 3.7 cm. Foam insulation 3 cm thick can be added to the gap between the outer fiberboard upholstery.
Drawing of a narrow hive frame
We make the bottom of the hive of this configuration two-layer: the bottom layer is made of pine boards, and the top layer is made of birch plywood. In order to close the taphole if necessary, a sleeve is attached to the front, on the bottom, onto which a special taphole barrier is nailed. A metal ventilation grille is installed at the back of the bottom, which is necessary for ventilation in the cold season and cooling in the heat.
The narrow, high type of hive requires a flat roof; it consists of a roof, a box, a feeder and insulation. The roof body is made of wooden planks 6 cm high and 2 cm thick. The board shield should be 1.5 cm wide. We attach the feeder to the side, but if it is no longer needed, it can be removed and replaced with insulation. The roofing material is galvanized iron sheets. The roof is attached directly to the body using studs.
Advantages and disadvantages of the Ukrainian hive
Advantages
This design fully satisfies all the biological requirements that bee colonies can put forward for evidence.
The main features of this “house” are that it consists of 22 (plus or minus 2 high frames) high frames, and contains absolutely no removable parts. That is, such hives can be easily moved and transported without worrying that the removable parts are securely reinforced.
This type is very convenient for forming bends in them. Moreover, hives can be formed simultaneously with the settlement of an existing family. To do this, you just need to fence off a place for the family and for new cuttings. In addition to the fencing, it is also advisable to make peculiar grooves in the side partitions. You can insert partitions into them, which will separate the high frames for the layering and for the nucleus (Find out everything about the nucleus). On the Internet you can find a lot of drawings on how to properly make partitions for high frames and drawings on how to make holes.
It is precisely because the hive is very easy to divide into 2 parts (using publicly available drawings) that such hives are very common for use in apiaries where beekeepers are engaged in breeding.
Ukrainian beehive beds are also very convenient for the winter season. After all, in the same way, by dividing their high frames, you can populate the main family of bees and layering.
Everything that relates to working in a hive-bed is just setting up high frames, rearranging them and selecting high frames with foundation and honeycombs. The owner of such hives will not have to deal with the removal and installation of heavy buildings. They simply aren't there. That is why such structures are used in apiaries that are homestead.
Disadvantages of use
There is nothing in nature that has only merits. And Ukrainian evidence-beds are no exception. They also have their drawbacks.
Due to the fact that this structure is non-demountable, it, like any bulky structure, takes up a fairly large amount of space. Not everyone has enough free space in their apiary to install such houses for bees.
The second disadvantage is that they have very small frame space. This greatly complicates the exchange of air “in the house,” which is important in the winter season, when insects go to spend the night.
The location of the nests in such buildings is the biggest drawback. The fact is that they are located here horizontally, and therefore difficulties may arise with expanding the nests.
After all, it has been repeatedly proven that with horizontal nests, bees are much more active than with vertical nests.
However, despite all these disadvantages, more and more professionals in the field of breeding these beneficial insects are choosing bed evidence.
Reviews
As they say, beekeeping is serious business. Analyzing the reviews, it is worth saying that every beekeeper chooses a home for his pets according to his taste. Some people like Ukrainian bee hives, others, of course, find shortcomings. And this is understandable. But for the most part, all users of these hives only talk about the positive qualities of their design. For example, many people like the possibility of placing two bee colonies in them, and also the fact that insects tolerate wintering well in it. Some talk about the inconvenience during migration, since these hives were originally invented for stationary housing of bees. In any case, the popularity of Ukrainian hives is justified and proven by their many years of use.
Rules for keeping bees in Ukrainian hives
In hives with narrow frames, when keeping two families or a family with a nucleus, in the spring it is necessary to provide them with a lot of food - about 8-10 kg per family, and the nests should be well insulated with pillows, mats, and paper.
It is important to take measures to prevent members of one family from ending up in another. To do this, strong families are first released. After they return to the hive, the entrances are closed and members of the weak family are released for the spring flight.
The nest is expanded once. The expansion should be done at the time the queen lays eggs. The procedure is carried out with light brown honeycombs. If there are 7-8 combs of brood, all combs must be moved to the wall located on the opposite side of the entrance. The space that is freed up should be filled with frames with drying material and wax in an amount of at least 5 pieces. To restore the normal position of the nest, honey insects will build honeycombs on the foundation, and they will not have time to swarm. Newly built combs are placed closer to the center of the nest. Old honeycombs are gradually moved closer to the edges.
Advantages and disadvantages of the Farrar hive
To avoid swarming, it is necessary to divide the nest into 2 halves with two or three frames of dry land. Noticing this, the queen will try to reunite the nest by filling the comb with eggs. When the honey yield level exceeds 2 kg, the hive is supplemented with an extension with 10–20 frames. When the nest becomes crowded, the family should be moved to a separate hive.
Advice from experienced beekeepers
To make keeping bees in Ukrainian hives comfortable for both the owner and the insects, you should follow the recommendations of experienced beekeepers:
- Extend the expansion in 2-3 times: with 6-7 frames with brood, deliver 2 frames with honey and 2 with artificial foundation; after filling them, add 4-5 frames, 3 of which with foundation; if necessary, add the required number of frames before honey collection.
- Expanding the nest by dividing it into 2 parts should only be done in a strong family and in the absence of the threat of cold weather.
- Before the main honey collection, it is necessary to regroup the frames by concentrating all the frames with open brood and the queen near the entrance, and the combs with printed brood - in the depths of the nest.
- It is not necessary to equip hives with extensions if the colony begins to swarm and lays queen cells on the combs.
- To save labor during the late honey harvest, it is necessary to form a temporary layer. Formation is started after the family has grown 11-12 frames, 8-9 of which will be occupied by brood.
- To prevent swarming, you need to use various methods: assistant queens, the Chaikin method, loading the bees with work, etc.
So, Ukrainian hives are simple structures for keeping two bee colonies or one colony with a nucleus. They are easy to use for the beekeeper and comfortable for the bees to live in.
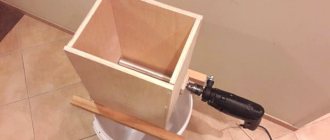
Master Class. How to tension a wire
To ensure that the string in the frame is properly tensioned, follow the step-by-step instructions below.
Table. The nuances of wire tension.
| Steps, photo | Description of actions |
| Securely secure the frame to prevent it from slipping. Where the top hole is, a nail is carefully driven in so that it rises only a few millimeters. |
| A second nail is driven diagonally from the opposite side. Next, a special tape measure is attached to the table - it will bend the side rail. |
| It is worth remembering that at this moment the second side rail will also bend, since the structure was fixed on all sides. |
| The string is fixed to the first nail, then its head is hammered tightly. The string is pulled through the holes. Similar manipulations are carried out with the second nail. Then the clamp is released, the sides are aligned, and the string is stretched even more. To avoid damaging the wood, you can use push pins under the wire. |
Varieties and advantages of other types of hives
Advantages of the beehive over other models
- there is no need to rearrange the overall structure and honey extensions;
- Layings can be made next to the main bee colony;
- ease of use of the frame;
- good development of bees in beds and simple implementation of measures to insulate the hive.
In addition to the classic lounger hive, there are the following varieties:
- Alpine - has a compact design, where the development of the bee colony occurs in the vertical direction. The inner part, with a place for bees, is made in the form of a hollow. There are no partitions, ventilation is carried out naturally, through the entrance;
- Cassette type . Its peculiarity consists of thin partitions that provide bees with a favorable microclimate. The main goal is to create conditions that reduce insect disease, so the walls are coated with wax;
- Ruta - used only in the southern regions from a special design that requires constant rearrangement of stores, which leads to heat loss;
- The Ukrainian lounger is suitable for beginners and is easy to use. Simple design and insulated side walls. Bees produce honey well;
- The Dadanovsky hive is the most popular model among beekeepers. Its design is compact, designed for 12-16 frames; in winter, bees are kept in the nesting section.
What should the framework be?
Despite the seemingly simple procedure, several important factors need to be taken into account when assembling frames. The quality of the product depends on the following points:
- base type;
- number of frames;
- dimensions;
- string tension method;
- form.
Making frames with your own hands
Frames have a classic design and consist of two elements - a base and a wire . The size is influenced by the volume and type of hive. There are ready-made frames on sale, plastic ones are especially popular, but purchasing them all the time is very expensive (compared to homemade analogues).
Important ! The main function of the frame is to limit the construction of cells. Thanks to it, bees direct potential in the required direction, which a person regulates at his own discretion.
As a rule, several slats are installed inside the hive parallel to each other. Slats of different thicknesses are installed at the bottom and top of the structure. To make your own frames, you need dried wood without defects. Moreover, it is better not to use pine and birch blanks - the optimal material for homemade products is soft larch.
Construction frame in beekeeping
Innovative bee frame