In the cage with quails, it is necessary to install feeders that provide free access to food. You can not only purchase them in the store, but also make them yourself, taking into account the number of heads on the farm. To do this, you will need to select a structure of a suitable type, prepare the appropriate materials and tools, and then begin assembling the feeder according to the prepared drawings and step-by-step instructions.
Requirements for drinking bowls for quails
Experienced breeders know that quails are very messy birds.
They knock over containers of water, throw dry food on the floor and throw grain. All this leads to cell contamination and unnecessary waste of money on food. Poor feeding management can lead to deterioration in the health of birds, since for harmonious growth they must eat only fresh food and drink clean water.
That is why you need to choose only high-quality drinkers that are suitable for the age of the bird. When making it yourself, the conditions and requirements that apply to liquid supply systems must be taken into account.
Basic requirements for quail drinkers:
- The size of the drinking bowl should correspond to the age and physique of the birds;
- Water bowls for quails should be made of safe and environmentally friendly material, not emit harmful impurities, and be easy to clean;
- The supply system should be convenient so that birds can easily approach the container and drink as much as they need;
- Changing the fluid should be easy;
- The structure must be made of durable material and securely attached to the wall so that quails cannot turn it over;
- The drinking bowl must be securely closed to protect the liquid from various contaminants and not allow chicks inside;
- Wood and clay are not suitable for making water supply systems;
- Even for a small poultry farm, it is better to install several structures so that all the quail can drink on time;
- It is better to refuse to install combined structures in which liquid and food are located nearby. For quails, it is best to install a separate, convenient container;
- It is most convenient to use removable models. They are easy to remove to wash and dry.
How to assemble a quail feeder?
Quails grow quickly, so it is important for them to provide proper nutrition. Feeders are installed in cages and pens
Choose a model depending on the type of feed. Trough and tray products are well suited for wet mash. For dry mixtures, bunker structures are purchased.
Birds eat 30-50 g of feed per day. In order not to fill the trays with compound feed every day, automatic structures are installed; This is especially true for farms with large livestock.
The grain mixture will be supplied to the birds in portions. Feeders are made of plywood, tin, and plastic. The equipment can be made at home. How to build a bird feeder? What materials should I use?
Choosing the right one
Bird drinkers should always be filled with clean, fresh water. Therefore, for hygiene reasons, they are most often installed outside the cage on the side wall. This is very convenient, as it does not clutter up extra space in the cage. Nipple automatic drinkers can be hung inside the cages.
This type of sippy cup for quails is most convenient for keeping adult birds. In this case, the bird can always drink as much as it wants. In addition, you will not need to monitor its cleanliness.
There are also vacuum drinkers for poultry. They are made of plastic, very comfortable and suitable for raising young animals. Such sippy cups are installed inside the cage. The microcup model consists of small cups with balls inside. They have proven themselves very well when raising quails.
Hopper feeder options
There are various options for this design, which we will consider in more detail below.
From chipboard
This option is considered one of the best, although it can be assembled in an hour using materials that can be found in bins or purchased at a low price.
Here are the necessary tools and materials:
- profile CD-60, used when installing ceilings and walls approximately 20 cm wide (recommended feeder dimensions for adult quails are 2x2.5 cm);
- 2 sheets of chipboard 105x60;
- 4 mm plywood (or any sheet material fiberboard, plastic, laminate) - 2 sheets measuring 20x10.5 and 20x8.5 cm;
- silicone or similar sealant for sealing cracks;
- 10 self-tapping screws measuring 1.6x2.5 cm;
- pliers;
- jigsaw;
- drill.
Having prepared everything you need, you can start making the feeder:
- Cut out 2 paper templates in the form of the number “7” for the CD-60 profile. The size of the bottom is 6 cm, and the side walls are 2.7 cm. Height is 10.5 cm (based on 1/2 the height of the brooder door).
- Attach the templates to a sheet of chipboard and make markings.
- Using a jigsaw, cut out 2 pieces of “sevens” to create side walls. You can see what they look like in the photo below.
- Use pliers to compress the side of the CD profile, which will be turned upside down towards the cage. If this is not done, the quail may be injured in the future.
- On the contrary, straighten the second sidewall.
- Drill holes for self-tapping screws in the profile and ends of the chipboard so that the material does not crack in the future. Next you can tighten the screws. As a rule, one is enough on both sides and below.
From a plastic bottle
This design is simpler than the previous one and its production will take no more than half an hour. This is an excellent option for inexperienced craftsmen who do not have the skills of a carpenter or mechanic.
To make it you need to prepare:
The feeder is made in this order:
- Cut the plastic bottle almost in half.
- In the lower part, use a sharp knife to cut holes in a circle with a radius of 1 cm so that the quail can stick its head into them.
- Turn the top of the bottle over and insert it into the bottom. Pour food into it and place it in the cage with the birds.
How to make a primitive bunker feeder is shown and explained in the video:
Made of metal
In the manufacture of feeders, you should never use toxic materials like copper, but metal is a completely acceptable option. In addition, it is easy and quick to clean and disinfect. Let us consider in detail how to make the necessary equipment from it.
Here's what you need to prepare:
- Metal sheet;
- plumber's scissors;
- sheet bender;
- hammer;
- drill;
- riveter;
- pliers;
- clamps;
- calipers;
- ruler.
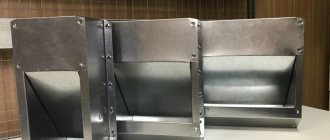
It is necessary to cut 4 blanks from a sheet of metal using ready-made drawings:
- main part – 340x940 mm;
- internal part or dispenser – 200x940 mm;
- 2 side walls in the shape of a rectangular trapezoid with a height of 180 mm and bases of 150 and 100 mm:
The length of the feeder depends on the size of the cage and can vary. The size of 940 mm provides for the economical use of metal, since from a sheet measuring 1250x200 mm you can make 2 such feeders and even 4 pallets without waste, which will certainly be useful on the farm.
So, having cut out all the necessary parts, you can start assembling:
- Bend all edges tightly in one plane by 1 cm so that the quail does not get injured in the future. In order for the bends to be uniform, you must first bend both ends with a hammer, and then secure the part with a clamp and begin processing the entire edge.
- Give all the workpieces the desired configuration using the corner of a sheet bender.
- On the sides, fold the short side 100 mm, and then the rest. Leave small loose tabs at the top of the long side.
- Place the sides over the main part, and bend the tabs inward with pliers to secure the parts.
- Insert the dispenser inside and fasten all the elements with rivets using a drill and a riveter. In order for the dispenser to be firmly fixed and adjusted depending on the size of the feed, 2 metal clamp strips should be inserted inside the feeder. Their optimal width is 15-20 cm.
If you follow these instructions, you can assemble a feeder that can be filled with 7 kg of feed, which will provide the birds with food for 5 days. In order to complete all the work correctly, we recommend that in the following video you can clearly see the entire process of making the feeder - from cutting metal to assembling blanks:
Before you start
All products for feeding quails differ in materials and methods of feeding. The most convenient are feeders installed outside the cage. Their advantages:
- easy to add feed;
- quickly removed and washed;
- install without effort;
- droppings, fluff and feathers do not get into the feed;
- feed consumption is reduced by 1/3;
- the cage is not contaminated with grain waste.
Before you start assembling the feeder yourself, you need to decide on its type, purchase or find the necessary tools and materials on the farm, calculate the dimensions and sketch out a drawing.
Let's consider various options for feeding equipment for quails: the necessary items and assembly steps.
Types of feeders
There are different models of feeders. First of all, they are usually divided according to the method of filling the feed. The following main types are distinguished:
- Bunker feeders. Used to feed adults. It is customary to install the structure not inside the cage, but outside. It is ideal for large farms. Mainly suitable for dry food only;
- Automatic. This is a modern updated model that feeds birds without outside help or human participation. The automatic feeder is equipped with a timer that determines when food should be served. Thanks to a special dispenser, the food is dispensed in portions. The automatic device is very convenient to use, but is quite expensive. The system is used in large farms.
- Grooved. Used to feed quails of different ages. Trough structures are suitable for any type of feed. It is most convenient to attach them to the outside of the cage. When making it, you need to take into account that each quail should have 40 - 50 mm.
- Tray. This model is designed for feeding small chicks up to several weeks old. It consists of a long pipe and can be installed directly into the feed tray. For convenience, tray feeders for chickens have small sides so that the chicks can feed themselves. Only one type of feed can be poured into the tray pipes.
"Dinnerware
We should also talk about “table” devices intended for quails.
- Firstly, the dishes need to be easy for the owner to use; the food trays must be fixed so that they can be easily removed and washed.
- Secondly, the trays are located in such a way that each individual has its own space for eating. It is recommended to provide up to eleven millimeters of space for each bird along the entire length of the tray.
- Thirdly, safety. Feeding devices must be made of safe materials and not cause harm or discomfort to birds.
Gutter feeder made of polycarbonate pipe - each individual has its own place to eat
Types of quail feeders
Depending on the age of the quail, feeding devices will differ in size and design. For the first two weeks, the chicks are fed from trays in the brooder. In the future, grooved designs of “dishes” for quails are used. It is better to place drinking bowls and “dining utensils” on the outside. With open access to the “dishes” inside the cage, the food will quickly be trampled, dirty and scattered. You can make the following types of feeding devices with your own hands:
- tray;
- grooved;
- bunker feeder for quails;
- automatic feeder.
There are two options for acquiring feed equipment: buy or make your own equipment. Typically, metal profiles for drywall work are used for feed.
Materials from which “tableware” for feeding quails is made:
- galvanized profile;
- cutting boards;
- plywood;
- plastic;
- from a plastic bottle.
DIY brooder
You can make a brooder for quails from any available devices - a cardboard box, a plywood parcel box, etc. This is one of the simplest solutions, which, however, will not provide the young chicks with the proper conditions of heat and lighting.
Brooder requirements
- Strength.
- Availability of heating and lighting system.
- Ability to maintain cleanliness and hygiene in the premises.
Quail in a brooder with a feeder and drinker
The most durable and high-quality brooder for quails is made from wooden beams and plywood sheets.
For convenience, the bottom of this design is made of removable mesh. IR lamps will provide the necessary lighting. To regulate the heat as the chicks grow, you will need a thermostat. Any sheet of metal or plastic that can be easily cleaned can be used as a litter dispenser.
Types of structures
From a plastic bottle
Purchased or homemade drinking bowls may have different designs. The simplest and cheapest option is from a plastic bottle.
A longitudinal slot is made in a container with a screwed-on lid, after which the structure is installed on a support or hung on the cage wall using wire.
The undoubted advantage of this option is the lack of costs. The disadvantages of this device are quite significant:
- the bottle gets dirty quickly;
- you have to constantly monitor water quality due to the lack of protection from debris.
Nipple drinkers
Nipple drinkers can be purchased or made yourself. They are a plastic or stainless steel pipe located parallel to the floor of the room or cage.
The installation height depends on the purpose - for adult birds, automatic drinkers are placed higher, for chicks - lower. This type of device is also called drip drinkers.
Birds quickly learn to press the moving part of the nipple, which, under such pressure, moves, allowing water to pass through.
Drip drinkers can be with or without a drip eliminator (a container into which water flows from the nipple).
The advantages of the design are:
- the ability to constantly provide birds with clean and fresh water;
- maintaining cleanliness at the place where quails are kept;
- durability;
- possibility of supplying dissolved vitamins.
When making such a design with your own hands, you should be guided by the following provisions:
- The drinker can be connected to a drinking water pipeline or to a reservoir, and also have a bypass to allow you to choose the method of liquid supply.
- The higher the reservoir is located relative to the drinker, the higher the pressure in the pipeline, the drinker works better
- The drinking bowl pipe from the opposite end connected to the water supply is closed with a plug.
- To install nipples, threaded holes are drilled in a plastic or metal pipe in increments of 25-30 cm.
- To prevent leakage, the nipple installation sites can be protected with Teflon tape.
There are no special requirements or tricks regarding how to make such a device; you just need to remember that the holes for the nipples must be carefully processed and not have sharp edges.
For chicks under 20 days of age, it is recommended to use special soft nipples. For older young and adult birds, hard nipples are installed.
Such automatic drinkers with a 360° operating angle are especially convenient; with them, birds receive water by pressing the nipple on either side.
Drip drinkers can be mounted on the outside or inside of the cage, as well as on the wall or special supports when birds are kept on the floor.
It is believed that nipple drinkers are unprofitable with a small number of quails.
If you nevertheless decide to buy such a drinker, a ready-made 2-nipple system will cost you about 500 rubles, and a system for 20 drinkers will cost you about 6,500 rubles.
Vacuum models
There is no point in making vacuum drinkers yourself; you can buy them for 200-300 rubles. At the same time, they last a long time, do not break, and one product is enough to feed 10-20 individuals.
Technically, this design is a container (usually 10 liters) onto which the drinker itself is placed - a semi-permeable lid with a circular protruding groove. The structure, assembled and filled with water, turns over and liquid flows into the drinking trough.
This type of drinker is optimal for keeping quails on the floor.
Cup designs
Cup drinkers are another fairly simple design that provides timely water supply and protects liquid from dirt. Due to the small size of the containers, such products are called micro-cup drinkers.
They are a small cup containing a floating tongue. The latter is connected by a rod to a ball that closes the water supply from a thin hose.
If there is water in the container, the tongue floats and no water flows. When the liquid runs out, the tongue drops to the bottom and opens the liquid supply through the rod.
It is possible to make such structures with your own hands, but quite difficult. This type of device is suitable for both floor and cage keeping of birds.
The cost of one microcup drinker is about 50 rubles. per piece
In each specific case, the choice of the type of drinking bowl is made taking into account a combination of factors, including the type of bird housing (cage or floor), the total number of quails and their age.
Proper selection reduces labor costs when caring for poultry, and also reduces the risk of various diseases.
Types of feeders
To properly raise poultry, it is important to create optimal living conditions: keep the cage clean, provide a complete diet of food and a sufficient amount of clean water. Quails are one of those birds that leave a mess in their cage after eating.
Dirt in a bird's home, in turn, negatively affects the growth and development of pets. To cope with this situation, you need to use special bird feeders. There are several options for feeders that can be selected taking into account the type of birds, the volume of their food and water consumption.
- Tray. It is optimal to use for chicks when they reach the age of two weeks. The cage contains a tray with food, to which there is easy access. Thanks to the small sides, the chicks can easily get to food. Only one type of food is poured into such a container.
- Grooved. The most universal option, as it is suitable for birds of different ages and species. You can pour a variety of food into this feeder at the same time. Their type of fastening is external, which allows minimizing the scattering of food throughout the cage. It is necessary to correctly calculate the amount of food for each individual so that the birds do not go hungry and do not overeat.
- Bunker room. Used primarily for adult birds. Usually it is mounted outside, but if desired, it can be installed inside the cage. Designed for dry food.
- Automatic bunker. It is a more modern version of the bunker type: food is served automatically, without human presence. Using a timer, you can set the time frame for when food will be supplied to the feeder. A dispenser is also installed, which allows you to limit the amount of food entering the feeder. The cost of this option is high, so only large farms can afford it.
In addition to the fact that quail feeders can have a varied structure and appearance, be automatic or made by hand, they must also comply with certain norms and standards.
The standards were derived based on many years of experience in breeding birds, and non-compliance with them, as a rule, entails negative consequences for novice poultry farmers.
Basic feeding rules
Although the quail is a relative of the chicken, its digestive system is much more sensitive, and therefore small birds have special requirements for a properly balanced diet. The basic rules that must be followed when preparing a quail diet are as follows:
- Feed consumption rates per adult bird range from 25 to 30 grams (normal monthly consumption approximately corresponds to one kilogram). Excess food has a detrimental effect on the health of quails, primarily affecting the bird's liver.
- Feeders and drinkers must be thoroughly washed at least once a day.
- Regardless of what type of structure is used, wet food cannot be placed in containers for dry food and vice versa.
- It is very important to ensure that quails always have fresh, purified water at room temperature available (in the cold season, it is advisable to heat the water to warmer water).
- Quail food must be fresh and of very high quality.
- Wet types of food (mash, vegetables, fruits, etc.) can be left in the feeders for no longer than two hours, after which they must be mercilessly destroyed, otherwise the quail may develop serious intestinal disorders.
- Experts recommend mixing cereals with wet food, since too viscous food is very poorly absorbed by the gastrointestinal tract of quails.
- Controlling the color and consistency of droppings is a necessary requirement for proper care of quails. The feces of healthy quails have a dense structure, the main color is dark, with the presence of light inclusions. Liquid green stools indicate the presence of an inflammatory process, and yellow and watery stools most likely indicate that the birds are receiving too much carbohydrate food.
- At the first sign of diarrhea, the bird should stop feeding, making sure that it drinks as much liquid as possible. It is recommended to add disinfectants to drinking bowls: a weak solution of magnesium permanganate, a decoction of chamomile or wormwood, etc. The expressed liquid after boiling short-grain rice or oatmeal has binding properties.
- If you want to use feed for feeding quails, it is recommended to give preference to products intended for laying hens or (which is a little worse) for broiler chickens.
- Preparing a diet for quails based on natural ingredients is welcome, but it is very important that such a diet is properly balanced.
Did you know? The Japanese use a very unusual technology for feeding quails. In the Land of the Rising Sun, these birds receive only two components of nutrition, and in equal shares. One of them is rice, the second is fishmeal. Surprisingly, such a diet, as practice shows, fully provides birds with everything they need - energy, minerals and vitamins. In our latitudes, an adapted version of a simplified diet is sometimes used, which has also shown its effectiveness: quails should be given corn, soybeans and alfalfa flour in equal proportions.
The quail diet must include:
- grain crops (oats, millet, barley, corn, cut rice);
- legumes (peas, lentils, soybeans);
- fresh greens (clover, alfalfa, salads, sprouted grains in winter);
- vegetables and mash (carrots, beets, potatoes, cabbage, etc.);
- fats in the form of sunflower seeds or meal;
- proteins - at least 20% of the total diet (boiled chopped eggs or egg powder, cottage cheese or milk powder, boiled meat or fish, meat and bone meal, maggots, worms, slugs, snails and other “living creatures” that you can get yourself or purchase at a pet store);
- calcium and other minerals (chalk, crushed eggshells, small shells or gravel);
- vitamin supplements (in particular, fish oil).
Crushed crackers can be added to the quail diet as a carbohydrate component; in small quantities, both white and black bread can be used to prepare them.
Raising quails is a troublesome but profitable business. The success of the enterprise largely depends on the extent to which the farmer was able to think through in advance and implement all the conditions necessary for the health and normal development of the poultry. Important! The digestive system of quails reacts extremely negatively to green shoots of nightshade crops (potatoes, tomatoes, eggplants, peppers), plants of the buttercup family (wrestler, anemone, columbine, marigold, etc.). Buckwheat and rye should not be included in the quail diet.
The choice of feeders plays an important role here: there are many modifications of such devices, but the most optimal ones have long been identified. If you have some skills and ingenuity, you can build an excellent feeder with your own hands, this will significantly reduce the cost of starting an entire business project.
Types of drinking bowls
Depending on whether the devices are used in large poultry factories or small farms, different fluid supply models have been developed. They differ in volume, material from which they are made, and also in the method of placement.
First of all, when choosing a design, you should give preference only to models that are safe for birds.
The most popular and convenient liquid supply systems for quails:
- Vacuum. The operating principle is based on a unique method of liquid supply. Water enters the drinking bowl using pressure exerted by the atmosphere of the internal and external spheres. The vacuum design is made specifically for large poultry farms, so it is not suitable for individual use. The vacuum system is indispensable in cases where individuals are kept on the floor and it is impossible to track the amount of liquid consumed;
- Open. This is the simplest model, so it is easy to install yourself. An open container is a small container from which a bird can drink water at any time. The main advantage of the container is its simplicity and low cost. Among the disadvantages are unsafety, since chicks can drown in a crush, as well as rapid contamination. Food, excrement and other small debris get into drinking water, which can have a negative impact on the health of adult individuals. Also, due to its light weight, the container is easy to tip over;
- Cupped. The amount of liquid is distributed depending on the weight of the bowl. It consists of a rod tongue, which controls the entire fluid flow. As soon as the bird touches it, water begins to flow. There is also a micro-cup drinker for quails. It is designed specifically for young animals;
- Nipple drinkers for quails. In another way they are called drip. The method of operation of drinking bowls is based on the principle of a washstand. Water appears only if pressure is applied to the valve. This liquid supply is the best option for small farms;
- Plastic bunker drinkers. You can make them yourself. A quail drinker made from a plastic bottle is easy to use, the most important thing is to choose a plastic container of the appropriate size;
- Grooved. The liquid supply system is designed for adult birds; it can be buried in the ground or mounted on a wall. The design of drinking bowls is intended only for rooms with bedding, which is changed periodically. Otherwise, the tanks will often get dirty.
Types of drinking bowls for quails
There are several of them.
Capacitive
Used for quail aged from 1 to 2-3 days. They are a saucer or container with low sides and a flat bottom into which warm water with additives is poured. Sometimes a Petri dish is used as such a drinking bowl. The layer of water should not exceed 3-4 mm, so that the quails do not drink it and drown. Due to rapid contamination, the water must be changed every 3 hours by adding 1-2 drops of a pink solution of potassium permanganate.
On the first day, sugar is added to the water to relieve stress - 1 teaspoon per liter of water. Subsequently, you can dissolve 2 grams of ascorbic acid powder per liter of water, which will help the chicks to cheer up.
The container is installed at the border of the spot from the infrared lamp so that the water does not cool or heat up too much.
Pros:
- natural presence of water underfoot, allowing quails to quickly learn to drink;
- a small volume of water that does not allow the chicks to drown;
- the optimal temperature for drinking when the drinking bowl is partially under an infrared lamp.
Minuses:
- rapid contamination of the container;
- the need for frequent water changes;
- quail get wet and die from hypothermia.
Vacuum
Used for young animals aged from 3 to 30 days. Traditionally, purchased drinking bowls with a plastic container of 1-2 liters are used, installed in an inverted position on a base with an annular groove of a semicircular cross-section, the radius of which should not exceed 5 mm. Water from the container is supplied to the annular groove through the radial channel when it is aired.
To start the drinker you need:
- fill the container with warm water;
- cover the container with the base turned upside down, aligning the ridges on the rim of the container with the grooves in the base;
- turn the base clockwise so that the tides fit into the slots of the grooves;
- turn the drinker over;
- place it in the brooder so that it is illuminated by an infrared lamp.
Despite the small cross-section of the annular groove for water, quails can choke and drown. To prevent this, a ring cut from a suitable round plastic container is inserted into the groove. The ring should block the channel so that the quails can put only part of their beak into the water.
Pros:
- quail will quickly get used to the drinking bowl;
- free access to the drinking bowl;
- availability of sufficient water supply;
- no water pollution.
Minuses:
the need to modify the drinker to reduce the cross-section of the groove.
Nipple
Nipple drinkers with drip eliminators are considered the basis for an automatic watering system in cages or cage batteries. They are hung outside or inside the cage at the back or side wall. Used to provide water to adult quails over 4 weeks of age.
For quails, due to their low weight, purchased double nipple drinkers with drip eliminators are suitable, connected using sections of polypropylene pipes into a single line, the length of which should not exceed the width of the cage. On one side, a plug is installed on the line, on the other, a plastic sleeve with a fitting for connecting the hose. Water is supplied to the main line through a hose from a plastic canister installed above the nipple drinkers.
Pros:
- simplicity of design and availability of nipples;
- the possibility of building an automatic watering system with your own hands;
- quick replacement of nipples when they fail.
Minuses:
- leakage of nipples when the integrity of the rod seal is damaged (manufacturer’s defect);
- the need to flush the nipples due to clogging of the channels with mucus.
Grooved
These drinkers are included with standard cell batteries of the KBE-1P type. They are hung outside the back walls of the cages so that the quail can drink by sticking their heads into the mesh cells measuring 25 x 50 mm.
Trough drinkers can be made:
- from a plastic pipe with a diameter of 25 mm, cut in half lengthwise;
- made of stainless steel sheet 1 mm thick, rectangular (25 x 25 mm) or triangular (sides 25 and 50 mm) with curved edges along the drinking front.
The water level in trough drinkers is set by adjusting the float mechanism or due to the lifting height of the vacuum mechanism fitting.
Pros:
- durability;
- the ability to adjust the water level depending on the age of the bird;
- easy access to the grooves for disinfection.
Minuses:
- the possibility of contamination of the grooves on the lower tiers of the cell battery with particles of droppings;
- rapid cooling of water in metal grooves.
Making a quail cage with your own hands Read
What breed of quail lays blue eggs Read more
Quails have stopped laying eggs Watch
Two ways to breed quails at home Next
How to make nipple drinkers?
Similar designs are also automated, but they have a more complex structure, although they are popular for both adults and young chickens. Before assembling such a mechanism, it is worth assessing its strengths and weaknesses.
Characteristics
The advantages of such drinkers are as follows:
- Saving water. This is achieved thanks to its dosed supply, so each bird receives the required amount of water. So, compared to other types of drinkers, the nipple design allows you to consume less water by about 20-30 times. At the same time, its consumption can be further reduced by equipping the system with a drop eliminator.
- Protecting water from pollution. The drinker is of a closed type, so the water is not contaminated with dust, droppings, etc.
- Easy to use. Maintenance of the nipple system consists only of periodically adding clean water to the tank.
- Stability of the structure. Often, such a drinking bowl is attached to the cage lattice, so you don’t have to worry about the chickens knocking it over or it turning over on its own due to strong winds.
The disadvantage of the nipple system is that a limited number of chickens can drink water at the same time. In the summer season, this can lead to crowding near the drinking bowl, especially after feeding. Of course, such a drawback can be eliminated if you correctly calculate the needs of chickens and the optimal number of nipples in advance.
From plastic pipes
You can assemble a complete nipple drinker for chickens according to the following instructions:
- Take a small piece of plastic pipe with a diameter of 2-3 cm. You need to measure 60 cm using a tape measure, and mark every 10 cm with a simple marker. It is in these places that the nipples will be installed.
- Cut off the excess section of the pipe using a metal file or a special pipe cutter (scissors for cutting pipes). The cut may be uneven. In this case, it must be leveled by removing excess areas using a sharp knife.
- Prepare holes in the marked areas of the pipe using a drill. You need to work carefully so as not to drill through the plastic. After drilling, it is worth blowing out the pipe to eliminate plastic shavings.
- Screw the nipples into the prepared holes. It's better to do it with your hands first, and then you can use a wrench. The drinking bowl does not require strong pressure, so there is no need for seals.
- Place a plug at one end of the pipe, and at the other end a special wick, which you need to buy in the store. To securely fasten the elements, you can use a special soldering iron for plastic pipes.
- Check the drinking bowl for functionality. To do this, you need to blow strongly into the wick. If everything works properly, you need to install special latches and attach the drinker to a suitable place.
From the bucket
It could be an old bucket or tank, but it must be solid. It can be converted into a drinking bowl in two steps:
- Cut 5-6 holes in the bottom of the container. Their optimal diameter is 9 mm.
- Screw the nipples into the holes. The design of such a part is designed in such a way that water flows only when it moves, which saves water.
Such a bucket should be hung in the chicken coop and filled with water, which several chickens can drink at the same time. You can increase the convenience of this design by using aluminum wire or strong rope, making a drinker handle from it.
It is worth considering that the dimensions of the drinker may vary depending on the temperature in the chicken coop or what feed is used. For example, if the temperature in the room does not fall below 18 degrees, then the volume of the drinking bowl should not be more than 300 ml. From this calculation, you can determine the optimal size of the drinking bowl for your chicken coop.
From a bottle
Use a plastic bottle or 5-liter bottle. The instructions for making a drinking bowl are as follows:
- Drill a hole with a diameter of 9 mm in the lid.
- Screw the nipple into the hole.
- Close the bottle with a lid and cut off its bottom.
- Drill two symmetrical small holes at the edges of the container. Take a strong rope, stretch the ends of which through the holes and secure with a reliable knot. Thus, you will be able to get a convenient handle for the drinker, with which you can hang it in a chicken coop or pen, and then fill it with water.
How to install the nipple into the lid, see the video below:
Quail tray
The tray is a long box with low walls. Manufacturers offer plastic products with a lid. The lid contains holes of a certain diameter. For quails, designs with holes of 1-3 cm are chosen. For chickens and other poultry, the diameter is larger, 5-7 cm.
The lid prevents the quail from scattering the grain mixture; feed will be used rationally. Trays are installed in pens and cages. When keeping birds in cages, the equipment is taken outside the wall.
The length of the quail feeder depends on the size of the cage or the number of birds in the flock. If the length of the cage is 150 cm, then the tray can be made the same size.
Products 50 cm long are installed in the pens. There may be several of them. The depth of the tray is 3-5 cm, width 7 cm, but it is made larger to increase the feeding front.
A metal profile measuring 100*50 mm can be used as a tray. Select a profile of the appropriate length. Brackets or hinges are installed on it, and the cages are strengthened at the bottom.
All edges are rounded with pliers. There is no need to make a lid. The tray can be made from wooden boards. They must first be sanded. Workpieces are made according to dimensions:
- side walls 5*7 cm;
- front and back walls 7*50 cm;
- the bottom is made of 7*50 cm board;
- a carrying handle can be provided for the tray;
- for the stability of the structure, legs are adjusted;
- To prevent birds from climbing into the tray, thick wire is reinforced along the top every 3-5 cm.
More on the topic: What kind of mesh is used for quails?
Tray feeders are used for both wet and dry food. For mash, it is better to use products made of metal profiles or plastic. They are easier to wash. It is difficult to clean wood from wet food.
Galvanized sheet groove structure
The product is made from galvanized sheet metal of small thickness. The length is determined by measuring the front side of the cage. The width of the workpiece is 20.5 cm. Along the long side, carry out:
- 2 lines with an indent of 1 cm - on one side (No. 1 and No. 2);
- 2 lines with an indent of 1 cm - on the other side (No. 3 and No. 4);
- departing from mark No. 2 5.5 cm (No. 5);
- stepping back from mark No. 5 another 5 cm (No. 6).
Using a sheet bending machine, the following are sequentially bent:
- No. 1 and No. 2 – 2 lines at right angles, forming a U-shaped edge;
- No. 5 – at right angles;
- No. 6 – at an acute angle;
- No. 3 and No. 4 – 2 lines at right angles, forming a U-shaped edge.
Video with a detailed description of the process
You can complicate the design a little. In this case, the outer side will consist of 2 segments curved at an angle. The size layout will also change:
- a U-shaped edge is formed;
- 5 cm is measured, the sheet is bent at a right angle;
- another 5 cm is measured and a bend is made at an angle of 140 degrees (bending direction is outward);
- 3 cm is measured and an angle of 110 degrees is created (inward bend).
The finished structure is applied to the metal sheet with its side and the outline is outlined. Allowances of 1.5 cm are added along the edges. A straight line without allowance is drawn along the upper edge (an allowance of 2.5 cm is provided along the lower edge). The areas allocated for allowance are bent at right angles. There are 2 holes for fastening on three sides. The finished side part is placed on the edge of the product and through holes are drilled in the metal. The parts are connected using rivets.
The sides can be made from a sheet of plywood - it is not necessary to use metal.
Requirements for feeders
To effectively keep quails, you need to take care not only of lighting, temperature, food, but also of equipment.
A good feeder meets the following requirements:
- Safe for poultry health. Feeding equipment must not emit toxic substances when used. They should be easy to clean, strong and durable. It is best if the feeders are made of plastic, ceramics, wood, stainless steel, galvanized sheet. Copper is not suitable here.
- Correspond to the dimensions of the cage, the number of quails and the volume of food. It is optimal when the box is filled to 2/3 of the total volume, otherwise the food will be outside, on the floor.
- Have sufficient side height. If they are very low, then the food will get inside the cage and mix with the droppings.
- Stable during operation. The bird should not be injured while eating feed; regardless of the type, the structure must be well installed.
- The design must be reliable and easy to maintain. To attach the feeder, you should use hooks instead of screws; they make it possible to easily remove the equipment for cleaning.
Important! Total number of quails per 1 sq. m cage is 15 quails, the calculation for normal feeding is 5-9 cm per head. When using an external feeder, there must be a minimum of 1.1 cm along the length of the tray per bird.
When using an external feeder, there must be a minimum of 1.1cm of tray length per bird.
A simple tray feeder made of plastic pipe
A sewer plastic pipe of the required length is closed on both sides with plugs. Wooden blocks equal in length to the diameter of the pipe are fixed on them. They will take on the role of legs. A longitudinal hole is marked and cut out in the upper part. The edges of the cut are processed. If the goal is to delimit feeding areas, then cut out a series of identical round holes instead of one oblong one.
Making automatic feeders
At its core, an auto feeder is a device with dosed feed supply. An automatic feeder is used most effectively on large farms.
The cost of purchasing feed in poultry farming takes up a significant share of costs. Automation of feeding will reduce feed consumption by up to 20%. This is a significant reduction in the cost of producing eggs and quail meat.
Such automatic feed supply devices are manufactured in the factory. It is also possible to make such devices yourself. This will require electrical and mechanical skills.
The bunker tank can be additionally equipped with an automatic feed supply device. You will need a time relay (timer), an electric drive, a dispenser, and wires. In this case, feeding is done three times a day. The timer goes off and food comes into the tray. Then the feeder “closes”. The mechanism for opening and closing the curtains can be electrically driven. The poultry farmer saves time and feed. The benefits are obvious.
What are the requirements and sizes for quail feeders?
A high-quality and reliable feeder must meet the following requirements:
- contain the amount of feed required by the birds with a small reserve,
- made of safe environmentally friendly material,
- easy to disinfect, wash,
- have a convenient approach for both birds and farmers,
- protect the feed from contamination, such as feathers or droppings (a special protective device is used for this).
When choosing a design, it is important to consider the following factors:
- material of manufacture: stainless steel, plastic are optimal (safe, easy to clean, non-toxic),
- size – when choosing a feeder model, it is necessary to calculate the required amount of feed, and also take into account the size of the cage,
- reliability of the design - the sides should not be too low, otherwise the feed will spill out; the feeder itself must be stable and durable.
Step-by-step instructions for making a bunker feeder
Any bunker-type feeder is a container with a tray. The structure is turned over, and the food begins to pour into the tray itself as the birds eat it. Human participation in the process is not required.
Hopper feeder made from a plastic bottle
Let's consider two ways:
Option 1
For a simple and convenient quail feeder, you only need two plastic bottles.
- From the first you need to cut off two thirds and cut out a rectangle.
- Then you need to cut a hole in the bottom of the second bottle; food will flow through it in the future.
- The second bottle is placed in the first so that its neck does not reach the bottom of the first bottle. At this point the feeder can be considered ready.
VIDEO INSTRUCTION
Option 2
To create a feeder you need:
- two chipboards 105x50 mm,
- CD60 profile, matching in size to the width of the future feeder,
- plywood 200x85 mm and 200x105 mm,
- 10 screws,
- sealant.
Tools:
- knife,
- jigsaw,
- drill,
- pliers
- screwdriver.
VIDEO DESCRIPTION
Operating procedure:
- Cut out a paper template for the CD60 profile in the form of the number 7. The bottom should be 60 mm in size, the side walls 27 mm. The height is 105 mm (this is half the height of the burger door).
- Using a paper sample, cut out two products from chipboard and cut them out with a jigsaw.
- Crimp the side of the profile with pliers to make the edge non-sharp. The other side needs to be straightened.
- Drill holes for self-tapping screws to avoid cracks in the chipboard, secure the end and profile with self-tapping screws.
- Take measurements of the structure, divide the width and height in half. This data is necessary to create the walls. They can be made from plywood or other material.
- Assemble the parts, file down any uneven parts with a knife, and seal all cracks with sealant.
- Secure the structure with a self-tapping screw to the side strip of the brooder door.
- If the cage is made of galvanized mesh, the feeder can be secured with copper wire hooks.