Next you will learn:
- How to make a simple and effective mole trap from plastic bottles with your own hands, as well as the principle of operation of the design;
- How to properly install such a trap on the site in order to reliably catch the pest;
- How can you easily increase the effectiveness of a homemade mole catcher from a plastic bottle by about 2 times;
- Additional ways to catch a mole alive;
- What to do with a mole after it is caught and where it is better to release it so that it definitely does not return back to your site;
- And what other anti-mole products can you make yourself from ordinary plastic bottles...
Even if you have already been thoroughly tortured by moles “running amok” on your property, then do not rush to poison them with poisons or set traps on them - this is simply not humane. You can fight animals very effectively with the help of special traps - it’s not difficult to make such a mole trap with your own hands from plastic bottles, and given the availability and low cost of materials for it, you can make and install several traps on the site at once, which will significantly increase the chances of catching all the pests.
A mole trap made from a plastic bottle allows you to catch animals alive, and then take them out and release them at such a distance from the site that they can no longer return. This approach is considered the most civilized and humane, because after all, a normal person without sadistic tendencies will be much calmer in preserving the life of an animal that simply by chance ended up on his property, instead of necessarily killing a mole with poison, a trap or a shovel, as is sometimes done people who are not burdened by love for animals.
It should be borne in mind that mole traps made from plastic bottles are effectively complemented by other types of traps that work on different principles. For example, a mole can be caught in a simple plastic bottle placed on its side in its passage, or you can do this with the help of a wide jar, bucket or pan buried under the passage. The best option is to use such traps together (we'll talk about this a little later).
But first, let's take a closer look at how to make a reliable mole trap from a standard plastic bottle, obtaining a truly effective catching tool. In addition, we will see how to properly install such traps on the site so that they work well.
Mole trap made from a plastic bottle
So, the first type of trap is a kind of analogue of the commercially available pipe mole trap, but the “locking” element in it works on a slightly different principle.
The photo below shows a mole trap-pipe for comparison:
The mole easily climbs into such a trap, but cannot get out of it. It is implemented as follows:
- Take a plastic bottle with a capacity of 1.5 liters - it will be the basis of the design. It is not worth taking smaller or larger bottles, because a liter bottle is too narrow, and it is difficult for the animal to climb into it, and a two-liter bottle, on the contrary, is too wide, and often does not fit into the animal’s path ;
- Either the bottom or the neck of the bottle is cut off - it doesn’t matter. The main thing is to make a free entrance on one side, and on the other there should be a dead end;
- Then take a second bottle of the same size, which, in fact, will clog the mole. The dense part of the neck is cut off (on which the cap is screwed), but a “funnel” is left, and the bottom is also cut off (you can even cut off the bottom half of the bottle);
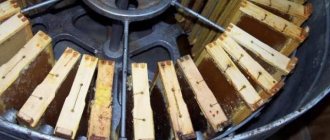
- In the second bottle, 10-12 longitudinal cuts are made on the tapering part until it becomes a flat part. The result is a kind of long “petals”;
- After this, the second plastic bottle is inserted with its narrowed part into the open passage of the first, and the junction of the two bottles is secured with tape.
That's all, the mole trap is ready. If you place it in a mole passage, the animal will make its way into it along the second (entrance) bottle: under its pressure, the petals will easily bend and do not prevent it from crawling along the joint line, thereby ensuring unhindered access to the main bottle.
After the animal passes, the petals close again. Here he reaches a dead end, turns around, tries to move back, but runs into narrowed petals that he can no longer move apart. The mole is caught.
This mole trap made from plastic bottles is easy to make with your own hands in about 10-15 minutes.
On a note
The locking principle described above is called “against the grain.” While the petals “stroke” the animal, it calmly moves forward “along the fur.” But the animal can no longer get back out, because it moves “against the grain” of the valve - the petals rest against its face and do not move apart at all.
Not everyone takes into account that this mole trap can be easily improved, increasing its efficiency by approximately 2 times, if both the bottom and the top of the main bottle are cut off, and then “valves” are installed on both sides, allowing the animal to only pass inside. In this case, you won’t have to guess from which side the mole will approach the mole trap in its underground passage. Moreover, as practice shows, if there are several animals on the site, a “double” trap can catch two moles at once.
The video at the end of the article shows the process of making a mole trap with your own hands. However, it is important not only to make the mole trap correctly, but also to install it correctly on the site, since the final result of its work also largely depends on this.
Working mechanisms
If the mole population exceeds 5-10 individuals, then you cannot do without traps. They work flawlessly. You can make the structures yourself, but it is preferable to purchase spring triggers in specialized stores. Thus, you will not get hurt during the manufacturing process, the design will be durable, and in case of breakdown or failure to perform functions, you can always order repairs using a warranty card.
Trap for an underground animal
A mole trap is a ready-made device, upon contact with which the animal is killed by suffocation or fracture of the cervical vertebrae. The basis for traps is a wire base.
You can free territories from moles using scissor traps, plunger mechanisms, all kinds of nooses, and crossbows.
Catch with a scissor trap
By choosing a trap presented in a design similar to scissors, you will certainly know that it has worked. This type of mole trap is quite well known among gardeners due to its advantages:
- It's easy to install. You need to insert the handles into the soil and cock the mechanism.
- You can see that the trap has worked even from afar.
- Sensitivity is adjustable.
Disadvantages of the pest control method:
- The small size is sometimes not enough to place the device in a tunnel at depth.
- If you don't adjust the sensitivity, it triggers on leaves, stones, and nuts.
- In cold weather, frozen handles do not function.
Since the main harvest time is the summer-autumn season, and fresh passages are located near the surface, the disadvantages will not play a decisive role during the purchase.
Skat-1 system against the blind beast
Plunger designs
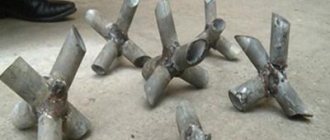
In terms of efficiency, plunger designs are not inferior to scissor traps. There are two main types: “Scat-1”, “Scat-2”. A mole trap, regardless of type, is designed to kill underground inhabitants.
The operating principle of Skat-1 is similar to the operation of a crossbow. To start work, you need to stick the legs into the soil on the sides of the mole's hole, cock the spring, which inserts the guard into the hole.
Hitting the guard, a spring is activated, which releases three spokes into the mole, killing the animal.
How does Skat-2 work? Catching occurs similarly to the first plunger design, only, having touched the guard, the staples clamp the pest, breaking the backbone or limbs.
This method of fighting is considered professional, although live traps will bring more results, since after the plunger mechanism is triggered, you need to re-tension the spring, but a large pipe can accommodate 2-3 adult individuals at once.
Will a loop trap work?
A suffocating trap for a mole is made of wire. This loop is easy to make yourself. If you don’t have enough time, then similar mechanisms can be found in agricultural stores; the price relative to other traps is not so high.
Like any type of trap, a wire loop is laid in the move. Crawling through a round hole, the mechanism is triggered, and the mole is squeezed by a deadly noose.
The device is designed for reusable use, so that by purchasing several traps, you will be able to clear the land of moles that prefer to settle in families.
Harpoon fishing
Another type will be various crossbows. This rather labor-intensive process of catching moles can harm even humans. How does a mole trap work?
Harpoon for catching underground animals
- A pipe filled with gunpowder and shot, sealed on one side, is used.
- Nichrome wire is connected to the gunpowder.
- In the same way, connect the motion sensor at a distance of 20-30 cm from the crossbow.
- As the sensor passes by, the wire heats up and the device kills the animal.
An absolutely inhumane method of fighting is not only labor-intensive, but in most cases it is useless, because if the mechanism does not work, the animal will be injured and will die for a long time and painfully.
A mole is not a fish
Particularly “sophisticated” hunting enthusiasts recommend catching moles with a hook. Such an action is inherently useless, since the animal is injured and ultimately dies. How do you catch moles with hooks?
How to catch a mole with such a trap?
A mole trap made of plastic bottles should be installed inside the mole passage, located between fresh earth emissions. Such passages are sometimes (but not always) clearly visible on the surface of the site, since their arch is slightly raised by the animal when moving, as a result of which a long earthen ridge is formed above the passage.
It is also useful to read: Ecosniper mole repellers and reviews of their use
It is this roller that needs to be carefully excavated (the passage itself is located at a depth of about 10-15 cm). Then the passage needs to be slightly cleared of the ground and slightly deepened in the place where the trap will be installed.
It is better to dig out the mole's underground passage with a garden trowel. It is not advisable to use a shovel, since it severely damages the passage itself, and the mole may not “want” to move along it and climb into the trap in the future.
Important:
You should not install a mole trap made from a plastic bottle at the entrance to a tunnel or in a pile of soil spilled out by a mole. The animal may no longer use such a molehill, but the underground passage itself will be inspected regularly. Therefore, the mole trap is placed precisely in the passage between the animal’s exits to the surface.
Before installation, it is advisable to pour a little soil into the mole trap so that the animal does not notice the sudden transition of normal soil into slippery plastic.
It can also be useful to put several earthworms in the main bottle - the mole smells them well and can ignore suspicion when touching the plastic if it smells food.
The trap itself is placed in motion, its valve is directed in the direction from which the animal is supposed to approach it. If the trap is double-sided, then its orientation does not matter.
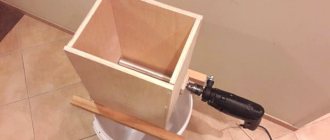
The top of the mole trap should be sprinkled with earth (but so as not to cover the entrances to it!) and covered with a wooden shield or a very thick opaque cloth. The main task in this case is to eliminate the light in the trap so that it is as dark in it as in the rest of the passage (although it is believed that moles are blind, this is not entirely true - they are able to distinguish between light and darkness, and also see outlines items).
After this, the trap should be checked two to three times a day. Most often, a mole is caught at night or in the evening.
On a note
Keep in mind that due to the accelerated metabolism, the mole cannot fast for a long time. It may not survive even 24 hours in a mole trap, and therefore the trap should be checked at least twice a day, and immediately after finding the animal, take it out of the area as quickly as possible and release it into the wild.
Of course, the more traps are installed on the site, the faster it will be possible to catch all the moles (often only one mole lives in a small area, since these animals are very jealous of protecting their territory). If the mole trap is made in a single copy, then with a certain probability it will have to be moved from one move to another if it remains empty for more than 4-5 days.
Lethal means
In the fight for territory, you can also resort to the use of pesticides. However, in this case, it will not be possible to exterminate the animals by poisoning the bait due to the fact that moles feed on insects and bugs.
The best option is to use substances and preparations that are distributed in the air space of the soil and act through evaporation.
- Calcium carbide. The use of a solid substance is due to the calcium phosphide and acetylene contained in the composition, the vapors of which are toxic to living beings (including the owner of the site). To achieve the result, you need to place several weighty pieces of carbide in a plastic bottle and pour in water, and place the container itself with the neck inside the underground passage. As a result of a chemical reaction, accompanied by active seething, gas will be released, which will cause significant damage to the health of the animal.
- "Alphos the mole." The principle of operation is approximately the same as in the case of carbide. The product is a tablet with aluminum phosphide. This poison has a destructive effect on both animals and insects. “Alphos mole” is buried in the ground, and when exposed to humidity, toxic gas is released.
- "Detia". A drug intended not to exterminate living creatures, but to repel them. During the use of granules, it is not a poisonous gas that is released, but evaporation of essential oils, the smell of which is unpleasant to moles.
- "STOP-Mole." A specialized product for exterminating earth-moving animals. Presented in the form of tablets that need to be buried in the mink area. It is best to carry out manipulations in the middle of daylight hours when the pest is hibernating.
- Green house ANTICROT. The chemical has a completely different principle of action. Acts as a bait, which contains food elements that enhance the perception of the drug as a source of nutrition. The damaging substance is bromadiolone, which contributes to the deterioration of the blood clotting of an animal or insect. As a result, after a few days the mole rat dies.
How to catch a mole in a jar?
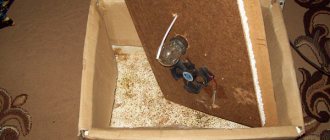
There is another method that has been tested many times in practice to catch a mole: in a jar, pan, bucket or plastic bottle with the top cut off. This kind of mole trap can also be easily done with your own hands - for this you will need to make a kind of trap pit.
Let's look at the manufacturing procedure for this mole trap:
- You can take a large five-liter plastic drinking water bottle; you need to cut off the tapered top. Some gardeners successfully use three-liter glass jars - their width is quite sufficient for a mole to be caught in them (the animal is comparable in size to a rat). You can also use a suitable size pan or bucket; it is only important that the height of the trap is at least 25-30 cm, otherwise there is a chance that the mole will get out of it;
- Then the mole's passage is excavated and a hole is dug, identical in diameter and height to the trap;
- A prepared mole trap (container) is inserted into the hole;
- After this, the cracks along the edges of the trap are filled with earth, the earth here is compacted a little. As a result, the edges of the container should be hidden with a compacted earthen roller so that the mole does not feel them;
- The top of the trap is covered with a wooden shield or thick fabric so that light does not penetrate into the trap and does not scare away the animal.
Such a mole trap, installed in a gap in the underground passage of the mole, works even simpler than the one described above from two plastic bottles. The animal simply falls into the jar (or other deep container), moving along its course.
You also need to check the trap at least twice a day so as not to starve the caught animal.
Additional tips and tricks
Combinatoriality is important in catching moles. A combination of different types of traps will give maximum results.
8 of the best DIY mole repellents
If you want to catch an animal alive and unharmed, it is extremely important to use hard gloves when working. They bite hard. It's painful and unsafe. It is better for the catcher to take his trophy away from home, at a distance of at least two km. In this case, he will not find his old moves.
Fact! Moles have 44 teeth, plus fangs. This is a predator. Not only worms and insects are eaten. Small mice and even sick relatives will be eaten for breakfast. The mole is a cruel animal, stocking up for the winter and may well harm small rodents, but not kill them. Leaving them to breathe. And when he is hungry, he will eat them.
If there are a lot of moles in the region, then it makes sense to spend time and money, but solve the problem radically:
- Dig a lawn net throughout the area. To do this, remove about 15 cm of soil around the entire perimeter, lay a mesh and then return the soil.
- A similar preventative method, but the mesh is dug in around the perimeter to a depth of up to a meter deep and about 30 cm of mesh should remain on top of the ground.
- As an option, trenches are dug around the perimeter, which are concreted or filled with coarse gravel, parts of bricks, and crushed stone.
In any bad news there can be good moments. Experts say that moles are picky and will not settle on infertile land. So, if “guests” appear at the dacha, it means that the earth is full of vitamins and minerals. All that remains is to send out the uninvited comrades and start planting seeds for the future harvest.
About the effectiveness of traps made from plastic bottles
As practice shows, hand-made mole traps made from plastic bottles work no less effectively than various flayer crushes, traps and crossbows. Moles get caught in bottles just as often, and the overall reliability of the structure is determined not so much by its performance as by the correct installation of the trap in the garden plot.
In particular, the choice of the mole's course in which the trap will be set plays an important role. If the passage is old and rarely visited by the animal, then the mole trap may stand in vain for several days, and the disappointed gardener will eventually reject the product, deeming it ineffective.
In addition, a horizontal trap with one trap entrance may not work simply because the mole will each time approach it from the other side - from the side of the dead end. Thus, the animal will not fall into the trap itself, and if it finds an obstacle, it may also try to make a detour.
Practice shows that trapping pits made from cans and pots dug under passages generally work more effectively than “against the grain” traps. The mole does not have time to notice them, and cannot avoid falling into such a mole trap.
It is also useful to read: How to get rid of moles in the garden: effective means and nuances of their use
Types of ready-made traps
There are quite a few ready-made mole traps, for example: scissor traps, tunnel traps, plunger traps, pipe mole traps (also called humane traps) or live traps, ultrasonic repellers. Let's look at each trap in detail.
Scissor trap
There are many options for such devices, which are most often found in gardening stores, etc.
The photo shows a simple example of a scissor trap
- Easy to install (just press the handles into the ground and cock the mechanism).
- You can observe the operation from a distance.
- It is easy to adjust the sensitivity of the device.
- Simple but reliable design.
- Although easy to use, the trap is difficult to install in a tunnel opening, especially at great depths. It must be located and hidden so that the moving parts are not obstructed in the form of stones, pieces of peat, or clods of earth. Due to the tight handles, it is difficult to completely hide the device without light entering the passage, ensuring reliable operation.
- If there are low temperatures in the ground, the handles freeze and the trap does not work.
- Heavy rain can wash away the soil, making the trap undetectable.
- Difficult to install in very shallow and very deep tunnels.
Tunnel trap
The most suitable design for a mole trap is one that includes a semi-tunnel. Such a trap is easy to hide; working parts for the most part do not jam from foreign objects.
- Easy to install in a mole passage. It is enough to pour a little earth on top to block the access of light.
- Quickly and effectively kills pests.
- It is easy to adjust the sensitivity of the mechanism.
- Working parts practically do not jam due to the ingress of stones, peat, etc.
- If you cover the trap with peat or a board, frost and rain will not affect its operation.
- It is used with equal success in deep and shallow tunnels.
- Can neutralize two moles at the same time.
- Complex installation, requires advance instructions. If used incorrectly, you can easily get hurt.
- The operation of the device cannot be seen from afar.
- Invisible above the ground, so if the pointer is lost, the trap will be difficult to find.
Plunger trap
If you prefer to use a scissor trap, then this effective device is worth a try.
This is what a plunger trap looks like Another version of a plunger trap
- The trigger mechanism is triggered in a different way from the previous two types. The trap is activated not by the movement of the mole with its nose or paws, but by pushing through the earth to restore the previously dug tunnel. Thus, the trap is very useful in the presence of moles that bypass the traps.
- A very powerful trap that requires a little practice to use.
- No need to adjust before use.
- Relatively easy to install, but requires a little time, especially when working on rocky soil.
- If there are stones in the ground, it can become stuck, as is the case with a scissor trap.
- If you do not have the skills to install it correctly, the device may not work, and moles will freely pass through it.
Humane mole trap-tube and ultrasonic device
Quite ineffective devices. The first is a hollow tube with movable doors on both sides, the second also has the shape of a tube that is installed in the soil. According to reviews from gardeners, it is almost impossible to get rid of moles using such traps, because moles bypass some of them, while they get used to others or ignore them altogether. However, there are also cases where ultrasound turned out to be effective, as long as it did not become addictive, like any surface noise produced by a person.
Example of an ultrasonic trapHumane tube (not very effective)Ultrasonic mole repeller device
What to do with a caught animal?
A mole caught in a mole trap must be taken out of the area, carried away to a distance of about 1 km and released.
When freeing a captive, you need to be careful: moles have very sharp, albeit small, teeth, with which they can bite quite painfully (after all, moles are, first of all, predators). The epidemiological danger of moles has been poorly studied, and it is never possible to guarantee for sure that when an animal bites it it will not give a person some kind of bacterial “joy”.
The smartest thing to do is to take the mole out of the area directly in the mole trap, and at the place of release, simply open it and carefully shake the animal onto the ground. It is better to release the mole among thick grass or in the forest, where it has a better chance of remaining unnoticed by predators.
The release operation itself should be carried out immediately after discovery of the capture. As noted above, an extra few hours of hunger can be fatal for a mole.
Features of mole hunting
Only a madman or someone who has no idea what this activity is like would go after this animal with a gun. It may seem to a novice hunter that hunting moles is a pointless and boring undertaking, but this is far from the case. If you taste all the delights of mole hunting just once, you will be captivated by this activity forever and will recommend it to all your friends and acquaintances. Perhaps if every skeptic tried this “strange” activity at least once, his opinion about mole catchers would change significantly.
Material dividends are not all that hunting animals can bring. From an emotional point of view, this type of hunting will allow a new look at nature even for those individuals who “see” it quite rarely. As a rule, moles begin to be hunted when the fields bloom with different colors, the smell of black currants is fragrant in the air, and young mushrooms begin to attract with their recognizable caps. This is the time when the aroma of freshly cut hay and meadowsweet is in the air.
However, despite all the above-mentioned romance, catching moles will not be easy. Like any other craft, this activity requires great dexterity and certain skills. It is worth knowing a lot about the biology of the animal, especially where exactly it lives.
Do moles return to their areas and how to prevent their reappearance?
The mole is an active animal, but it cannot move long distances. Young animals, leaving the maternal area in search of unoccupied land, can move 1.5-2 km away from the place of birth, but adult moles, who have already settled somewhere, are constantly in their territory of about a hectare.
This means that if a caught mole is released a kilometer from the place of capture, then it will not return to its original area. If you release it right behind the fence, and the fence itself does not have a foundation, then with a high probability the same mole will have to be caught again.
In general, it is useful to keep in mind that preventing moles from entering an area is easier than fighting these animals later. Even if the animals are already in the garden and causing harm, they can and should be caught and taken away, but in parallel, measures should be taken to reliably protect the area: fence it off with an impenetrable foundation, even if not a powerful one, or simply dig in around the perimeter to a depth of 70-80 cm durable fine-mesh plastic mesh (with a cell size of no more than 1 cm).
Such measures will guarantee that after catching and removing all moles from the area, other animals will not enter it again. Otherwise, you will have to constantly catch moles.
As for various mole repellers, they also sometimes give good results, although they do not provide absolute protection of the area. By the way, you can also make them yourself from plastic bottles...
How to make a mole trap with your own hands
The caught mole must be taken approximately 1-1.5 km from the site and released - in this case, the animal will definitely not come back. It is advisable to release the mole into the wild in dense grass, plantings, bushes or forests, where it can quickly bury itself and not be caught by a predator.
If the trap is supposed to be set again immediately after being caught, then the caught animal can be temporarily shaken out into a bucket.
All manipulations with captured moles, as well as mice, rats, shrews, voles, blind men and other living creatures that often also get caught in a mole trap, should be carried out wearing thick construction gloves. As mentioned above, the mole has very sharp teeth, and in rare cases it can be a carrier of diseases dangerous to humans, so its bites should be avoided in every possible way.
Ideally, there is no need to touch the caught animal at all; it is simply shaken out of the pipe. If there is a need to take it with your hand, then it grabs either the tail or the scruff of the neck.
It is important to understand that if additional measures are not taken to protect the area from moles, then in most cases the animals will enter it again periodically, and they will have to be caught almost every year. For example, a very effective (albeit expensive) way to protect a site from moles is to dig a fine mesh net into the ground around the perimeter of the site to a depth of 70-80 cm and a height of about 20 cm above ground level - this will prevent new moles from entering the territory.
Repellers made from plastic bottles: do they help?
There are two ways to scare off moles with plastic bottles:
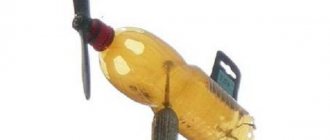
- Make pinwheels out of bottles that spin in the wind, make noise and scare the animals (moles hear well);
- Or you can simply lay out large quantities of closed plastic bottles throughout the area. With constant changes in temperature in the morning, afternoon, evening and night, they make cracking noises, which presumably also scare away animals.
Many gardeners and gardeners note that such homemade repellers are really effective and help get rid of moles on the site. However, at the same time, many reviews indicate the lack of effect from the use of these funds.
Apparently, the truth is somewhere in the middle: moles can actually be frightened by the noise created by these devices and leave the area in search of more comfortable territory. But repellers can also be ignored, especially if there is a problem of survival due to lack of food. Therefore, the use of such repellers is a kind of lottery: it may help, or it may not give any visible result.
Simple do-it-yourself mole traps
The most convenient solution to the question of how to catch a mole is to use purchased equipment. However, in general, such devices are more aimed at scaring the animal away from the territory. This approach not only requires financial investments, but is also not always effective. From this article you will learn all the intricacies of the fight against underground inhabitants. You can make some devices yourself.
Other types of traps, humane and inhumane
A pipe trap works on the same principle as homemade traps made from plastic bottles. Only in it the animal pushes the door that easily opens inward and slams behind it, penetrates the pipe, but cannot open the same door from the inside.
There are also inhumane traps for moles that simply kill the animals:
- Spring traps;
- Loop traps;
- Scissor traps;
- Harpoon-type traps (crossbows).
Some people make them with their own hands, or buy them ready-made. However, before using them, think: why mercilessly kill warm-blooded animals just because for some reason they bother you. And even more so, you shouldn’t kill animals just because you’re too lazy to catch them alive and take them out of the area.
The effectiveness of all these lethal traps is approximately the same and does not differ from the effectiveness of homemade live traps. You shouldn’t expect that if you didn’t catch a mole with a properly made structure from a plastic bottle, then the trap will certainly kill it. It makes more sense to figure out why the trap turned out to be ineffective (wrong choice of move, errors in placement or manufacturing), correct the flaws and catch the pest alive.
In any case, no matter what mole traps are used, without effective measures to protect the site, the results of their use will be temporary, and you will have to constantly catch animals, worrying about a damaged harvest. Therefore, you should first take care of protecting the area from the penetration of moles, and only then catch the animals. Read about how to effectively protect your area from moles in other articles on our website.
If you have personal experience using homemade mole traps, be sure to leave your feedback in the comments field at the bottom of this page.
A clear example of repelling moles using ordinary plastic bottles
Cylinder mole trap - easy and effective
One of the most common types of mole traps (and not only) are cylinders. They are quite easy to make and there is no need to run to the store for them. The advantage of these traps is that they are not disposable, like many of their other counterparts, and allow you to catch moles in unlimited quantities.
As a basis, we take a piece of plastic pipe - the diameter does not really matter, but you should not buy one that is too large, and one that is too small simply does not make sense. Many of us have a good idea of the size of a mole, and the diameter of the holes found on the site makes them easy to determine. We will also need galvanized sheet metal and wire. We cut out two plates from a piece of tin, which will become dampers at the ends of the pipe. One damper will be “blind”, that is, firmly fixed like a wall. The other will be a movable door through which the welcome guest will enter the trap. This damper should only move inward, otherwise the entire effect of the trap will disappear. The essence of it is that the mole enters the pipe with the damper slightly opened, finds itself inside the trap, and cannot get back out.
The wire will help us fix the door so that it opens only in one direction and nothing else. To do this, holes for the wire are made in the pipe and in the planes of the plug. As a limiter, a wire is placed in the upper part of the pipe in the area of the damper, which will not allow the door to open outward. There are a lot of options for fixing the dampers; you can create a whole wire system, it all depends on your imagination and skill. The main thing is to allow the damper to safely return to its original position immediately after the mole is trapped.
Choosing a location for the trap
During the hot season, it is best to catch moles along ditches and streams, as well as on trails used by people and livestock for travel. In such places the soil is not so hot, so moles will be found here most often. During the rainy season, it is best to place mole traps directly on the surface, where the prey will crawl out of the water-filled holes.
Permanent and feeding passages are quite often located in close proximity to each other, forming a complex interweaving between them. In order to determine the type of burrows, do not hesitate to dig up the ground and examine them from the inside. If you find a feeding ground, then be sure that there will be a permanent passage nearby. Remember that setting traps in feeding holes is a waste of time.
Sources
- https://podomu.info/vermin/kak-pojmat-krota.html
- https://krot911.ru/kroty/kak-izbavitsya-ot-krotov/krotolovka-iz-plastikovyx-butylok-svoimi-rukami.html
- https://texnotoys.ru/drugoe/krotolovka-svoimi-rukami.html
- https://stopklopu.com/lovuski-dla-krotov-svoimi-rukami/
- https://dr-dez.ru/myshi-i-krysy/krotolovka-iz-provoloki.html
- https://GdeKlop.ru/kroty/kak-pojmat/