Domesticated female quails may lose the instinct to incubate eggs. However, even if the bird is able to hatch offspring, it will still not be able to take more than 15 eggs. In this regard, the breeder must acquire an incubator, which will replace the laying hen. To do this, you don’t have to go to a hardware store, because a modern device can be made in a home workshop.
Why do you need an incubator?
Quails are usually kept in large numbers due to their small size. However, sometimes natural offspring are not enough for the desired population, since one female can hatch no more than 12-15 eggs. In addition, she may completely refuse to hatch them.
To solve this problem, you need an incubator - a hermetically sealed box that includes thermal insulation, special heating and egg trays. Thus, it artificially creates all the conditions for the production of full-fledged chicks from fertilized eggs.
There are a large number of incubator models available in hardware stores, but they are not cheap. To significantly reduce your costs, you can assemble the device yourself, using available materials and ready-made drawings.
Conditions of detention
You know, in order to keep two hundred quails, just one room and eight cages are enough. My father didn’t even have to build a chicken coop - they fit perfectly in the basement of a country house. True, they need appropriate conditions: air humidity 60%, temperature about 25 degrees and dim lighting, even twilight.
Read also: Cages for quails: photo drawings, Your Own Builder
If they are not provided, problems may begin. My father was faced with the fact that his birds were going bald. Literally. He took them to veterinarians for a long time, took tests, but the cause was never found, the quails were absolutely healthy. Only they didn’t have feathers. It turned out that their plumage was affected by excessively high humidity - the hygrometer showed more than 80%!
How much space do you need for chickens? That's right, a separate room, preferably with a special walk. But it needs to be cleaned at least twice a week to avoid unsanitary conditions. And what a “wonderful” aroma of poultry is in the air! Imagine watching even fifty chickens trample on a green lawn every day. On the third day after such a walk, only a memory will remain from him.
Problems for chicken farm owners arise during the cold season. In order to maintain such a livestock, it is necessary to provide heat to the chicken coop, because in winter the bird can die from the cold.
Quail owners have an easier life, even if the number of birds is four times greater. In winter, it will be enough to move the cages to a heated room. A house basement or garage will do.
Important! If you house chickens and quails together, the risk of quail eggs becoming infected with salmonella increases. Chicken manure can get on the shell and become a source of infection.
If you keep both of them, then in different rooms.
A chicken is four times larger than a quail. Even the largest one. Even a broiler. And her egg size will be correspondingly larger. In the previous paragraph, I consciously wrote about two hundred quails and fifty chickens. In this ratio they are equal, and you can see the difference in keeping approximately the same number of birds.
True, if you look only at the size, then the quail lost in this competition; it will not cope with such competition. But she needs less food. But more on that later.
How much can one chicken eat per year to lay eggs? 40 kg of feed and 15 kg of greens and hay. She should receive 320 kcal from food per day, including 20 g of protein.
Now let's multiply these numbers by fifty conventional chicken heads and get an impressive figure. I won’t talk about feed prices, so it’s clear that the costs will be significant.
What do they feed quails? My father makes a mixture of special feed, mineral supplements and fresh vegetables for them. In general, the consumption per day is small. As a basis, I will take 8 cages with birds, each of which contains an average of 25 quails.
In this situation, it turns out about 6 kg for all cells per day. In my opinion, this is quite a bit.
Let me remind you that ONE chicken eats 40 kg of dry food per year! What if there are fifty of them?
In addition to the mixed feed, the father feeds the birds with fresh grass, shell rock and eggshells. Yes, yes, waste-free production is achieved. Very comfortably.
Requirements
If the device does not meet a number of requirements, during its operation you can lose all the eggs at once. So, when making an incubator yourself, you must take into account the following rules:
- The incubator must be maintained at a temperature between 37.3-38.3°C. In the room where the device will be located, it should not be below 20°C. As for humidity, it should be 50-50% in the chamber, and 20% outside the chamber.
- The easiest way to heat the box is to use regular 40 W incandescent lamps. To heat a small space, 4 such lamps are enough. As an alternative, heating elements can be used, but in this case the design will be more complex.
- Heat should be evenly distributed at all points of the incubator. This is not an easy task given that warm air tends to rise. Thus, hatching eggs often have to be swapped. In industrial devices, this requires swapping trays, and in household devices, transferring the eggs from the middle to the edges. However, there is another option: equip the device with two heat sources, placing the first of them under the lid, and the second on the lid. As heating elements, you can use 25 W incandescent lamps (2 each on top and bottom).
- To optimize the temperature regime, the bottom of the trays should be made of metal mesh, since it allows warm air to pass through much faster. It is better to make the trays themselves not stationary, but movable, on each of the three rows by installing not one solid tray, but two measuring 1/3 of the area of the row. This will solve the problem of temperature fluctuations, since the egg will constantly be in the middle of the device, and the entire incubation process will take place in optimal mode.
- If possible, the cover of the device should be made not from the side (on the entire wall), but from the top. This way the incubator will not cool down quickly when turning the eggs.
- To make the body of the device, you can use various materials - from a wooden box to an old refrigerator. However, in any case, it will be necessary to provide the device with sufficient thermal insulation using modern insulation materials.
During the incubation period, the temperature inside the device must be maintained at 37.3-38.3°C and humidity up to 50-55%. These parameters should not depend on either current fluctuations in the outlet or power outages. You can read more about how quail eggs are incubated here.
Differences in feeding
As for feeding birds, there are several important points to consider:
- The chicken diet is much simpler than the quail diet. To make work easier, some poultry farmers try to feed all their birds the same food, but this is wrong, because chicken feed does not contain the nutrients that quail need. And although special feed for young broiler chickens is quite suitable for quail food, it is nevertheless necessary to mix additional ingredients into these mixtures: fish meal, crushed sunflower seeds and corn, dried chopped grass, pine needle flour.
- If the chicken coop is small, then organizing separate feeding of chickens and quails will not be easy. In any case, the quails are given food first, since in the process of eating, sloppy birds scatter food around, and chickens pick up the scattered remains of food and finish it.
- At first, the feeding process should be under the control of the poultry farmer; this is necessary in order to stop bird fights for food. If a fighter appears in the herd, constantly bullying his relatives, then he needs to be isolated from the team for a couple of days. If you do not pay attention to the behavior of the aggressor, then other birds also begin to fight among themselves. After a few days of isolation, the bird can be returned to the chicken coop, but if the behavior of the troublemaker does not change, the individual is sold or slaughtered for meat.
- Water intended for drinking must be clean. For chickens, drinking bowls with water are installed on the floor of the chicken coop; for quails, drinking containers are firmly fixed to the walls of the cages. Drinkers intended for chickens must be designed to prevent them from tipping over. In winter, the water should be warm for chickens and quails. Quails can catch a cold from cold water, and a chicken drinking cold water will not lay eggs in the winter.
- To provide their pets with vitamin C for the winter, farmers harvest rowan berries in the fall, which grow in large quantities in deciduous forests and forest plantations. Dried and crushed, the berries are regularly added to bird food throughout the winter. Dried berries should be stored at home or in another dry and warm room.
If you comply with all the conditions described above, then the chicken flock and quail will be able to live in the same territory, the main thing is to control their communication during the first ten days together.
Construction principle
When making a homemade incubator, you can use various materials and drawings. In this case, the principle of action is almost the same:
- A box of the required size is used as a body, and thermal insulation walls are made to maintain stable temperature and humidity in it. The outside can also be lined with polystyrene foam boards or roll insulation, and covered with plywood on top. You can also use an old refrigerator as a body, on top of which you need to drill several holes for ventilation and install glass to monitor the condition of the eggs.
- The interior of the chamber or box is cleaned to allow for future cleaning and disinfection of the cavity.
- To install the net with eggs, stops and a sealed hatch are made.
- To maintain the desired level of humidity, an evaporator is installed at the bottom of the chamber. The nets must be installed higher, otherwise the chicks may drown in the bath.
- To ensure that all eggs are heated evenly, an internal fan with periodic switching mode is installed on the upper and lower grids.
- An air space is created in the chamber so that the nets with eggs can be turned over by 45 degrees. So, the distance from the floor to the tray should be at least 10 cm. As for the distance from the tray to the ceiling or the top viewing glass, it must be calculated depending on the heating method. If 40 W light bulbs are used, then it should also be at least 10 cm.
- To make trays for eggs, you can stretch any suitable material, for example, nylon fishing line, onto a foam frame. The main thing is that the eggs do not roll when the tray is turned over, and the hatched chicks do not fall into the cells.
- Mains power is used for incubating birds. It is worth connecting the battery in case of emergency.
- To monitor the temperature in the chamber, a mercury thermometer is installed, which is usually used to monitor the operation of temperature sensors. It should not touch the eggshell. To measure humidity, a psychrometer is installed.
- When the chicks are born, a fine mist is created in the chamber so that the shell is easily separated when broken by the beak. The chicks dry out in the chamber for 1-2 days.
- The finished incubator is installed on a raised platform.
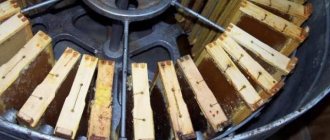
By assembling the incubator with your own hands, you can get a design of this type:
Egg culling
For a high hatchability rate, preliminary collection and correct egg storage conditions are of great importance.
Store eggs for brood in a horizontal position, turning them over periodically, at a temperature not exceeding 12 degrees and humidity not exceeding 80%.
Eggs with a damaged, thin or rough surface or irregular shape are rejected. Using an ovoscope device, eggs with two yolks, with a large chamber made of air, are set.
should never be washed before being placed in an incubator , because this damages the film over the shell, which has certain properties. Eggs that are too large are also not suitable for incubation.
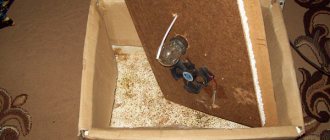
How to make an incubator from a foam box?
Polystyrene foam has the property of maintaining the required temperature, so it can be used as the main material in the manufacture of an incubator.
Option #1
How the device will look in cross-section can be seen in the diagram:
Before assembling the device, you must prepare:
- 2 sheets of polystyrene foam or a ready-made foam box;
- incandescent lamp 40 W or 4 lamps of 15 W;
- glass or plastic;
- egg tray;
- water tray;
- fan;
- thermal insulation foil;
- thermostat;
- scotch;
- glue;
- soldering iron;
- drill.
The structure is assembled in this order:
- Cut the first sheet of polystyrene foam into 4 equal parts to form the walls of the box. Glue the resulting walls together in the form of a box.
- Cut the second sheet of foam plastic into 2 equal parts. Take the first of them and divide into 2 parts 60 cm wide and 40 cm wide to get the lid and bottom of the structure.
- Cut a window with equal sides (in the shape of a square) in the lid. Cover it with glass or plastic.
- Glue the bottom to the previously assembled box. The seams are additionally covered with tape, and the inner walls are lined with thermal insulating foil.
- From the last sheet of polystyrene, cut out the legs - bars 6 cm high and 4 cm wide. Glue them to the bottom.
- In the sidewalls, drill or burn with a soldering iron 3 holes for ventilation with a diameter of 12 mm. They should be 1 cm above the bottom.
- Attach lamp sockets inside the box.
- Install a thermostat on the outside of the lid, and secure the sensor inside at a height of 1 cm from the egg tray.
- Insert the egg tray.
- Attach a fan to the cover of the structure.
- Place a tray of water at the bottom of the incubator.
You can see what a homemade incubator made of 4 cm thick foam plastic looks like in the following video:
Option No. 2
An incubator from a foam box can be assembled into a more complex type. To do this, you will also need to prepare tin cans, aluminum sheets, 15 W light bulbs and a cooler to maintain a uniform temperature inside the device. The structure is assembled in this order:
- Cover the inside walls of the box with polyethylene foil to keep the incubator warm.
- Attach the cooler and light bulbs to a sheet of plywood, since direct attachment to the foam will be unreliable. The cooler must be installed at such an angle that it blows on the light bulbs.
- Cut “screens” from cans to evenly distribute the heat radiation from the light bulbs.
- Cut holes in the lid of the box and attach a piece of glass so that the farmer can observe the condition of the eggs.
- Make several small holes in the box to provide the chicks with fresh air.
- Place a metal grid with cells measuring 40x30 at the bottom. Sharpen all mesh points using a file.
- Attach a piece of wire to the grid to form a handle for turning the tray over.
- Place containers of water at the bottom of the structure to maintain humidity levels.
To regulate the temperature, you can install a digital controller in the incubator. In addition, you should remember about a psychrometer, which will help maintain a constant level of humidity.
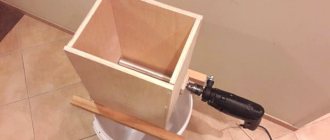
Options for assembling an incubator from a wooden box
The basis of such an incubator is a wooden box or frame. From the inside it is insulated with plywood, polystyrene foam or heat insulation. To create the necessary conditions, heating lamps and water trays are also installed. There are several options for assembling this design.
Option #1
A simple design, for assembly you will need:
- box;
- foam sheets;
- plywood sheet;
- metal construction mesh;
- one incandescent lamp with a power of 40 W or 4 lamps with a power of 15 W.
When assembling a product from a wooden frame made from bars, you can proceed from the following drawing:
The incubator is assembled in several stages:
- Cover the box with pieces of plywood and additionally insulate the walls with polystyrene foam.
- Drill several ventilation holes with a diameter of 1 cm in the bottom part.
- Make a glass window in the lid so that in the future you can monitor the eggs in the trays and control the temperature inside the incubator.
- Under the cover, install electrical wiring with lamp sockets, which must be placed in each corner of the product.
- Attach the egg tray to a foam support approximately 10 cm above the bottom.
- Stretch a metal mesh over the top of the tray.
Option No. 2
Advantages of the model:
- wooden box;
- sheet of plywood, foam plastic or thermal insulation;
- cover;
- 3 wooden logs;
- 2 water trays;
- metal mesh;
- fixing slats;
- 2 heater resistors (PEV-100, 300 Ohm);
- 40 W incandescent lamps;
- wire in heat-resistant insulation.
To make an incubator, you need to follow this sequence:
- Cover the walls of the box with heat-insulating material - plywood, polystyrene foam or heat insulation.
- Make a viewing window in the lid and cover it with glass.
- Drill through holes in the lid and equip them with movable slats that can be opened or closed if necessary.
- Install 40 W lamps in each corner. Place the wiring 20 cm below the cover.
- Stretch a mesh or lattice over a metal frame to create an egg tray. Install it 10 cm above the bottom.
- Install a fan, thermometers and a thermostat inside the box. Thus, it will be possible to control the microclimate inside the device, and, if necessary, change the level of temperature and humidity.
- Place trays of water on the “floor.”
Keeping quails outside
Most people give their preference to keeping quails in open areas. When planning, people often ask the question: how are quails kept outside?
Those who plan to place quails often choose open spaces, usually their summer cottages
This is the right decision, since it is easier to keep quails in a summer cottage, since the length of the day with light is increased, there is no need to monitor ventilation, the birds can eat fresh grass (which is very important for the health of the birds, since the grass contains a huge amount of vitamins)
But there is one drawback - these benefits are only available for spring-summer
It is impossible to keep quails in an open area, since the birds will freeze, so it is worth paying attention to the construction of a barn in the dacha area
But what then should quails be kept in a barn in winter? The barn must be equipped with the necessary portable heater or use thermal insulation materials.
Homemade incubator according to Dulik's scheme
Amateur poultry farmer S. E. Dulik offers a rather complex design, equipped with a heating element in the form of an iron tank with water. However, this provides good results during operation, since this heating method does not depend on voltage and provides uniform heating. Even if there is a power outage, the chicks will be fine.
Dulik's scheme looks like this:
To make such an incubator yourself, you need to understand the principle of its construction:
- A distinctive characteristic of the incubator is a heating element in the form of a tank of water (1). It is responsible for the uniform distribution of heat inside the device. The main thing is that it will function regardless of the presence of voltage. This tank is made of iron 4 mm thick. It can be made from galvanized iron, but the seams will need to be soldered.
- Branch pipes (2) 30 mm high are made from pipe sections with a diameter of 4 inches and are welded into the top cover of the tank. The internal hole should be 10 mm smaller than the diameter of the pipe.
- The formed side is necessary for the lamp limiter (3) made of 4-5 mm thick braid. You also need to cut out two disks from it - an outer diameter of 95 mm and an inner one, the size of which must match the size of the cartridge. The resulting fastening elements will also be indicators that the heating is turned on, since through them you can see the process of heating the water.
- In the design itself, the bulbs of 100 W lamps are lowered into the water up to the sockets themselves. They must be selected with an external nut so that the lamps can be adjusted relative to the height of the socket. In addition, 2 lamps will be required to duplicate the heaters. They are connected in parallel to the thermostat load.
- The tank is filled with water to the brim. To make it possible to drain it, the container is equipped with a valve (4) on the side. Additionally, it is recommended to line the tank with a heat insulator - 40 mm polystyrene foam. In this case, if there is a power outage for 10-12 hours, the water will only cool by 0.5-1°C.
- The structure itself is made of a wooden frame consisting of 5 bars measuring 40x40 mm, as well as 2 trays: the lower one (6) is used for baths with water, and the upper one (7) is used for laying eggs. The upper tray should be made of 12 mm thick planks, and the bottom of the incubator should be lined with a mesh with 13x13 mm cells. You already need to put a nylon net on it for storing eggs.
- The front wall of the upper tray is sealed with double glass (8) to retain heat in the chamber and control the temperature inside it. Wooden plates (9) are attached to the glazed frame. For this, screws and PVA glue are used. These pads should protrude beyond the front wall on all sides by approximately 20 mm in order to seal the tray with foam pads and prevent heat leakage from the outlet chamber.
- The lower wooden tray (6) must have a 2 mm thick fiberglass bottom (10). It needs to be attached to the frame with screws from below. The bottom should protrude 20 mm from the sides of the tray so that, if necessary, the container can be pushed along the grooves sawn into the wooden pads (11) into the incubator itself. At the front, you need to attach the cover plate (12) to this tray with screws. It is advisable to cover the front part with foam plastic.
- At the bottom of the frame there are bars with 9 holes on each side with a diameter of 12 mm. They need to be opened to ventilate the incubator. Additionally, you should also make the upper through slots (14) 180 mm long. They should be on the right and left at the top of the frame. Thus, the top of the slots should be level with the bottom of the tank. In addition, they need to be equipped with small valves of two halves.
- The finished frame is sheathed with foam plastic and fiberboard on all sides.
Small incubator made from a plastic bucket
If a farm hatches a small number of eggs, it is best to make a small-sized incubator from a plastic bucket with a lid. The diagram of this design is as follows:
Making such an incubator is very simple:
- Cut a small viewing window in the lid.
- Attach a source of thermal radiation to the lid from the inside. It is enough to use 1-2 incandescent lamps.
- Place a mesh egg tray in the middle of the bucket.
- At a distance of 70-80 mm from the bottom, drill several ventilation holes in the side wall.
- Pour some water into the bottom of the bucket to create the desired level of humidity.
In such an incubator, the tray with eggs must be turned over regularly. To do this, it is enough to slightly change the inclination of the bucket, but taking into account that the angle of inclination should not be more than 45 degrees.
First day of hatched chicks
On the first day of hatching, the chicks are placed in cardboard boxes with newspaper placed at the bottom. Since the chickens are accustomed to warmth, they need to be provided with the same conditions for some time. If necessary, place a table lamp in the box.
Fabric bedding is not used because chickens easily become entangled in it. In the first days of life, young animals are fed a hard-boiled egg at the rate of half an egg per head per day.
In addition to food, chickens constantly need clean, warm water. Starting from the third day, boiled millet, cottage cheese, and crackers are introduced.
How to make an incubator from an old refrigerator?
The body of an old refrigerator is excellent for making an incubation unit, since it is quite spacious and has the required degree of tightness and thermal insulation. This option is especially attractive for amateur poultry farmers, since it involves simple installation, which is obvious from the design drawing:
To convert a refrigerator into an incubator, you need to perform several steps:
- instead of shelves for storing food, install trays with eggs;
- insulate the walls from the inside with polystyrene foam;
- for ventilation, make holes in the walls and install a fan;
- install incandescent lamps for heating, and a thermostat for temperature control;
- to maintain the desired level of humidity, place trays with water on the bottom;
- Make a metal lever to turn the eggs.
Thus, to refurbish a refrigerator, you need to prepare the following materials and tools:
- egg trays with grids – 3 pcs.;
- tray rotation handle;
- 100 W light bulbs – 6 pcs.;
- fan;
- thermostat sensor;
- thermometer;
- psychrometer;
- water tray;
- metal plates – 2 pcs.;
- window glass;
- scotch;
- drill;
- screwdrivers;
- screws.
Dismantling the refrigerator is performed in the following order:
- Drill 4 through holes with a diameter of 1-1.5 cm in the lid and bottom of the refrigerator to ensure natural air exchange.
- Attach a fan to the top wall.
- Install a thermostat on the lid.
- Attach light bulbs to the side panels - 4 on top and 2 on the bottom. Connect them to the thermostat. You can simply attach 2-4 lamp sockets to the ceiling of the camera using ordinary self-tapping screws and run electrical wiring to them.
- Install temperature and humidity sensors to the inner walls.
- Attach metal plates to the side panels, and attach trays to them with screws. They should look to one side and the other at an angle of 45 degrees.
- Attach a metal lever or handle to turn the trays at the same time.
- Make an observation window in the door and glaze it. Place a tray of water at the bottom.
To keep the heat in the chamber well, it is recommended to insulate the inside of the refrigerator with foam plates.
The diagram of the finished incubator will look like this:
An overview of a homemade incubator from a refrigerator is offered in the video below:
Manufacturing of the device
There are several options for creating an incubator with your own hands at home. You can use an old refrigerator or a box as a base. This device can also be assembled using foam plastic. Below are diagrams of the most popular designs that you can make yourself.
Incubator out of the box
- First, you need to cut a small hole in the side of the box for ventilation, and secure the light bulb sockets in the box lid.
- For 60 chicken eggs you will need to insert 3 25 W light bulbs. They should be located at a distance of 15 cm from the tray.
- For reliability, it is recommended to cover all edges of the box with plywood or chipboard sheets.
- Below the eggs you need to place a container of water. The area of the evaporated surface depends on the volume of the housing and is selected experimentally using a hygrometer.
- The egg tray is installed in the middle of the box.
- It is recommended to choose a gyroscope and thermometer, the data of which can be viewed without opening the box. It is recommended to tear off the lid of the box only to turn the eggs.
Simple incubator out of the box
From foam plastic
Polystyrene foam has excellent thermal insulation properties, and most farmers can find this material at home. This is why do-it-yourself incubators are often made from polystyrene foam. The principle of its manufacture is in many ways similar to creating a structure from a cardboard box. But you can choose the housing size yourself based on the desired number of eggs.
- First you need to make a box from foam sheets. You can easily do this yourself using adhesive tape. Simply cut the edges to the desired size and fasten them into a box in a convenient way for you.
- This design will provide high thermal insulation and will allow the use of light bulbs with a power of about 20 W for heating. Of course, you can include special heaters in the design, but the option with light bulbs is the most budget-friendly and they cope with their functions perfectly.
- As in the previous design, it is recommended to insert the light bulbs into the top cover at a distance of about 15 cm from the eggs.
- You can use a ready-made structure as a tray, or make it from wooden planks. It is best to place the tray in the middle of the homemade box so that the distance to the water containers and heating elements is approximately the same.
- When making such an incubator with your own hands, do not forget to leave space between the tray and the walls, because air circulation is very important when hatching chickens at home.
Eggs in a foam incubator
With automatic revolution
The most difficult thing to do at home is to make an incubator with automatic egg turning. But this design will help to hatch chickens at home as conditionally as possible, because regular egg turning is the most important factor. Such a mechanism will be indispensable for people who are often absent and cannot pay enough attention to hatching chickens from eggs. In addition, this design will minimize the number of times the lid is opened, which is also a very important factor.
The easiest way to implement automatic turning is to purchase ready-made trays with a special mechanism. Such a device will cost several times less than a ready-made incubator, but you will need to create a suitable housing, as well as purchase a thermometer and a gyroscope. The body of an old refrigerator is perfect for assembling a house. It has good thermal insulation and a convenient door. You will need to perform the following sequence of actions:
- Remove unnecessary parts, including the freezer.
- Cut a window in the door and glaze it.
- Attach automatic turning trays where shelves were previously.
- Install 4 light bulbs at the bottom of the refrigerator and 2 at the top.
- Place a reservoir of water at the bottom.
- Attach the thermometer and gyroscope so that they can be seen through the window.
Eggs in an incubator from the refrigerator
Photo gallery
The photographs and drawings presented below will help you make a device for hatching chicks at home. You can find even more information in the video.
Useful tips
When making an incubation box, experienced breeders recommend adhering to the following recommendations:
- To ensure uniform heating of the grid with eggs, incandescent lamps should be installed both below and under the lid.
- For natural ventilation, be sure to make several round holes in the lid.
- Provide a backup heat source in case of a power outage. To do this, make a special chamber at the bottom, which is separated from the rest of the incubator with three-layer plywood. Drill many holes in it. Place the aluminum canister into the resulting compartment. If the electricity goes out, you need to pour boiling water into the canister, and then close all the ventilation and cover the incubator with a blanket. The heat from the homemade battery will emanate for 12-14 hours.
- Avoid sudden shocks and noise in the room, otherwise the embryos may become frightened and lag behind in development.
- Do not use outdoor thermometers to monitor temperature, as they have a fairly high error rate. The best option is medical devices. They can be installed near the eggs, but they must not be allowed to come into contact with the shell, otherwise the accuracy of their readings will suffer. To ensure accurate data, measurements should be taken some time after turning on the incubator and at regular intervals.
- If the device is large, you can use an ordinary fan, which will help maintain the temperature balance inside the chamber.
- The incubator should be installed on an elevated surface in a room where room temperature is maintained, there is no direct sunlight and there are no drafts.
Video: homemade incubator with a revolution
The following video explains how to make an inverted incubator with two separate chambers. Its power supply is 12 W, and it can also be connected to a car battery. To control the temperature regime, a thermostat 1209 is used:
Knowing the design features of the incubator, you can make it yourself, using ready-made drawings and instructions. At the same time, any homemade design should be tested before use. It needs to be turned on “idle” for several days to monitor how the sensors work and whether the temperature is well maintained.
0
0
Copy link