The most suitable place to house and live a horse is a stall. It goes by many names: pen, stall, stall. A stall is needed not only for ease of maintenance, but also for taming a horse, raising and training the animal.
When kept in a stall, the animal's powers of observation and attentiveness are impaired. If you keep a horse in a stall, then it suffers least from boredom - there is always something to do and something to see. So how to make a stall for a horse with your own hands?
Where to start, what to grab onto, what to come up with. Let's start in order.
Preparation for work
Before building a stable, it is worth focusing on important details:
- The structure is built in such a way as to make the animal’s stay in it comfortable. A prerequisite is the presence of heat, light, cleanliness, as well as the absence of even the slightest drafts. Because they can seriously undermine the health of horses.
- When choosing the location of a building, you should prefer a site that is located on a small hill. This solution will prevent dampness in the structure, which is a common cause of hoof diseases.
- It is important to determine which winds prevail in the area. It is necessary to orient the building relative to them in such a way that cold air masses hit the end of the building or its corner.
- Decide right away how much money you are willing to invest in construction. Before drawing up an estimate, find out the current prices for materials and tools that will be used in the work process. Based on them, final calculations are made. It is worth understanding that the objectively calculated cost of the project, which fits into the existing budget, will allow the construction of the stables to be completed on time, avoiding long-term construction.
- If you have a strong desire to do everything on your own, it would be a good idea to consult with experienced construction professionals. By following the recommendations received from them, you will avoid common mistakes and save time and money.
Levada
Levada is intended for daily walks of horses in the fresh air, exercises and training with them. When constructing it, only safe materials are used. Preference is given to wood.
It is forbidden to use barbed wire or use electric current to fence the levada.
The fence around the pen is erected at least 1.5 m high, with pillars every 1.5-2 m. The locks on the gates should be reliable, but easy to use. The territory of the levada is ideally lined with rubber tiles or a special coating.
Construction of a stable is a necessary undertaking for a horse breeder. The choice of building materials and construction project are discussed at the initial stage. Planning in this process is the key to success. In a well-built room, animals will be comfortable and safe.
0
0
Copy link
Materials used
To build a beautiful house for horses, which will serve as protection for animals from bad weather for many years, you need to wisely choose the material for building walls. The most popular materials in this area are wood and brick. The frame made of them will be durable, dry and warm.
If finances do not allow you to use factory ones, then you should look towards simple materials. Adobe is a clay-straw mixture that retains heat well and has sufficient strength. Sometimes the walls are framed from boards, and the resulting space is filled with sawdust mixed with clay. There are options for erecting stone walls, but this solution cannot be called a good one. Dampness regularly occurs inside it, heat is poorly retained, as a result of which horses regularly catch colds.
Boxing
The most ideal option is a box with a paddock. It allows the horse to be both indoors and outdoors. Naturally, in bad weather, you need to control the time the animal spends outside. If funds or space do not allow this, then you can solve the problem with the help of an external box. When the top door is open, the horse also takes an active part in the life of the stable and does not get bored. Protect your horse from drafts.
Site selection
You should carefully consider the choice of site for the construction of housing for horses. It is desirable that it be a plain or a small hill. In the lowlands, the animals will be protected from the wind, but dampness will settle in the stables. Increased humidity will have a negative effect on horses' hooves.
If the site is located on a hill, then the water quickly leaves it, but the weak point will be the accessibility to the winds. Constant drafts are harmful to animals. This is inevitable, so it is worthwhile to provide natural barriers of trees that form so-called forest belts.
Dimensions
In almost all stables, the size of the stall is no more than three meters by three meters - nine square meters. All these sizes are suitable for keeping horses “satisfactorily”. Accordingly, we can observe trampling, horse hooves, gnawing - all this from a very confined space.
If we think logically and calculate correctly how to make a stall for a horse, we have the following picture: the length of a horse is on average two meters and forty centimeters. Accordingly, the side is slightly small. The ideal option for a horse is four meters by five meters. This is necessary so that the animal can calmly turn around in the stall.
List of outbuildings of the stables
Utility rooms: feed room, rooms for roughage, bedding, harness room, inventory room, duty room, harness and mating arena, shower stall, artificial insemination station.
The purpose of the feed room is to store a supply of concentrates and feed for three days. Concentrates are stored in wooden chests with a lid. The fodder room must be separated from the room with the horses by a solid partition. The area of the fodder depends on the number of horses: when placing 20-25 horses in the stable, the fodder is 5.25 m2 (stall size); if 40 horses are accommodated - 10-12m2 (stall dimensions). These standards have been adopted for the convenience of designing stables.
Harness is stored and dried in the harness room. For better drying and ventilation, this room is provided with a heating and supply and exhaust ventilation system. The harness room is designed with an area of 10-12 m2 with a mandatory blank partition separating it from the stall room.
The duty room for farm staff occupies 10-12 m2, it must be equipped with heating and water supply systems (hot and cold water).
The arena for harnessing, guiding, mating is provided on breeding farms, its area is 80-90 m2.
Flooring
Many people simply remove the top layer of soil, sprinkle it with peat, and the coating is ready. This is due to savings, but this can hardly be called savings; the costs for a doctor will be much higher. Peat, together with manure and urine, forms an excellent environment for infectious diseases.
There is an option for an adobe floor, but you have to knock it down two or three times a year and lay a new one, it is very warm and not slippery, but you need to always have a clay quarry with you, and this is also not cheap. Wooden flooring is also a good option, but over time it becomes slippery. We recommend the best option - a concrete floor. Only he will protect you from rats.
Concrete floor
Walls
The walls of the box must be made of proven brick. Horses do not chew or hit it with their hooves. But if we take into account the needs of the animal, many simply lose their will because they gnaw on wood, which hurts the horse’s teeth or hits it with their hooves:
- It’s very easy to make a wooden partition and you don’t have to skimp on the profile. The dividing partition should cover half the height of the stable. Side partitions must be equipped with ventilation holes.
- The front wall can have a different appearance and production method. The front mesh of metal bars resembles a prison, but is convenient for stables with regular visitors - the horse cannot reach out and bite.
Front mesh
- For a private stable, an open front wall is suitable. If the dividing partitions are made of brick, then the front wall is also built from it. It can also be made from a channel and a board. Or simply abandon metal structures altogether and install a completely wooden partition.
Features of a farmer's stable
A farmer who has several or even one horse also needs a stable. All standards and hygienic requirements for horse breeding farms also apply to such stables. But unlike large farms, a farmer can allow his horse to be kept in a more spacious stall with an area of 10-14 m2 and a height of 2.8-3.5 m.
The floor for a farm stable is made of adobe, since it is relatively cheap and meets hygienic requirements. To make an earthen floor you need to dig it up, mix the earth with straw cuttings and compact it thoroughly. When planning the floor, you need to provide a slight slope from the outer walls to the passage.
The ceiling is made of 50mm thick boards, it is insulated with clay-sand mortar and sawdust.
At the stables, a corral is constructed from boards or poles. The horse stays in this pen while the stable is being cleaned and ventilated.
Doors
Almost all types of doors are equally good and equally bad. If your stable does not have the required width, then it is better to make sliding doors. An ordinary rotary or, as it is also called, “rotating” one, withstands the pressure of horses better and more reliably. The size of the door must be at least one meter and fifty centimeters. And pay attention to the fittings, there is, of course, a great choice here, but two galvanized bolts for a regular door are the most reliable and durable lock.
Sliding doors
Rules for placing parts
The disadvantage of the stall is that only the front wall remains for feeding and it is necessary to place a manger, a feeder, and an automatic drinker on it at the same time. This gives the horse a reason to indulge in water and food and do other fun things. If it is not possible to divide the stall, then you need to follow the rules:
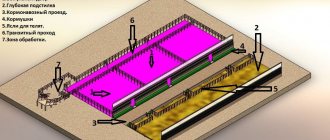
- The stall size ranges from three meters long to three and a half long and two meters long.
- Slope up to one and a half centimeters per meter in the direction of the gutter.
- The separation pole is tightly attached to the feeding table.
- The stable pole is attached at a level of one meter from the ground.
- To avoid collisions with a neighboring horse, a shockproof casing is attached.
The box stall is very convenient; it provides the horse with a comfortable bed, measuring two and a half by one and a half meters. You can provide a grill on top to prevent bickering between animals.
In the end, one thing we can suggest is that the best stall for a horse is a box. First of all, this is the health of our horses, which will always reciprocate our feelings.
Independent design
You can create a stable plan yourself, modifying the standard one or completely anew. You can draw it by hand, or you can use computer programs. After this, you will need to submit the plan to the local authorities in order to obtain planning permission. To successfully develop a plan, it is necessary to take into account the specifics of individual structural elements.
This is what a stable project drawn by yourself might look like
It is important at this stage to calculate the cost of construction. It is recommended to draw up a full estimate, which will include:
- the cost of all materials with a small margin;
- payment for the services of builders, watchmen, and auxiliary workers during construction;
- the cost of providing all necessary communications;
- state duties.
Construction estimates for a standard project are easy to find on the Internet. An individual project will have to be calculated independently. You will need to add 10% to the total amount for unforeseen expenses that will definitely arise.
Communication design
Although there may be no communications in a stable, especially a summer or temporary one, there should be communications in the permanent place where horses are kept.
Electricity
In a winter stable there must be light not only in the corridor, but also in the stalls. The duration of daylight hours in the place where horses are kept permanently must be at least 8 hours. In addition, in an unlit room it will be problematic to clean stalls and care for horses.
The stable should be well lit.
You will also need sockets for electrical appliances. It is better to place them either outside at the front door under a canopy in the case of a summer house, or in technical rooms and in the corridor from the inside at the front door. If the stable has a rest room for staff, sockets should be there too.
Ventilation
It must be there! Sometimes, during construction, to ventilate the room, a gap is left between the roof and the crowns of the walls, but this cannot be done. Constant drafts can cause horses to catch colds. However, it is impossible without ventilation, since the air must be clean and dry, otherwise problems with the horses’ health may begin. In addition, these animals quickly heat the room with the heat of their bodies, and the stable should be cool.
Diagram of a simple ventilation system.
It is optimal to space the ventilation holes at different heights. This creates the air flow necessary for traction. The inlets are made in the stalls, and the outlets are on the roof.
Good ventilation can also solve the problem of condensation.
Water supply and heating
If possible, you need to supply water to at least the technical room, this will greatly simplify the work of the grooms. If this is not possible, then the design provides space for large barrels in which water will be stored. Their volume is derived from the fact that each horse requires 50 liters of water per day.
In places with harsh climates it is necessary, but it must be used with caution. Low temperatures are not as dangerous for horses as stuffiness and heat. The optimal temperature for a stable lies in the range from +5 to +15.
Arrangement inside the stables
It is worth arranging the interior of the stable in such a way that it is comfortable for horses to be there, and it is convenient for people to carry out cleaning and other work.
Feeder and drinkers
Feeders can be purchased ready-made or made by yourself. The main thing is that it is convenient for the animals to eat from them, and that filling them does not cause inconvenience to the owner. Feeders are often hung on the wall at a height of no more than 1 m from the floor, and a hatch is made above them so that food can be placed without entering the stall.
Never dump horse feed on the floor. There is a high probability that the animal will become infected with tetanus or worms.
Automatic drinking bowls will make it easier to care for horses; otherwise, it is recommended to install special containers, given that animals require up to 50 liters of water per day.
Drinkers and feeders must be periodically cleaned and washed with disinfectant solutions.
Stall and bedding
The stall should be comfortable and safe. The size varies depending on the breed of the horse. The height from the floor is at least 2.5 m. It is advisable to make the walls from wood or metal gratings, so that the animals can see each other.
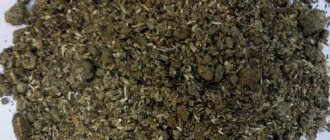
Sawdust, straw or peat can be used as bedding. They should be changed every few days, carefully cleaning out the corners. The 50 cm thick bedding is changed once every month or two.
Watch the video of the arrangement of a stable using the example of one stud farm:
Safety in the stables
The finished stable must meet safety requirements. And we are talking not only about fire safety, although the presence of fire extinguishers and containers with sand is strictly necessary. When building a stable, it is necessary to take into account several not obvious points:
- Horses are large and strong animals. Frightened or angry, they hit doors and partitions with force. Therefore, special attention must be paid to the strength of these elements.
- Wiring should not protrude from the walls, otherwise animals may accidentally damage it and receive an electric shock. Place sockets so that horses cannot reach the wires. Provide good insulation for wires.
- There should be nothing inside that could scratch or injure the horse - protruding fasteners, sharp corners, protruding structural elements.
These rules can be called banal, which is why they are often forgotten. And the horses pay for this with their health and their owners with money.
Construction of a summer stable
The summer stable differs from the winter one in being less “solid.” It has fewer requirements and is easier to build. In addition, it does not require a deep foundation and registration, since it is not a permanent structure.
Summer stable
This is what the step-by-step construction of a summer house for two horses using frame technology looks like. The dimensions 6x3m were chosen based on both the comfort of the horses and economy. Lumber has a standard length of 6 m, so you won’t have to overpay for what will be scrapped.
Video - Construction of a summer stable
Famous stable buildings
Solomon's Stables
- The stables of King Ahab found by archaeologists in the Israeli city of Megiddo (IX century BC).
- "Solomon's Stables", Jerusalem - a system of underground arched ceilings that strengthens the artificial embankment of the Temple Mount (under the al-Aqsa Mosque). In fact, it was a Muslim architectural structure - the Marwan prayer house. Turned into a stable by the Templars.
- "Great stables" (Grandes Écuries) of the Prince of Condé in Chantilly, built by the French architect Jean Aubert in 1719-1740. for 500 heads. Now it is an equestrian museum.
- Hyde Park Stables on Rotten Row is one of London's landmarks.
- Tauride Palace of His Serene Highness Prince Potemkin. After the death of Catherine II, Emperor Paul I, who hated her memory, gave the building to the Horse Guards Regiment. Stables were built in the luxurious halls.
- Augean stables.
- Stud farm du Pin (French: Le Haras-du-Pin), built at the beginning of the 18th century by order of Louis XIV in the town of Pin-au-Haras (French: Le Pin-au-Haras). The plan for “Versailles for Horses,” as this 1,200-hectare complex is sometimes affectionately called, was drawn by Le Nôtre, the author of the Versailles park.
Step-by-step instructions for building a summer stable
There are fewer requirements for summer stables than for regular ones. Therefore, this can be installed using frame technology. We will build without a stationary foundation, on posts. This design helps make the building collapsible and can be moved. We take the sizes based on the number of horses, we will have 2 of them.
Foundation
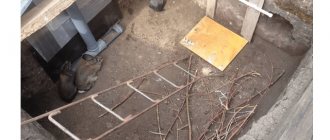
You should start by marking the outer perimeter of the flyer. This is done as follows. Using a tape measure and any angle measuring device, mark a 6x3 rectangle on the ground. The length of the diagonals also needs to be checked to ensure that the rectangle is even.
Pegs are driven in around the perimeter and tied with rope. It marks the boundaries of the pit, which must be dug to a depth of 30 cm. A drainage drain is made, a film is laid for waterproofing, after which the resulting hole is filled with layers of graphite and sand several centimeters high in turn.
Illustration of a finished foundation
Piles are installed on the resulting gravel-sand “cushion,” which can be bricks or blocks made of any strong material. They are covered with roofing felt to prevent direct contact with the tree, and the first stage of construction is completed.
Building a frame step by step
Step 1. We begin the construction of the frame from the bottom frame. It is fastened at the corners so that the logs are embedded in the frame. The location of their installation must be calculated so that they pass along the foundation blocks. To strengthen the structure, a 15x15 cm board is placed between the joists.
Fastening frame parts.
Step 2. Then comes the turn of forming the corners, for which corner vertical posts are installed on the harness. The main ones are also placed in the place of future windows and doors. Intermediate between them, so that the maximum gap does not exceed 3m. Their height is equal to the desired height of the stable, in this example it is 3m.
Ready frame.
Step 3. Using levels, we measure the angles, after which we fix the racks with braces and cross members, which will prevent the structure from “floating.” The upper harness is done in the same way as the lower one. Crossbars indicate door and window openings. The front wall is raised by a beam, forming a roof slope. We put it on the floor joists.
Step 4. Then the middle wall is formed. To do this, a beam of the required height is placed vertically according to the marks.
Frame with rafters.
Finishing and insulation
The next stage of construction begins with the installation of the roof. Then comes the turn of the external walls - they are covered with insulation and sheathed with any lumber. After which the roofs and walls of the stable are insulated.
Cold roof scheme.
Insulation is inserted into the cells of the frame, after which the entire internal perimeter is covered with heat-insulating material using a construction stapler and sheathed with moisture-resistant plywood. Then, the floor is covered with boards, windows and doors are inserted, and the summer stable is ready.
How to make a stable with your own hands?
Site selection
You should carefully consider the choice of site for the construction of housing for horses. It is desirable that it be a plain or a small hill. In the lowlands, the animals will be protected from the wind, but dampness will settle in the stables. Increased humidity will have a negative effect on horses' hooves.
If the site is located on a hill, then the water quickly leaves it, but the weak point will be the accessibility to the winds. Constant drafts are harmful to animals. This is inevitable, so it is worthwhile to provide natural barriers of trees that form so-called forest belts.
Construction materials
Be responsible when choosing materials for building housing for horses. To build durable, warm and dry stables, brick and wood are especially often used; as an alternative, adobe, bulk mixtures and insulation materials are used for frame construction.
Do not use stone and concrete blocks. Such a structure will not be able to provide and maintain the necessary microclimate for animals. Adobe structures are warm, but short-lived.
Brick
The most popular material for construction, which has a lot of positive arguments:
- buildings are built to last, independent of the influence of environmental factors;
- minimal heat loss, moisture does not accumulate;
- The thickness of the walls in the climate of Central Russia should be at least 2 bricks.
A significant disadvantage of this building material is the cost of construction and the low speed of construction work.
Tree
Wooden buildings have a more respectable appearance. Working with such material is not difficult, and the speed of work is at a constantly high level.
Wooden rooms retain heat well and conduct air. Animals will feel comfortable in such stables. When building a wooden dwelling, you should use logs or beams no thinner than 20 cm, covering them with clapboard.
The use of wood in construction has its disadvantages:
- Short service life of the stable. Wood tends to deteriorate when subjected to physical impact.
- The building has a high level of fire hazard.
- Fungus, wood-boring beetles, etc. can ruin a structure and make it life-threatening in a short period of time. The problem is partially solved by the use of wood impregnations and treatments. These are additional operating costs.
Frame-and-fill design
Buildings of this kind are characterized by the lowest cost. The frame is built from wood or metal. Double walls are erected, and the voids are filled with a mixture of sawdust and expanded clay, mineral wool and other insulation.
If there are gaps on the walls between the joining material, then the internal bulk filling will spill out through them. This creates air pockets inside where rodents and pests can live. In addition, due to voids, the thermal insulation of the stable will be reduced.
Heat loss, condensation formation and the appearance of dampness in this situation are inevitable.
Foundation
Before constructing the foundation, site preparation will be a necessary measure. It is cleared of any type of vegetation, trees are uprooted as much as possible, and the top layer of soil is removed.
If the plans are for a brick stable, then the foundation will have to be poured with a concrete strip type. Waterproofing material is laid on top of the concrete to protect the walls from dampness.
For other types of structures, a gravel cushion is poured and a pillar foundation is installed. To do this, corner supports are installed and from them, using a beating cord or level, even rows of a columnar base are built. The number of pillars depends on the area of the proposed building.
A protective layer is laid on the foundation. Pressed wood lining will prevent rodents and other unwanted guests from entering the stable.
Construction of the frame
When building a room made of brick, there is no need to build a wooden frame. In other cases, you cannot do without it. There is no point in saving on materials used in such work. The wood must be of the best quality, because the service life of the entire stable depends on this.
The frame, 3-3.5 m high, is assembled from timber, with diagonal beams attached for greater stability and strength. Before assembly, be sure to study the design diagram so that unnecessary questions and time-consuming moments do not arise during the work. When assembling, consider the location of window and door openings.
Walls
The first step when building walls is to determine their thickness. This parameter is directly dependent on the climate of the region where it is located. The lower the winter air temperature, the thicker the stable walls. A 25 cm wall preserves the microclimate even in the most severe frosts. The minimum wall thickness is 10 cm.
When assembling wooden walls, it is recommended to use several types of fastenings, and keep the distance between them the same. This will increase the strength of the structure. Consider installing waterproofing between the foundation and the wall.
Divide the stable area into stalls using wooden partitions. They can be mounted at ceiling height by making window openings on both sides and inserting grilles into them. Another option is to construct wooden dividers with a height of 1.3 m to 15 m.
Keep in mind that each animal requires a minimum stall size of 3x4 m. A space of 4x5 m is considered optimal.
Roof
To protect animals from bad weather, precipitation and keep the room warm, installation of a reliable roof is required. The most popular are single-pitched and gable roofs with a water drainage system.
The first option is the cheapest, because it requires a minimum amount of materials. A layer of vapor barrier is laid on the wooden beams, and then a slate, metal-profile or other roof is assembled.
When building a gable, more building materials will be required, but the advantage will be the possibility of using the attic space for household needs. You can store hay, straw, accessories, or any other material there.
Sew the ceiling with a board no thinner than 5 cm, and insulate it with expanded clay or mineral wool. This will additionally keep the room warm.
Floor installation
In the construction of stables, 2 flooring compositions are used:
Clay
Comfortable for horse hooves, as it is quite soft in composition. Its cost is inexpensive, you can repair and correct defects yourself, without spending a lot of time and effort. Grooves for manure flow are easily formed.
But, such a floor tends to absorb moisture well. To destroy germs from horse excrement, sanitary cleaning of the floor is necessary. In this case this is not possible.
Concrete
It washes well and does not absorb liquid animal waste. In stalls, the floor is poured at a slight angle so that the liquid flows into the sanitary openings behind the compartment and is removed from the stable.
The main disadvantage of a concrete floor is its hardness and low thermal conductivity. Therefore, it is recommended to lay a layer of boards on such a floor. This will protect the horses' hooves and prevent them from freezing on the cold surface.
Wood
Often used in the construction of frame stables. To install it, a pit is dug, which is later filled with coarse crushed stone.
There is no need to leave a cushion of air under the floor. It will make the building unstable. A ditch is provided along the perimeter for drainage, the depth of which is at least half a meter. This type of floor requires periodic replacement due to wear and tear of the material.
Windows and doors
The optimal width for a door is considered to be 1.5 m. If the size of the stable allows, then it is better to use hinged swing doors. They are more reliable in terms of resistance to animal attacks. Otherwise, you'll have to settle for sliding ones. They save space, but are less reliable in operation. Among all the options for locks and latches, the favorite is the regular lock.
The area allocated for window openings is calculated as 1/8 of the total area of the frame walls or 1/15 of the floor area. The standard window size is 50 cm by 70 cm.
They are installed at a height from the floor not lower than 1.5 m, but not higher than 2 m. To protect from excessive sunlight and for safety reasons, it is advisable to provide shutters on the windows. Be sure to cover opening window openings with mosquito netting to prevent insects from disturbing the horses.
Summer stable
Summer quarters for horses do not require registration, as they are not permanent buildings. It is easier to build and there are no special requirements.
The most common option for building a summer stable is the frame construction method. Using timber, boards, fasteners and a level, the frame and frame of the room are assembled.
The walls are assembled from lumber using insulation. A wooden floor is being installed. Windows and doors are inserted into the openings.
When laying ceiling and roof beams, take into account the slope to organize drains. The beams are hemmed with a board, a heat-insulating layer is laid on top, and a special film is nailed with a stapler. Plywood with moisture-repellent impregnation is nailed on top. Next, the slate roof is installed.