Cardboard box incubator
Using a cardboard box is a very cheap way to make an incubator, but don't expect the resulting structure to be durable and last for centuries. The work is performed in the following order:
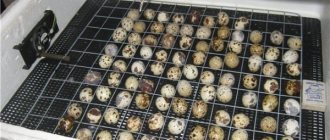
It is necessary to take a box, the dimensions of which are calculated based on the amount of planned incubation products. The inside of the box is covered with several layers of paper or felt. Holes are made where the electrical wiring will come out. 3 25W light bulbs are attached to the inside. They should be 15 cm higher than the laying of incubation materials
There are existing gaps, even where the wiring is sealed with cotton wool, but it is important not to forget about the presence of holes for ventilation. Production of wooden trays for eggs and mounting rails (for installing trays), doors. Place a thermometer inside the incubator, place a container of water at the bottom, and cut a viewing window on the side of the box.
Mechanism assembly
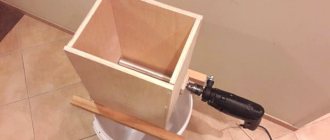
After painting, you can assemble the tray turning mechanism. First of all, the axle is installed in the bearing and secured in place. To prevent the bearing from falling out, it is tightened with a steel clamp.
We securely fix the frames on the axes. On the left side of the frame, a mount for the gearmotor is welded. Where and how the gear motor will be attached must be taken care of before painting.
We install the remaining frames (in this case there are only four). We connect the upper and lower frames with rods (the rods can be made from a 10x2mm strip) on each side. The middle frames are attached directly to the rods. The distance between the frames is 15cm.
The frames are attached using M5 bolts. To prevent the nuts from unwinding, they must be locked.
To drive the trays in motion, you can use two methods - chain transmission and using a threaded rod. But due to the design features of the gearmotor, I was unable to install the threaded rod. I had to go to a flea market and buy the smallest sprocket and chain for it.
But as it turned out, with this size of the sprocket, the speed of rotation of the trays turned out to be too high (about 6 seconds). I decided to make my own sprocket with seven teeth. To do this, I drilled holes in a 4 mm thick strip and cut off the excess with a grinder. And the tray turning time slowed down to 11 seconds.
At the bottom of the structure, on a piece of plastic, I installed limit switches (switches) that will stop the engine when the tray is tilted at 45 degrees.
Why is it necessary to turn eggs?
If you neglect the timely and regular turning of eggs, they will not hatch into strong and healthy quail offspring.
If you dive into biology, you can understand that the yolk has a lower specific gravity than the white. Accordingly, it will always rise up. And if the testicle lies on one side all the time, then the embryo runs the risk of sticking to the shell and dying.
Farmers say that quail eggs need to be turned at least four times a day, that is, every six hours.
Thus, the entire egg is warmed up evenly, the organs of the future embryo develop gradually, and the correct position of the embryo is ensured by the end of incubation.
Manipulations with hatching eggs increase not only hatchability, but also the health of the entire quail population.
Experiments were carried out that showed that eggs that never turned over gave 15% of the offspring. While two knocking turns provided 45% of hatchability, and six turns provided 85%.
It is worth noting that the hatching of quails was not affected in any way by which coups began: from the first or third.
What is it needed for?
Many novice poultry farmers are not sure that they need an automated incubator and do not know what it is for. This device is indispensable as it independently turns chicken eggs. This greatly simplifies the process of incubating the eggs, because the person will not have to turn them over manually.
It is necessary to turn the testicles over, as this contributes to the proper development of the young fetus. If this is not done, the chicken will grow sick and soon die. Professional biologists say that they should be turned over at least three times a day.
How to make an automatic egg incubator at home?
Before making an incubator with your own hands, you need to familiarize yourself with the features of creating the design.
Size calculation
It is recommended to understand the dimensions of the future incubation structure in advance. To determine the size, you will have to decide in advance how many chickens will be raised. The number of eggs that will be placed in the incubator depends on this. In addition, the dimensions of the device depend on the material of manufacture and the characteristics of the heating system used.
Most often, poultry farmers make structures that can hold 100 eggs. In this case, each egg cell must have a diameter of at least 40 millimeters and a depth of about 75 millimeters.
Necessary tools and materials for work
Before making an incubator, it is necessary to prepare in advance the materials and tools for the work. To assemble the structure you will need:
- Drill. This is an indispensable device with which holes are created for installing fasteners.
- Assembly adhesive. Some structural parts cannot be secured with screws or nails. Instead, they are connected using a special mounting adhesive.
- Knife. Used for cutting fabric or rubber materials.
- Bulb. It is used when organizing heating inside the incubator.
- Fridge. The body of the structure is created from it.
- Hygrometer. It is used to monitor the humidity level in the device.
- Thermostat. An indispensable part of automated incubation systems that controls temperature indicators.
Incubator body
The effectiveness of the further operation of the created device directly depends on the preparation of the case. Therefore, it is necessary to familiarize yourself in advance with how to create it correctly.
The housing for the incubator can be made from an old unnecessary refrigerator. To do this, remove the freezer and other equipment that is built inside. Then small holes are made in the walls of the refrigerator, through which air circulates. After organizing the ventilation system, you can install egg trays inside.
Tray system
The system of trays that are installed inside the structure is made in the form of a grid. A small grid with cells for eggs is installed inside it. These trays differ in the number of cells. The most commonly used systems are those that can accommodate a hundred testicles. However, for more compact designs, less capacious systems are used, which contain only 60-70 cells.
For automated systems, tray models are used that are equipped with special sides to support eggs. They are made from durable cardboard or foam rubber.
A heating element
People who decide to make an incubator themselves will have to equip a heating system. 40 W incandescent lamps are used as heating elements. They are located at the top and bottom of the refrigerator. At the same time, they must be positioned in such a way that the light bulbs located below do not interfere. Therefore, before organizing a heating system, you need to carefully think through everything and make a layout diagram.
Features of keeping and caring for chickens in the summer at the dacha, growing and breedingRead
You also need to install one of three types of thermostat:
- barometric;
- bimetallic;
- electric contactor
Fan
When organizing a ventilation system inside the structure, you will have to install a small fan. It is needed to improve air circulation through the drilled holes. For a refrigerator, choose a fan that meets the following requirements:
- possibility of operation from a 220V network;
- the diameter of the structure is not less than thirty centimeters;
- productivity is about one hundred m3/h.
Automatic turning mechanism
To turn the laid eggs, a special turning mechanism is used, which must operate at least twice a day. There are two main types of systems that are used in incubators:
- Frame. This mechanism pushes the testicles together using a small frame.
- Inclined. This is the common system used most often. In this case, all the eggs turn over due to the tilt of the filled trays.
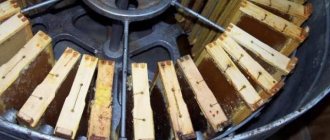
Inclined tray for 50 eggs
The main part is an aluminum base, with holes drilled in it for better air circulation. The maximum diameter is 1 cm. The sides are made of laminate. A cut is made to the middle in increments of 5 cm, through which a mesh of twine is woven to hold the eggs.
For smaller eggs, you can make a grid in increments of 2.5 or 3 cm. A DAN2N electric drive is used to rotate the axis. It is usually used for ventilation in pipes. The drive power is enough to slowly tilt the tray by 45°. The change of position is controlled by a timer, which opens and closes the contacts every 2.5-3 hours.
Manufacturing of the device
There are several options for creating an incubator with your own hands at home. You can use an old refrigerator or a box as a base. This device can also be assembled using foam plastic. Below are diagrams of the most popular designs that you can make yourself.
Incubator out of the box
- First, you need to cut a small hole in the side of the box for ventilation, and secure the light bulb sockets in the box lid.
- For 60 chicken eggs you will need to insert 3 25 W light bulbs. They should be located at a distance of 15 cm from the tray.
- For reliability, it is recommended to cover all edges of the box with plywood or chipboard sheets.
- Below the eggs you need to place a container of water. The area of the evaporated surface depends on the volume of the housing and is selected experimentally using a hygrometer.
- The egg tray is installed in the middle of the box.
- It is recommended to choose a gyroscope and thermometer, the data of which can be viewed without opening the box. It is recommended to tear off the lid of the box only to turn the eggs.
Simple incubator out of the box
From foam plastic
Polystyrene foam has excellent thermal insulation properties, and most farmers can find this material at home. This is why do-it-yourself incubators are often made from polystyrene foam. The principle of its manufacture is in many ways similar to creating a structure from a cardboard box. But you can choose the housing size yourself based on the desired number of eggs.
- First you need to make a box from foam sheets. You can easily do this yourself using adhesive tape. Simply cut the edges to the desired size and fasten them into a box in a convenient way for you.
- This design will provide high thermal insulation and will allow the use of light bulbs with a power of about 20 W for heating. Of course, you can include special heaters in the design, but the option with light bulbs is the most budget-friendly and they cope with their functions perfectly.
- As in the previous design, it is recommended to insert the light bulbs into the top cover at a distance of about 15 cm from the eggs.
- You can use a ready-made structure as a tray, or make it from wooden planks. It is best to place the tray in the middle of the homemade box so that the distance to the water containers and heating elements is approximately the same.
- When making such an incubator with your own hands, do not forget to leave space between the tray and the walls, because air circulation is very important when hatching chickens at home.
Eggs in a foam incubator
With automatic revolution
The most difficult thing to do at home is to make an incubator with automatic egg turning. But this design will help to hatch chickens at home as conditionally as possible, because regular egg turning is the most important factor. Such a mechanism will be indispensable for people who are often absent and cannot pay enough attention to hatching chickens from eggs. In addition, this design will minimize the number of times the lid is opened, which is also a very important factor.
The easiest way to implement automatic turning is to purchase ready-made trays with a special mechanism. Such a device will cost several times less than a ready-made incubator, but you will need to create a suitable housing, as well as purchase a thermometer and a gyroscope. The body of an old refrigerator is perfect for assembling a house. It has good thermal insulation and a convenient door. You will need to perform the following sequence of actions:
- Remove unnecessary parts, including the freezer.
- Cut a window in the door and glaze it.
- Attach automatic turning trays where shelves were previously.
- Install 4 light bulbs at the bottom of the refrigerator and 2 at the top.
- Place a reservoir of water at the bottom.
- Attach the thermometer and gyroscope so that they can be seen through the window.
Eggs in an incubator from the refrigerator
Photo gallery
The photographs and drawings presented below will help you make a device for hatching chicks at home. You can find even more information in the video.
Pros of homemade designs
Homemade incubators have a number of positive aspects:
- Designed for local conditions, taking into account climate and structural features;
- Possibility of assembly from available materials, according to your own measurements;
- They are distinguished by economical energy consumption;
- Reliability in use;
- Capacity. Some designs for home use hatch several hundred eggs at once;
- In such containers the survival rate is 90%. Chicks are no different from those hatched under a hen;
- The versatility of the device allows you to produce poultry of different breeds, including exotic ones (chicken, geese, parrots, ostriches).
Vertical refrigerator incubator with semi-automatic egg turning
This type of incubator from a refrigeration unit is more difficult to implement than the previous ones, however, with its help you can significantly reduce the time spent on turning eggs yourself. No, the incubator will not do it on its own, however, from now on it will be possible to turn the cells over in one motion.
The manufacturing principle is similar to the previously described method, however, there are significant differences in the installation of additional mechanisms. You will have to spend a little more time, but the result will make you experience real pleasure.
Drawing of a vertical incubator from a refrigerator, direction of air flow circulation
Materials and tools
- unnecessary refrigerator;
- thermoregulatory element;
- pin;
- trays for eggs made of plastic or metal;
- axles made of metal, 8-9 millimeters in diameter;
- a heating element;
Heating element for incubator - a small fan, for example, from a computer system unit;
- metal racks, 4-5 centimeters thick;
- breathing tubes, 3 centimeters in diameter;
Breathing tubes - any load weighing 500 grams;
- screws;
- water container, like a cat litter box;
- a strip with holes made, 6 millimeters in diameter;
- rubber cushions;
- electrical and conventional construction tools.
Let's start construction
Step 1.
We cut off the section inside that separates the freezer and refrigerator compartments, if there is one in the design. We remove all excess from the inside and seal the cracks, by analogy with the instructions for the second and first methods.
Step 2.
We treat the body of the future semi-automatic incubator with cleaning agents and antiseptics, wipe it dry and prepare it for installation of the main parts.
Option for a vertical incubator from a refrigerator
Step 3.
We find the center of the front door and rear wall of the refrigeration unit and at this level we install racks, which we fix in the device body using metal screws. We make holes in the racks at the level of the shelves.
Self-tapping screws for metal
Step 4.
In each cellular egg tray we insert a metal axis, the diameter of which will be approximately 8-9 millimeters. We install both ends into the racks, getting even rows of boxes between them.
Vertical incubator assembly stage
Step 5.
We attach a metal strip to the egg boxes using screws as fasteners. The gap should be at least two millimeters. From the bottom side of the bar you need to hang a five-hundred-gram load, which can be absolutely any heavy object. A pin is attached to the free part of the bar from below, which plays the role of a fuse, preventing it from going inside due to the pressure of the suspended load.
Attaching the bar to the trays, installing the load
At the top of the incubator, a bar extends to the outside of the housing. To do this, you need to drill a slot in the top of the refrigerator.
Step 6.
We install the breathing tubes into the side of the refrigerator by drilling corresponding holes in the body, top and bottom, each time at approximately a third of the height.
Step 7
We will equip the lighting and heat by installing three lamps with a power of approximately 100 watts on the back panel of the refrigerator. According to the diagram, we connect a thermoregulatory device to them.
Installing incubator elements from an old refrigerator
Step 8
Ventilation in the form of a part from a computer or a small household fan is installed so that the air must pass through the heating elements.
Household fan
Step 9
Fill the tray with water and place it on the bottom of the incubator.
That's it, the semi-automatic incubator is ready! To turn the eggs, you just need to lift the bar up and then release it, securing it with a pin in another hole. During this procedure, the trays attached to it tilt in the other direction, changing the position of the embryo inside the egg, and also exposing the other side to heat. This way you will save a lot of time on manually transferring eggs and get high-quality and healthy feathered offspring.
Breeding chicks in a homemade incubator
However, we all understand that a semi-automatic incubator is not yet ideal. Therefore, we advise you not to make a decision before reading the following instructions, with which you can make a fully automatic incubator!
Useful tips
When making an incubation box, experienced breeders recommend adhering to the following recommendations:
- To ensure uniform heating of the grid with eggs, incandescent lamps should be installed both below and under the lid.
- For natural ventilation, be sure to make several round holes in the lid.
- Provide a backup heat source in case of a power outage. To do this, make a special chamber at the bottom, which is separated from the rest of the incubator with three-layer plywood. Drill many holes in it. Place the aluminum canister into the resulting compartment. If the electricity goes out, you need to pour boiling water into the canister, and then close all the ventilation and cover the incubator with a blanket. The heat from the homemade battery will emanate for 12-14 hours.
- Avoid sudden shocks and noise in the room, otherwise the embryos may become frightened and lag behind in development.
- Do not use outdoor thermometers to monitor temperature, as they have a fairly high error rate. The best option is medical devices. They can be installed near the eggs, but they must not be allowed to come into contact with the shell, otherwise the accuracy of their readings will suffer. To ensure accurate data, measurements should be taken some time after turning on the incubator and at regular intervals.
- If the device is large, you can use an ordinary fan, which will help maintain the temperature balance inside the chamber.
- The incubator should be installed on an elevated surface in a room where room temperature is maintained, there is no direct sunlight and there are no drafts.
Basic requirements for an incubator
When starting to make a home incubator with your own hands, you should always keep in mind that the end result of this work should be an apparatus in which all the conditions are created for the full development of the embryo in the egg and the birth of a healthy chick in due time.
In other words, the design of the incubator and its equipment should be subordinated to the goal of creating in the chamber the same conditions that a brood bird creates for its future offspring. And among these factors, the most important are temperature and humidity.
Thermometers for incubators
It is necessary to design the future incubator in such a way that the poultry farmer has the opportunity to constantly and without any obstacles control the temperature and humidity conditions of incubation. Here it must be borne in mind that the aging of eggs of most of the most popular poultry species among breeders occurs in the range between 37.1 and 39˚C.
In this case, in the first days of incubation, the eggs (before placing them in the chamber they can be stored for no more than 10 days) are heated to the maximum temperature calculated for a particular type of bird (see temperature table), and by the end of this period the temperature drops to the minimum. And only when hatching quails, a constant temperature of 37.5 degrees is maintained throughout the entire 17-day incubation period.
Table of temperature conditions in the incubator
As for another important parameter - humidity, it also changes throughout the entire period before the chicks hatch. In particular, the optimal level of air humidity inside the incubator before the moment of hatching should be 40-60%, and between hatching and the moment of hatching it should remain at 80%. And only before sampling the young animals, the relative humidity should be reduced again to 55-60%
And only before sampling the young animals, the relative humidity should be lowered again to 55-60%.
Incubator with hygrometer
A good help for high-quality hatching of chickens in a home incubator will be the installation of a forced ventilation system. The operation of the electric fan will ensure air movement inside the chamber at a speed of 5-6 m/sec, which will contribute to an ideal balance between the temperature and humidity of the atmosphere in the incubator.
Where to start creating an incubator?
Any process of assembling a household incubator begins with determining the main material from which the device will be made. For example, large pieces of polystyrene foam (at least 25x40 cm in size) or an ordinary large-volume cardboard box are good for this purpose. Perhaps the ideal option is to have an old refrigerator that has expired. In any case, we must proceed from the determining factor that is inherent in any structure - its thermal insulation ability.
Polystyrene foam sheets
In addition, you should take care of devices for heating the incubation chamber (lamp or heating device) and convenient temperature control (thermometer). In order not to burden yourself with the need to manually periodically turn the eggs, it is worth equipping the incubator with an automatic turning system. Such a mechanism will save a person’s time. True, such devices are usually installed in large incubators - for 200 or more eggs.
Components for creating an incubator
Components and tools required for work
- the body of an old non-working refrigerator, a cardboard box, plywood sheets (boards);
- foam blocks - depending on the chosen project;
- standard incandescent lamps (power - from 25 to 40 W). The number of light bulbs is directly dependent on the volume of the incubator. Thus, a relatively small apparatus for a hundred eggs is normally heated by 4 lamps. Instead of light bulbs, you can use electric heating elements;
- egg trays. To keep the eggs tightly in place, trays are made of metal mesh, wood, plastic or analogues of these materials.
- fan, thermometer;
- thermostat. Used when designing an automatic incubator. For this purpose, bimetallic plates, barometric sensors or electrical contactors can be used;
- gear motor, bearings with clamps (for equipping the device with a turning mechanism);
- hygrometer. With its help, current humidity is monitored;
- installation tools (jigsaw, pliers, knife, electrical tape, etc.).
Prices for popular models of jigsaws
Jigsaw
Remember that before selecting everything you need from the list above, you need to decide on the optimal size of the incubator.
Thermostat
The thermostat is a very important part of the incubator. Choose a reliable digital model with a PID algorithm.
The main requirement for a thermostat is a digital one with a PID controller. The relay model will also perform its functions, but now you can find comparable cost models with more accurate algorithms.
Under no circumstances should one thermostat be used to maintain the regime in two different incubators. Unless the model has two sensors and two independent control algorithms, each incubator must have a separate thermostat.
Uncontrollable risks
A homemade incubator always carries the risk of temperature fluctuations. There is no way to insure against this.
The use of a third-party thermostat can lead to the establishment of hysteresis with a large amplitude. This is a phenomenon in which the temperature fluctuates in one range and does not settle at any value. Accidental overlap of housing geometry, thermostat algorithms and thermal insulation properties of the housing can lead to fluctuations of up to 3 degrees on either side of the set value. This regime is unpredictable and interferes with the uniform development of embryos and the establishment of a constant microclimate. Unfortunately, without preliminary experiments and tests it is impossible to insure against this. Therefore, making a homemade incubator will always carry the risk of establishing temperature hysteresis.
Incubator manufacturing options
The device can be manufactured in horizontal, vertical and semi-automatic versions. Before construction, drawings and diagrams are drawn up, in which all the details of the future unit are indicated in detail.
Horizontal
To construct a unit of this type you will need:
- fridge;
- plywood sheet;
- 100 W light bulbs with sockets (4 pcs.);
- egg trays;
- water container;
- thermostat;
- scotch;
- drill;
- screwdriver.
Proceed as follows:
- Remove shelves and freezer from the refrigerator.
- Turn it over so that the door opens upward.
- Attach plywood to the inside of the door.
- Place light bulb sockets on a sheet of plywood.
- Drill a hole (5x5 cm) in the plywood door.
- Fill the container with water and place it at the bottom.
- Install egg trays.
- Attach the thermostat near the hole in the door using tape.
- Run the thermostat sensors through the hole.
Sectional diagram of the incubator: 1 - bath with water; 2 - viewing window; 3 — tray with egg; 4 — thermostat; 5 - temperature sensor; A is the distance from the light bulb to the egg
Vertical
The design of such an incubator involves the use of:
- directly from the refrigerator;
- Fibreboard (several sheets);
- glue;
- self-tapping screws;
- fan;
- thermometer;
- thermostat;
- tubular heater;
- metal wires (6 mm in diameter);
- containers;
- egg trays;
- welding;
- drills;
- spatula.
The work should be done in this order:
- Remove shelves and freezer from the refrigerator.
- On the inside, install fiberboard sheets with glue or self-tapping screws to level the surface and close the cracks.
- Install a fan on the rear wall, bring the motor to the outer wall.
- Attach a heating element near the fan.
- Make holes in the door around the perimeter for air circulation.
- Drill 2 holes on the top wall and install a thermostat and a thermometer.
- Fill the container with water and place it on the bottom.
- Build a frame for the trays from wire and place them in the refrigerator.
This is what a drawing of a vertical incubator will look like:
Semi-automatic
For the incubator to have a semi-automatic mode, you will need:
- fridge;
- metal strips;
- metal axles;
- self-tapping screws;
- egg trays adapted for axles;
- screws;
- load on the bar;
- cotter pin;
- breathing tubes with a diameter of 30 mm (2 pcs.);
- 100 W light bulbs with sockets (4 pcs.);
- thermostat;
- fan;
- water container;
- drill;
- screwdriver.
The procedure for your actions is simple. The main thing is to do everything according to the instructions:
- Remove shelves and freezer from the refrigerator.
- Make holes in the planks for the axles.
- Using self-tapping screws, install the strips on the side walls in the center.
- Install the axles into the trays and insert into the bars.
- Use one strip to vertically combine all the trays, attaching it to them with screws with a gap of 1-2 mm.
- Drill a hole in the top so that the connecting strip can be removed.
- Pull out the strip and make a hole in it for the cotter pin.
- Attach a weight to the lower end.
- The trays can be rotated by moving the bar; secure it with a cotter pin.
- Install the breathing tubes into the side surface at a height of about one third of the refrigerator and always on top.
- Mount the thermostat, light bulbs and fan at the bottom of the wall so that the air from the fan is heated by the light bulbs.
- Fill the container with water and place it on the bottom.
Horizontal model
The refrigerator is placed on the back wall with the lid up. In this position, the incubator takes up a lot of space in the room, but the absence of tiers of several trays inside allows you to accurately maintain the temperature regime over all the eggs.
The manufacturing steps are similar, only they make one large tray for the entire area of the refrigerator. The bulbs are hung evenly so that they heat the entire area. A fan must be installed, since the incubator has a large volume.
Homemade incubator timer with your own hands on the K176IE5 chip
Most electronic devices, such as the incubator timer in question, have been known since Soviet times. An example of the implementation of a two-interval timer for incubating eggs with detailed instructions was published in the magazine Radio, popular among radio amateurs (No. 1, 1988). But, as you know, everything new is well forgotten old.
If you are lucky enough to find a ready-made radio designer based on the K176IE5 microcircuit with an already etched printed circuit board, then assembling and configuring the finished device will turn out to be a simple formality (the ability to hold a soldering iron in your hands is, of course, highly desirable).
Let's look at the stage of setting time intervals in more detail. The two-interval timer in question provides alternation of the “operation” mode (the control relay is turned on, the incubator tray rotation mechanism is working) with the “pause” mode (the control relay is turned off, the incubator tray rotation mechanism is stopped).
The “work” mode is short-term and lasts between 30–60 seconds (the time required to rotate the tray to a certain angle depends on the type of specific incubator).
Important!
At the stage of assembling the device, you should strictly follow the instructions to avoid overheating in the soldering areas of electronic semiconductor components (mainly the main microcircuit and transistors).
The “pause” mode is long and can last up to 5 or 6 hours (depending on the size of the eggs and the heating capacity of the incubator.)
For ease of setup, the circuit includes an LED, which will blink at a certain frequency while setting time intervals. The LED power is adjusted to the circuit using resistor R6.
The duration of these modes is adjusted by timing resistors R3 and R4. It should be noted that the duration of the “pause” mode depends on the value of both resistors, while the duration of the operating mode is set exclusively by resistance R3. For fine tuning, it is recommended to use variable resistors 3–5 kOhm for R3 and 500–1500 kOhm for R4 as R3 and R4, respectively.
Important!
The lower the resistance of the timing resistors, the more frequently the LED will blink and the shorter the cycle time will be. Adjusting the “work” mode:
- short-circuit resistor R4 (reduce resistance R4 to zero);
- turn on the device;
- Use resistor R3 to adjust the blinking frequency of the LED. The duration of the “work” mode will correspond to thirty-two flashes.
Adjusting the pause mode:
- use resistor R4 (increase resistance R4 to nominal);
- turn on the device;
- Use a stopwatch to measure the time between adjacent LED flashes.
The duration of the “pause” mode will be equal to the received time multiplied by 32.
For example, in order to set the pause mode duration to 4 hours, the time between flashes should be 7 minutes 30 seconds. After completing the setup of the modes (determining the required characteristics of the time-setting resistors), R3 and R4 can be replaced with fixed resistors of the appropriate values, and the LED can be turned off. This will increase the reliability of the timer and significantly extend its service life.