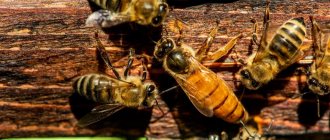
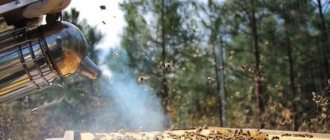
Every beekeeper sooner or later has to deal with the phenomenon of swarming bees. At this time, insects leave their home and go in search of a new hive. Having formed a swarm, the bees simply circle in the air for some time, and then attach themselves to a tree branch, cornice or other object. Now the beekeeper’s task is to catch the swarm and send it back to the apiary. If this is not done, the bees will leave the old place forever. A simple device called a swarmer will help you catch swarming insects. Many beekeepers make a hive for bees with their own hands according to drawings.
Basic requirements and trap volume
A swarm is a temporary shelter for bees. Beekeepers use it to catch and store bees that have escaped from permanent hives. There is a list of certain requirements for creating a swarm:
- when making swarm, pay attention to its size, smell, distance from water;
- the shape of the swarm does not matter to the bees, but the beekeeper himself should pay attention to how he will install the trap on the tree;
- Barrels made of plywood are suitable for roeving - after the tapholes are made, the roof is sheathed with roofing felt, and frames with foundation are placed inside.
To determine the size of the trap you should also know some nuances:
- housing for bees should be as spacious as possible, because they do not like cramped spaces;
- a trap that is too large will be cumbersome and the bees will ignore a small one;
- if the volume of the trap is 20 liters, then drive a small swarm there (such a family can be hatched at the end of summer), since a large swarm that was hatched at the beginning of summer will not fly into a 20-liter trap;
- The optimal trap volume is from 40 to 80 liters.
What it is
A bee trap is a special device. With the help of which a person can catch stray families of insects. In this way, he will help them survive, and he himself will receive many benefits, the main one of which is the most valuable product - honey. It is used in many industries - medicine, cosmetology, cooking, folk medicine, etc. This is not surprising, because the product of bee origin is a record holder for the content of useful substances.
It is used to normalize many vital processes for weight loss, to maintain the functionality of all organs and systems.
It is not difficult to make a swarm trap with your own hands. Most often this is a wooden plywood box in which the bait is located. There is only one hole in this device, for entry. When the swarm gets inside, it is closed with a special flap so that the insects cannot fly out. Thus, the beekeeper can catch a swarm, but for this he needs to follow some rules and take into account some points.
There is no special drawing or uniform standard for a bee trap. When constructing, it is important to build on the requirements for them. But what the future house will be made of does not matter.
How is the swarm organized?
In beekeeping practice, several types of swarm structures are known. Before you build it yourself, read the following tips:
- Make a tray in the form of a basket or box with a lid. The swarm is caught and kept inside for a certain time.
- The swarm also needs a scoop for raking the swarm and a catcher (a net with an unusually shaped lid). Using a hook, secure the net in the place where the swarm is located, then pour the swarm into it and close the net with a lid.
- To make a trap, take either three-layer plywood or fiberboard.
- The size of the box from the inside depends on the frames - for example, their length and depth are the same, but the width depends on the number (with five frames, the size of the trap is 191 cm).
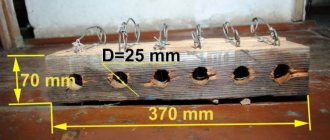
- In order for the bees to freely fly out of the swarm, it is necessary to make an entrance - special holes - the diameter of the top is 20-25 cm, the bottom - 7-8 cm. The top must be round, and the shape of the bottom is not important.
- The thickness of the back and front walls is 20-24 mm, the side walls are 3-4 cm. For the space under the frame, leave 10-15 cm.
- In no case should there be any cracks in the trap so that the bees cannot get out of it.
How to make a bee trap with your own hands using drawings
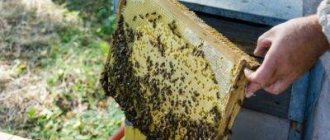
If a beekeeper needs to lure bees into a specific trap, it is necessary to resort to strategic and decisive action. An important nuance of successful fishing is a reliable bait. The best bait for bees is honeycombs and propolis. One bee trap holds about two full frames, as well as several empty ones on which you can install a wax strip.
Basic Rules
The trap must have the following characteristics:
- Volume. From 40 to 60 liters - this volume is suitable for bees who are looking for a home for a bee colony. For this reason, store designs are not suitable for this purpose - they have a volume of slightly more than 20 liters. But if you take two such structures and combine them, you can get the desired size.
- Letok. The area of the entrance should be 10-12 square centimeters so that it looks like a hollow tree where wild bees live. The gap itself needs to be made 1.5 cm high and 8 cm long - this way birds will not get inside.
- Ease. No more than 5-6 kg. The weight should be such that you can hold the structure in one hand when you climb a tree.
- Strength and durability. Such a trap must last a long time to achieve the desired effect. The more swarms you catch with one trap, the more bee pheromones will remain in it to attract new colonies.
- Waterproof. Such housing should be protected from water, since bees will not choose a house with high dampness.
- Simplicity. The design should be simple and understandable so that anyone can build it without any extra effort.
- Appearance. Before bringing in a swarm, the bee carefully inspects the structure and crawls along the walls. If the trap is completely filled with frames, it may feel like the house is cramped, so there is no need to fill more than half of it.
- Bait. If you have a new trap, then it must be treated with propolis. To do this, warm up a piece of propolis with your hands until it becomes soft, then coat the walls of the trap. You can also buy special bee pheromones - they serve as an excellent bait.
- Dark honeycomb. Old honeycombs and the smell of wax attract bees. If you have such honeycombs, be sure to place at least one in a trap. Old frames will also work for this purpose. The main thing is that they come from a healthy family. You can freeze them before using to kill any bacteria.
- Materials. The best choice is plywood or hardwood boards. You should not make a very smooth surface inside such a structure, since in nature they have uneven walls. Rough walls help bees cling to them.
You may also find useful information on how to catch a swarm of bees and not make mistakes in this dangerous matter.
Plywood roofing
Plywood is ideal for woodworking, as it is an inexpensive, lightweight and durable material. Plywood is an environmentally friendly material; it exists in several types, which differ in thickness, cost and moisture resistance.
To make a plywood frame, you need the following materials:
- plywood;
- metal and mosquito nets;
- wooden block or pressed slabs;
- cardboard;
- waterproof glue;
- scissors;
- woodworking tools.
Roevny dimensions:
- bottom – 35x45 cm;
- side walls (2 pcs.) – 30x45 cm;
- front wall – 35x20 cm;
- cover – 20x45 cm.
There are two ways to make a plywood frame, let’s look at each.
1st method:
- Cut out the pieces.
- Glue them together.
- Make a 1 x 8 cm tap hole on the side wall.
- Make an air exchange frame.
- Place the net on the frame and secure it with shoe nails.
- Make a box from the four walls.
- Attach hangers inside the back and front walls, and bevel the lower part - frames with honeycombs will be placed here.
- Make a hole in the lid, cover it with mesh, and then hang the lid on the latches.
- Attach the hooks on the sides that are needed to hang the bee trap on the tree.
2nd method:
Cut the side slats and frame from 4 cm wide slats.
- Make the folds in the frame necessary to install the frames.
- Cut a 1x1 cm tap hole in the front wall.
- Assemble the side and end walls.
- Secure and tin the roof.
- Set the dryer and at least 5 frames.
- To attract bees to the trap, rub it with wax, propolis or mint.
- Attach the handles.
- If you want the wood to last longer, dry it and paint it. However, this should be done so that all odors have time to dissipate before the trap is used.
In the video below you can see the process of collecting plywood wood:
Advice from experienced beekeepers
Some recommendations from experienced beekeepers regarding the design and use of bee traps:
- Try to use natural materials for production - wood is the most suitable.
- If a decision has been made to treat the structure with drying oil or other paint, then this must be done a year before it is put into operation.
- When placing the swarm, select trees that do not receive direct sunlight - bees do not tolerate heat.
- Always additionally secure the trap with slings or wire.
Important! If, when checking a trap, a swarm is found in it, then after moving it to the hive, the swarm must be returned to the same place.
A swarm is a device that every beekeeper should have on his farm. This design is simply irreplaceable in preserving the inhabitants of the apiary during swarming. It is absolutely easy to make from scrap materials.
Styrofoam trap
Expanded polystyrene is a moisture- and air-tight eco-friendly material. It is lighter than plywood and mold does not form on it, however, excess condensation can collect, which is why it is necessary to make additional holes in polystyrene foam.
Expanded polystyrene conducts heat well; mice and birds cannot harm it, but sunlight and mechanical damage can destroy this material.
It is not difficult to build a wooden structure from polystyrene foam, as it happens quickly and the materials are inexpensive.
Such a swarm consists of the following parts:
- cover and bottom – 51x36 cm;
- 2 side walls – 51x35 cm;
- front and back walls – 30x35 cm.
To build a polystyrene foam structure you will need:
- sheets of expanded polystyrene (thickness - 30 mm);
- liquid Nails;
- glue;
- stationery knife;
- Ruler and pencil;
- screwdriver and screws.
To securely close the lid, make a recess 3.0 x 0.5 cm and secure it with self-tapping screws.
Cut the entrance in the shape of a small square and, during transportation, attach a net and tape to it to make it convenient to hang the tree on the tree.
You should be careful during transportation - due to the fragility of the material, the body of the swarm can be damaged by tree branches.
Technique 1
A novice beekeeper will immediately ask: how to catch a swarm? The answer is quite simple, but you will need a special trap for this.
It will help attract the attention of both wild workers and domestic ones who have escaped from the previous owner. As a rule, such a trap is a regular vertical or horizontal box with 8 standard frames
We fill the frames with wax and place the box in the bees' habitat.
Hang and set traps only in certain places where bees live. This could be a large spruce, oak or aspen near a pond and not far from honey plants
If your box does not immediately attract the attention of insects, but you are sure that they are here, you should wait until the scouts find a suitable place. It is advisable to hang traps a couple of weeks before the start of the main harvest in your area.
You can learn how to make such a trap from our previous article “Learning to make a bee trap yourself.” Let's talk about how to install it correctly. Swarming bees and catching bee swarms are two interrelated things. That is, when bee colonies expand, they begin to swarm and look for a new home. We need to orient our trap to the south and attach it to a dense, strong branch.
It is very good if the box is slightly hidden from the sun, otherwise the bees will not want to settle in the stuffy object. The entrance must be accessible so that it is not cluttered or covered by branches. There should be no anthills or other animal dwellings below a tree or bush. For greater attractiveness, use camouflage made from bark and branches, as well as preparations such as Apiroy or Uniroy. They are good for lubricating the tapholes and sides of traps.
Roevnya Butlerova
Roevnya Butlerov is the most popular model of bee trap. It consists of a frame with hoops put on it. To make it you will need the following materials:
- thin plywood (pre-soaked in water for 24 hours);
- staple gun;
- fastening material (bolts, clusters, studs, etc.);
- wire mesh;
- canvas;
- loop, hook or handle.
The height of the scythe will be 400-450 mm, and the diameter will be 300-350 mm.
The process of creating a swarm is as follows:
- Cut a strip of plywood about 1 m long and 40-45 cm wide. This will be the body.
- Cut two strips of plywood 1 m long and about 3 cm wide. These will be hoops.
- The cabinet plywood must be given the shape of a cylinder, and to do this, you need to fix the hoop at the lower base of the future “cylinder” using staples. The hoop strip on one side should be attached at least 5 cm further from the edge, and on the other side it should overlap. Do the same with the hoop at the upper base of the “cylinder”.
- Cover the bottom of the structure with canvas, securing it with staples.
- Prepare another narrow strip of plywood, which you secure with staples along the height of the “cylinder”. The result will be like the handle of a basket (see picture below).
- Cut a strip of plywood for the lid, and secure it with a pin or bolt so that it is movable.
- First, cover the fixed part of the lid with mesh, and then lower the movable part of the lid down and cover it too (as in the figure below).
- Attach a hook or handle to the side of the body so that it is convenient to carry the structure or to hang it on a tree. The handle should be mounted on the opposite side of the movable cover.
Saturday, April 30, 2011
We build a bee trap for a standard frame
Hi all! Today I bring to your attention step-by-step instructions for making a bee trap for a standard Dadan frame (although you can use Rutov and store-bought frames with the same success). Here you can download a drawing of a trap pattern, find out what tools and materials will be needed for manufacturing, as well as how much it will all cost you. Interested? Well then read on! Suppose you have a burning desire to catch bees in the forest, but you don’t know how to make a trap. No problem! I will help you with this. First, we purchase the material. Here is a complete list of what we need to make two traps:
- Sheet of four-millimeter plywood measuring 1525x1525 (264 rubles per sheet)
- Four bars with a section of 25x25, 3 meters long (50 rubles per piece) or six bars 2 meters long (23 rubles per piece) I was surprised when I discovered such a difference in price.
- 120 self-tapping screws with press washers pointed 4.2x19 (0.3 rubles per piece)
- Oil paint PF-115 dark green 0.5 kg (approximately 80 rubles)
- Paint brush (10 rubles)
These traps can be made at home “on your knees”. Here is a list of the tools we need for our work:
- Metal ruler 1m (I used a 50 centimeter - inconvenient)
- Pencil
- Hacksaw
- Screwdriver
So, we have obtained the tool and the material, now let’s start manufacturing. First you need to lay out a sheet of plywood. The pattern drawing is in the picture below. You can download it in GIF format from this link. For convenience, I numbered the parts.
Before you draw the sheet, I want to give you a couple of tips:
A sheet of 4 mm plywood consists of three, perpendicularly glued layers. As a result, the “horizontal” plywood is more rigid in bending than the “vertical” one. The direction of the fibers of the layers must be oriented relative to the pattern drawing as shown in the figure below. This is done to make the side walls of the trap (which lack the top bar) more rigid.
If you like to do everything with millimeter precision, then consider the cutting width of the hacksaw (1-2 mm). In the picture below I have schematically shown where you need to cut directly along the line, and where next to the line. Now let's move on to sawing the timber. Here is a list of preparations that need to be made:
- 497 mm – 8 pcs. (detail 6)
- 434 mm – 8 pcs. (detail 7)
- 286 mm – 4 pcs. (detail
- 226 mm – 4 pcs. (detail 9)
- 173 mm – 4 pcs. (item 10)
All preparatory work has been completed. We proceed directly to assembling the trap. We attach parts 7, 9 and 10 to part 1. To meet the limit on self-tapping screws, we screw them in as shown in the following photos.
We attach part 6 to part 2. Do not screw the outer screws close to the edge, because the side walls will be attached to these places.
The next stage is connecting all the side walls as shown in the photo below.
Parts 6 and 10 should be at the bottom. The bottom is attached to them (part 3).
Now let's start assembling the lid for the trap. Parts 6 and 8 are attached to part 4.
Part 5 remains. It will be used to fix the frames as shown in the penultimate photo in this post.
The final stage is painting. After painting, the trap should be ventilated in fresh air for 5 days. Just don't paint the inside of the trap!
Arrangement of the Roevny
After the frame of the trap and its main parts have been made, it needs to be painted and filled from the inside to attract bees. Painting and filling the woodwork has its own nuances.
What and how to paint?
There are also several nuances when painting wood:
- Use oil paints for painting. After painting, the trap becomes more resistant to both hot weather, which will save you from premature cracking, and rainy weather, since the paint will prevent the main body of the trap from getting wet. Paint the hive six months before the bees move into it, so that during this time all odors have time to disappear.
- Choose green paint to help the trap blend in with the surrounding trees.
- Do not use quick-drying paints because they retain an unpleasant odor for a long time and quickly become cracked.
- Paint only the outer part of the wall, since the inside should allow moisture and air to pass through and not become covered with condensation due to temperature changes.
Filling the trap
The inside of the swarm also needs to be carefully prepared for the settlement of bees:
- Bees don't like the smell of dry wood. Therefore, to get rid of the smell, expose the roaster with the lid open to the rain.
- To attract the attention of bees, rub the inside of the swarm with lemon balm or blackcurrant leaves;
- hang traps on spruce trees, as they release phytoncides that repel parasites.
- Also rub the heated walls of the trap with broken mother liquors or wax, and coat the edges of the walls with an alcohol solution of propolis.
- Apply a piece of pine resin dissolved in ether to the wooden parts of the frames. After a while, the ether evaporates, but the smell of resin remains.
- Rub the entrance and its edge with wax or honey.
Lures for catching stray swarms
I have already written about propolis and beeswax. There are also modern baits that are designed specifically for catching swarms. These preparations contain substances that have been selected in accordance with the basic instincts of insects. The most effective baits include the following drugs:
- apimil;
- apira;
- sanroy;
- TOS-3
and others. If you are interested in knowing exactly how they work and what is included in their composition, ask in the comments, I will collect everything I have on them in one article, but for now it is enough to know that they work and apply them correctly.
And here's what happens inside the swarm:
When to check the swarm?
During the swarming period, bees can leave their food base, flying 2.5-3 km, so there is a chance that someone else's swarm will be caught. Set traps in the last days of spring or the first days of summer. It is advisable to install everything already on the 13th-15th of May, since by this time the scout bees discover a new home and lead the rest of the swarm to it.
It is very difficult to make predictions when catching swarms and this is a significant disadvantage, since it takes a lot of time, and the result of the process may not be known. But, with the proper patience, you can acquire your own apiary in a couple of years without investing serious finances in it.
You can learn about how to catch a swarm of bees in a swarm, how to put a caught swarm into a hive, what equipment is needed to catch it, from the video below:
Making a bee trap is not difficult and will not take much time. This rod will last for many years. The main thing is to follow all the rules for installing and capturing wild bees.
0
0
Copy link
Design Features
The features of a bee trap are determined by their behavioral characteristics during swarming. So, the already separated part of the family flies out of the hive, and then, after making several circles in the air, lands at a new place of residence. Typically, insects choose elevated areas for this purpose - branches of massive large trees, roof parapets. Based on this, the device in question must be quite spacious to accommodate a swarm of bees and assume the possibility of attaching complex fixing elements that will allow it to be securely positioned at a high altitude.
Its main feature is its low weight and strength - if the box is too heavy, it will not be able to be secured at a sufficient height. In addition, the design must ensure optimal air circulation so that the bees feel comfortable during the period of temporary exposure.
Advantages
- The main advantages of this device are:
- the opportunity to return “fugitives” without threatening their health;
- with the right approach to fishing, ensuring free swarming, which will give a lot of advantages in the form of increasing the endurance of insects, natural culling of old families and increasing bribes;
- the ability to catch not only your own swarms, but also wild bees;
- ease of use;
- versatility - with the help of a swarm you can not only catch families that have already flown away, but also transfer workers who are just preparing for this to another place.
The main advantage of the design is the possibility of its production on its own without significant expenditure of money.
Find out more about useful beekeeping tools.
Flaws
Royovni has no significant disadvantages. They are, rather, not related to the design itself, but to the organizational aspects of catching bees. This includes the difficulty of removing the device from a great height along with the insects inside. The second nuance is the need not only to set a trap, but also to lure fugitives into it, for which you need to use various sprays or rubs from herbal collections. Plus, a swarm, even if there are high-quality baits, may choose a completely different place, and not the one that is beneficial to the beekeeper. Based on this, you should acquire several swarms and place them in the most attractive places for insects.
Did you know? Drones do not participate at all in collecting nectar. They are necessary for fertilization of the uterus, and die immediately after mating.